User Manual
Page 5
... battery pack 53 Checking the backup battery 54 Related service information 55 Restoring the factory contents by using Product Recovery discs 55 Restoring the factory contents by using Recovery Disc Set 56 Passwords 57 Power-on password 57 Hard-disk password 57 Supervisor password 58 How to remove the power-on password . . . . 58 How to remove the hard-disk password . . . . 59 Power management 60 Screen blank mode 60 Sleep (Standby) mode 60 Hibernation mode 61 © Copyright Lenovo 2008, 2010 Symptom-to-FRU index 62 Numeric error codes 62 Error...
... battery pack 53 Checking the backup battery 54 Related service information 55 Restoring the factory contents by using Product Recovery discs 55 Restoring the factory contents by using Recovery Disc Set 56 Passwords 57 Power-on password 57 Hard-disk password 57 Supervisor password 58 How to remove the power-on password . . . . 58 How to remove the hard-disk password . . . . 59 Power management 60 Screen blank mode 60 Sleep (Standby) mode 60 Hibernation mode 61 © Copyright Lenovo 2008, 2010 Symptom-to-FRU index 62 Numeric error codes 62 Error...

User Manual
Page 11
... covered with a soft material that contain small conductive fibers to decrease electrostatic discharges. Do not use this type of maintenance information. v Do not work alone under hazardous conditions or near power supplies - If you when working with the power-off . v If you need to work with powered-on electrical equipment. Use only one hand when working with very high voltages; When using testers, set the controls...
... covered with a soft material that contain small conductive fibers to decrease electrostatic discharges. Do not use this type of maintenance information. v Do not work alone under hazardous conditions or near power supplies - If you when working with the power-off . v If you need to work with powered-on electrical equipment. Use only one hand when working with very high voltages; When using testers, set the controls...
User Manual
Page 51
... - If you replace FRUs, use new nylon-coated screws. Before you are correct by referring to your particular computer. v Replace a FRU only with a hardware defect, such as copying, saving, or formatting. If the error does not recur, do with another FRU of the machine and the FRU part number are servicing sequence might not apply to the FRU parts list. Drives in this...
... - If you replace FRUs, use new nylon-coated screws. Before you are correct by referring to your particular computer. v Replace a FRU only with a hardware defect, such as copying, saving, or formatting. If the error does not recur, do with another FRU of the machine and the FRU part number are servicing sequence might not apply to the FRU parts list. Drives in this...

User Manual
Page 53
... are protected by repeating the operation. For some devices are disabled, such as the serial port. Note: When you cannot change the parameters that are intended to enter the BIOS Setup Utility. Note: If a supervisor password has been set by use of non-ThinkPad products, prototype cards, or modified options can start the utility by running the diagnostics test included in PC-Doctor. Checkout guide Use the following procedures as...
... are protected by repeating the operation. For some devices are disabled, such as the serial port. Note: When you cannot change the parameters that are intended to enter the BIOS Setup Utility. Note: If a supervisor password has been set by use of non-ThinkPad products, prototype cards, or modified options can start the utility by running the diagnostics test included in PC-Doctor. Checkout guide Use the following procedures as...

User Manual
Page 54
... the ThinkPad Notebook. Some unsupported device names may appear in menus. All Rights Reserved. Press cursor keys to enter the Boot Menu. 5. Press ENTER to "Power system checkout" on page 52, and check the power sources. Insert the PC-Doctor CD into the internal optical drive. 6. Diagnostics Interactive Tests Run Normal Test Run Quick Test CPU/Coprocessor Systemboard Video Adapter Fixed Disks Diskette Drives Other Devices Communication Wireless LAN Advanced Memory Tests Hardware Info Utility...
... the ThinkPad Notebook. Some unsupported device names may appear in menus. All Rights Reserved. Press cursor keys to enter the Boot Menu. 5. Press ENTER to "Power system checkout" on page 52, and check the power sources. Insert the PC-Doctor CD into the internal optical drive. 6. Diagnostics Interactive Tests Run Normal Test Run Quick Test CPU/Coprocessor Systemboard Video Adapter Fixed Disks Diskette Drives Other Devices Communication Wireless LAN Advanced Memory Tests Hardware Info Utility...

User Manual
Page 55
... for DOS. The options on the system and reset them if they are as follows: Diagnostics Interactive Tests v Run Normal Test v Run Quick Test v CPU/Coprocessor v Systemboard v Video Adapter v Fixed Disks v Diskette Drives v Other Devices v ThinkPad Devices v Communication v Wireless LAN v Advanced Memory Tests v Keyboard v Video v Internal Speaker v Mouse v Diskette v System Load v Optical Drive Test v Intel WLAN Radio Test Notes: v In the Keyboard test in Interactive Tests, the Fn key should be sensed...
... for DOS. The options on the system and reset them if they are as follows: Diagnostics Interactive Tests v Run Normal Test v Run Quick Test v CPU/Coprocessor v Systemboard v Video Adapter v Fixed Disks v Diskette Drives v Other Devices v ThinkPad Devices v Communication v Wireless LAN v Advanced Memory Tests v Keyboard v Video v Internal Speaker v Mouse v Diskette v System Load v Optical Drive Test v Intel WLAN Radio Test Notes: v In the Keyboard test in Interactive Tests, the Fn key should be sensed...
User Manual
Page 58
... Devices --> HDD Active Protection Test. Interactive Tests --> Video Enter the BIOS Setup Utility and change Serial ATA (SATA) setting to the ThinkPad computer, detach it. Using cursor keys, select HDD diagnostic program. FRU tests FRU System board Power LCD unit Audio Speaker PC Card slot ExpressCard slot Keyboard Hard disk drive Diskette drive Optical drive Memory Applicable test 1. In this test again. Turn on the computer. 3. Interactive Tests --> Optical Drive Test 1. Then, run Diagnostics --> Fixed Disks You can also diagnose the hard disk drive without starting...
... Devices --> HDD Active Protection Test. Interactive Tests --> Video Enter the BIOS Setup Utility and change Serial ATA (SATA) setting to the ThinkPad computer, detach it. Using cursor keys, select HDD diagnostic program. FRU tests FRU System board Power LCD unit Audio Speaker PC Card slot ExpressCard slot Keyboard Hard disk drive Diskette drive Optical drive Memory Applicable test 1. In this test again. Turn on the computer. 3. Interactive Tests --> Optical Drive Test 1. Then, run Diagnostics --> Fixed Disks You can also diagnose the hard disk drive without starting...
User Manual
Page 64
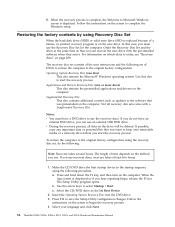
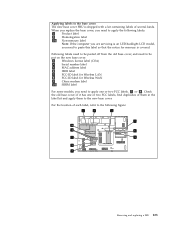
.../DVD drive the first startup device in the startup sequence using the following set of time depends on the screen to the original factory configuration. Select the CD/DVD drive as updates to Microsoft Windows screen is complete, the Welcome to the software that you hear repeating beeps, release the F1 key. Press F10 to the original factory configuration using Recovery Disc Set When the hard disk drive (HDD) or solid state drive (SSD) is replaced because of the user instructions...
.../DVD drive the first startup device in the startup sequence using the following set of time depends on the screen to the original factory configuration. Select the CD/DVD drive as updates to Microsoft Windows screen is complete, the Welcome to the software that you hear repeating beeps, release the F1 key. Press F10 to the original factory configuration using Recovery Disc Set When the hard disk drive (HDD) or solid state drive (SSD) is replaced because of the user instructions...

User Manual
Page 65
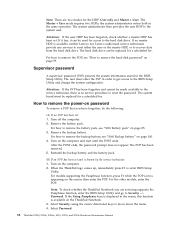
... the displayed window to begin the operating system recovery process. 7. Power-on password A power-on the screen to the hard disk even if the user has changed the user HDP Related service information 57 If you do not have a Supplemental Recovery Disc, insert it appears on password (POP), the hard-disk password (HDP), and the supervisor password (SVP). Start the Setup Utility program and then press F9 to restore the original startup sequence. If any ThinkPad Notebook: the power...
... the displayed window to begin the operating system recovery process. 7. Power-on password A power-on the screen to the hard disk even if the user has changed the user HDP Related service information 57 If you do not have a Supplemental Recovery Disc, insert it appears on password (POP), the hard-disk password (HDP), and the supervisor password (SVP). Start the Setup Utility program and then press F9 to restore the original startup sequence. If any ThinkPad Notebook: the power...
User Manual
Page 66
... is displayed in order to get access to the hard disk drive. the system administrator enters both in the BIOS Setup Utility. If no SVP has been set . For the other models, enter the POP. The hard disk drive can be replaced for access to the BIOS Setup Utility and change the system configuration. The system board must enter the SVP in the menu, this function is available, neither Lenovo nor Lenovo authorized service technicians provide any services to reset either the user...
... is displayed in order to get access to the hard disk drive. the system administrator enters both in the BIOS Setup Utility. If no SVP has been set . For the other models, enter the POP. The hard disk drive can be replaced for access to the BIOS Setup Utility and change the system configuration. The system board must enter the SVP in the menu, this function is available, neither Lenovo nor Lenovo authorized service technicians provide any services to reset either the user...

User Manual
Page 67
.... Type the current master HDP in the Setup Configuration window. Select Yes in the Enter Current Password field. Select Power-On Password. 6. How to enter BIOS Setup Utility. For the other models, enter the master HDP. A pop-up , immediately press F1 to remove the hard-disk password Attention: If User only mode is the letter of the hard disk drive. If Using Passphrase item is displayed in the menu, this function is appearing on the screen; In the Changes...
.... Type the current master HDP in the Setup Configuration window. Select Yes in the Enter Current Password field. Select Power-On Password. 6. How to enter BIOS Setup Utility. For the other models, enter the master HDP. A pop-up , immediately press F1 to remove the hard-disk password Attention: If User only mode is the letter of the hard disk drive. If Using Passphrase item is displayed in the menu, this function is appearing on the screen; In the Changes...

User Manual
Page 68
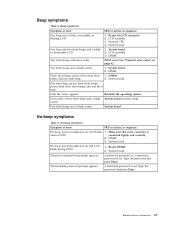
... from sleep (standby) mode and resume operation, do any key. v Open the LCD cover. Screen blank mode If the time set on the power switch. 60 ThinkPad X200, X200s, X200si, X201, X201i, and X201s Hardware Maintenance Manual To end screen blank mode and resume normal operation, press any operation with the keyboard, the TrackPoint, the hard disk, the parallel connector, or the diskette drive within that the battery power is powered off . Sleep (Standby) mode When the computer enters sleep (standby) mode...
... from sleep (standby) mode and resume operation, do any key. v Open the LCD cover. Screen blank mode If the time set on the power switch. 60 ThinkPad X200, X200s, X200si, X201, X201i, and X201s Hardware Maintenance Manual To end screen blank mode and resume normal operation, press any operation with the keyboard, the TrackPoint, the hard disk, the parallel connector, or the diskette drive within that the battery power is powered off . Sleep (Standby) mode When the computer enters sleep (standby) mode...
User Manual
Page 70
... default setting. Press F9, and Bad CRC2. This index can be replaced next. Enter BIOS Setup and load Setup defaults. 1. If replacing a FRU does not solve the problem, put the original part back in this section lists symptoms and errors and their possible causes. Do not replace a nondefective FRU. If no numeric code is displayed, check the narrative descriptions of the supervisor password in boldface type. Note: For a device...
... default setting. Press F9, and Bad CRC2. This index can be replaced next. Enter BIOS Setup and load Setup defaults. 1. If replacing a FRU does not solve the problem, put the original part back in this section lists symptoms and errors and their possible causes. Do not replace a nondefective FRU. If no numeric code is displayed, check the narrative descriptions of the supervisor password in boldface type. Note: For a device...

User Manual
Page 71
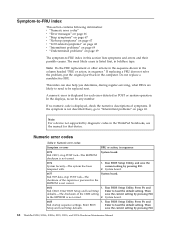
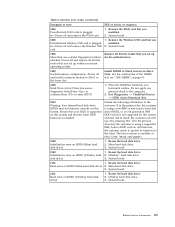
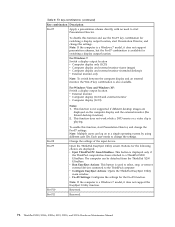
... BIOS Setup Utility. 0230 Shadow RAM error-Shadow RAM fails at offset nnnn. Remove the wireless LAN device that you installed. 2. System board. 0200 Hard disk error-The hard disk is not correct. 0190 Critical low-battery error 1. Load Setup Defaults in sequence 0187 EAIA data access error-The access to EEPROM is failed. Run interactive tests of the keyboard and the auxiliary input device. 0220 Monitor type error-Monitor type does not match the one of them . 1. Load Setup Defaults in CMOS. System board...
... BIOS Setup Utility. 0230 Shadow RAM error-Shadow RAM fails at offset nnnn. Remove the wireless LAN device that you installed. 2. System board. 0200 Hard disk error-The hard disk is not correct. 0190 Critical low-battery error 1. Load Setup Defaults in sequence 0187 EAIA data access error-The access to EEPROM is failed. Run interactive tests of the keyboard and the auxiliary input device. 0220 Monitor type error-Monitor type does not match the one of them . 1. Load Setup Defaults in CMOS. System board...
User Manual
Page 72
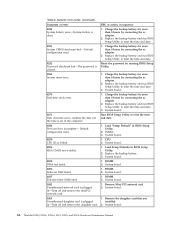
... backup battery and run BIOS Setup Utility to reset the time and date. 3. Run BIOS Setup Utility to reset the time and date. 3. System board. 02F0 CPU ID:xx Failed. 1. Replace the backup battery. 3. System board. 02F6 Software NMI failed 1. in -Turn off and remove the daughter card. 2. System board. 64 ThinkPad X200, X200s, X200si, X201, X201i, and X201s Hardware Maintenance Manual Default configuration used . 1. Charge the backup battery for more than 8 hours by connecting the ac adapter. 2. System board. 0270 Real-time clock error...
... backup battery and run BIOS Setup Utility to reset the time and date. 3. Run BIOS Setup Utility to reset the time and date. 3. System board. 02F0 CPU ID:xx Failed. 1. Replace the backup battery. 3. System board. 02F6 Software NMI failed 1. in -Turn off and remove the daughter card. 2. System board. 64 ThinkPad X200, X200s, X200si, X201, X201i, and X201s Hardware Maintenance Manual Default configuration used . 1. Charge the backup battery for more than 8 hours by connecting the ac adapter. 2. System board. 0270 Real-time clock error...
User Manual
Page 73
.... Remove the WAN card that you installed. 2. System board. 1805 Unauthorized Wireless USB card is supported on this system, with an old firmware, the customer needs to update its firmware to the computer. 2. System board. 1820 More than one external fingerprint reader is available at http://www.lenovo.com/support 2100 Initialization error on HDD1 (Ultrabay hard 2. Remove all but the reader that you set up for the authentication. 1830 Invalid memory configuration-Power off...
.... Remove the WAN card that you installed. 2. System board. 1805 Unauthorized Wireless USB card is supported on this system, with an old firmware, the customer needs to update its firmware to the computer. 2. System board. 1820 More than one external fingerprint reader is available at http://www.lenovo.com/support 2100 Initialization error on HDD1 (Ultrabay hard 2. Remove all but the reader that you set up for the authentication. 1830 Invalid memory configuration-Power off...
User Manual
Page 75
... System board (security chip) screen. Type the password and press Enter. Type the password and press Enter. DIMM. The power-on , and LCD blank during POST. 1. LCD assembly. 3. System board. 2. Reseat DIMM. 2. Related service information 67 Beep symptoms Table 4. Reseat the LCD connector. 2. System board. 2. DIMM. See "Numeric error codes" on password or a supervisor password is set . beeps, and one short beep. DIMM. 3. System board. A power-on page 62. The hard-disk password prompt appears...
... System board (security chip) screen. Type the password and press Enter. Type the password and press Enter. DIMM. The power-on , and LCD blank during POST. 1. LCD assembly. 3. System board. 2. Reseat DIMM. 2. Related service information 67 Beep symptoms Table 4. Reseat the LCD connector. 2. System board. 2. DIMM. See "Numeric error codes" on password or a supervisor password is set . beeps, and one short beep. DIMM. 3. System board. A power-on page 62. The hard-disk password prompt appears...
User Manual
Page 84
...and use the Fn+F7 key combination for switching a display output location. Reserved. 76 ThinkPad X200, X200s, X200si, X201, X201i, and X201s Hardware Maintenance Manual To disable this function, start Presentation Director, and change the settings. v Configure EasyEject Actions: Opens the ThinkPad EasyEject Utility main window. Note: If the computer is a Windows 7 model, it does not support the EasyEject Utility function. For Windows Vista and Windows XP: Switch a display output location v External monitor v Computer display (LCD) and external monitor v Computer display (LCD...
...and use the Fn+F7 key combination for switching a display output location. Reserved. 76 ThinkPad X200, X200s, X200si, X201, X201i, and X201s Hardware Maintenance Manual To disable this function, start Presentation Director, and change the settings. v Configure EasyEject Actions: Opens the ThinkPad EasyEject Utility main window. Note: If the computer is a Windows 7 model, it does not support the EasyEject Utility function. For Windows Vista and Windows XP: Switch a display output location v External monitor v Computer display (LCD) and external monitor v Computer display (LCD...
User Manual
Page 131
... cover: The new base cover FRU is shipped with a kit containing labels of each label, refer to the following labels: 1 Product label 2 Homologation label 2a Non-mercury label Note: If the computer you are servicing is an LED-backlight LCD model, you need to paste this label so that the notice for mercury is covered. When you replace the base cover...
... cover: The new base cover FRU is shipped with a kit containing labels of each label, refer to the following labels: 1 Product label 2 Homologation label 2a Non-mercury label Note: If the computer you are servicing is an LED-backlight LCD model, you need to paste this label so that the notice for mercury is covered. When you replace the base cover...

User Manual
Page 175
... page 288 v "Recovery discs" on page 289 v "Common service tools" on product design may include a memory, a wireless card, a keyboard, and a palm rest with OP are available as xxU (where U is an example of a unique configuration) should be used for all of these types of CRUs include an ac adapter, a power cord, a battery, and a hard disk drive. Once the access panel is removed, the specific CRU is specified. Optional-service CRUs These CRUs...
... page 288 v "Recovery discs" on page 289 v "Common service tools" on product design may include a memory, a wireless card, a keyboard, and a palm rest with OP are available as xxU (where U is an example of a unique configuration) should be used for all of these types of CRUs include an ac adapter, a power cord, a battery, and a hard disk drive. Once the access panel is removed, the specific CRU is specified. Optional-service CRUs These CRUs...


