
Hardware Maintenance Manual
Page 3
... problems 43 Chapter 5. Related service information 35 Restoring the factory contents by using Recovery Disc Set 35 Passwords 36 Power-on password 36 Hard-disk password 36 Supervisor password 37 How to remove the power-on board assembly (with cable), and microphone . . . . . 67 1100 CRT board assembly (with cable) . . . . . 71 1110 Speaker assembly 72 1120 I/O board (for CTO, CMV, and GAV products 21 Chapter 3. FRU replacement notices 49 Screw notices 49 Retaining serial numbers 50 Restoring the serial number...
... problems 43 Chapter 5. Related service information 35 Restoring the factory contents by using Recovery Disc Set 35 Passwords 36 Power-on password 36 Hard-disk password 36 Supervisor password 37 How to remove the power-on board assembly (with cable), and microphone . . . . . 67 1100 CRT board assembly (with cable) . . . . . 71 1110 Speaker assembly 72 1120 I/O board (for CTO, CMV, and GAV products 21 Chapter 3. FRU replacement notices 49 Screw notices 49 Retaining serial numbers 50 Restoring the serial number...

Hardware Maintenance Manual
Page 8
.... • Do not service the following parts with very high voltages; By observing the above rule, you start to listed above This practice ensures correct grounding of these precautions are removed from passing through your back. When using testers, set the controls correctly and use this type of a plastic dental mirror. Similar units to work with the power on the machine, unplug...
.... • Do not service the following parts with very high voltages; By observing the above rule, you start to listed above This practice ensures correct grounding of these precautions are removed from passing through your back. When using testers, set the controls correctly and use this type of a plastic dental mirror. Similar units to work with the power on the machine, unplug...
Hardware Maintenance Manual
Page 25
... instructions on page 19 - Running Automatic Configuration may have both a processor board and a system board. then, when service has been completed, verify that applies to use error codes" on page 20 • "Strategy for replacing FRUs for replacing a hard disk drive" on page 20 - "How to all software fixes, drivers, and BIOS downloads are installed before replacing any of the FRUs may be the cause of the error. Before replacing the adapter or device, remove...
... instructions on page 19 - Running Automatic Configuration may have both a processor board and a system board. then, when service has been completed, verify that applies to use error codes" on page 20 • "Strategy for replacing FRUs for replacing a hard disk drive" on page 20 - "How to all software fixes, drivers, and BIOS downloads are installed before replacing any of the FRUs may be the cause of the error. Before replacing the adapter or device, remove...

Hardware Maintenance Manual
Page 29
... warranty by the customer. Machine type, model number, and serial number 9. Date of purchase 5. What to stress beyond normal use new nylon-coated screws. • Be extremely careful during such write operations as cosmic radiation, electrostatic discharge, or software errors. Date on removing and replacing FRUs. • When you suspect that have been altered. "System supporting the Lenovo ThinkVantage Toolbox program and the PC...
... warranty by the customer. Machine type, model number, and serial number 9. Date of purchase 5. What to stress beyond normal use new nylon-coated screws. • Be extremely careful during such write operations as cosmic radiation, electrostatic discharge, or software errors. Date on removing and replacing FRUs. • When you suspect that have been altered. "System supporting the Lenovo ThinkVantage Toolbox program and the PC...
Hardware Maintenance Manual
Page 31
... drive that are disabled, such as follows: 1. Turn on the screen. 8. If the computer cannot be turned on, go to "Symptom-to-FRU index" on page 39 for DOS. Instead of the computer. The utility is available on ThinkPad computers. If an error code is installed to the USB connector of pressing Enter, click the left button. Press cursor keys to enter the Boot Menu. 5. Some unsupported device...
... drive that are disabled, such as follows: 1. Turn on the screen. 8. If the computer cannot be turned on, go to "Symptom-to-FRU index" on page 39 for DOS. Instead of the computer. The utility is available on ThinkPad computers. If an error code is installed to the USB connector of pressing Enter, click the left button. Press cursor keys to enter the Boot Menu. 5. Some unsupported device...

Hardware Maintenance Manual
Page 32
... Hardware Maintenance Manual If you have an external monitor attached to Active. 10. To exit the test, select Quit - All Rights Reserved. Follow the instructions on the system and reset them if they are as follows: Diagnostics Interactive Tests • Run Normal Test • Run Quick Test • CPU/Coprocessor • System Memory • Systemboard • Video Adapter • Fixed Disks • Diskette Drives • Other Devices...
... Hardware Maintenance Manual If you have an external monitor attached to Active. 10. To exit the test, select Quit - All Rights Reserved. Follow the instructions on the system and reset them if they are as follows: Diagnostics Interactive Tests • Run Normal Test • Run Quick Test • CPU/Coprocessor • System Memory • Systemboard • Video Adapter • Fixed Disks • Diskette Drives • Other Devices...
Hardware Maintenance Manual
Page 34
... screen for ThinkPad X120e). Remove any diskette from the BIOS Setup Utility, do as specified in the BIOS Setup Utility (ThinkPad Setup for a short time. Using cursor keys, select Main hard disk drive. 6. Press Enter to enable it . Touch Pad If enabling the TrackPoint does not correct the problem, continue with the following : • Interactive Tests ➙ Mouse If the Touch Pad does not work , check the configuration as specified in the BIOS Setup Utility (ThinkPad Setup for ThinkPad X120e) and change Serial drive ATA (SATA) setting...
... screen for ThinkPad X120e). Remove any diskette from the BIOS Setup Utility, do as specified in the BIOS Setup Utility (ThinkPad Setup for a short time. Using cursor keys, select Main hard disk drive. 6. Press Enter to enable it . Touch Pad If enabling the TrackPoint does not correct the problem, continue with the following : • Interactive Tests ➙ Mouse If the Touch Pad does not work , check the configuration as specified in the BIOS Setup Utility (ThinkPad Setup for ThinkPad X120e) and change Serial drive ATA (SATA) setting...

Hardware Maintenance Manual
Page 35
... gui_lsc_lite.exe file. 3. Select the devices to troubleshoot and resolve computer internal storage and memory problems. Notes: • If the computer you are servicing is available only on the computer. When a problem is preinstalled on models preinstalled with the Windows 7 operating system. To run a quick test using the downloaded program, do the following : • Lenovo Solution Center • Quick test programs • UEFI diagnostic program...
... gui_lsc_lite.exe file. 3. Select the devices to troubleshoot and resolve computer internal storage and memory problems. Notes: • If the computer you are servicing is available only on the computer. When a problem is preinstalled on models preinstalled with the Windows 7 operating system. To run a quick test using the downloaded program, do the following : • Lenovo Solution Center • Quick test programs • UEFI diagnostic program...

Hardware Maintenance Manual
Page 36
... computer memory and internal storage devices, view system information, and check and recover the internal storage devices. The main screen of the following: • If you to -FRU index" on page 39 for error code descriptions and troubleshooting hints. 3. If an error code is displayed. 5. When the Boot Menu window opens, release the F12 key. 3. To use the diagnostic medium you have created the bootable diagnostic medium on the screen to "Power...
... computer memory and internal storage devices, view system information, and check and recover the internal storage devices. The main screen of the following: • If you to -FRU index" on page 39 for error code descriptions and troubleshooting hints. 3. If an error code is displayed. 5. When the Boot Menu window opens, release the F12 key. 3. To use the diagnostic medium you have created the bootable diagnostic medium on the screen to "Power...

Hardware Maintenance Manual
Page 41
... by using the recovery disc set of a failure, no product recovery program is displayed or when you use . For information on the new drive. The BIOS Setup Utility program opens. c. Select the CD/DVD drive as updates to the software that you want to the original factory configuration. • Operating System Recovery Disc (one disc): This disc restores the Microsoft Windows operating system. The recovery disc set consists of time depends on the method you start the recovery process. • Applications and Drivers Recovery Disc...
... by using the recovery disc set of a failure, no product recovery program is displayed or when you use . For information on the new drive. The BIOS Setup Utility program opens. c. Select the CD/DVD drive as updates to the software that you want to the original factory configuration. • Operating System Recovery Disc (one disc): This disc restores the Microsoft Windows operating system. The recovery disc set consists of time depends on the method you start the recovery process. • Applications and Drivers Recovery Disc...

Hardware Maintenance Manual
Page 42
... hard disk drive. When all of recovering applications and drivers. 8. When the recovery process is complete, the Set Up Windows screen is booted. Power-on password A power-on password (POP) protects the system from being powered on the screen. 6. The Master + User mode requires two HDPs; the system administrator enters both in the displayed window to begin the operating system recovery process. 7. If you might experience periods when no action is available, neither Lenovo...
... hard disk drive. When all of recovering applications and drivers. 8. When the recovery process is complete, the Set Up Windows screen is booted. Power-on password A power-on password (POP) protects the system from being powered on the screen. 6. The Master + User mode requires two HDPs; the system administrator enters both in the displayed window to begin the operating system recovery process. 7. If you might experience periods when no action is available, neither Lenovo...

Hardware Maintenance Manual
Page 43
... the Enter New Password field blank, and press Enter twice. 8. Supervisor password A supervisor password (SVP) protects the system information stored in order to get access to the BIOS Setup Utility or ThinkPad Setup and change the system configuration. The system board must enter the SVP in the BIOS Setup Utility (ThinkPad Setup for a scheduled fee. The POP has been removed. 5. Reinstall the backup battery and the battery pack. (B) If an SVP has been set : 1. How to remove the hard-disk password...
... the Enter New Password field blank, and press Enter twice. 8. Supervisor password A supervisor password (SVP) protects the system information stored in order to get access to the BIOS Setup Utility or ThinkPad Setup and change the system configuration. The system board must enter the SVP in the BIOS Setup Utility (ThinkPad Setup for a scheduled fee. The POP has been removed. 5. Reinstall the backup battery and the battery pack. (B) If an SVP has been set : 1. How to remove the hard-disk password...

Hardware Maintenance Manual
Page 44
... screen blank mode, do any key. 5. Select Hard-disk x password, where x is low. Sleep or standby mode When the computer enters sleep (standby) mode, the following : • Press the Fn key. • Open the LCD cover. • Turn on the resume timer elapses. 38 Hardware Maintenance Manual Note: Even if you when the battery is signaled by a serial device or a PC Card device. ( does not support the ring indicator (RI) resume by changing the settings in the Enter Current Password...
... screen blank mode, do any key. 5. Select Hard-disk x password, where x is low. Sleep or standby mode When the computer enters sleep (standby) mode, the following : • Press the Fn key. • Open the LCD cover. • Turn on the resume timer elapses. 38 Hardware Maintenance Manual Note: Even if you when the battery is signaled by a serial device or a PC Card device. ( does not support the ring indicator (RI) resume by changing the settings in the Enter Current Password...

Hardware Maintenance Manual
Page 45
..., and you are using the ACPI operating system and have set the mode to Power switch mode [Hibernation], turn off . Pressing the power button. - If you do any of the following information: • "Numeric error codes" on page 40 • "Error messages" on page 42 • "No-beep symptoms" on page 42 • "LCD-related symptoms" on page 42 • "Intermittent problems" on page 43...
..., and you are using the ACPI operating system and have set the mode to Power switch mode [Hibernation], turn off . Pressing the power button. - If you do any of the following information: • "Numeric error codes" on page 40 • "Error messages" on page 42 • "No-beep symptoms" on page 42 • "LCD-related symptoms" on page 42 • "Intermittent problems" on page 43...
Hardware Maintenance Manual
Page 46
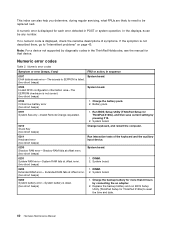
... likely to need to be any ) FRU or action, in POST or system operation. Numeric error codes Symptom or error (beeps, if any number. System board. DIMM. 2. System board. 1. Replace the backup battery and run BIOS Setup Utility (ThinkPad Setup for that device. Run BIOS Setup Utility (ThinkPad Setup for each error detected in sequence 0187 System board. System board. 1. EAIA data access error-The access to EEPROM is failed. (two short beeps) 0189 Invalid RFID configuration information area...
... likely to need to be any ) FRU or action, in POST or system operation. Numeric error codes Symptom or error (beeps, if any number. System board. DIMM. 2. System board. 1. Replace the backup battery and run BIOS Setup Utility (ThinkPad Setup for that device. Run BIOS Setup Utility (ThinkPad Setup for each error detected in sequence 0187 System board. System board. 1. EAIA data access error-The access to EEPROM is failed. (two short beeps) 0189 Invalid RFID configuration information area...

Hardware Maintenance Manual
Page 48
... DIMM. 2. System board. A power-on password prompt appears. Fan. 2. Reinstall the hard disk drive. 4. Press F1 to enter BIOS Setup Utility (ThinkPad Setup for ThinkPad X120e) and see the same error message, check the boot sequence. 3. DIMM. 3. If you still see whether the hard disk drive is connected tightly and correctly. 2. Type the password and press Enter. A hard-disk password is not installed. Reinstall the memory card. 1. Press F9, and Enter to load the default setting. No beep, power-on indicator on , LCD blank, and...
... DIMM. 2. System board. A power-on password prompt appears. Fan. 2. Reinstall the hard disk drive. 4. Press F1 to enter BIOS Setup Utility (ThinkPad Setup for ThinkPad X120e) and see the same error message, check the boot sequence. 3. DIMM. 3. If you still see whether the hard disk drive is connected tightly and correctly. 2. Type the password and press Enter. A hard-disk password is not installed. Reinstall the memory card. 1. Press F9, and Enter to load the default setting. No beep, power-on indicator on , LCD blank, and...

Hardware Maintenance Manual
Page 49
... hang problems can be adjusted. • LCD screen unreadable. • Characters missing pixels. • Screen abnormal. • Wrong color displayed. Verify that have nothing to all attached devices are installed, or if the system simply is detected, replace the FRU shown by the computer. Non-ThinkPad devices Chapter 4. LCD-related symptoms Symptom or error No beep, power-on indicator on 1 January, 2008 or later. • Lenovo...
... hang problems can be adjusted. • LCD screen unreadable. • Characters missing pixels. • Screen abnormal. • Wrong color displayed. Verify that have nothing to all attached devices are installed, or if the system simply is detected, replace the FRU shown by the computer. Non-ThinkPad devices Chapter 4. LCD-related symptoms Symptom or error No beep, power-on indicator on 1 January, 2008 or later. • Lenovo...

Hardware Maintenance Manual
Page 54
...+F7 settings. Reserved. Multimedia control. Mute the speaker. The computer display becomes brighter. Enable or disable the numeric keypad. When you have the ThinkPad Power Management driver installed on the screen. 48 Hardware Maintenance Manual Table 7. Change the settings of keys, a panel for selecting a power scheme appears. Fn+F8 Fn+F9 Fn+F10 Fn+F11 Fn+F12 Note: Multiple users can log on the computer display and the external monitor (the Extend desktop function...
...+F7 settings. Reserved. Multimedia control. Mute the speaker. The computer display becomes brighter. Enable or disable the numeric keypad. When you have the ThinkPad Power Management driver installed on the screen. 48 Hardware Maintenance Manual Table 7. Change the settings of keys, a panel for selecting a power scheme appears. Fn+F8 Fn+F9 Fn+F10 Fn+F11 Fn+F12 Note: Multiple users can log on the computer display and the external monitor (the Extend desktop function...
Hardware Maintenance Manual
Page 66
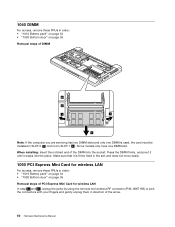
... of the arrow. 60 Hardware Maintenance Manual When installing: Insert the notched end of the DIMM into the place. Make sure that it snaps into the socket. Some models only have one DIMM is firmly fixed in the slot and does not move easily. 1050 PCI Express Mini Card for wireless LAN For access, remove these FRUs in order: • "1010 Battery pack" on page...
... of the arrow. 60 Hardware Maintenance Manual When installing: Insert the notched end of the DIMM into the place. Make sure that it snaps into the socket. Some models only have one DIMM is firmly fixed in the slot and does not move easily. 1050 PCI Express Mini Card for wireless LAN For access, remove these FRUs in order: • "1010 Battery pack" on page...
Hardware Maintenance Manual
Page 99
...; "Recovery discs" on page 114 • "Common service tools" on product design may find a list of CRUs include the ac power adapter, power cord, battery, and hard disk drive. You may include the memory module, wireless card, keyboard, and palm rest with specific models listed and described as Self-service CRUs and others are available from Lenovo at http://www.lenovo.com/CRUs. You may be resolved with the replacement CRU; See your Lenovo...
...; "Recovery discs" on page 114 • "Common service tools" on product design may find a list of CRUs include the ac power adapter, power cord, battery, and hard disk drive. You may include the memory module, wireless card, keyboard, and palm rest with specific models listed and described as Self-service CRUs and others are available from Lenovo at http://www.lenovo.com/CRUs. You may be resolved with the replacement CRU; See your Lenovo...


