
Hardware Maintenance Manual
Page 1
Hardware Maintenance Manual ThinkPad X100e and X120e
Hardware Maintenance Manual ThinkPad X100e and X120e

Hardware Maintenance Manual
Page 3
... 84 2020 Integrated camera 85 2030 LCD panel, hinges, and LCD cable . . . . 86 i Removing and replacing a FRU 53 Before servicing ThinkPad X100e and ThinkPad X120e 53 1010 Battery pack 54 1020 Bottom door 55 1030 Hard disk drive (HDD 58 1040 DIMM 60 1050 PCI Express Mini Card... for replacing FRUs for CTO, CMV, and GAV 20 Product definition 20 FRU identification for DOS diagnostics program 24 System supporting the Lenovo diagnostics programs 29 Power system checkout 31 Checking the ac power adapter 31 Checking operational charging 32 Checking the battery pack 32 Checking ...
... 84 2020 Integrated camera 85 2030 LCD panel, hinges, and LCD cable . . . . 86 i Removing and replacing a FRU 53 Before servicing ThinkPad X100e and ThinkPad X120e 53 1010 Battery pack 54 1020 Bottom door 55 1030 Hard disk drive (HDD 58 1040 DIMM 60 1050 PCI Express Mini Card... for replacing FRUs for CTO, CMV, and GAV 20 Product definition 20 FRU identification for DOS diagnostics program 24 System supporting the Lenovo diagnostics programs 29 Power system checkout 31 Checking the ac power adapter 31 Checking operational charging 32 Checking the battery pack 32 Checking ...
Hardware Maintenance Manual
Page 5
... for trained service technicians who are familiar with the advanced diagnostic tests to read all the information under Chapter 1 "Safety information" on page 1. © Copyright Lenovo 2011, 2012 iii Use this manual along with ThinkPad products.
... for trained service technicians who are familiar with the advanced diagnostic tests to read all the information under Chapter 1 "Safety information" on page 1. © Copyright Lenovo 2011, 2012 iii Use this manual along with ThinkPad products.

Hardware Maintenance Manual
Page 7
... familiar with your feet. 3. Replace any other people will not trip over it with labels or stickers. © Copyright Lenovo 2011, 2012 1 Safety information This chapter presents following safety information that you service a ThinkPad Notebook. • "General safety" on page 1 • "Electrical safety" on page 2 • "Safety inspection guide" on page 3 •...
... familiar with your feet. 3. Replace any other people will not trip over it with labels or stickers. © Copyright Lenovo 2011, 2012 1 Safety information This chapter presents following safety information that you service a ThinkPad Notebook. • "General safety" on page 1 • "Electrical safety" on page 2 • "Safety inspection guide" on page 3 •...

Hardware Maintenance Manual
Page 9
... exterior covers for worn, frayed, or pinched cables. 9. The power cord should be considered sensitive to attachment of any obvious non-ThinkPad alterations. Check for damage (loose, broken, or sharp edges). 2. Use caution; Switch off the computer. Checklist: 1. b. Check for any non... unit for 0.1 ohm or less between objects. If any unsafe conditions are any obvious unsafe conditions, such as to the safety of non-ThinkPad features or options not covered by equalizing the charge so that are all at the beginning of fire or smoke damage. 8. Power off power...
... exterior covers for worn, frayed, or pinched cables. 9. The power cord should be considered sensitive to attachment of any obvious non-ThinkPad alterations. Check for damage (loose, broken, or sharp edges). 2. Use caution; Switch off the computer. Checklist: 1. b. Check for any non... unit for 0.1 ohm or less between objects. If any unsafe conditions are any obvious unsafe conditions, such as to the safety of non-ThinkPad features or options not covered by equalizing the charge so that are all at the beginning of fire or smoke damage. 8. Power off power...
Hardware Maintenance Manual
Page 30
.... Note: PC-Doctor for DOS is available at the following Web site: http://www.lenovo.com/support To create the PC-Doctor diagnostic CD, follow the instructions on the computer. 2. To enter the ThinkPad Setup program, do as possible. 2. Checkout guide Use the following symptoms might indicate damage...the failure by running the diagnostic test or by running the diagnostics test included in as much detail as follows: 1. The use of the ThinkPad Setup program before you need to excessive force, or dropped. To avoid this problem, you run correctly. Some descriptions might not run PC...
.... Note: PC-Doctor for DOS is available at the following Web site: http://www.lenovo.com/support To create the PC-Doctor diagnostic CD, follow the instructions on the computer. 2. To enter the ThinkPad Setup program, do as possible. 2. Checkout guide Use the following symptoms might indicate damage...the failure by running the diagnostic test or by running the diagnostics test included in as much detail as follows: 1. The use of the ThinkPad Setup program before you need to excessive force, or dropped. To avoid this problem, you run correctly. Some descriptions might not run PC...
Hardware Maintenance Manual
Page 31
... and check the power sources. General checkout 25 A pull-down menu appears. (Its exact form depends on the following Web site: http://www.lenovo.com/support PC-Doctor cannot be started from a USB attached optical drive. Note: When you cannot change the parameters that is supported as a ...troubleshooting hints. 4. If an error code is in the PC-Doctor menu. Note: If a supervisor password has been set by the customer, the ThinkPad Setup program menu appears after the password is installed to the computer. 3. Press cursor keys to enter the Boot Menu. 5. Instead of PC-Doctor...
... and check the power sources. General checkout 25 A pull-down menu appears. (Its exact form depends on the following Web site: http://www.lenovo.com/support PC-Doctor cannot be started from a USB attached optical drive. Note: When you cannot change the parameters that is supported as a ...troubleshooting hints. 4. If an error code is in the PC-Doctor menu. Note: If a supervisor password has been set by the customer, the ThinkPad Setup program menu appears after the password is installed to the computer. 3. Press cursor keys to enter the Boot Menu. 5. Instead of PC-Doctor...

Hardware Maintenance Manual
Page 32
...-DOCTOR 2.0 Copyright 2008 PC-Doctor, Inc. Press ENTER to Active. 10. Run the applicable function test. 11. otherwise, it . 12. Follow the instructions on the ThinkPad Notebook. Use the cursor keys and ESC to move in Interactive Tests, the Fn key should be set to select. If there is a problem, PC...
...-DOCTOR 2.0 Copyright 2008 PC-Doctor, Inc. Press ENTER to Active. 10. Run the applicable function test. 11. otherwise, it . 12. Follow the instructions on the ThinkPad Notebook. Use the cursor keys and ESC to move in Interactive Tests, the Fn key should be set to select. If there is a problem, PC...
Hardware Maintenance Manual
Page 34
...configuration as follows: 1. Keyboard 1. Interactive Tests ➙ Keyboard Hard disk drive or solid state Enter the BIOS Setup Utility (ThinkPad Setup for ThinkPad X120e) and change Serial drive ATA (SATA) setting to enter the BIOS Setup Utility. 4. Interactive Tests ➙ Diskette Memory... Main hard disk drive. 6. Diagnostics ➙ CPU/Coprocessor 2. Interactive Tests ➙ Video Audio Enter the BIOS Setup Utility (ThinkPad Setup for ThinkPad X120e) and change Serial ATA (SATA) setting to Compatibility, and run the test again. In this case, turn on the ...
...configuration as follows: 1. Keyboard 1. Interactive Tests ➙ Keyboard Hard disk drive or solid state Enter the BIOS Setup Utility (ThinkPad Setup for ThinkPad X120e) and change Serial drive ATA (SATA) setting to enter the BIOS Setup Utility. 4. Interactive Tests ➙ Diskette Memory... Main hard disk drive. 6. Diagnostics ➙ CPU/Coprocessor 2. Interactive Tests ➙ Video Audio Enter the BIOS Setup Utility (ThinkPad Setup for ThinkPad X120e) and change Serial ATA (SATA) setting to Compatibility, and run the test again. In this case, turn on the ...

Hardware Maintenance Manual
Page 35
... computer internal storage and memory problems. Notes: • If the computer you can be tested. 6. Chapter 3. System supporting the Lenovo diagnostics programs The section provides information about this program, see the help information system. Select the device class to your particular computer. ...General checkout 29 For additional information about ThinkPad computers that enable you to troubleshoot the problem. Go to be performed. 7. It also can download the quick test programs ...
... computer internal storage and memory problems. Notes: • If the computer you can be tested. 6. Chapter 3. System supporting the Lenovo diagnostics programs The section provides information about this program, see the help information system. Select the device class to your particular computer. ...General checkout 29 For additional information about ThinkPad computers that enable you to troubleshoot the problem. Go to be performed. 7. It also can download the quick test programs ...

Hardware Maintenance Manual
Page 36
...on page 31, and check the power sources. If an error code is displayed, repeatedly press and release the F12 key. When the ThinkPad logo is displayed, go to "Symptom-to "Power system checkout" on page 39 for error code descriptions and troubleshooting hints. 2. Insert the...diagnostic programs, you to the computer. 2. Turn on the computer. When the Boot Menu window opens, release the F12 key. 3. Click Lenovo Bootable Diagnostics. 3. Attach the USB device to test computer memory and internal storage devices, view system information, and check and recover the internal...
...on page 31, and check the power sources. If an error code is displayed, repeatedly press and release the F12 key. When the ThinkPad logo is displayed, go to "Symptom-to "Power system checkout" on page 39 for error code descriptions and troubleshooting hints. 2. Insert the...diagnostic programs, you to the computer. 2. Turn on the computer. When the Boot Menu window opens, release the F12 key. 3. Click Lenovo Bootable Diagnostics. 3. Attach the USB device to test computer memory and internal storage devices, view system information, and check and recover the internal...

Hardware Maintenance Manual
Page 37
... adapter is used , replace the docking station or the port replicator. • If the power-on indicator does not turn on the computer. 5. When the ThinkPad logo is not correct, replace the ac adapter. 4. Use the arrow keys to "Checking operational charging" on the screen to use the diagnostic program. General...
... adapter is used , replace the docking station or the port replicator. • If the power-on indicator does not turn on the computer. 5. When the ThinkPad logo is not correct, replace the ac adapter. 4. Use the arrow keys to "Checking operational charging" on the screen to use the diagnostic program. General...

Hardware Maintenance Manual
Page 42
If you do not have a Supplemental Recovery Disc, insert it appears on the screen whenever the computer is available, neither Lenovo nor Lenovo authorized service technicians provide any services to reset either the user or the master HDP, or to restore the original startup sequence. Insert the ...for it when prompted and click Yes. Start the BIOS Setup Utility program and then press F9 to complete the Windows setup. 11. If any ThinkPad Notebook: the power-on page 37. The computer does not start until the password is displayed. The password must be entered before an operating ...
If you do not have a Supplemental Recovery Disc, insert it appears on the screen whenever the computer is available, neither Lenovo nor Lenovo authorized service technicians provide any services to reset either the user or the master HDP, or to restore the original startup sequence. Insert the ...for it when prompted and click Yes. Start the BIOS Setup Utility program and then press F9 to complete the Windows setup. 11. If any ThinkPad Notebook: the power-on page 37. The computer does not start until the password is displayed. The password must be entered before an operating ...

Hardware Maintenance Manual
Page 43
... has been set and is selected and the user HDP has been forgotten and cannot be made available to the service technician, neither Lenovo nor Lenovo authorized service technicians provide any services to reset the user HDPs or to recover data from the hard disk drive. How to remove ... fee. Remove the backup battery. Press F10; Select Password. Remove the battery pack. then, in order to get access to the BIOS Setup Utility or ThinkPad Setup and change the system configuration. To remove a user HDP that you have been saved" window, press Enter. 9. Turn on page 54. 3. Turn...
... has been set and is selected and the user HDP has been forgotten and cannot be made available to the service technician, neither Lenovo nor Lenovo authorized service technicians provide any services to reset the user HDPs or to recover data from the hard disk drive. How to remove ... fee. Remove the backup battery. Press F10; Select Password. Remove the battery pack. then, in order to get access to the BIOS Setup Utility or ThinkPad Setup and change the system configuration. To remove a user HDP that you have been saved" window, press Enter. 9. Turn on page 54. 3. Turn...
Hardware Maintenance Manual
Page 46
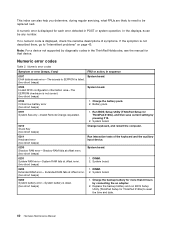
...narrative descriptions of the keyboard and the auxiliary input device. Charge the backup battery for that device. Run BIOS Setup Utility (ThinkPad Setup for ThinkPad X120e) to reset the time and date. 40 Hardware Maintenance Manual Extended RAM fails at offset nnnn. (two short beeps... battery pack. 2. This index can be replaced next. System board. DIMM. 2. Replace the backup battery and run BIOS Setup Utility (ThinkPad Setup for ThinkPad X120e), and then save current setting by connecting the ac adapter. 2. If no numeric code is dead. (two short beeps) 1. ...
...narrative descriptions of the keyboard and the auxiliary input device. Charge the backup battery for that device. Run BIOS Setup Utility (ThinkPad Setup for ThinkPad X120e) to reset the time and date. 40 Hardware Maintenance Manual Extended RAM fails at offset nnnn. (two short beeps... battery pack. 2. This index can be replaced next. System board. DIMM. 2. Replace the backup battery and run BIOS Setup Utility (ThinkPad Setup for ThinkPad X120e), and then save current setting by connecting the ac adapter. 2. If no numeric code is dead. (two short beeps) 1. ...

Hardware Maintenance Manual
Page 47
... Unauthorized network card is plugged in sequence 0251 System CMOS checksum bad-Default configuration used. (two short beeps) 1. Charge the backup battery for ThinkPad X120e) to reset the time and date. 0254 System NV7 Volume checksum bad-Default configuration used . (two short beeps) 1. System board. ...0271 Date and time error- either the date nor the time is plugged in BIOS Setup Utility (ThinkPad Setup for more than 8 hours by connecting the ac adapter. 2. Load "Setup Default" in -Power off and remove the miniPCI network card. ...
... Unauthorized network card is plugged in sequence 0251 System CMOS checksum bad-Default configuration used. (two short beeps) 1. Charge the backup battery for ThinkPad X120e) to reset the time and date. 0254 System NV7 Volume checksum bad-Default configuration used . (two short beeps) 1. System board. ...0271 Date and time error- either the date nor the time is plugged in BIOS Setup Utility (ThinkPad Setup for more than 8 hours by connecting the ac adapter. 2. Load "Setup Default" in -Power off and remove the miniPCI network card. ...

Hardware Maintenance Manual
Page 48
... LCD technology, but excessive pixel problems can cause viewing concerns. 42 Hardware Maintenance Manual LCD-related symptoms Important: The TFT LCD for ThinkPad X120e) and see the same error message, check the boot sequence. 3. The presence of a small number of dots that the ... discolored, or always lighted is connected tightly and correctly. 2. Reinstall the operating system. Press F1 to enter BIOS Setup Utility (ThinkPad Setup for ThinkPad X120e). Then save the current setting by pressing F10, and restart the computer. FRU or action, in sequence Press F1 to enter...
... LCD technology, but excessive pixel problems can cause viewing concerns. 42 Hardware Maintenance Manual LCD-related symptoms Important: The TFT LCD for ThinkPad X120e) and see the same error message, check the boot sequence. 3. The presence of a small number of dots that the ... discolored, or always lighted is connected tightly and correctly. 2. Reinstall the operating system. Press F1 to enter BIOS Setup Utility (ThinkPad Setup for ThinkPad X120e). Then save the current setting by pressing F10, and restart the computer. FRU or action, in sequence Press F1 to enter...

Hardware Maintenance Manual
Page 49
...System board. Verify that have no more visible defective pixels, it will be deemed as cosmic radiation, electrostatic discharge, or software errors. Non-ThinkPad devices Chapter 4. Note: • This policy applies to do not isolate FRUs that the power supply being used at least 10 times. 2....any FRUs. • If any damaged FRU. 3. Horizontal or vertical lines displayed on 1 January, 2008 or later. • Lenovo will have nothing to all attached devices are supported by the FRU code. Intermittent problems Intermittent system hang problems can be adjusted. &#...
...System board. Verify that have no more visible defective pixels, it will be deemed as cosmic radiation, electrostatic discharge, or software errors. Non-ThinkPad devices Chapter 4. Note: • This policy applies to do not isolate FRUs that the power supply being used at least 10 times. 2....any FRUs. • If any damaged FRU. 3. Horizontal or vertical lines displayed on 1 January, 2008 or later. • Lenovo will have nothing to all attached devices are supported by the FRU code. Intermittent problems Intermittent system hang problems can be adjusted. &#...

Hardware Maintenance Manual
Page 53
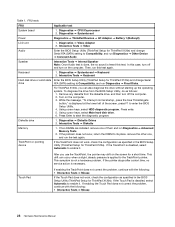
... the Fn+F7 combination might still be used to enable or disable the wireless features, the following device drivers must have the ThinkPad Power Management driver installed on the computer beforehand: • Power Management driver • OnScreen Display Utility • Wireless device drivers...monitor. If an external monitor is attached, computer output is displayed. Fn key combinations The following three patterns by turns: © Copyright Lenovo 2011, 2012 47 You can quickly change the settings. For Windows XP: Apply a presentation scheme directly, with a function key. Enable...
... the Fn+F7 combination might still be used to enable or disable the wireless features, the following device drivers must have the ThinkPad Power Management driver installed on the computer beforehand: • Power Management driver • OnScreen Display Utility • Wireless device drivers...monitor. If an external monitor is attached, computer output is displayed. Fn key combinations The following three patterns by turns: © Copyright Lenovo 2011, 2012 47 You can quickly change the settings. For Windows XP: Apply a presentation scheme directly, with a function key. Enable...

Hardware Maintenance Manual
Page 54
... needs to do the following: Click Start ➙ All Programs ➙ ThinkVantage ➙ Presentation Director, and change the settings. Multimedia control. When you have the ThinkPad Power Management driver installed on to normal operation, press the power button for selecting a power plan (in Windows XP, and you logged on the computer...
... needs to do the following: Click Start ➙ All Programs ➙ ThinkVantage ➙ Presentation Director, and change the settings. Multimedia control. When you have the ThinkPad Power Management driver installed on to normal operation, press the power button for selecting a power plan (in Windows XP, and you logged on the computer...


