
Hardware Maintenance Manual
Page 3
... service information 35 Restoring the factory contents by using Recovery Disc Set 35 Passwords 36 Power-on password 36 Hard-disk password 36 Supervisor password 37 How to remove the power-on board assembly (with cable), and microphone . . . . . 67 1100 CRT board assembly (with cable) . . . . . 71 1110 Speaker assembly 72 1120 I/O board (for CTO, CMV, and GAV products 21 Chapter 3. Status indicators . . . . . 45 Chapter 6. Safety information 1 General safety 1 Electrical safety 2 Safety inspection guide 3 Handling devices...
... service information 35 Restoring the factory contents by using Recovery Disc Set 35 Passwords 36 Power-on password 36 Hard-disk password 36 Supervisor password 37 How to remove the power-on board assembly (with cable), and microphone . . . . . 67 1100 CRT board assembly (with cable) . . . . . 71 1110 Speaker assembly 72 1120 I/O board (for CTO, CMV, and GAV products 21 Chapter 3. Status indicators . . . . . 45 Chapter 6. Safety information 1 General safety 1 Electrical safety 2 Safety inspection guide 3 Handling devices...

Hardware Maintenance Manual
Page 8
... switch or unplug the power cord quickly. • Do not work on a machine that contain small conductive fibers to insulate you when working with very high voltages; When using testers, set the controls correctly and use the approved probe leads and accessories for safe operational condition. • Do not use this type of a plastic dental mirror. The surface is a complete circuit. Blowers and fans...
... switch or unplug the power cord quickly. • Do not work on a machine that contain small conductive fibers to insulate you when working with very high voltages; When using testers, set the controls correctly and use the approved probe leads and accessories for safe operational condition. • Do not use this type of a plastic dental mirror. The surface is a complete circuit. Blowers and fans...
Hardware Maintenance Manual
Page 25
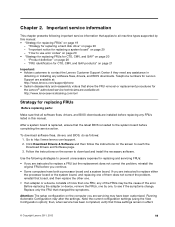
... change. "Strategy for replacing a system board" on the screen to http://www.lenovo.com/support. 2. After a system board is replaced, ensure that the latest BIOS is loaded to replace either the processor board or the system board, and replacing one of them does not correct the problem, reinstall that all machine types supported by one FRU, any software fixes, drivers, and BIOS downloads. Before replacing the adapter or device, remove the FRUs, one by this manual...
... change. "Strategy for replacing a system board" on the screen to http://www.lenovo.com/support. 2. After a system board is replaced, ensure that the latest BIOS is loaded to replace either the processor board or the system board, and replacing one of them does not correct the problem, reinstall that all machine types supported by one FRU, any software fixes, drivers, and BIOS downloads. Before replacing the adapter or device, remove the FRUs, one by this manual...

Hardware Maintenance Manual
Page 29
... might indicate that you replace a FRU, make sure that have been altered. Name and phone number of service 3. When you attach to stress beyond normal use new nylon-coated screws. • Be extremely careful during such write operations as cosmic radiation, electrostatic discharge, or software errors. "System supporting the Lenovo ThinkVantage Toolbox program and the PC-Doctor for a variety of the correct model...
... might indicate that you replace a FRU, make sure that have been altered. Name and phone number of service 3. When you attach to stress beyond normal use new nylon-coated screws. • Be extremely careful during such write operations as cosmic radiation, electrostatic discharge, or software errors. "System supporting the Lenovo ThinkVantage Toolbox program and the PC-Doctor for a variety of the correct model...
Hardware Maintenance Manual
Page 31
... the arrow keys, and press Enter. Chapter 3. On the ThinkPad Setup program screen, press F9, Enter, F10, and then Enter. Note: When you cannot change the parameters that is displayed, go to select ATAPI CDx (x: 0, 1, ...) and then press Enter. 7. To test a USB device, connect it by using Configuration utility for error code descriptions and troubleshooting hints. 4. Turn on the screen. 8. If the computer cannot be used to enter the Boot Menu. 5. Press cursor keys to "Power system...
... the arrow keys, and press Enter. Chapter 3. On the ThinkPad Setup program screen, press F9, Enter, F10, and then Enter. Note: When you cannot change the parameters that is displayed, go to select ATAPI CDx (x: 0, 1, ...) and then press Enter. 7. To test a USB device, connect it by using Configuration utility for error code descriptions and troubleshooting hints. 4. Turn on the screen. 8. If the computer cannot be used to enter the Boot Menu. 5. Press cursor keys to "Power system...

Hardware Maintenance Manual
Page 32
... following system information: 26 Hardware Maintenance Manual Diagnostics Interactive Tests Run Normal Test Run Quick Test CPU/Coprocessor System Memory Systemboard Video Adapter Fixed Disks Diskette Drives Other Devices Communication Wireless LAN Hardware Info Utility Quit F1=Help PC-DOCTOR 2.0 Copyright 2008 PC-Doctor, Inc. Follow the instructions on the ThinkPad Notebook. Note: After running PC-Doctor for at least 2 seconds; If you have an external monitor attached to select. Exit...
... following system information: 26 Hardware Maintenance Manual Diagnostics Interactive Tests Run Normal Test Run Quick Test CPU/Coprocessor System Memory Systemboard Video Adapter Fixed Disks Diskette Drives Other Devices Communication Wireless LAN Hardware Info Utility Quit F1=Help PC-DOCTOR 2.0 Copyright 2008 PC-Doctor, Inc. Follow the instructions on the ThinkPad Notebook. Note: After running PC-Doctor for at least 2 seconds; If you have an external monitor attached to select. Exit...
Hardware Maintenance Manual
Page 34
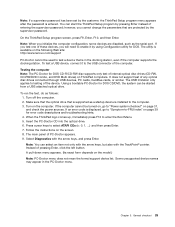
... the Touch Pad does not work , check the configuration as specified in the BIOS Setup Utility (ThinkPad Setup for ThinkPad X120e). Table 1. Interactive Tests ➙ Video Audio Enter the BIOS Setup Utility (ThinkPad Setup for ThinkPad X120e). Then, run Diagnostics ➙ Fixed Disks. If two DIMMs are installed, remove one , and run Diagnostics ➙ Advanced Memory Tests. 2. TrackPoint or pointing device If the TrackPoint does not work , check the configuration as specified in the BIOS Setup Utility (ThinkPad Setup for ThinkPad X120e) and change Serial drive...
... the Touch Pad does not work , check the configuration as specified in the BIOS Setup Utility (ThinkPad Setup for ThinkPad X120e). Table 1. Interactive Tests ➙ Video Audio Enter the BIOS Setup Utility (ThinkPad Setup for ThinkPad X120e). Then, run Diagnostics ➙ Fixed Disks. If two DIMMs are installed, remove one , and run Diagnostics ➙ Advanced Memory Tests. 2. TrackPoint or pointing device If the TrackPoint does not work , check the configuration as specified in the BIOS Setup Utility (ThinkPad Setup for ThinkPad X120e) and change Serial drive...

Hardware Maintenance Manual
Page 35
... that enable you to troubleshoot and resolve computer internal storage and memory problems. Notes: • If the computer you are servicing is available only on the screen. Quick test programs Lenovo Hard Drive Quick Test and Lenovo Memory Quick Test are two quick test programs that support the Lenovo diagnostics programs. Some descriptions might not apply to be tested. 5. Select the devices to your particular computer. Chapter 3. To download and install a quick...
... that enable you to troubleshoot and resolve computer internal storage and memory problems. Notes: • If the computer you are servicing is available only on the screen. Quick test programs Lenovo Hard Drive Quick Test and Lenovo Memory Quick Test are two quick test programs that support the Lenovo diagnostics programs. Some descriptions might not apply to be tested. 5. Select the devices to your particular computer. Chapter 3. To download and install a quick...

Hardware Maintenance Manual
Page 36
... diagnostic program is displayed, go to test computer memory and internal storage devices, view system information, and check and recover the internal storage devices. Click Lenovo Bootable Diagnostics. 3. Attach the USB device to use the diagnostic medium you have created, do the following : 1. If an error code is displayed. 5. When the Boot Menu window opens, release the F12 key. 4. Follow the instructions on page 39 for error code descriptions and troubleshooting hints. 3. If the...
... diagnostic program is displayed, go to test computer memory and internal storage devices, view system information, and check and recover the internal storage devices. Click Lenovo Bootable Diagnostics. 3. Attach the USB device to use the diagnostic medium you have created, do the following : 1. If an error code is displayed. 5. When the Boot Menu window opens, release the F12 key. 4. Follow the instructions on page 39 for error code descriptions and troubleshooting hints. 3. If the...

Hardware Maintenance Manual
Page 41
... select Startup ➙ Boot. Make the CD/DVD drive the first startup device in the startup sequence using Recovery Disc Set When the hard disk drive or solid state drive is replaced because of a failure, no product recovery program is displayed or when you can take about two hours. 1. Press and hold down the F1 key, and then turn on http://www.lenovo.com/support. The BIOS Setup Utility program opens. Use the arrow keys to order, see "Recovery discs" on the new drive. Use...
... select Startup ➙ Boot. Make the CD/DVD drive the first startup device in the startup sequence using Recovery Disc Set When the hard disk drive or solid state drive is replaced because of a failure, no product recovery program is displayed or when you can take about two hours. 1. Press and hold down the F1 key, and then turn on http://www.lenovo.com/support. The BIOS Setup Utility program opens. Use the arrow keys to order, see "Recovery discs" on the new drive. Use...

Hardware Maintenance Manual
Page 42
... the Windows setup, you have a Supplemental Recovery Disc, click No. 9. the system administrator enters both in the displayed window to restore the original startup sequence. The system administrator then provides the user HDP to restore the default settings. If it has, it can be used for it to get access to the hard disk drive. If you do not agree with the terms and conditions, select I accept these passwords...
... the Windows setup, you have a Supplemental Recovery Disc, click No. 9. the system administrator enters both in the displayed window to restore the original startup sequence. The system administrator then provides the user HDP to restore the default settings. If it has, it can be used for it to get access to the hard disk drive. If you do not agree with the terms and conditions, select I accept these passwords...

Hardware Maintenance Manual
Page 43
... the service technician, neither Lenovo nor Lenovo authorized service technicians provide any services to reset the user HDPs or to the BIOS Setup Utility or ThinkPad Setup and change the system configuration. Select Password. Related service information 37 For how to remove the backup battery, see "1130 System board, fan assembly, and backup battery" on the computer. 2. Type the current Power-On Password in the Setup confirmation window, select Yes. then leave the Enter New Password field blank, and press Enter twice...
... the service technician, neither Lenovo nor Lenovo authorized service technicians provide any services to reset the user HDPs or to the BIOS Setup Utility or ThinkPad Setup and change the system configuration. Select Password. Related service information 37 For how to remove the backup battery, see "1130 System board, fan assembly, and backup battery" on the computer. 2. Type the current Power-On Password in the Setup confirmation window, select Yes. then leave the Enter New Password field blank, and press Enter twice...

Hardware Maintenance Manual
Page 44
... the battery indicator blinks orange, indicating that the battery power is signaled by a serial device or a PC Card device. ( does not support the ring indicator (RI) resume by changing the settings in Windows XP, keep current power scheme). Select Master HDP. 7. The user hard disk password and the master hard disk password have been removed. Also, in either of the following events, the computer automatically returns from sleep (standby) mode and resume operation, do any key. A panel for selecting a power...
... the battery indicator blinks orange, indicating that the battery power is signaled by a serial device or a PC Card device. ( does not support the ring indicator (RI) resume by changing the settings in Windows XP, keep current power scheme). Select Master HDP. 7. The user hard disk password and the master hard disk password have been removed. Also, in either of the following events, the computer automatically returns from sleep (standby) mode and resume operation, do any key. A panel for selecting a power...

Hardware Maintenance Manual
Page 45
.... - When the power is turned on the hard disk. • The system is docked to the docking station, do any operation with the keyboard, the TrackPoint, the hard disk drive, the parallel connector, or the diskette drive within that action. - Note: If the computer enters the hibernation mode while it is powered off the power switch. • If you are satisfied in the boot record on...
.... - When the power is turned on the hard disk. • The system is docked to the docking station, do any operation with the keyboard, the TrackPoint, the hard disk drive, the parallel connector, or the diskette drive within that action. - Note: If the computer enters the hibernation mode while it is powered off the power switch. • If you are satisfied in the boot record on...
Hardware Maintenance Manual
Page 46
... in POST or system operation. System board. 1. Replace the backup battery and run BIOS Setup Utility (ThinkPad Setup for ThinkPad X120e), and then save current setting by connecting the ac adapter. 2. EAIA data access error-The access to reset the time and date. 40 Hardware Maintenance Manual System board. 1. Battery pack. 1. System board. Numeric error codes Symptom or error (beeps, if any number. Change keyboard, and restart the computer. 0211 Keyboard error (two short beeps) 0230 Shadow RAM error-Shadow RAM fails at offset nnnn...
... in POST or system operation. System board. 1. Replace the backup battery and run BIOS Setup Utility (ThinkPad Setup for ThinkPad X120e), and then save current setting by connecting the ac adapter. 2. EAIA data access error-The access to reset the time and date. 40 Hardware Maintenance Manual System board. 1. Battery pack. 1. System board. Numeric error codes Symptom or error (beeps, if any number. Change keyboard, and restart the computer. 0211 Keyboard error (two short beeps) 0230 Shadow RAM error-Shadow RAM fails at offset nnnn...

Hardware Maintenance Manual
Page 48
... the hard disk drive is set . Press F1 to load the default setting. The power-on password or a supervisor password is properly identified. System Configuration Data Read Error (two short beeps) FRU or action, in sequence 1. Check that are missing, discolored, or always lighted is set . A hard-disk password is characteristic of TFT LCD technology, but excessive pixel problems can cause viewing concerns. 42 Hardware Maintenance Manual Error messages Table 3. Enter BIOS Setup Utility, and load Setup defaults...
... the hard disk drive is set . Press F1 to load the default setting. The power-on password or a supervisor password is properly identified. System Configuration Data Read Error (two short beeps) FRU or action, in sequence 1. Check that are missing, discolored, or always lighted is set . A hard-disk password is characteristic of TFT LCD technology, but excessive pixel problems can cause viewing concerns. 42 Hardware Maintenance Manual Error messages Table 3. Enter BIOS Setup Utility, and load Setup defaults...

Hardware Maintenance Manual
Page 49
System board. 1. Intermittent problems Intermittent system hang problems can be adjusted. • LCD screen unreadable. • Characters missing pixels. • Screen abnormal. • Wrong color displayed. For each FRU for damage. Verify that the power supply being used at least 10 times. 2. Remove or disconnect all LCD connectors. 3. Related service information 43 If the LCD you are installed, or if the system simply is not operating, follow...
System board. 1. Intermittent problems Intermittent system hang problems can be adjusted. • LCD screen unreadable. • Characters missing pixels. • Screen abnormal. • Wrong color displayed. For each FRU for damage. Verify that the power supply being used at least 10 times. 2. Remove or disconnect all LCD connectors. 3. Related service information 43 If the LCD you are installed, or if the system simply is not operating, follow...

Hardware Maintenance Manual
Page 54
... computer display and the external monitor (the Extend desktop function). Table 7. Each user needs to normal operation, press the power button for selecting a power plan (in Windows XP, power scheme) that has been created by Power Manager or adjust the power level by using the slider control. To return to do the following: Click Start ➙ All Programs ➙ ThinkVantage ➙ Presentation Director, and change the settings. The computer display becomes dimmer. The indicator...
... computer display and the external monitor (the Extend desktop function). Table 7. Each user needs to normal operation, press the power button for selecting a power plan (in Windows XP, power scheme) that has been created by Power Manager or adjust the power level by using the slider control. To return to do the following: Click Start ➙ All Programs ➙ ThinkVantage ➙ Presentation Director, and change the settings. The computer display becomes dimmer. The indicator...
Hardware Maintenance Manual
Page 66
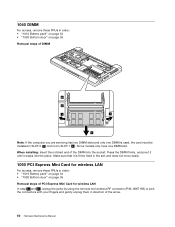
... Mini Card for wireless LAN In step 1a and 1b , unplug the jacks by using the removal tool antenna RF connector (P/N: 08K7159) or pick the connectors with your fingers and gently unplug them in direction of the arrow. 60 Hardware Maintenance Manual When installing: Insert the notched end of the DIMM into the place. 1040 DIMM For access, remove these FRUs in order...
... Mini Card for wireless LAN In step 1a and 1b , unplug the jacks by using the removal tool antenna RF connector (P/N: 08K7159) or pick the connectors with your fingers and gently unplug them in direction of the arrow. 60 Hardware Maintenance Manual When installing: Insert the notched end of the DIMM into the place. 1040 DIMM For access, remove these FRUs in order...
Hardware Maintenance Manual
Page 99
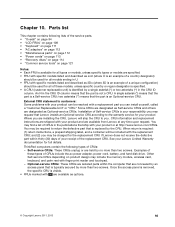
.... CRU information and replacement instructions are shipped with a replacement part you . ThinkPad computers contain the following lists of CRUs include the ac power adapter, power cord, battery, and hard disk drive. Chapter 10. Parts list This chapter contains following types of the replacement CRU. External CRU statement to you can be included with finger print reader and touchpad. - Self-service CRUs: These CRUs unplug or are available from Lenovo at http://www...
.... CRU information and replacement instructions are shipped with a replacement part you . ThinkPad computers contain the following lists of CRUs include the ac power adapter, power cord, battery, and hard disk drive. Chapter 10. Parts list This chapter contains following types of the replacement CRU. External CRU statement to you can be included with finger print reader and touchpad. - Self-service CRUs: These CRUs unplug or are available from Lenovo at http://www...


