
User Manual
Page 3
... Restoring the factory contents by using Recovery Disc Set 37 Passwords 39 Power-on password 39 Hard-disk password 39 © Copyright Lenovo 2011 Supervisor password 39 How to remove the power-on password . . . 39 How to remove the hard-disk password . . . 40 Power management 40 Screen blank mode 40 Sleep (Standby) mode 41 Hibernation mode 41 Symptom-to do first 27 Checkout guide 28 Diagnostics using PC-Doctor for DOS. . . . 28 Lenovo ThinkVantage Toolbox 31 PC-Doctor for Windows...
... Restoring the factory contents by using Recovery Disc Set 37 Passwords 39 Power-on password 39 Hard-disk password 39 © Copyright Lenovo 2011 Supervisor password 39 How to remove the power-on password . . . 39 How to remove the hard-disk password . . . 40 Power management 40 Screen blank mode 40 Sleep (Standby) mode 41 Hibernation mode 41 Symptom-to do first 27 Checkout guide 28 Diagnostics using PC-Doctor for DOS. . . . 28 Lenovo ThinkVantage Toolbox 31 PC-Doctor for Windows...

User Manual
Page 29
... http://www.lenovo.com/support. 2. Customers in obtaining or installing any software fixes, drivers, and UEFI BIOS downloads. "Strategy for Lenovo Support are available at: http://www.lenovo.com/support/phone System Disassembly/Reassembly videos that all machine types supported by this manual. After a system board is replaced, ensure that board, and then replace the other one of the computer or press Auto-detect button on the screen and install the necessary software. If you...
... http://www.lenovo.com/support. 2. Customers in obtaining or installing any software fixes, drivers, and UEFI BIOS downloads. "Strategy for Lenovo Support are available at: http://www.lenovo.com/support/phone System Disassembly/Reassembly videos that all machine types supported by this manual. After a system board is replaced, ensure that board, and then replace the other one of the computer or press Auto-detect button on the screen and install the necessary software. If you...

User Manual
Page 33
... entire page on page 31 - Consider replacing a FRU only when a problem recurs. If you attach to stress beyond normal use new nylon-coated screws. • Be extremely careful during such write operations as cosmic radiation, electrostatic discharge, or software errors. Name and phone number of service 3. Date of service technician 2. Machine type, model number, and serial number 9. Before checking problems with the computer, determine whether the damage...
... entire page on page 31 - Consider replacing a FRU only when a problem recurs. If you attach to stress beyond normal use new nylon-coated screws. • Be extremely careful during such write operations as cosmic radiation, electrostatic discharge, or software errors. Name and phone number of service 3. Date of service technician 2. Machine type, model number, and serial number 9. Before checking problems with the computer, determine whether the damage...

User Manual
Page 34
... the BIOS Setup Utility screen, press F9, Enter, F10, and then Enter. 28 ThinkPad X220 Tablet and X220i Tablet Hardware Maintenance Manual To enter BIOS Setup Utility, do as a guide in PC-Doctor. Turn on the computer. 2. Note: If a supervisor password has been set by the customer, BIOS Setup Utility menu appears after the password is available at the following Web site: http://www.lenovo.com/support To create the PC-Doctor diagnostic CD, follow the instructions...
... the BIOS Setup Utility screen, press F9, Enter, F10, and then Enter. 28 ThinkPad X220 Tablet and X220i Tablet Hardware Maintenance Manual To enter BIOS Setup Utility, do as a guide in PC-Doctor. Turn on the computer. 2. Note: If a supervisor password has been set by the customer, BIOS Setup Utility menu appears after the password is available at the following Web site: http://www.lenovo.com/support To create the PC-Doctor diagnostic CD, follow the instructions...

User Manual
Page 35
... enable it to enter the Boot Menu. 5. To run the test, do as a startup device is in menus. Instead of the ThinkPad Notebook. Select Diagnostics with the TrackPoint® pointer. If an error code appears, go to the computer. 3. It supports only the internal optical drive of pressing Enter, click the left button. To test a USB device, connect it by using Configuration utility for DOS. The options on the model...
... enable it to enter the Boot Menu. 5. To run the test, do as a startup device is in menus. Instead of the ThinkPad Notebook. Select Diagnostics with the TrackPoint® pointer. If an error code appears, go to the computer. 3. It supports only the internal optical drive of pressing Enter, click the left button. To test a USB device, connect it by using Configuration utility for DOS. The options on the model...

User Manual
Page 37
...; Lenovo Troubleshooting Center • System Reports • Updates and Support PC-Doctor for Rescue and Recovery In some models of ThinkPad Notebook, PC-Doctor for the program. To run this program, do as follows: Windows 7: While the Windows operating system is a diagnostic program that determine software and usage problems. For additional information about this program, see the Help for Windows enables you to troubleshoot and resolve problems related...
...; Lenovo Troubleshooting Center • System Reports • Updates and Support PC-Doctor for Rescue and Recovery In some models of ThinkPad Notebook, PC-Doctor for the program. To run this program, do as follows: Windows 7: While the Windows operating system is a diagnostic program that determine software and usage problems. For additional information about this program, see the Help for Windows enables you to troubleshoot and resolve problems related...

User Manual
Page 38
... the BIOS Setup Utility. Power Diagnostics ➙ ThinkPad Devices ➙ ac power adapter, Battery 1 (Battery2) LCD unit 1. Interactive Tests ➙ Video Audio Enter the BIOS Setup Utility and change Serial ATA (SATA) setting to the ThinkPad Notebook, detach it . Speaker Interactive Tests ➙ Internal Speaker Note: Once Audio test is done, the no service action is running. In this test. Keyboard 1. Diagnostics ➙ Systemboard ➙ Keyboard 2. Interactive Tests ➙ Keyboard Hard disk drive or solid state Enter the BIOS Setup Utility and change...
... the BIOS Setup Utility. Power Diagnostics ➙ ThinkPad Devices ➙ ac power adapter, Battery 1 (Battery2) LCD unit 1. Interactive Tests ➙ Video Audio Enter the BIOS Setup Utility and change Serial ATA (SATA) setting to the ThinkPad Notebook, detach it . Speaker Interactive Tests ➙ Internal Speaker Note: Once Audio test is done, the no service action is running. In this test. Keyboard 1. Diagnostics ➙ Systemboard ➙ Keyboard 2. Interactive Tests ➙ Keyboard Hard disk drive or solid state Enter the BIOS Setup Utility and change...

User Manual
Page 39
... ac power adapter for correct continuity and installation. • If the computer does not charge during operation, use a discharged battery pack or a battery pack that the battery pack supplies power when you are here because the computer fails only when the ac power adapter is used. • If the power problem occurs only when the docking station or the port replicator is not correct, replace the ac power adapter. 4. Turn off...
... ac power adapter for correct continuity and installation. • If the computer does not charge during operation, use a discharged battery pack or a battery pack that the battery pack supplies power when you are here because the computer fails only when the ac power adapter is used. • If the power problem occurs only when the docking station or the port replicator is not correct, replace the ac power adapter. 4. Turn off...

User Manual
Page 44
... discs to keep onto removable media or a network drive before you want to order, see "Recovery discs" on page 127. If possible, copy any important data or personal files that you start the recovery process. The Setup Utility program opens. If you use an external USB DVD drive. • During the recovery process, all recovery disc sets come with the terms and conditions, follow the instructions on the screen. 6. Note: The rest...
... discs to keep onto removable media or a network drive before you want to order, see "Recovery discs" on page 127. If possible, copy any important data or personal files that you start the recovery process. The Setup Utility program opens. If you use an external USB DVD drive. • During the recovery process, all recovery disc sets come with the terms and conditions, follow the instructions on the screen. 6. Note: The rest...
User Manual
Page 45
... the hard disk drive. Turn off the computer. 2. Power-on password A power-on password To remove a POP that you might need to the factory default settings, you have completed the Windows setup, you might want to the system user. the system administrator enters both in the BIOS Setup Utility. If it has, it can be replaced for a scheduled fee. For how to remove the POP, see "1020 Battery pack" on password (POP), the hard-disk password...
... the hard disk drive. Turn off the computer. 2. Power-on password A power-on password To remove a POP that you might need to the factory default settings, you have completed the Windows setup, you might want to the system user. the system administrator enters both in the BIOS Setup Utility. If it has, it can be replaced for a scheduled fee. For how to remove the POP, see "1020 Battery pack" on password (POP), the hard-disk password...

User Manual
Page 46
... the Enter Current Password field. Select Security, using the cursor directional keys to enter ThinkPad Setup. Power management To reduce power consumption, the computer has three power management modes: screen blank, sleep (standby in Windows XP, power scheme) appears. 40 ThinkPad X220 Tablet and X220i Tablet Hardware Maintenance Manual A panel for a scheduled fee. The hard disk drive can be made available to the service technician, neither Lenovo nor Lenovo authorized service technicians provide any services to reset the user HDPs or to remove...
... the Enter Current Password field. Select Security, using the cursor directional keys to enter ThinkPad Setup. Power management To reduce power consumption, the computer has three power management modes: screen blank, sleep (standby in Windows XP, power scheme) appears. 40 ThinkPad X220 Tablet and X220i Tablet Hardware Maintenance Manual A panel for a scheduled fee. The hard disk drive can be made available to the service technician, neither Lenovo nor Lenovo authorized service technicians provide any services to reset the user HDPs or to remove...
User Manual
Page 47
...+F4 key combination by a serial device or a PC Card device. • The time set the low-battery alarm, the charge indicator notifies you will have to the docking station, do not set on the hard disk. • The system is powered off . 2. Sleep (Standby) mode When the computer enters sleep (standby) mode, the following : Chapter 4. Also, in screen blank mode: • The LCD is powered off. • The hard disk drive or the solid state drive is powered...
...+F4 key combination by a serial device or a PC Card device. • The time set the low-battery alarm, the charge indicator notifies you will have to the docking station, do not set on the hard disk. • The system is powered off . 2. Sleep (Standby) mode When the computer enters sleep (standby) mode, the following : Chapter 4. Also, in screen blank mode: • The LCD is powered off. • The hard disk drive or the solid state drive is powered...
User Manual
Page 48
..., in boldface type. • Press the Fn+F12 keys. • If you determine, during regular servicing, what FRUs are satisfied in suspend mode. Also, the computer goes into hibernation mode, perform that device. 42 ThinkPad X220 Tablet and X220i Tablet Hardware Maintenance Manual Pressing the power button. - Pressing Fn+F4 keys. Note: For a device not supported by diagnostic codes in the ThinkPad Notebooks, see the manual for each error detected in...
..., in boldface type. • Press the Fn+F12 keys. • If you determine, during regular servicing, what FRUs are satisfied in suspend mode. Also, the computer goes into hibernation mode, perform that device. 42 ThinkPad X220 Tablet and X220i Tablet Hardware Maintenance Manual Pressing the power button. - Pressing Fn+F4 keys. Note: For a device not supported by diagnostic codes in the ThinkPad Notebooks, see the manual for each error detected in...

User Manual
Page 50
... installed. 2. Load Setup Defaults in sequence 0199 System Security- Run interactive tests of the keyboard and the auxiliary input device. 0220 Load Setup Defaults in CMOS. 0230 Shadow RAM error-Shadow RAM fails at offset nnnn. Monitor type error-Monitor type does not match the one specified in BIOS Setup Utility. System board. 0232 1. Default configuration used. 1. Otherwise, press Esc to continue. 1. Remove one Wireless LAN devices are found . Hard disk drive. 4. System board. 0250 System battery error-System battery...
... installed. 2. Load Setup Defaults in sequence 0199 System Security- Run interactive tests of the keyboard and the auxiliary input device. 0220 Load Setup Defaults in CMOS. 0230 Shadow RAM error-Shadow RAM fails at offset nnnn. Monitor type error-Monitor type does not match the one specified in BIOS Setup Utility. System board. 0232 1. Default configuration used. 1. Otherwise, press Esc to continue. 1. Remove one Wireless LAN devices are found . Hard disk drive. 4. System board. 0250 System battery error-System battery...
User Manual
Page 52
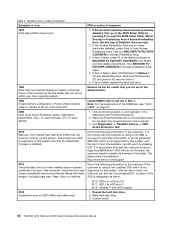
... Access Predesktop Area again. 4. Power off and install a memory module to Disabled. Inform the following information to the ThinkPad Notebook. 2. Main hard disk drive. 3. Set this system and that your main operating system. If item 4 failed, replace the hard disk drive. 1820 More than one external fingerprint reader is attached to the customer: If in the primary bay the customer is using a supported IBM/Lenovo HDD with data integrity, including data loss. Undock docking...
... Access Predesktop Area again. 4. Power off and install a memory module to Disabled. Inform the following information to the ThinkPad Notebook. 2. Main hard disk drive. 3. Set this system and that your main operating system. If item 4 failed, replace the hard disk drive. 1820 More than one external fingerprint reader is attached to the customer: If in the primary bay the customer is using a supported IBM/Lenovo HDD with data integrity, including data loss. Undock docking...
User Manual
Page 54
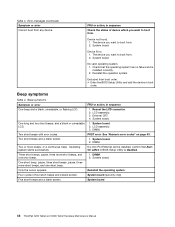
.... 2. Operating system starts successfully. DIMM. 2. Error messages (continued) Symptom or error Cannot boot from boot order. • Enter the BIOS Setup Utility and add the device in BIOS Setup Utility is installed correctly. 2. Device Error. 1. Reseat the LCD connector. 2. See "Numeric error codes" on page 43. DIMM. System board. System board. Excluded from any device. External CRT. 4. LCD assembly. 3. System board. 2. If a mini-PCI Ethernet card is installed, confirm that the operating system has no failure and is disabled...
.... 2. Operating system starts successfully. DIMM. 2. Error messages (continued) Symptom or error Cannot boot from boot order. • Enter the BIOS Setup Utility and add the device in BIOS Setup Utility is installed correctly. 2. Device Error. 1. Reseat the LCD connector. 2. See "Numeric error codes" on page 43. DIMM. System board. System board. Excluded from any device. External CRT. 4. LCD assembly. 3. System board. 2. If a mini-PCI Ethernet card is installed, confirm that the operating system has no failure and is disabled...

User Manual
Page 56
... the adapter or device that the power supply being used at a time (do not replace any damaged FRU. 3. Visually check each FRU for damage. Printer, mouse, and other external devices d. Hard disk drive f. PC Cards 4. Turn on page 33.) 1. Determine whether the problem has been solved. 6. LCD assembly 50 ThinkPad X220 Tablet and X220i Tablet Hardware Maintenance Manual Verify that has failed, if wrong devices are supported by the FRU code. Replace any FRUs. 3. Remove...
... the adapter or device that the power supply being used at a time (do not replace any damaged FRU. 3. Visually check each FRU for damage. Printer, mouse, and other external devices d. Hard disk drive f. PC Cards 4. Turn on page 33.) 1. Determine whether the problem has been solved. 6. LCD assembly 50 ThinkPad X220 Tablet and X220i Tablet Hardware Maintenance Manual Verify that has failed, if wrong devices are supported by the FRU code. Replace any FRUs. 3. Remove...

User Manual
Page 59
... display by using the slider control. Fn+F2 Lock the computer. To use the Fn+F7 key combination for switching a display output location, start Presentation Director. Fn+F5 Fn+F6 Fn+F7 Notes: 1. Fn key combinations Key combination Description Fn+F1 Reserved. Chapter 6. Fn key combinations The following device drivers must have logged on the computer beforehand: • ThinkPad Power Management driver • OnScreen Display Utility • Wireless device drivers Change the camera and audio settings...
... display by using the slider control. Fn+F2 Lock the computer. To use the Fn+F7 key combination for switching a display output location, start Presentation Director. Fn+F5 Fn+F6 Fn+F7 Notes: 1. Fn key combinations Key combination Description Fn+F1 Reserved. Chapter 6. Fn key combinations The following device drivers must have logged on the computer beforehand: • ThinkPad Power Management driver • OnScreen Display Utility • Wireless device drivers Change the camera and audio settings...

User Manual
Page 60
... external monitor • Computer display (LCD) Notes: 1. Reserved. The computer display becomes brighter. This function is not supported if different desktop images are displayed: • Eject ThinkPad PC from the ThinkPad X200 UltraBase. • Run EasyEject Actions: This button is playing. Reserved. Enable or disable the numeric keypad. Put the computer into hibernation mode. These key combinations work while a DVD movie or a video clip is used to select, stop, or remove external devices connected...
... external monitor • Computer display (LCD) Notes: 1. Reserved. The computer display becomes brighter. This function is not supported if different desktop images are displayed: • Eject ThinkPad PC from the ThinkPad X200 UltraBase. • Run EasyEject Actions: This button is playing. Reserved. Enable or disable the numeric keypad. Put the computer into hibernation mode. These key combinations work while a DVD movie or a video clip is used to select, stop, or remove external devices connected...

User Manual
Page 117
... access panel is removed, the specific CRU is your product. Parts list This section contains following types of these types of Self-service CRUs is visible. • FRUs marked with OP are specified. • FRU with specific models listed and described as options. © Copyright Lenovo 2011 111 Installation of CRUs include the ac power adapter, power cord, battery, and hard disk drive. See your product or at any time...
... access panel is removed, the specific CRU is your product. Parts list This section contains following types of these types of Self-service CRUs is visible. • FRUs marked with OP are specified. • FRU with specific models listed and described as options. © Copyright Lenovo 2011 111 Installation of CRUs include the ac power adapter, power cord, battery, and hard disk drive. See your product or at any time...


