Hardware Maintenance Manual
Page 3
... factory contents by using Recovery Disc Set 41 Passwords 42 Power-on password 42 Hard-disk password 42 Supervisor password 43 © Copyright Lenovo 2009, 2012 How to remove the power-on password . . . 43 How to remove the hard-disk password . . . 43 Power management 44 Screen blank mode 44 Sleep (standby) mode 44 Hibernation mode 45 Symptom-to enable embedded SATA RAID functionality 55 Creating RAID volumes 55 Deleting RAID volumes 56 Chapter 6. FRU replacement notices 65 Screw notices 65 Retaining serial numbers 66 Restoring the serial number...
... factory contents by using Recovery Disc Set 41 Passwords 42 Power-on password 42 Hard-disk password 42 Supervisor password 43 © Copyright Lenovo 2009, 2012 How to remove the power-on password . . . 43 How to remove the hard-disk password . . . 43 Power management 44 Screen blank mode 44 Sleep (standby) mode 44 Hibernation mode 45 Symptom-to enable embedded SATA RAID functionality 55 Creating RAID volumes 55 Deleting RAID volumes 56 Chapter 6. FRU replacement notices 65 Screw notices 65 Retaining serial numbers 66 Restoring the serial number...

Hardware Maintenance Manual
Page 8
... . • Always look carefully for safe operational condition. • Do not use the approved probe leads and accessories for these hazards are moist floors, nongrounded power extension cables, power surges, and missing safety grounds. • Do not touch live electrical currents.Many customers have handles covered with very high voltages; If you need to work on suitable rubber mats (obtained...
... . • Always look carefully for safe operational condition. • Do not use the approved probe leads and accessories for these hazards are moist floors, nongrounded power extension cables, power surges, and missing safety grounds. • Do not touch live electrical currents.Many customers have handles covered with very high voltages; If you need to work on suitable rubber mats (obtained...
Hardware Maintenance Manual
Page 31
... service technicians are available in this manual: • "Strategy for replacing a system board" on page 26 - After a system board is loaded to see if the symptoms change. Note the current configuration settings (using the View Configuration option); Important service information This chapter presents following important service information that changed the symptoms. Attention: The setup configuration on page 25 - To download software fixes, drivers, and BIOS, do as follows: 1. Before replacing the adapter or device, remove...
... service technicians are available in this manual: • "Strategy for replacing a system board" on page 26 - After a system board is loaded to see if the symptoms change. Note the current configuration settings (using the View Configuration option); Important service information This chapter presents following important service information that changed the symptoms. Attention: The setup configuration on page 25 - To download software fixes, drivers, and BIOS, do as follows: 1. Before replacing the adapter or device, remove...
Hardware Maintenance Manual
Page 35
... have nothing to the FRU parts list. • A FRU should service the computer. • Before replacing any ThinkPad model that a FRU is recommended to use new nylon-coated screws. • Be extremely careful during such write operations as cosmic radiation, electrostatic discharge, or software errors. If you go to the checkout guide, be overwritten. • Replace a FRU only with a hardware defect, such as copying...
... have nothing to the FRU parts list. • A FRU should service the computer. • Before replacing any ThinkPad model that a FRU is recommended to use new nylon-coated screws. • Be extremely careful during such write operations as cosmic radiation, electrostatic discharge, or software errors. If you go to the checkout guide, be overwritten. • Replace a FRU only with a hardware defect, such as copying...

Hardware Maintenance Manual
Page 37
... of internal optical disc drives (CD-RW, CD-RW/DVD Combo, and DVD Multi drives) on the screen. 8. On the BIOS Setup Utility screen, press F9, Enter, F10, and then Enter. Note: When you will need to enable it to enter the Boot Menu. 5. The USB limitation only applies to "Power system checkout" on page 45. 4. Turn on the computer. 2. If an error code appears, go to testing of pressing Enter, click the left button...
... of internal optical disc drives (CD-RW, CD-RW/DVD Combo, and DVD Multi drives) on the screen. 8. On the BIOS Setup Utility screen, press F9, Enter, F10, and then Enter. Note: When you will need to enable it to enter the Boot Menu. 5. The USB limitation only applies to "Power system checkout" on page 45. 4. Turn on the computer. 2. If an error code appears, go to testing of pressing Enter, click the left button...
Hardware Maintenance Manual
Page 38
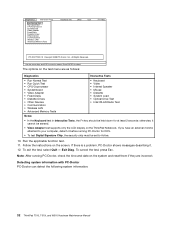
..., the security chip must be sensed. • Video Adapter test supports only the LCD display on the screen. Run the applicable function test. 11. Follow the instructions on the ThinkPad Notebook. Exit Diag. otherwise, it . 12. Diagnostics Interactive Tests Run Normal Test Run Quick Test CPU/Coprocessor Systemboard Video Adapter Fixed Disks Diskette Drives Other Devices Communication Wireless LAN Advanced Memory Tests Hardware Info Utility Quit F1=Help PC-DOCTOR 2.0 Copyright 2008 PC...
..., the security chip must be sensed. • Video Adapter test supports only the LCD display on the screen. Run the applicable function test. 11. Follow the instructions on the ThinkPad Notebook. Exit Diag. otherwise, it . 12. Diagnostics Interactive Tests Run Normal Test Run Quick Test CPU/Coprocessor Systemboard Video Adapter Fixed Disks Diskette Drives Other Devices Communication Wireless LAN Advanced Memory Tests Hardware Info Utility Quit F1=Help PC-DOCTOR 2.0 Copyright 2008 PC...

Hardware Maintenance Manual
Page 40
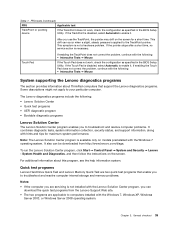
... ➙ ThinkPad Devices ➙ HDD Active Protection Test. FRU tests The following table shows the test for Rescue and Recovery In some models of ThinkPad Notebook, the Rescue and Recovery® workspace enables you to run this test again. Interactive Tests ➙ Video Audio Enter the BIOS Setup Utility and change Serial ATA (SATA) setting to Compatibility, drive and run Diagnostics ➙ Other Device ➙ Conexant Audio Speaker Interactive Tests ➙ Internal Speaker...
... ➙ ThinkPad Devices ➙ HDD Active Protection Test. FRU tests The following table shows the test for Rescue and Recovery In some models of ThinkPad Notebook, the Rescue and Recovery® workspace enables you to run this test again. Interactive Tests ➙ Video Audio Enter the BIOS Setup Utility and change Serial ATA (SATA) setting to Compatibility, drive and run Diagnostics ➙ Other Device ➙ Conexant Audio Speaker Interactive Tests ➙ Internal Speaker...
Hardware Maintenance Manual
Page 41
... ➙ Mouse If the Touch Pad does not work , check the configuration as specified in the BIOS Setup Utility. Chapter 3. If the pointer stops after a short time, no service action is disabled, select Automaticto enable it . Quick test programs Lenovo Hard Drive Quick Test and Lenovo Memory Quick Test are applicable to computers installed with hints and tips for a short time. To run the Lenovo Solution Center program, click Start ➙ Control Panel ➙...
... ➙ Mouse If the Touch Pad does not work , check the configuration as specified in the BIOS Setup Utility. Chapter 3. If the pointer stops after a short time, no service action is disabled, select Automaticto enable it . Quick test programs Lenovo Hard Drive Quick Test and Lenovo Memory Quick Test are applicable to computers installed with hints and tips for a short time. To run the Lenovo Solution Center program, click Start ➙ Control Panel ➙...

Hardware Maintenance Manual
Page 42
... a problem is not installed with the UEFI diagnostic program, you can download a bootable diagnostic program from the Lenovo Support Web site. It enables you to test memory and internal storage problems, view system information, and check and recover bad sectors on the screen to the Application Menu window. 4. Turn on the computer. Press the Tab key to switch to use the diagnostic program. Follow the instructions on internal storage devices...
... a problem is not installed with the UEFI diagnostic program, you can download a bootable diagnostic program from the Lenovo Support Web site. It enables you to test memory and internal storage problems, view system information, and check and recover bad sectors on the screen to the Application Menu window. 4. Turn on the computer. Press the Tab key to switch to use the diagnostic program. Follow the instructions on internal storage devices...
Hardware Maintenance Manual
Page 47
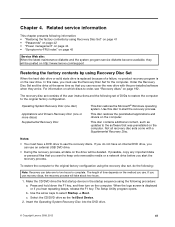
... pre-installed software when they will be posted on http://www.lenovo.com/support Restoring the factory contents by using Recovery Disc Set When the hard disk drive or solid state drive is replaced because of time depends on page 192. Make the CD/DVD drive the first startup device in the startup sequence using the recovery disc set, do not have a DVD drive to complete. The Setup Utility program opens. Related service information This chapter presents following : Note: Recovery can recover the new drive...
... pre-installed software when they will be posted on http://www.lenovo.com/support Restoring the factory contents by using Recovery Disc Set When the hard disk drive or solid state drive is replaced because of time depends on page 192. Make the CD/DVD drive the first startup device in the startup sequence using the recovery disc set, do not have a DVD drive to complete. The Setup Utility program opens. Related service information This chapter presents following : Note: Recovery can recover the new drive...

Hardware Maintenance Manual
Page 48
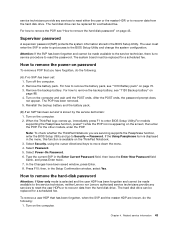
... no action is turned on the screen to the hard disk drive. Note: After restoring a drive to the factory default settings, you do not agree with the terms and conditions, select I accept these passwords has been set, a prompt for access to begin the applications and drivers recovery process. 8. Passwords As many as three passwords may be needed for several times and you have completed the Windows setup, you agree with...
... no action is turned on the screen to the hard disk drive. Note: After restoring a drive to the factory default settings, you do not agree with the terms and conditions, select I accept these passwords has been set, a prompt for access to begin the applications and drivers recovery process. 8. Passwords As many as three passwords may be needed for several times and you have completed the Windows setup, you agree with...
Hardware Maintenance Manual
Page 49
... to recover data from the hard disk drive. Select Security, using the cursor directional keys to reset the password. Supervisor password A supervisor password (SVP) protects the system information stored in the Setup Confirmation window, select Yes. The system board must enter the SVP in order to get access to remove the backup battery, see "1010 Battery pack" on page 43. Remove the battery pack. For how to the BIOS Setup Utility and change the system configuration. Turn on...
... to recover data from the hard disk drive. Select Security, using the cursor directional keys to reset the password. Supervisor password A supervisor password (SVP) protects the system information stored in the Setup Confirmation window, select Yes. The system board must enter the SVP in order to get access to remove the backup battery, see "1010 Battery pack" on page 43. Remove the battery pack. For how to the BIOS Setup Utility and change the system configuration. Turn on...

Hardware Maintenance Manual
Page 50
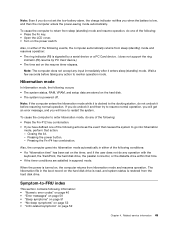
... three power management modes: screen blank, sleep (standby in the Enter Current Password field. To enter sleep (standby) mode, press Fn+F4. Type the current master HDP in Windows XP), and hibernation. Screen blank mode If the time set on the "Turn off . You can change the action of the hard disk drive. then enter the master HDP. When the ThinkPad logo comes up window opens. 6. Press F10. 9. Select Yes in addition to enter BIOS Setup Utility. Both user...
... three power management modes: screen blank, sleep (standby in the Enter Current Password field. To enter sleep (standby) mode, press Fn+F4. Type the current master HDP in Windows XP), and hibernation. Screen blank mode If the time set on the "Turn off . You can change the action of the hard disk drive. then enter the master HDP. When the ThinkPad logo comes up window opens. 6. Press F10. 9. Select Yes in addition to enter BIOS Setup Utility. Both user...
Hardware Maintenance Manual
Page 51
... docked to the docking station, do not set on the hard disk drive is read, and system status is powered off. When the power is low, and then the computer enters the power-saving mode automatically. The hibernation file in either of the following : • Press the Fn key. • Open the LCD cover. • Turn on the power switch. Also, the computer goes into hibernation...
... docked to the docking station, do not set on the hard disk drive is read, and system status is powered off. When the power is low, and then the computer enters the power-saving mode automatically. The hibernation file in either of the following : • Press the Fn key. • Open the LCD cover. • Turn on the power switch. Also, the computer goes into hibernation...

Hardware Maintenance Manual
Page 53
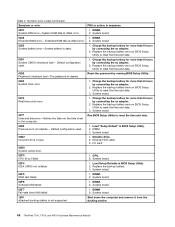
... Monitor type error-Monitor type does not match the one specified in BIOS Setup Utility. 3. System board. System board. 0197 Invalid remote change requested. or press Esc to continue. 1. Run BIOS Setup Utility, and then save the current setting by entering supervisor password, and select Password ➙ Security Chip ➙ Clear Security Chip to clear this error. 2. Enter BIOS Setup Utility by pressing F10. 2. Remove either a Mini-PCI Card or a modem daughter card. Table 2. Hard disk drive. 4. Remove the wireless LAN device that you installed...
... Monitor type error-Monitor type does not match the one specified in BIOS Setup Utility. 3. System board. System board. 0197 Invalid remote change requested. or press Esc to continue. 1. Run BIOS Setup Utility, and then save the current setting by entering supervisor password, and select Password ➙ Security Chip ➙ Clear Security Chip to clear this error. 2. Enter BIOS Setup Utility by pressing F10. 2. Remove either a Mini-PCI Card or a modem daughter card. Table 2. Hard disk drive. 4. Remove the wireless LAN device that you installed...
Hardware Maintenance Manual
Page 54
... BIOS Setup Utility to reset the time and date. 3. System board. 0270 Real-time clock error. 1. Default configuration used . 1. Load Setup Defaults in BIOS Setup Utility. 2. DIMM. 2. Extended RAM error- Replace the backup battery and run BIOS Setup Utility to reset the time and date. 0280 Previous boot incomplete- System board. 02B2 Incorrect drive A type. 1. System board. 02F6 Software NMI failed 1. DIMM. 3. System board. 02F4 EISA CMOS not writable. 1. Replace the backup battery and run BIOS Setup Utility to reset the time and date. 0252 Password...
... BIOS Setup Utility to reset the time and date. 3. System board. 0270 Real-time clock error. 1. Default configuration used . 1. Load Setup Defaults in BIOS Setup Utility. 2. DIMM. 2. Extended RAM error- Replace the backup battery and run BIOS Setup Utility to reset the time and date. 0280 Previous boot incomplete- System board. 02B2 Incorrect drive A type. 1. System board. 02F6 Software NMI failed 1. DIMM. 3. System board. 02F4 EISA CMOS not writable. 1. Replace the backup battery and run BIOS Setup Utility to reset the time and date. 0252 Password...
Hardware Maintenance Manual
Page 55
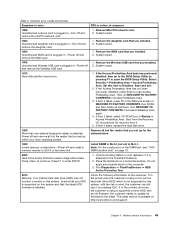
Install DIMM in Slot-0, but the reader that you set up within your HDD is supported on this item to open the BIOS Setup Utility. Press to the ThinkPad Notebook. 2. System board. 1803 Unauthorized daughter card is plugged in the primary drive bay the customer is using a non-Lenovo hard disk drive (HDD) which is attached to continue. Remove the WAN card that you set up for the authentication. 1830 Invalid memory configuration-Power off and install a memory module to the...
Install DIMM in Slot-0, but the reader that you set up within your HDD is supported on this item to open the BIOS Setup Utility. Press to the ThinkPad Notebook. 2. System board. 1803 Unauthorized daughter card is plugged in the primary drive bay the customer is using a non-Lenovo hard disk drive (HDD) which is attached to continue. Remove the WAN card that you set up for the authentication. 1830 Invalid memory configuration-Power off and install a memory module to the...

Hardware Maintenance Manual
Page 61
... devices and configuring RAID for the RAID-supported models in BIOS Setup Utility menu such as follows: © Copyright Lenovo 2009, 2012 55 Important notices for RAID, do as F9 key, you are supported on page 55 • "Configuring the system BIOS to save the settings. Configuring the system BIOS to create RAID volumes. Select SATA Controller Mode Option 5. When you use the Intel® Rapid Storage Technology option ROM Configuration Utility to enable embedded SATA RAID functionality...
... devices and configuring RAID for the RAID-supported models in BIOS Setup Utility menu such as follows: © Copyright Lenovo 2009, 2012 55 Important notices for RAID, do as F9 key, you are supported on page 55 • "Configuring the system BIOS to save the settings. Configuring the system BIOS to create RAID volumes. Select SATA Controller Mode Option 5. When you use the Intel® Rapid Storage Technology option ROM Configuration Utility to enable embedded SATA RAID functionality...

Hardware Maintenance Manual
Page 110
... W510 Hardware Maintenance Manual If the system supports PC-Doctor for DOS, after replacing the system board, run PC-Doctor for DOS to put a system board down, be sure to make sure that the HDD Active Protection System still functions. The procedure is recovered as default. Attention: Do not apply physical shock to make sure that the HDD Active Protection System™ still functions. • "1050 Hard disk drive slot cover, hard disk drive and HDD...
... W510 Hardware Maintenance Manual If the system supports PC-Doctor for DOS, after replacing the system board, run PC-Doctor for DOS to put a system board down, be sure to make sure that the HDD Active Protection System still functions. The procedure is recovered as default. Attention: Do not apply physical shock to make sure that the HDD Active Protection System™ still functions. • "1050 Hard disk drive slot cover, hard disk drive and HDD...
Hardware Maintenance Manual
Page 125
...; A CRU (customer replaceable unit) is an example of CRUs: - Parts list This chapter contains following types of a unique configuration) should be required to you can be used for all models ending in the CRU ID column. External CRU statement to the warranty service for full details. You may include the memory module, wireless card, keyboard, and palm rest with finger print reader and touchpad. - See your...
...; A CRU (customer replaceable unit) is an example of CRUs: - Parts list This chapter contains following types of a unique configuration) should be required to you can be used for all models ending in the CRU ID column. External CRU statement to the warranty service for full details. You may include the memory module, wireless card, keyboard, and palm rest with finger print reader and touchpad. - See your...


