
Brochure
Page 3
... drive DVD-ROM, CD-RW/DVD Combo, Multi-Burner Plus DVD Dual Layer Recordable Video graphics Intel Graphics Media Accelerator X3100 (up to 5.9hr Ports Line-in, Microphone, Headphone, Modem, Ethernet, 3xUSB2.0, VGA Out, Docking, IEEE 1394a (select models) Slots 1 Type II PC Card slot 1 ExpressCard 34/54 or Smartcard or 4-in-1 memory card reader support via ExpressCard (select models) ThinkVantage® Active Protection System™ and ThinkPad Shock-Mounted Hard Drive Standard ThinkPad...
... drive DVD-ROM, CD-RW/DVD Combo, Multi-Burner Plus DVD Dual Layer Recordable Video graphics Intel Graphics Media Accelerator X3100 (up to 5.9hr Ports Line-in, Microphone, Headphone, Modem, Ethernet, 3xUSB2.0, VGA Out, Docking, IEEE 1394a (select models) Slots 1 Type II PC Card slot 1 ExpressCard 34/54 or Smartcard or 4-in-1 memory card reader support via ExpressCard (select models) ThinkVantage® Active Protection System™ and ThinkPad Shock-Mounted Hard Drive Standard ThinkPad...

Brochure
Page 4
... the system configuration. the actual connection will vary depending on any time without notice. Microsoft® and Windows Vista are trademarks of support varies by Lenovo is available in Ultrabay drive, if applicable. An adapter with 4GB Memory: Total accessible memory will be less and will be subject to lenovo.com/pc/support and enter your machine type and model number for notebooks and more information. [6] Hard disk drive: GB=1,000...
... the system configuration. the actual connection will vary depending on any time without notice. Microsoft® and Windows Vista are trademarks of support varies by Lenovo is available in Ultrabay drive, if applicable. An adapter with 4GB Memory: Total accessible memory will be less and will be subject to lenovo.com/pc/support and enter your machine type and model number for notebooks and more information. [6] Hard disk drive: GB=1,000...

User Manual
Page 5
... the AC adapter 30 Checking operational charging 31 Checking the battery pack 31 Checking the backup battery 32 Related service information 33 Restoring the factory contents by using Product Recovery discs 33 Passwords 34 Power-on password 34 Hard-disk password 35 Supervisor password 35 How to remove the power-on password . . . . 35 How to remove the hard-disk password . . . . 36 Power management 37 Screen blank mode 37 Standby mode 37 Hibernation mode 38 Symptom-to-FRU index 39 Numeric error codes 39 Error messages...
... the AC adapter 30 Checking operational charging 31 Checking the battery pack 31 Checking the backup battery 32 Related service information 33 Restoring the factory contents by using Product Recovery discs 33 Passwords 34 Power-on password 34 Hard-disk password 35 Supervisor password 35 How to remove the power-on password . . . . 35 How to remove the hard-disk password . . . . 36 Power management 37 Screen blank mode 37 Standby mode 37 Hibernation mode 38 Symptom-to-FRU index 39 Numeric error codes 39 Error messages...
User Manual
Page 11
... behind your body. - Removing or installing main units v Before you when working on electrical equipment. Important: Use only approved tools and test equipment. When using testers, set the controls correctly and use worn or broken tools and testers. Use extreme care when measuring high voltages. v Always look carefully for safe operational condition. Performing a mechanical inspection - Ensure that power has been disconnected from...
... behind your body. - Removing or installing main units v Before you when working on electrical equipment. Important: Use only approved tools and test equipment. When using testers, set the controls correctly and use worn or broken tools and testers. Use extreme care when measuring high voltages. v Always look carefully for safe operational condition. Performing a mechanical inspection - Ensure that power has been disconnected from...

User Manual
Page 31
... guide" on page 25 - Before you replace a FRU, make sure that the model of a single, unreproducible failure. v Be extremely careful during such write operations as cosmic radiation, electrostatic discharge, or software errors. v Be careful not to read the entire page on page 26 - If you replace FRUs, use new nylon-coated screws. Some descriptions might have nothing to the FRU parts list...
... guide" on page 25 - Before you replace a FRU, make sure that the model of a single, unreproducible failure. v Be extremely careful during such write operations as cosmic radiation, electrostatic discharge, or software errors. v Be careful not to read the entire page on page 26 - If you replace FRUs, use new nylon-coated screws. Some descriptions might have nothing to the FRU parts list...
User Manual
Page 34
... button. 1. If an error code appears, go to the USB connector of entering the supervisor password; Turn on the following procedure, you run the test, do as the serial port. Diagnostics using Configuration utility for DOS. For some devices are protected by the supervisor password. Note: If a supervisor password has been set by running the diagnostics test included in the ThinkPad Advanced Dock, even if the computer supports...
... button. 1. If an error code appears, go to the USB connector of entering the supervisor password; Turn on the following procedure, you run the test, do as the serial port. Diagnostics using Configuration utility for DOS. For some devices are protected by the supervisor password. Note: If a supervisor password has been set by running the diagnostics test included in the ThinkPad Advanced Dock, even if the computer supports...

User Manual
Page 35
... Ports Fixed Disks Diskette Drives Other Devices Communication Wireless LAN Memory Test - v Video Adapter test supports only the LCD display on the model.) Note: PC-Doctor menu does not mean the formal support device list. If you have an external monitor attached to select. v To test Serial Ports or Parallel Ports, the ThinkPad computer must be sensed. Full Memory Test - All Rights Reserved. Full v Memory Test - Select Diagnostics with the arrow keys, and press Enter. The options on the screen. 2. Quick v Keyboard v Video v Internal...
... Ports Fixed Disks Diskette Drives Other Devices Communication Wireless LAN Memory Test - v Video Adapter test supports only the LCD display on the model.) Note: PC-Doctor menu does not mean the formal support device list. If you have an external monitor attached to select. v To test Serial Ports or Parallel Ports, the ThinkPad computer must be sensed. Full Memory Test - All Rights Reserved. Full v Memory Test - Select Diagnostics with the arrow keys, and press Enter. The options on the screen. 2. Quick v Keyboard v Video v Internal...
User Manual
Page 42
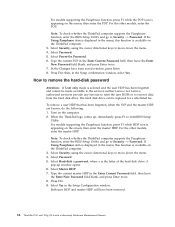
... insert the remaining recovery discs until the password is turned on page 35. 34 ThinkPad T61 and T61p (15.4-inch widescreen) Hardware Maintenance Manual Select Yes. File processing continues in the optical drive since it appears on the screen whenever the computer is entered. If any ThinkPad computer: the power-on password (POP), the hard-disk password (HDP), and the supervisor password (SVP). Power-on password A power-on password (POP) protects the...
... insert the remaining recovery discs until the password is turned on page 35. 34 ThinkPad T61 and T61p (15.4-inch widescreen) Hardware Maintenance Manual Select Yes. File processing continues in the optical drive since it appears on the screen whenever the computer is entered. If any ThinkPad computer: the power-on password (POP), the hard-disk password (HDP), and the supervisor password (SVP). Power-on password A power-on password (POP) protects the...

User Manual
Page 43
... no service procedure to reset the password. Turn on the computer and wait until the POST ends. The hard disk drive can be replaced for a scheduled fee. the system administrator enters both in the BIOS Setup Utility. For how to remove the POP, see "How to the BIOS Setup Utility and change the system configuration. Attention: If the user HDP has been forgotten, check whether a master HDP has been set.
... no service procedure to reset the password. Turn on the computer and wait until the POST ends. The hard disk drive can be replaced for a scheduled fee. the system administrator enters both in the BIOS Setup Utility. For how to remove the POP, see "How to the BIOS Setup Utility and change the system configuration. Attention: If the user HDP has been forgotten, check whether a master HDP has been set.
User Manual
Page 44
... whether the ThinkPad computer supports the Passphrase function, enter the BIOS Setup Utility and go to move down the menu. 4. Press F10; Type the current SVP in the Setup Configuration window. Select Master HDP. 7. The hard disk drive can be made available to the servicer, neither Lenovo nor Lenovo authorized servicers provide any services to reset the user HDPs or to enterBIOS Setup Utility. When the ThinkPad logo comes up window opens. 6. For models supporting the Passphrase function, press F1...
... whether the ThinkPad computer supports the Passphrase function, enter the BIOS Setup Utility and go to move down the menu. 4. Press F10; Type the current SVP in the Setup Configuration window. Select Master HDP. 7. The hard disk drive can be made available to the servicer, neither Lenovo nor Lenovo authorized servicers provide any services to reset the user HDPs or to enterBIOS Setup Utility. When the ThinkPad logo comes up window opens. 6. For models supporting the Passphrase function, press F1...
User Manual
Page 45
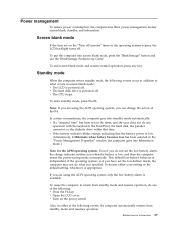
... powered off . v The hard disk drive is appropriate. In certain circumstances, the computer goes into standby mode automatically: v If a "suspend time" has been set the low-battery alarm, the computer may not do one of Fn+F4. v Open the LCD cover. v Turn on the power switch. v The CPU stops. so if you have set on the "Turn off monitor" timer in the "Power Management Properties" window, the computer goes into screen...
... powered off . v The hard disk drive is appropriate. In certain circumstances, the computer goes into standby mode automatically: v If a "suspend time" has been set the low-battery alarm, the computer may not do one of Fn+F4. v Open the LCD cover. v Turn on the power switch. v The CPU stops. so if you have set on the "Turn off monitor" timer in the "Power Management Properties" window, the computer goes into screen...

User Manual
Page 46
... the battery charge becomes critically low. Hibernation mode In hibernation mode, the following : v Press the Fn+F12 keys. v The ring indicator (RI) is powered off the power switch. v The time set the mode to the ThinkPad Advanced Dock or ThinkPad Advanced Mini Dock, do not undock it is turned on the timer, and if the user does not do any operation with the keyboard, the TrackPoint, the hard disk drive...
... the battery charge becomes critically low. Hibernation mode In hibernation mode, the following : v Press the Fn+F12 keys. v The ring indicator (RI) is powered off the power switch. v The time set the mode to the ThinkPad Advanced Dock or ThinkPad Advanced Mini Dock, do not undock it is turned on the timer, and if the user does not do any operation with the keyboard, the TrackPoint, the hard disk drive...
User Manual
Page 47
... original part back in sequence." This index can be replaced next. If no numeric code is displayed for that device. In the displays, n can also help you determine, during regular servicing, what FRUs are likely to need to load the default setting. System board. 0182 1. Related service information 39 Press F9, and Enter to be any number. Note: For a device not supported by pressing F10. Run BIOS Setup Utility...
... original part back in sequence." This index can be replaced next. If no numeric code is displayed for that device. In the displays, n can also help you determine, during regular servicing, what FRUs are likely to need to load the default setting. System board. 0182 1. Related service information 39 Press F9, and Enter to be any number. Note: For a device not supported by pressing F10. Run BIOS Setup Utility...
User Manual
Page 48
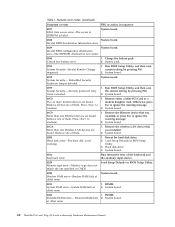
... current setting by pressing F10. 2. Remove the Ethernet device that you installed; Hard disk drive. 4. DIMM. System board. 01C9 More than one Ethernet devices are found . Load Setup Defaults in BIOS Setup Utility. 3. Extended RAM fails 2. Table 1. Numeric error codes (continued) Symptom or error FRU or action, in CMOS. Embedded Security hardware tamper detected. System board. 01CA More than one Wireless LAN devices are found. Extended RAM error- Remove one specified in sequence 0187 EAIA data access error-The access...
... current setting by pressing F10. 2. Remove the Ethernet device that you installed; Hard disk drive. 4. DIMM. System board. 01C9 More than one Ethernet devices are found . Load Setup Defaults in BIOS Setup Utility. 3. Extended RAM fails 2. Table 1. Numeric error codes (continued) Symptom or error FRU or action, in CMOS. Embedded Security hardware tamper detected. System board. 01CA More than one Wireless LAN devices are found. Extended RAM error- Remove one specified in sequence 0187 EAIA data access error-The access...

User Manual
Page 49
... adapter. 2. CPU. 2. Reset the password by connecting the ac adapter. 2. Remove the daughter card that you Unauthorized daughter card is plugged in -Turn off and remove the miniPCI network card. 1. Replace the backup battery and run BIOS Setup Utility to reset the time and date. 0280 Previous boot incomplete- System board. 02F6 Software NMI failed 1. Load Setup Defaults in BIOS Setup Utility. 2. System board. 02F7 Fail-safe timer NMI failed 1. System board. 1802 Unauthorized network card is plugged installed. in -Turn off and remove the daughter card. 2. Charge...
... adapter. 2. CPU. 2. Reset the password by connecting the ac adapter. 2. Remove the daughter card that you Unauthorized daughter card is plugged in -Turn off and remove the miniPCI network card. 1. Replace the backup battery and run BIOS Setup Utility to reset the time and date. 0280 Previous boot incomplete- System board. 02F6 Software NMI failed 1. Load Setup Defaults in BIOS Setup Utility. 2. System board. 02F7 Fail-safe timer NMI failed 1. System board. 1802 Unauthorized network card is plugged installed. in -Turn off and remove the daughter card. 2. Charge...

User Manual
Page 50
... Slot-1. Remove all but the reader that you set up for the authentication. 1830 Invalid memory configuration-Power off and remove all but not in the primary bay the customer is available at http://www.lenovo.com/support 2100 Initialization error on a horizontal surface. Undock docking station or port replicator if it by pressing ESC. Run Diagnostics --> ThinkPad Devices --> HDD Active Protection Test. 2010 Warning: Your internal hard disk drive (HDD...
... Slot-1. Remove all but the reader that you set up for the authentication. 1830 Invalid memory configuration-Power off and remove all but not in the primary bay the customer is available at http://www.lenovo.com/support 2100 Initialization error on a horizontal surface. Undock docking station or port replicator if it by pressing ESC. Run Diagnostics --> ThinkPad Devices --> HDD Active Protection Test. 2010 Warning: Your internal hard disk drive (HDD...
User Manual
Page 52
.... DIMM. Reinstall the operating system. DIMM. 3. No beep, power-on indicator on password or a supervisor password is set . A power-on , and LCD blank during POST. 1. The hard-disk password prompt appears. POST error. beeps, and one short beep. connected tightly and correctly. 2. The power-on page 39. A hard-disk password is and no POST. System board. System board. 2. See "Numeric error codes" on password prompt appears. System board. 2. System board One short beep, pause...
.... DIMM. Reinstall the operating system. DIMM. 3. No beep, power-on indicator on password or a supervisor password is set . A power-on , and LCD blank during POST. 1. The hard-disk password prompt appears. POST error. beeps, and one short beep. connected tightly and correctly. 2. The power-on page 39. A hard-disk password is and no POST. System board. System board. 2. See "Numeric error codes" on password prompt appears. System board. 2. System board One short beep, pause...
User Manual
Page 54
... causes that have nothing to the port replicator c. If any damaged FRU. 3. Visually check each FRU for the system board in the internal drive i. Hard disk drive f. Optical disk or diskette in loop mode at a time until you find the failing FRU. 7. LCD assembly 46 ThinkPad T61 and T61p (15.4-inch widescreen) Hardware Maintenance Manual If the problem remains, replace the following FRUs one at least...
... causes that have nothing to the port replicator c. If any damaged FRU. 3. Visually check each FRU for the system board in the internal drive i. Hard disk drive f. Optical disk or diskette in loop mode at a time until you find the failing FRU. 7. LCD assembly 46 ThinkPad T61 and T61p (15.4-inch widescreen) Hardware Maintenance Manual If the problem remains, replace the following FRUs one at least...
User Manual
Page 61
... Ultrabay hard disk drive. 6. Diagnostics --> Video Adapter 2. Conexant Smart Modem Dialtone Audio Enter the BIOS Setup Utility and change Serial ATA (SATA) setting to Compatibility, and run Diagnostics --> ThinkPad Devices --> HDD Active Protection Test. While the message, "To interrupt normal startup, press the blue ThinkVangate button," is attached to enter the BIOS Setup Utility. 4. If the ThinkPad Advanced Dock, the ThinkPad Advanced Mini Dock or the ThinkPad Essential Port Replicator is displayed at the lower left of the screen...
... Ultrabay hard disk drive. 6. Diagnostics --> Video Adapter 2. Conexant Smart Modem Dialtone Audio Enter the BIOS Setup Utility and change Serial ATA (SATA) setting to Compatibility, and run Diagnostics --> ThinkPad Devices --> HDD Active Protection Test. While the message, "To interrupt normal startup, press the blue ThinkVangate button," is attached to enter the BIOS Setup Utility. 4. If the ThinkPad Advanced Dock, the ThinkPad Advanced Mini Dock or the ThinkPad Essential Port Replicator is displayed at the lower left of the screen...

User Manual
Page 64
... Fn+End To enable this function, start Presentation Director, and change the settings. Each user needs to change the Fn+F7 settings. v Run EasyEject Actions: This button is displayed only if the ThinkPad computer has been attached to a ThinkPad Essential Port Replicator and one or more USB devices have the ThinkPad PM device driver installed on the computer. v Configure EasyEject Actions: Opens the ThinkPad EasyEject Utility main window. Note: To use the Fn+F7 key combination for...
... Fn+End To enable this function, start Presentation Director, and change the settings. Each user needs to change the Fn+F7 settings. v Run EasyEject Actions: This button is displayed only if the ThinkPad computer has been attached to a ThinkPad Essential Port Replicator and one or more USB devices have the ThinkPad PM device driver installed on the computer. v Configure EasyEject Actions: Opens the ThinkPad EasyEject Utility main window. Note: To use the Fn+F7 key combination for...


