

User Manual
Page 5
...Undetermined problems 52 FRU replacement notices 53 Screw notices 53 Retaining serial numbers 53 Removing and replacing a FRU 56 1010 Battery pack 57 1020 Ultrabay Slim device 58 1030 Hard disk drive cover, hard disk drive, and hard disk drive ...68 1080 PCI Express Mini Card for wireless LAN . . 70 1090 PCI Express Mini Card for wireless WAN 72 1100 Backup battery 74 1110 SIM card slot 75 1120 Keyboard bezel 76 1130 Fan assembly 78 1140 CPU 81 1150 LCD assembly 82 1160 Base... 153 Optional FRUs 153 Common parts list 154 Notices 156 Trademarks 157 © Copyright Lenovo 2007 iii
...Undetermined problems 52 FRU replacement notices 53 Screw notices 53 Retaining serial numbers 53 Removing and replacing a FRU 56 1010 Battery pack 57 1020 Ultrabay Slim device 58 1030 Hard disk drive cover, hard disk drive, and hard disk drive ...68 1080 PCI Express Mini Card for wireless LAN . . 70 1090 PCI Express Mini Card for wireless WAN 72 1100 Backup battery 74 1110 SIM card slot 75 1120 Keyboard bezel 76 1130 Fan assembly 78 1140 CPU 81 1150 LCD assembly 82 1160 Base... 153 Optional FRUs 153 Common parts list 154 Notices 156 Trademarks 157 © Copyright Lenovo 2007 iii
User Manual
Page 21
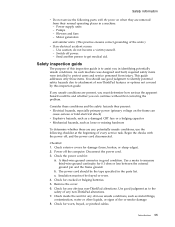
... face or a bulging capacitor v Mechanical hazards, such as loose or missing hardware To determine whether there are removed from injury. Check for cracked or bulging batteries. 5. Use good judgment as metal filings, contamination, water or other liquids, or signs of the units.) v If an electrical accident occurs: - Check for any obvious...
... face or a bulging capacitor v Mechanical hazards, such as loose or missing hardware To determine whether there are removed from injury. Check for cracked or bulging batteries. 5. Use good judgment as metal filings, contamination, water or other liquids, or signs of the units.) v If an electrical accident occurs: - Check for any obvious...
User Manual
Page 22
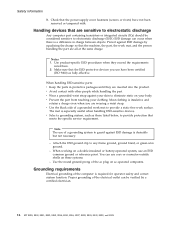
... certified (ISO 9000) as those listed below, to any frame ground, ground braid, or green-wire ground. - Safety information 9. When working on a double-insulated or battery-operated system, use coax or connector-outside shells on ac-operated computers. Check that are wearing a wrist strap. Notes 1.
... certified (ISO 9000) as those listed below, to any frame ground, ground braid, or green-wire ground. - Safety information 9. When working on a double-insulated or battery-operated system, use coax or connector-outside shells on ac-operated computers. Check that are wearing a wrist strap. Notes 1.

User Manual
Page 29
... saved window, press Enter. 9. Click Access BIOS. Remove the backup battery. The POP has been removed. 5. For models supporting the Passphrase function, press F1 while the POP icon is available, neither Lenovo nor Lenovo authorized servicers provide any services to reset either the user or the master...used for a scheduled fee. Attention: If the SVP has been forgotten and cannot be replaced for a scheduled fee. Reinstall the backup battery and the battery pack. (B) If an SVP has been set . Note: To check whether the ThinkPad computer supports the Passphrase function, enter the BIOS ...
... saved window, press Enter. 9. Click Access BIOS. Remove the backup battery. The POP has been removed. 5. For models supporting the Passphrase function, press F1 while the POP icon is available, neither Lenovo nor Lenovo authorized servicers provide any services to reset either the user or the master...used for a scheduled fee. Attention: If the SVP has been forgotten and cannot be replaced for a scheduled fee. Reinstall the backup battery and the battery pack. (B) If an SVP has been set . Note: To check whether the ThinkPad computer supports the Passphrase function, enter the BIOS ...

User Manual
Page 31
...Also, in the "Power Management Properties" window, the computer goes into standby mode automatically: v If a "suspend time" has been set the low-battery alarm, the computer may not do not set on the power switch. Hibernation mode In hibernation mode, the following : v Press the Fn key. This... operating system; In certain circumstances, the computer goes into hibernation mode.) Note for the APM operating system: Even if you when the battery is docked to reenter operation mode. General descriptions 25 Related service information To enter standby mode, press Fn+F4. Note: If you ...
...Also, in the "Power Management Properties" window, the computer goes into standby mode automatically: v If a "suspend time" has been set the low-battery alarm, the computer may not do not set on the power switch. Hibernation mode In hibernation mode, the following : v Press the Fn key. This... operating system; In certain circumstances, the computer goes into hibernation mode.) Note for the APM operating system: Even if you when the battery is docked to reenter operation mode. General descriptions 25 Related service information To enter standby mode, press Fn+F4. Note: If you ...

User Manual
Page 32
... The hibernation file in suspend mode. Related service information v If you are using the APM operating system and have set the mode to Hibernate when battery becomes low, and the battery charge becomes critically low. Also, the computer goes into hibernation mode, perform that time. Closing the lid. - Pressing Fn+F4 keys.
... The hibernation file in suspend mode. Related service information v If you are using the APM operating system and have set the mode to Hibernate when battery becomes low, and the battery charge becomes critically low. Also, the computer goes into hibernation mode, perform that time. Closing the lid. - Pressing Fn+F4 keys.

User Manual
Page 36
... your computer. Turn off the computer. 6. Check that the battery pack supplies power when you troubleshoot and resolve problems related to display symptoms and solutions: v CHECK SYSTEM HEALTH v SYSTEM AND DEVICE TESTS v LENOVO TROUBLESHOOTING v CENTER v SYSTEM REPORTS v UPDATES AND SUPPORT Power ...system checkout To verify a symptom, do the following : 1. Disconnect the ac adapter and install the charged battery pack. 7. v If the power-on indicator does not...
... your computer. Turn off the computer. 6. Check that the battery pack supplies power when you troubleshoot and resolve problems related to display symptoms and solutions: v CHECK SYSTEM HEALTH v SYSTEM AND DEVICE TESTS v LENOVO TROUBLESHOOTING v CENTER v SYSTEM REPORTS v UPDATES AND SUPPORT Power ...system checkout To verify a symptom, do the following : 1. Disconnect the ac adapter and install the charged battery pack. 7. v If the power-on indicator does not...

User Manual
Page 37
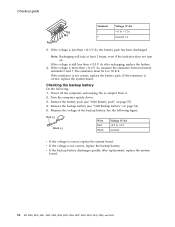
... in the computer. After it cools down, reinstall and recharge it is still not charged, go to "Product overview" on , remove the battery pack and let it may different from the computer and leave it at room temperature for a moment (but do not click), and the percentage... of battery power remaining is displayed. Note: Noise from having a shortened life. Checkout guide 3 2 1 (20V) Pin Voltage (V dc) 1 +20 2 0 3 Ground Note: Output voltage ...
... in the computer. After it cools down, reinstall and recharge it is still not charged, go to "Product overview" on , remove the battery pack and let it may different from the computer and leave it at room temperature for a moment (but do not click), and the percentage... of battery power remaining is displayed. Note: Noise from having a shortened life. Checkout guide 3 2 1 (20V) Pin Voltage (V dc) 1 +20 2 0 3 Ground Note: Output voltage ...
User Manual
Page 38
..., 8895, 8896, 8897, 8898, 8899, 8900, 8938, and 8939 Remove the backup battery (see "1010 Battery pack" on page 57). 4. If the voltage is more than +11.0 V dc, the battery pack has been discharged. If the voltage is less than +11.0 V dc, measure the... resistance between battery terminals 5 and 7. Remove the battery pack (see "1100 Backup battery" on . Checkout guide 7(-) 1(+) 2(+) 3 4 5 6(-) Terminal 1 7 Voltage (V dc) + 0 to 30 K . Checking the backup battery Do the following figure. Power off the computer, and unplug the ac...
..., 8895, 8896, 8897, 8898, 8899, 8900, 8938, and 8939 Remove the backup battery (see "1010 Battery pack" on page 57). 4. If the voltage is more than +11.0 V dc, the battery pack has been discharged. If the voltage is less than +11.0 V dc, measure the... resistance between battery terminals 5 and 7. Remove the battery pack (see "1100 Backup battery" on . Checkout guide 7(-) 1(+) 2(+) 3 4 5 6(-) Terminal 1 7 Voltage (V dc) + 0 to 30 K . Checking the backup battery Do the following figure. Power off the computer, and unplug the ac...

User Manual
Page 39
... 150 Miscellaneous parts 151 AC adapters 153 Optional FRUs 153 Common parts list 154 Tools 154 Power cords 155 Notices 156 Trademarks 157 © Copyright Lenovo 2007 33 ThinkPad T61 and T61p (14.1-inch) Product overview 34 Specifications 34 Status indicators 37 FRU tests 40 Fn key combinations 42 Symptom-to...number of the system unit 54 Retaining the UUID 54 Reading or writing the ECA information . . 54 Removing and replacing a FRU 56 1010 Battery pack 57 1020 Ultrabay Slim device 58 1030 Hard disk drive cover, hard disk drive, and hard disk drive rubber rails 59 1040 Palm ...
... 150 Miscellaneous parts 151 AC adapters 153 Optional FRUs 153 Common parts list 154 Tools 154 Power cords 155 Notices 156 Trademarks 157 © Copyright Lenovo 2007 33 ThinkPad T61 and T61p (14.1-inch) Product overview 34 Specifications 34 Status indicators 37 FRU tests 40 Fn key combinations 42 Symptom-to...number of the system unit 54 Retaining the UUID 54 Reading or writing the ECA information . . 54 Removing and replacing a FRU 56 1010 Battery pack 57 1020 Ultrabay Slim device 58 1030 Hard disk drive cover, hard disk drive, and hard disk drive rubber rails 59 1040 Palm ...
User Manual
Page 42
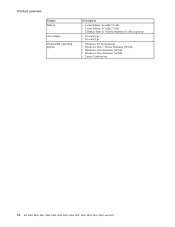
Product overview Feature Battery AC adapter Preinstalled operating system Description v Li-ion battery (6 cells) 5.2 Ah v Li-ion battery (9 cells) 7.8 Ah v Ultrabay Slim Li Polymer battery (3 cells) (option) v 65-watt type v 90-watt type v Windows XP Professional v Windows Vista™ Home Premium (32 bit) v Windows Vista Business (32 bit) v Windows Vista Business (64 bit) v Linux Certification 36 MT 8889, 8890, 8891, 8892, 8893, 8894, 8895, 8896, 8897, 8898, 8899, 8900, 8938, and 8939
Product overview Feature Battery AC adapter Preinstalled operating system Description v Li-ion battery (6 cells) 5.2 Ah v Li-ion battery (9 cells) 7.8 Ah v Ultrabay Slim Li Polymer battery (3 cells) (option) v 65-watt type v 90-watt type v Windows XP Professional v Windows Vista™ Home Premium (32 bit) v Windows Vista Business (32 bit) v Windows Vista Business (64 bit) v Linux Certification 36 MT 8889, 8890, 8891, 8892, 8893, 8894, 8895, 8896, 8897, 8898, 8899, 8900, 8938, and 8939
User Manual
Page 44
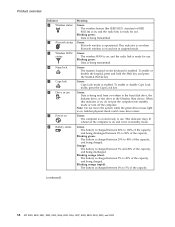
...or disable the keypad, press and hold the Shift key, and press the NumLk (ScrLk) key. When this indicator is operational. Blinking orange (rapid): The battery is charged between 0% to 80% of the capacity. Product overview Indicator 1 Wireless status 2 Bluetooth status R 3 Wireless WAN status 4 Num lock 5 .... This indicator stays lit whenever the computer is on the keyboard is not in the Ultrabay Slim device. Blinking orange (slow): The battery is being transmitted. Blinking green: Data is charged between 20% to the hard disk drive, the diskette drive, or the drive in...
...or disable the keypad, press and hold the Shift key, and press the NumLk (ScrLk) key. When this indicator is operational. Blinking orange (rapid): The battery is charged between 0% to 80% of the capacity. Product overview Indicator 1 Wireless status 2 Bluetooth status R 3 Wireless WAN status 4 Num lock 5 .... This indicator stays lit whenever the computer is on the keyboard is not in the Ultrabay Slim device. Blinking orange (slow): The battery is being transmitted. Blinking green: Data is charged between 20% to the hard disk drive, the diskette drive, or the drive in...
User Manual
Page 46
Power Diagnostics --> ThinkPad Devices --> AC Adapter, Battery 1 (Battery 2) LCD unit 1. Diagnostics --> Video Adapter 2. Make sure the modem is displayed at the lower left of the screen, press F1 to start the diagnostic program. (...
Power Diagnostics --> ThinkPad Devices --> AC Adapter, Battery 1 (Battery 2) LCD unit 1. Diagnostics --> Video Adapter 2. Make sure the modem is displayed at the lower left of the screen, press F1 to start the diagnostic program. (...

User Manual
Page 52
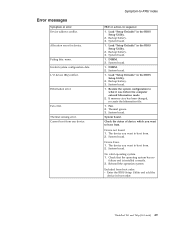
...by pressing F10. 2. Reseat the hard disk drive. 2. System board. 0232 1. System board. Default configuration used. 1. Charge the backup battery for more than one Ethernet devices are found. Press to -FRU index Symptom or error FRU or action, in BIOS Setup Utility. 0230 ... Symptom-to continue. 1. Remove either a Mini-PCI Card or a modem daughter card. Run interactive tests of them. Replace the backup battery and run BIOS Setup Utility to ignore the warning message. 2. Embedded Security hardware tamper detected. System board. 01C9 More than 8 hours by...
...by pressing F10. 2. Reseat the hard disk drive. 2. System board. 0232 1. System board. Default configuration used. 1. Charge the backup battery for more than one Ethernet devices are found. Press to -FRU index Symptom or error FRU or action, in BIOS Setup Utility. 0230 ... Symptom-to continue. 1. Remove either a Mini-PCI Card or a modem daughter card. Run interactive tests of them. Replace the backup battery and run BIOS Setup Utility to ignore the warning message. 2. Embedded Security hardware tamper detected. System board. 01C9 More than 8 hours by...

User Manual
Page 53
...to reset the time and date. 3. Run BIOS Setup Utility to reset the time and date. 0280 Previous boot incomplete- Charge the backup battery for more than 8 hours by connecting the ac adapter. 2. CPU. 2. System board. 1802 Unauthorized network card is plugged installed. in ... Remove the WAN card that you installed. 2. Remove the Wireless USB card that you installed. 2. System board. 1803 1. Replace the backup battery. 3. System board. System board. 02F7 Fail-safe timer NMI failed 1. System board. 02F6 Software NMI failed 1. Symptom-to-FRU index Symptom...
...to reset the time and date. 3. Run BIOS Setup Utility to reset the time and date. 0280 Previous boot incomplete- Charge the backup battery for more than 8 hours by connecting the ac adapter. 2. CPU. 2. System board. 1802 Unauthorized network card is plugged installed. in ... Remove the WAN card that you installed. 2. Remove the Wireless USB card that you installed. 2. System board. 1803 1. Replace the backup battery. 3. System board. System board. 02F7 Fail-safe timer NMI failed 1. System board. 02F6 Software NMI failed 1. Symptom-to-FRU index Symptom...
User Manual
Page 55
...failure and is installed correctly. 2. Excluded from any device. ThinkPad T61 and T61p (14.1-inch) 49 System board. 1. Backup battery. 3. Device Error. 1. System board. Reinstall the operation system. Invalid system configuration data. Hibernation error. Cannot boot from boot ... 2. Check the status of device which you want to boot from . 2. The device you want to boot from. 2. Allocation error for device. Backup battery. 3. System board. 1. DIMM. 2. System board. Device not found. 1. No valid operating system. 1. I/O device IRQ conflict. Load "Setup Defaults" ...
...failure and is installed correctly. 2. Excluded from any device. ThinkPad T61 and T61p (14.1-inch) 49 System board. 1. Backup battery. 3. Device Error. 1. System board. Reinstall the operation system. Invalid system configuration data. Hibernation error. Cannot boot from boot ... 2. Check the status of device which you want to boot from . 2. The device you want to boot from. 2. Allocation error for device. Backup battery. 3. System board. 1. DIMM. 2. System board. Device not found. 1. No valid operating system. 1. I/O device IRQ conflict. Load "Setup Defaults" ...

User Manual
Page 58
... used at least 10 times. 2. Devices attached to verify that no more errors exist. DIMM h. Determine whether the problem has been solved. 6. Non-ThinkPad devices b. Battery pack e. External diskette drive or optical drive g. System board b. Verify that all of the following : 1. PC Cards 4. Run the diagnostic test for damage. Undetermined problems...
... used at least 10 times. 2. Devices attached to verify that no more errors exist. DIMM h. Determine whether the problem has been solved. 6. Non-ThinkPad devices b. Battery pack e. External diskette drive or optical drive g. System board b. Verify that all of the following : 1. PC Cards 4. Run the diagnostic test for damage. Undetermined problems...
User Manual
Page 62
... any notes that have to replace a FRU, turn on the computer until you have made sure that all power cords from electrical outlets, remove the battery pack, and then disconnect any FRU, review "FRU replacement notices" on page 113. 8. Verify this by shaking the computer gently and listening for removing the...
... any notes that have to replace a FRU, turn on the computer until you have made sure that all power cords from electrical outlets, remove the battery pack, and then disconnect any FRU, review "FRU replacement notices" on page 113. 8. Verify this by shaking the computer gently and listening for removing the...
User Manual
Page 63
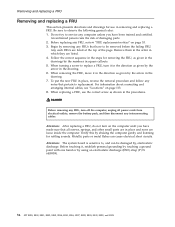
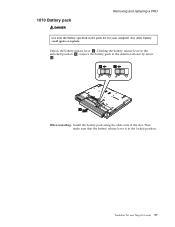
Holding the battery release lever in the unlocked position 2 , remove the battery pack in the locked position. Unlock the battery release lever 1 . Then make sure that the battery release lever is in the direction shown by arrow 3. 1 2 3 When installing: Install the battery pack along the slide rails of the slot. ThinkPad T61 and T61p (14.1-inch) 57 Any other battery could ignite or explode. 1010 Battery pack DANGER Removing and replacing a FRU Use only the battery specified in the parts list for your computer.
Holding the battery release lever in the unlocked position 2 , remove the battery pack in the locked position. Unlock the battery release lever 1 . Then make sure that the battery release lever is in the direction shown by arrow 3. 1 2 3 When installing: Install the battery pack along the slide rails of the slot. ThinkPad T61 and T61p (14.1-inch) 57 Any other battery could ignite or explode. 1010 Battery pack DANGER Removing and replacing a FRU Use only the battery specified in the parts list for your computer.
User Manual
Page 65
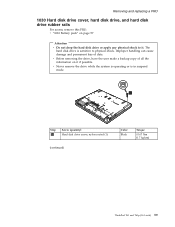
...) 59 Removing and replacing a FRU 1030 Hard disk drive cover, hard disk drive, and hard disk drive rubber rails For access, remove this FRU: v "1010 Battery pack" on it .
...) 59 Removing and replacing a FRU 1030 Hard disk drive cover, hard disk drive, and hard disk drive rubber rails For access, remove this FRU: v "1010 Battery pack" on it .


