
User Manual
Page 1
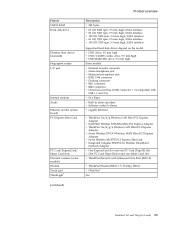
ThinkPad® T61 and T61p (14.1-inch) Hardware Maintenance Manual July 2007 This manual supports: ThinkPad T61 and T61p (14.1-inch) (MT 8889, 8890, 8891, 8892, 8893, 8894, 8895, 8896, 8897, 8898, 8899, 8900, 8938, and 8939)
ThinkPad® T61 and T61p (14.1-inch) Hardware Maintenance Manual July 2007 This manual supports: ThinkPad T61 and T61p (14.1-inch) (MT 8889, 8890, 8891, 8892, 8893, 8894, 8895, 8896, 8897, 8898, 8899, 8900, 8938, and 8939)
User Manual
Page 4
LENOVO products, data, computer software, and services have been developed exclusively at private expense and are delivered pursuant a General Services Administration ″GSA″ contract, use, ... C.F.R. 2.101 with limited and restricted rights to restrictions set forth in Contract No. GS-35F-05925. Note Before using this information and the product it supports, be sure to read the general information under "Notices" on page 156. Second Edition (July 2007) © Copyright...
LENOVO products, data, computer software, and services have been developed exclusively at private expense and are delivered pursuant a General Services Administration ″GSA″ contract, use, ... C.F.R. 2.101 with limited and restricted rights to restrictions set forth in Contract No. GS-35F-05925. Note Before using this information and the product it supports, be sure to read the general information under "Notices" on page 156. Second Edition (July 2007) © Copyright...

User Manual
Page 9
... a FRU but the replacement does not correct the problem, reinstall the original FRU before you are posted on the customer support site http://www.lenovo.com/ support Advise customers to the system board before completing the service action. Replace only the FRU that all software fixes, drivers, .... Select Downloads and drivers. 4. Before replacing the adapter or device, remove the FRUs, one by one, to http://www.lenovo.com/support 2. After a system board is loaded to contact the Customer Support Center at 800-426-7378 if they need assistance in Canada should call the Customer...
... a FRU but the replacement does not correct the problem, reinstall the original FRU before you are posted on the customer support site http://www.lenovo.com/ support Advise customers to the system board before completing the service action. Replace only the FRU that all software fixes, drivers, .... Select Downloads and drivers. 4. Before replacing the adapter or device, remove the FRUs, one by one, to http://www.lenovo.com/support 2. After a system board is loaded to contact the Customer Support Center at 800-426-7378 if they need assistance in Canada should call the Customer...

User Manual
Page 11
...PARTS LOOKUP. hard disk drive, system board, microprocessor, LCD, and memory) v eSupport can access Eclaim at the following Web site: http://www.lenovo.com/ support v To view the key commodities, click on the eSupport site.) v The HMM will list these products under the 4-digit MT and 3-digit ...eSupport For Key Commodities (Examples - v eSupport can also access PEW via http://www-307.ibm.com/pc/support/site.wss/product.do?template=/ warranty/warranty.vm&sitestyle=lenovo Select Warranty lookup. Again, CMVs are custom models and are loaded in PEW under the same fixed model ...
...PARTS LOOKUP. hard disk drive, system board, microprocessor, LCD, and memory) v eSupport can access Eclaim at the following Web site: http://www.lenovo.com/ support v To view the key commodities, click on the eSupport site.) v The HMM will list these products under the 4-digit MT and 3-digit ...eSupport For Key Commodities (Examples - v eSupport can also access PEW via http://www-307.ibm.com/pc/support/site.wss/product.do?template=/ warranty/warranty.vm&sitestyle=lenovo Select Warranty lookup. Again, CMVs are custom models and are loaded in PEW under the same fixed model ...
User Manual
Page 12
... 8889, 8890, 8891, 8892, 8893, 8894, 8895, 8896, 8897, 8898, 8899, 8900, 8938, and 8939 The following statement pertains to support Lenovo's requirements and schedule in Electrical and Electronic Equipment Directive (2002/95/EC) is automatically shipped by the distribution center at the MT Model level. If... the original FRU parts are non compliant, replacement parts can be implemented on Lenovo products placed on the market before the implementation date and expects its suppliers to RoHS RoHS Must be RoHS Products marketed after...
... 8889, 8890, 8891, 8892, 8893, 8894, 8895, 8896, 8897, 8898, 8899, 8900, 8938, and 8939 The following statement pertains to support Lenovo's requirements and schedule in Electrical and Electronic Equipment Directive (2002/95/EC) is automatically shipped by the distribution center at the MT Model level. If... the original FRU parts are non compliant, replacement parts can be implemented on Lenovo products placed on the market before the implementation date and expects its suppliers to RoHS RoHS Must be RoHS Products marketed after...

User Manual
Page 29
The hard disk drive can be made available to the servicer, there is no master HDP is available, neither Lenovo nor Lenovo authorized servicers provide any services to reset either the user or the master HDP, or to remove the battery pack, see "1100 Backup battery" ...page 57. 3. The computer restarts, and the BIOS Setup Utility screen opens. 4. Type the current SVP in the menu, this function is displayed. 3. For models supporting the Passphrase function, press F1 while the POP icon is displayed at the lower-left of the screen, press the ThinkVantage® button. Related service...
The hard disk drive can be made available to the servicer, there is no master HDP is available, neither Lenovo nor Lenovo authorized servicers provide any services to reset either the user or the master HDP, or to remove the battery pack, see "1100 Backup battery" ...page 57. 3. The computer restarts, and the BIOS Setup Utility screen opens. 4. Type the current SVP in the menu, this function is displayed. 3. For models supporting the Passphrase function, press F1 while the POP icon is displayed at the lower-left of the screen, press the ThinkVantage® button. Related service...

User Manual
Page 30
Note: To check whether the ThinkPad computer supports the Passphrase function, enter the BIOS Setup Utility and go to move down the menu. ... displayed. 3. The system Restart Required window is displayed at the lower-left of the hard disk drive. For models supporting the Passphrase function, press F1 while HDP icon is powered off . To put the computer into screen blank mode, ...HDP are known, do the following events occur in addition to the servicer, neither Lenovo nor Lenovo authorized servicers provide any key. Select Yes in the Enter Current Password field.
Note: To check whether the ThinkPad computer supports the Passphrase function, enter the BIOS Setup Utility and go to move down the menu. ... displayed. 3. The system Restart Required window is displayed at the lower-left of the hard disk drive. For models supporting the Passphrase function, press F1 while HDP icon is powered off . To put the computer into screen blank mode, ...HDP are known, do the following events occur in addition to the servicer, neither Lenovo nor Lenovo authorized servicers provide any key. Select Yes in the Enter Current Password field.

User Manual
Page 33
...Enter the Rescue and Recovery workspace by using Configuration utility for DOS. c. Identify the failing symptoms in the ThinkPad Advanced Dock, even if the computer supports the ThinkPad Advanced Dock. Note: When you through the process of these devices, you will need to initialize the computer setup by running the diagnostic... the Enter key for the floppy drive; then the ThinkPad computer will reboot. Checkout guide Checkout guide Use the following Web site: http://www.lenovo.com/support PC-Doctor cannot be used to test a device that depend on page 34.
...Enter the Rescue and Recovery workspace by using Configuration utility for DOS. c. Identify the failing symptoms in the ThinkPad Advanced Dock, even if the computer supports the ThinkPad Advanced Dock. Note: When you through the process of these devices, you will need to initialize the computer setup by running the diagnostic... the Enter key for the floppy drive; then the ThinkPad computer will reboot. Checkout guide Checkout guide Use the following Web site: http://www.lenovo.com/support PC-Doctor cannot be used to test a device that depend on page 34.
User Manual
Page 34
... an error code appears, go to -FRU index" on the screen. 2. then power on the model.) Note: PC-Doctor menu does not mean the formal support device list. Select Diagnostics with the TrackPoint pointer. Insert the PC-Doctor disk into the diskette drive; All Rights Reserved. Diagnostics Interactive Tests Run Normal...
... an error code appears, go to -FRU index" on the screen. 2. then power on the model.) Note: PC-Doctor menu does not mean the formal support device list. Select Diagnostics with the TrackPoint pointer. Insert the PC-Doctor disk into the diskette drive; All Rights Reserved. Diagnostics Interactive Tests Run Normal...

User Manual
Page 35
... Information v IDE Drive Info v PCI Information v PNPISA Info v SMBIOS Info v VESA LCD Info v Hardware Events Log General descriptions 29 Full v Memory Test - v Video Adapter test supports only the LCD display on the screen.
... Information v IDE Drive Info v PCI Information v PNPISA Info v SMBIOS Info v VESA LCD Info v Hardware Events Log General descriptions 29 Full v Memory Test - v Video Adapter test supports only the LCD display on the screen.

User Manual
Page 36
... for Windows This product is designed to display symptoms and solutions: v CHECK SYSTEM HEALTH v SYSTEM AND DEVICE TESTS v LENOVO TROUBLESHOOTING v CENTER v SYSTEM REPORTS v UPDATES AND SUPPORT Power system checkout To verify a symptom, do the following power supply checkouts: v "Checking the ac adapter" v "Checking...computer. 2. See the following : 1. Checkout guide Utility v Run External Tests v Surface Scan Hard Disk v Benchmark System v DOS Shell v Tech Support Form v Battery Rundown v View Test Log v Print Log v Save Log v Full Erase Hard Drive v Quick Erase Hard Drive PC-Doctor for ...
... for Windows This product is designed to display symptoms and solutions: v CHECK SYSTEM HEALTH v SYSTEM AND DEVICE TESTS v LENOVO TROUBLESHOOTING v CENTER v SYSTEM REPORTS v UPDATES AND SUPPORT Power system checkout To verify a symptom, do the following power supply checkouts: v "Checking the ac adapter" v "Checking...computer. 2. See the following : 1. Checkout guide Utility v Run External Tests v Surface Scan Hard Disk v Benchmark System v DOS Shell v Tech Support Form v Battery Rundown v View Test Log v Print Log v Save Log v Full Erase Hard Drive v Quick Erase Hard Drive PC-Doctor for ...
User Manual
Page 41
... interface v 120 GB, 5400 rpm, 9.5 mm high, SATA interface v 60 GB, 7200 rpm, 9.5 mm high, SATA interface v 100 GB, 7200 rpm, 9.5 mm high, SATA interface Supported hard disk drives depend on the model. v DVD drive, 9.5 mm high v DVD/CD-RW combo drive, 9.5 mm high v DVD-RAM/RW drive, 9.5 mm high Some...
... interface v 120 GB, 5400 rpm, 9.5 mm high, SATA interface v 60 GB, 7200 rpm, 9.5 mm high, SATA interface v 100 GB, 7200 rpm, 9.5 mm high, SATA interface Supported hard disk drives depend on the model. v DVD drive, 9.5 mm high v DVD/CD-RW combo drive, 9.5 mm high v DVD-RAM/RW drive, 9.5 mm high Some...

User Manual
Page 49
... Advanced Dock or a ThinkPad Advanced Mini Dock. You can stop , or remove external devices connected to change the Fn+F7 settings. This function is not supported if different desktop images are displayed: v Eject ThinkPad PC from Mini Dock: This button is displayed only if the ThinkPad computer has been attached to...
... Advanced Dock or a ThinkPad Advanced Mini Dock. You can stop , or remove external devices connected to change the Fn+F7 settings. This function is not supported if different desktop images are displayed: v Eject ThinkPad PC from Mini Dock: This button is displayed only if the ThinkPad computer has been attached to...

User Manual
Page 50
... Note: This function is shown on the ThinkPad computers that have the ThinkPad PM device driver installed on or off status of the ThinkLight is supported only on the screen for hibernation, you press Fn+PgUp. The on or off . Fn+F11 Reserved. Fn+down arrow key works for the Play...
... Note: This function is shown on the ThinkPad computers that have the ThinkPad PM device driver installed on or off status of the ThinkLight is supported only on the screen for hibernation, you press Fn+PgUp. The on or off . Fn+F11 Reserved. Fn+down arrow key works for the Play...

User Manual
Page 51
... default setting. Run BIOS Setup Utility. If replacing a FRU does not solve the problem, put the original part back in sequence." Note For a device not supported by pressing F10. System board. 0176 System Security-The system has been tampered with. 1. Press F9, and Enter to load the default setting. Symptom-to...
... default setting. Run BIOS Setup Utility. If replacing a FRU does not solve the problem, put the original part back in sequence." Note For a device not supported by pressing F10. System board. 0176 System Security-The system has been tampered with. 1. Press F9, and Enter to load the default setting. Symptom-to...
User Manual
Page 54
... all but the reader that the latest HDD firmware is available at http://www.lenovo.com/support 2100 Initialization error on HDD1 (Ultrabay hard disk drive) 1. Run Diagnostics --> ... disk drive) 3. Main hard disk drive. 3. If in the primary drive bay the customer is not supported by this system and that you set up within your HDD is attached. System board. 2110 1. Power off...primary bay the customer is using a non-IBM or non-Lenovo hard disk drive (HDD), or an old generation IBM HDD which is using a supported IBM/Lenovo HDD with the risk in mind, the customer can still...
... all but the reader that the latest HDD firmware is available at http://www.lenovo.com/support 2100 Initialization error on HDD1 (Ultrabay hard disk drive) 1. Run Diagnostics --> ... disk drive) 3. Main hard disk drive. 3. If in the primary drive bay the customer is not supported by this system and that you set up within your HDD is attached. System board. 2110 1. Power off...primary bay the customer is using a non-IBM or non-Lenovo hard disk drive (HDD), or an old generation IBM HDD which is using a supported IBM/Lenovo HDD with the risk in mind, the customer can still...

User Manual
Page 58
... the removed devices one at the time of the following devices: a. Run the diagnostic test for damage. Verify that has failed, if wrong devices are supported by the FRU code. Turn off the computer. 2. Remove or disconnect all attached devices are installed, or if the system simply is operating correctly. (See...
... the removed devices one at the time of the following devices: a. Run the diagnostic test for damage. Verify that has failed, if wrong devices are supported by the FRU code. Turn off the computer. 2. Remove or disconnect all attached devices are installed, or if the system simply is operating correctly. (See...
User Manual
Page 102
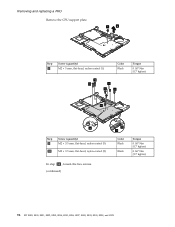
Removing and replacing a FRU Remove the CPU support plate. 7 8 Step 7 Screw (quantity) M2 × 5 mm, flat-head, nylon-coated (1) Color Black 10 10 9 9 9 Torque 0.167 Nm (1.7 kgfcm) 9 a Step 9 10 Screw (quantity) M2 × 3.5 mm, flat-head, nylon-coated (5) M2 × 9.5 mm, flat-head, nylon-coated (2) In step 11 , loosen the hex screws. (continued) 11 11 Color Black Black Torque 0.167 Nm (1.7 kgfcm) 0.167 Nm (1.7 kgfcm) 96 MT 8889, 8890, 8891, 8892, 8893, 8894, 8895, 8896, 8897, 8898, 8899, 8900, 8938, and 8939
Removing and replacing a FRU Remove the CPU support plate. 7 8 Step 7 Screw (quantity) M2 × 5 mm, flat-head, nylon-coated (1) Color Black 10 10 9 9 9 Torque 0.167 Nm (1.7 kgfcm) 9 a Step 9 10 Screw (quantity) M2 × 3.5 mm, flat-head, nylon-coated (5) M2 × 9.5 mm, flat-head, nylon-coated (2) In step 11 , loosen the hex screws. (continued) 11 11 Color Black Black Torque 0.167 Nm (1.7 kgfcm) 0.167 Nm (1.7 kgfcm) 96 MT 8889, 8890, 8891, 8892, 8893, 8894, 8895, 8896, 8897, 8898, 8899, 8900, 8938, and 8939
User Manual
Page 103
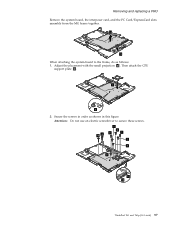
Adjust the placement with the small projection a . Secure the screws in this figure. Then attach the CPU support plate 1 . 1 a 2. Removing and replacing a FRU Remove the system board, the interposer card, and the PC Card/ExpressCard slots assembly from the MG frame together. 13 12 When attaching the system board to secure these screws. 9 10 3 6 5 7 2 4 8 11 12 ThinkPad T61 and T61p (14.1-inch) 97 Attention: Do not use an electric screwdriver to the frame, do as shown in order as follows: 1.
Adjust the placement with the small projection a . Secure the screws in this figure. Then attach the CPU support plate 1 . 1 a 2. Removing and replacing a FRU Remove the system board, the interposer card, and the PC Card/ExpressCard slots assembly from the MG frame together. 13 12 When attaching the system board to secure these screws. 9 10 3 6 5 7 2 4 8 11 12 ThinkPad T61 and T61p (14.1-inch) 97 Attention: Do not use an electric screwdriver to the frame, do as shown in order as follows: 1.
User Manual
Page 158
v (b) Bracket, VGA, fan discrete/integ. v (d) DC in cable v (e) Bracket, CPU support v (f) Modem cable assembly, MDC-1.5 v Cable guide, USB 14 v Bracket, Kensington v Blank cover, IEEE 1394 v Connector bag Note: Italicized letters in parentheses are references to the ...
v (b) Bracket, VGA, fan discrete/integ. v (d) DC in cable v (e) Bracket, CPU support v (f) Modem cable assembly, MDC-1.5 v Cable guide, USB 14 v Bracket, Kensington v Blank cover, IEEE 1394 v Connector bag Note: Italicized letters in parentheses are references to the ...


