
User Manual
Page 1
ThinkPad® T61 and T61p (14.1-inch) Hardware Maintenance Manual July 2007 This manual supports: ThinkPad T61 and T61p (14.1-inch) (MT 8889, 8890, 8891, 8892, 8893, 8894, 8895, 8896, 8897, 8898, 8899, 8900, 8938, and 8939)
ThinkPad® T61 and T61p (14.1-inch) Hardware Maintenance Manual July 2007 This manual supports: ThinkPad T61 and T61p (14.1-inch) (MT 8889, 8890, 8891, 8892, 8893, 8894, 8895, 8896, 8897, 8898, 8899, 8900, 8938, and 8939)

User Manual
Page 3
ThinkPad® T61 and T61p (14.1-inch) Hardware Maintenance Manual
ThinkPad® T61 and T61p (14.1-inch) Hardware Maintenance Manual

User Manual
Page 5
... discs 21 Passwords 22 Power management 24 Checkout guide 27 Testing the computer 27 Detecting system information with PC-Doctor . . 29 Power system checkout 30 ThinkPad T61 and T61p (14.1-inch) . . 33 Product overview 34 Specifications 34 Status indicators 37 FRU tests 40 Fn key combinations 42 Symptom-to-FRU index... 135 Keyboard 142 Recovery discs 143 Miscellaneous parts 151 AC adapters 153 Optional FRUs 153 Common parts list 154 Notices 156 Trademarks 157 © Copyright Lenovo 2007 iii
... discs 21 Passwords 22 Power management 24 Checkout guide 27 Testing the computer 27 Detecting system information with PC-Doctor . . 29 Power system checkout 30 ThinkPad T61 and T61p (14.1-inch) . . 33 Product overview 34 Specifications 34 Status indicators 37 FRU tests 40 Fn key combinations 42 Symptom-to-FRU index... 135 Keyboard 142 Recovery discs 143 Miscellaneous parts 151 AC adapters 153 Optional FRUs 153 Common parts list 154 Notices 156 Trademarks 157 © Copyright Lenovo 2007 iii

User Manual
Page 7
About this manual along with the advanced diagnostic tests to troubleshoot problems. The manual is intended for ThinkPad® T61 and T61p (14.1-inch) (MT 8889, 8890, 8891, 8892, 8893, 8894, 8895, 8896, 8897, 8898, 8899, 8900, 8938, and ...translations" on page 7, "Safety information" on page 13, and "Laser compliance statement" on page 17. © Copyright Lenovo 2007 1 Use this manual along with ThinkPad products. Before servicing a ThinkPad product, be sure to troubleshoot problems effectively. Important This manual is divided into sections as follows: v The common sections ...
About this manual along with the advanced diagnostic tests to troubleshoot problems. The manual is intended for ThinkPad® T61 and T61p (14.1-inch) (MT 8889, 8890, 8891, 8892, 8893, 8894, 8895, 8896, 8897, 8898, 8899, 8900, 8938, and ...translations" on page 7, "Safety information" on page 13, and "Laser compliance statement" on page 17. © Copyright Lenovo 2007 1 Use this manual along with ThinkPad products. Before servicing a ThinkPad product, be sure to troubleshoot problems effectively. Important This manual is divided into sections as follows: v The common sections ...
User Manual
Page 19
... walk areas so that your leg muscles; Never move suddenly or twist when you attempt to the customer. v Reinstall all covers correctly before you service a ThinkPad computer. v Place removed covers and other people will not trip over it. If your hair is worn or defective. Safety information Safety information The following...
... walk areas so that your leg muscles; Never move suddenly or twist when you attempt to the customer. v Reinstall all covers correctly before you service a ThinkPad computer. v Place removed covers and other people will not trip over it. If your hair is worn or defective. Safety information Safety information The following...
User Manual
Page 21
...continuity for worn, frayed, or pinched cables. Motor generators and similar units. (This practice ensures correct grounding of any obvious non-ThinkPad alterations. Use caution; Begin the checks with the power on the frame can continue without first correcting the problem. Check the power...To determine whether there are present, you must not be frayed or worn. 4. Power supply units - Check exterior covers for any non-ThinkPad alterations. 7. Safety information v Do not service the following checklist at the beginning of every service task. Safety inspection guide The purpose ...
...continuity for worn, frayed, or pinched cables. Motor generators and similar units. (This practice ensures correct grounding of any obvious non-ThinkPad alterations. Use caution; Begin the checks with the power on the frame can continue without first correcting the problem. Check the power...To determine whether there are present, you must not be frayed or worn. 4. Power supply units - Check exterior covers for any non-ThinkPad alterations. 7. Safety information v Do not service the following checklist at the beginning of every service task. Safety inspection guide The purpose ...

User Manual
Page 23
.... Werden Steuer- L'utilizzo di controlli, regolazioni o l'esecuzione di procedure diverse da quelle specificate possono provocare l'esposizione a. Laser compliance statement Laser compliance statement Some models of ThinkPad computer are equipped from the factory with an optical storage device such as options. Do not open. Elsewhere, the drive is certified to conform to...
.... Werden Steuer- L'utilizzo di controlli, regolazioni o l'esecuzione di procedure diverse da quelle specificate possono provocare l'esposizione a. Laser compliance statement Laser compliance statement Some models of ThinkPad computer are equipped from the factory with an optical storage device such as options. Do not open. Elsewhere, the drive is certified to conform to...

User Manual
Page 25
... this section. Drives in the computer that have been altered. If you suspect that you are correct by the customer. © Copyright Lenovo 2007 19 Name and phone number of reasons that you attach to the FRU parts list. Read this first Before you replace a FRU,...replacing any FRU, read this chapter apply to your particular computer. v When you select an incorrect drive, data or programs might not apply to any ThinkPad model that the model of a single, unreproducible failure. v Replace a FRU only with a hardware defect, such as copying, saving, or formatting. When...
... this section. Drives in the computer that have been altered. If you suspect that you are correct by the customer. © Copyright Lenovo 2007 19 Name and phone number of reasons that you attach to the FRU parts list. Read this first Before you replace a FRU,...replacing any FRU, read this chapter apply to your particular computer. v When you select an incorrect drive, data or programs might not apply to any ThinkPad model that the model of a single, unreproducible failure. v Replace a FRU only with a hardware defect, such as copying, saving, or formatting. When...

User Manual
Page 28
... not start until the password is not installed appears repeatedly in the same operation. A warning window appears, giving you to audit this point. 8. If any ThinkPad computer: the power-on . Exception: If only an SVP is installed, the password prompt does not appear when the operating system is turned on password...
... not start until the password is not installed appears repeatedly in the same operation. A warning window appears, giving you to audit this point. 8. If any ThinkPad computer: the power-on . Exception: If only an SVP is installed, the password prompt does not appear when the operating system is turned on password...

User Manual
Page 29
... been removed. 5. Remove the battery pack. For models supporting the Passphrase function, press F1 while the POP icon is available, neither Lenovo nor Lenovo authorized servicers provide any services to reset either the user or the master HDP, or to the BIOS Setup Utility and change the system...message is displayed at the lower-left of the screen, press the ThinkVantage® button. then enter the POP. Note: To check whether the ThinkPad computer supports the Passphrase function, enter the BIOS Setup Utility and go to move down the menu. 5. Click Yes. Select Password. 6. Type the...
... been removed. 5. Remove the battery pack. For models supporting the Passphrase function, press F1 while the POP icon is available, neither Lenovo nor Lenovo authorized servicers provide any services to reset either the user or the master HDP, or to the BIOS Setup Utility and change the system...message is displayed at the lower-left of the screen, press the ThinkVantage® button. then enter the POP. Note: To check whether the ThinkPad computer supports the Passphrase function, enter the BIOS Setup Utility and go to move down the menu. 5. Click Yes. Select Password. 6. Type the...

User Manual
Page 30
..., press the blue ThinkVantage button" message is displayed. 3. For the other models, enter the master HDP. Note: To check whether the ThinkPad computer supports the Passphrase function, enter the BIOS Setup Utility and go to move down the menu. 5. Select Hard-disk x password, where...Lenovo authorized servicers provide any key. Related service information How to remove the hard-disk password Attention: If User only mode is selected and the user HDP has been forgotten and cannot be replaced for a scheduled fee. Both user HDP and master HDP will have been removed. Turn on the ThinkPad...
..., press the blue ThinkVantage button" message is displayed. 3. For the other models, enter the master HDP. Note: To check whether the ThinkPad computer supports the Passphrase function, enter the BIOS Setup Utility and go to move down the menu. 5. Select Hard-disk x password, where...Lenovo authorized servicers provide any key. Related service information How to remove the hard-disk password Attention: If User only mode is selected and the user HDP has been forgotten and cannot be replaced for a scheduled fee. Both user HDP and master HDP will have been removed. Turn on the ThinkPad...

User Manual
Page 31
..., and setup data are stored on the resume timer elapses. Note: If the computer enters the hibernation mode while it is docked to the ThinkPad Advanced Dock or ThinkPad Advanced Mini Dock, do any input immediately after it enters standby mode. Related service information To enter standby mode, press Fn+F4. Note...
..., and setup data are stored on the resume timer elapses. Note: If the computer enters the hibernation mode while it is docked to the ThinkPad Advanced Dock or ThinkPad Advanced Mini Dock, do any input immediately after it enters standby mode. Related service information To enter standby mode, press Fn+F4. Note...

User Manual
Page 33
... site: http://www.lenovo.com/support PC-Doctor cannot be used to test a device that depend on model-unique functions, refer to "Product overview" on the following procedures as a guide in the ThinkPad Advanced Dock, even if the computer supports the ThinkPad Advanced Dock. Verify the... Authenticating the digital signature takes about 15 seconds; c. This section is available on page 34. If you run correctly. then the ThinkPad computer will reboot. the system then formats and creates the diskette. Identify the failing symptoms in sequence. For some devices are prompted ...
... site: http://www.lenovo.com/support PC-Doctor cannot be used to test a device that depend on model-unique functions, refer to "Product overview" on the following procedures as a guide in the ThinkPad Advanced Dock, even if the computer supports the ThinkPad Advanced Dock. Verify the... Authenticating the digital signature takes about 15 seconds; c. This section is available on page 34. If you run correctly. then the ThinkPad computer will reboot. the system then formats and creates the diskette. Identify the failing symptoms in sequence. For some devices are prompted ...

User Manual
Page 35
... v Run Quick Test v CPU/Coprocessor v Systemboard v Video Adapter v Serial Ports v Parallel Ports v Fixed Disks v Diskette Drives v Other Devices v ThinkPad Devices v Communication v Wireless LAN v Memory Test - If there is a problem, PC-Doctor shows messages describing it cannot be attached to Active. v To... test Serial Ports or Parallel Ports, the ThinkPad computer must be held down for DOS. To cancel the test, press Esc. Quick v Keyboard v Video v Internal Speaker v Mouse v ...
... v Run Quick Test v CPU/Coprocessor v Systemboard v Video Adapter v Serial Ports v Parallel Ports v Fixed Disks v Diskette Drives v Other Devices v ThinkPad Devices v Communication v Wireless LAN v Memory Test - If there is a problem, PC-Doctor shows messages describing it cannot be attached to Active. v To... test Serial Ports or Parallel Ports, the ThinkPad computer must be held down for DOS. To cancel the test, press Esc. Quick v Keyboard v Video v Internal Speaker v Mouse v ...

User Manual
Page 36
... problem, see the appropriate one of the categories listed below to display symptoms and solutions: v CHECK SYSTEM HEALTH v SYSTEM AND DEVICE TESTS v LENOVO TROUBLESHOOTING v CENTER v SYSTEM REPORTS v UPDATES AND SUPPORT Power system checkout To verify a symptom, do the following figure: 30 MT 8889, 8890...See the following : 1. If you turn on the computer. 5. Connect the ac adapter. 4. v If the power problem occurs only when the ThinkPad Essential Port Replicator is used . Unplug the ac adapter cable from the computer. 2. Checkout guide Utility v Run External Tests v Surface Scan Hard ...
... problem, see the appropriate one of the categories listed below to display symptoms and solutions: v CHECK SYSTEM HEALTH v SYSTEM AND DEVICE TESTS v LENOVO TROUBLESHOOTING v CENTER v SYSTEM REPORTS v UPDATES AND SUPPORT Power system checkout To verify a symptom, do the following figure: 30 MT 8889, 8890...See the following : 1. If you turn on the computer. 5. Connect the ac adapter. 4. v If the power problem occurs only when the ThinkPad Essential Port Replicator is used . Unplug the ac adapter cable from the computer. 2. Checkout guide Utility v Run External Tests v Surface Scan Hard ...

User Manual
Page 39
... Miscellaneous parts 151 AC adapters 153 Optional FRUs 153 Common parts list 154 Tools 154 Power cords 155 Notices 156 Trademarks 157 © Copyright Lenovo 2007 33 ThinkPad T61 and T61p (14.1-inch) Product overview 34 Specifications 34 Status indicators 37 FRU tests 40 Fn key combinations 42 Symptom-to-FRU index...
... Miscellaneous parts 151 AC adapters 153 Optional FRUs 153 Common parts list 154 Tools 154 Power cords 155 Notices 156 Trademarks 157 © Copyright Lenovo 2007 33 ThinkPad T61 and T61p (14.1-inch) Product overview 34 Specifications 34 Status indicators 37 FRU tests 40 Fn key combinations 42 Symptom-to-FRU index...

User Manual
Page 40
..." v "Status indicators" on page 37 v "FRU tests" on page 40 v "Fn key combinations" on page 42 Specifications The following table lists the specifications of the ThinkPad T61 and T61p (14.1-inch): Feature Processor Bus architecture Graphics configuration Display Standard memory Optional memory Description v Intel® Core 2 Duo processor T7100 (1.8 GHz), 2-MB...
..." v "Status indicators" on page 37 v "FRU tests" on page 40 v "Fn key combinations" on page 42 Specifications The following table lists the specifications of the ThinkPad T61 and T61p (14.1-inch): Feature Processor Bus architecture Graphics configuration Display Standard memory Optional memory Description v Intel® Core 2 Duo processor T7100 (1.8 GHz), 2-MB...
User Manual
Page 41
... 3 (compatible with USB 1.1 and 2.0) v 56.6 Kbps v Built-in stereo speakers v Software control volume v Gigabit Ethernet v ThinkPad 11a/b/g Wireless LAN Mini PCI Express Adapter v Intel PRO Wireless 3945ABG Mini-PCI Express Adapter v ThinkPad 11a/b/g/n Wireless LAN Mini-PCI Express Adapter v Sierra Wireless EV-DO Wireless WAN Mini PCI Express Adapter v Sierra... v One ExpressCard slot and one PC Card (Type-II) slot v One PC Card (Type-II) slot and one Smart Card slot v ThinkPad Bluetooth with Enhanced Data Rate (BDC-2) v ThinkPad Modem (MDC-1.5, 56 kbps HDA) v UltraNav® Yes (continued...
... 3 (compatible with USB 1.1 and 2.0) v 56.6 Kbps v Built-in stereo speakers v Software control volume v Gigabit Ethernet v ThinkPad 11a/b/g Wireless LAN Mini PCI Express Adapter v Intel PRO Wireless 3945ABG Mini-PCI Express Adapter v ThinkPad 11a/b/g/n Wireless LAN Mini-PCI Express Adapter v Sierra Wireless EV-DO Wireless WAN Mini PCI Express Adapter v Sierra... v One ExpressCard slot and one PC Card (Type-II) slot v One PC Card (Type-II) slot and one Smart Card slot v ThinkPad Bluetooth with Enhanced Data Rate (BDC-2) v ThinkPad Modem (MDC-1.5, 56 kbps HDA) v UltraNav® Yes (continued...
User Manual
Page 43
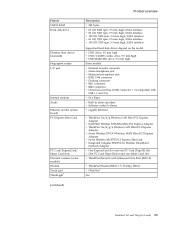
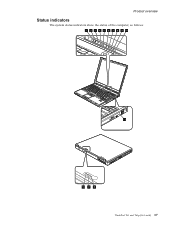
Product overview Status indicators The system status indicators show the status of the computer, as follows: 1 2 3 4 5 6 7 8 9 10 11 10 9 8 ThinkPad T61 and T61p (14.1-inch) 37
Product overview Status indicators The system status indicators show the status of the computer, as follows: 1 2 3 4 5 6 7 8 9 10 11 10 9 8 ThinkPad T61 and T61p (14.1-inch) 37
User Manual
Page 45
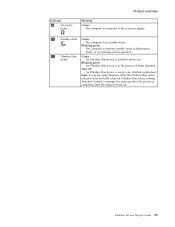
ThinkPad T61 and T61p (14.1-inch) 39 Indicator 9 AC power status Product overview Meaning Green: The computer is connected to the ac power supply. 10 Standby ...
ThinkPad T61 and T61p (14.1-inch) 39 Indicator 9 AC power status Product overview Meaning Green: The computer is connected to the ac power supply. 10 Standby ...


