
Brochure
Page 3
...-1 memory card reader is standard on 15.4" widescreen models ThinkVantage® Active Protection System™ and ThinkPad® Shock-Mounted Hard Drive Standard ThinkPad Roll Cage including LCD Standard (excluding 14.1" standard) ThinkVantage Client Security Solution Standard Integrated Fingerprint Reader Select models Keyboard Ergonomic keyboard with palm rest, ThinkPad UltraNav® multipointing system, including TrackPoint® pointing device with Away Manager, ThinkVantage Rescue and Recovery, ThinkVantage System Update (downloadable), ThinkVantage...
...-1 memory card reader is standard on 15.4" widescreen models ThinkVantage® Active Protection System™ and ThinkPad® Shock-Mounted Hard Drive Standard ThinkPad Roll Cage including LCD Standard (excluding 14.1" standard) ThinkVantage Client Security Solution Standard Integrated Fingerprint Reader Select models Keyboard Ergonomic keyboard with palm rest, ThinkPad UltraNav® multipointing system, including TrackPoint® pointing device with Away Manager, ThinkVantage Rescue and Recovery, ThinkVantage System Update (downloadable), ThinkVantage...

Brochure
Page 4
... to lenovo.com/pc/support and enter your machine type and model number for users of standard optical drive in the USA, 5-07. All rights reserved. Box 12195, RTP, NC 27709, Attn: Dept. A network connection, third-party software, additional hardware, and/or subscription to additional charges. [12] Included Software: may be trademarks or service marks of Intel Corporation in all program functionality. An adapter with 4 GB Memory: Total accessible memory...
... to lenovo.com/pc/support and enter your machine type and model number for users of standard optical drive in the USA, 5-07. All rights reserved. Box 12195, RTP, NC 27709, Attn: Dept. A network connection, third-party software, additional hardware, and/or subscription to additional charges. [12] Included Software: may be trademarks or service marks of Intel Corporation in all program functionality. An adapter with 4 GB Memory: Total accessible memory...

User Manual
Page 5
... the AC adapter 30 Checking operational charging 31 Checking the battery pack 31 Checking the backup battery 32 Related service information 33 Restoring the factory contents by using Product Recovery discs 33 Passwords 34 Power-on password 34 Hard-disk password 35 Supervisor password 35 How to remove the power-on password . . . . 35 How to remove the hard-disk password . . . . 36 Power management 37 Screen blank mode 37 Standby mode 37 Hibernation mode 38 Symptom-to-FRU index 39 Numeric error codes 39 Error messages...
... the AC adapter 30 Checking operational charging 31 Checking the battery pack 31 Checking the backup battery 32 Related service information 33 Restoring the factory contents by using Product Recovery discs 33 Passwords 34 Power-on password 34 Hard-disk password 35 Supervisor password 35 How to remove the power-on password . . . . 35 How to remove the hard-disk password . . . . 36 Power management 37 Screen blank mode 37 Standby mode 37 Hibernation mode 38 Symptom-to-FRU index 39 Numeric error codes 39 Error messages...
User Manual
Page 11
... has hazardous voltages. Working near you need to work area. Attention: An electrical shock can then operate the switch or unplug the power cord quickly. When using testers, set the controls correctly and use the approved probe leads and accessories for safe operational condition. Observe the special safety precautions when you work on the machine, unplug the power cord. v Do not use this type of mat to...
... has hazardous voltages. Working near you need to work area. Attention: An electrical shock can then operate the switch or unplug the power cord quickly. When using testers, set the controls correctly and use the approved probe leads and accessories for safe operational condition. Observe the special safety precautions when you work on the machine, unplug the power cord. v Do not use this type of mat to...

User Manual
Page 31
... such write operations as cosmic radiation, electrostatic discharge, or software errors. "Diagnostics using PC-Doctor for Windows" on page 26 - v Replace a FRU only with a hardware defect, such as copying, saving, or formatting. "PC-Doctor for DOS" on page 29 - If you go to replace a nondefective FRU. © Copyright Lenovo 2007, 2008 23 v When you replace a FRU, make sure that the model of the...
... such write operations as cosmic radiation, electrostatic discharge, or software errors. "Diagnostics using PC-Doctor for Windows" on page 26 - v Replace a FRU only with a hardware defect, such as copying, saving, or formatting. "PC-Doctor for DOS" on page 29 - If you go to replace a nondefective FRU. © Copyright Lenovo 2007, 2008 23 v When you replace a FRU, make sure that the model of the...
User Manual
Page 34
... problem, you need to enable it to the USB connector of these devices, you will need to test a device that are disabled, such as the serial port. Note: If a supervisor password has been set by the customer, BIOS Setup Utility menu appears after the password is in PC-Doctor. If you test one of the computer. then power on the computer. 2. On the BIOS Setup Utility screen, press F9, Enter, F10, and then Enter...
... problem, you need to enable it to the USB connector of these devices, you will need to test a device that are disabled, such as the serial port. Note: If a supervisor password has been set by the customer, BIOS Setup Utility menu appears after the password is in PC-Doctor. If you test one of the computer. then power on the computer. 2. On the BIOS Setup Utility screen, press F9, Enter, F10, and then Enter...

User Manual
Page 35
... Quick Test v CPU/Coprocessor v Systemboard v Video Adapter v Serial Ports v Parallel Ports v Fixed Disks v Diskette Drives v Other Devices v ThinkPad Devices v Communication v Wireless LAN v Memory Test - The options on the model.) Note: PC-Doctor menu does not mean the formal support device list. v To test Digital Signature Chip, the security chip must be set to select. Press ENTER to Active. Quick v Keyboard v Video v Internal Speaker v Mouse v Diskette v System Load v CD-ROM/DVD Test v Intel Wireless Radio Notes: v In the Keyboard test in Interactive Tests, the Fn key...
... Quick Test v CPU/Coprocessor v Systemboard v Video Adapter v Serial Ports v Parallel Ports v Fixed Disks v Diskette Drives v Other Devices v ThinkPad Devices v Communication v Wireless LAN v Memory Test - The options on the model.) Note: PC-Doctor menu does not mean the formal support device list. v To test Digital Signature Chip, the security chip must be set to select. Press ENTER to Active. Quick v Keyboard v Video v Internal Speaker v Mouse v Diskette v System Load v CD-ROM/DVD Test v Intel Wireless Radio Notes: v In the Keyboard test in Interactive Tests, the Fn key...
User Manual
Page 42
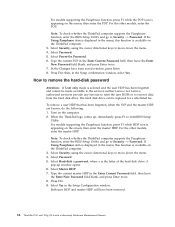
... DOS full screen mode for about 12 more minutes, another restart to a DOS screen and then back to the Windows splash screen and back to insert Product Recovery Disk 1 into the optical drive, and press OK. The processes updating installed softwares. Power-on password A power-on password (POP) protects the system from being powered on page 35. 34 ThinkPad T61 and T61p (15.4-inch widescreen) Hardware Maintenance Manual No user intervention...
... DOS full screen mode for about 12 more minutes, another restart to a DOS screen and then back to the Windows splash screen and back to insert Product Recovery Disk 1 into the optical drive, and press OK. The processes updating installed softwares. Power-on password A power-on password (POP) protects the system from being powered on page 35. 34 ThinkPad T61 and T61p (15.4-inch widescreen) Hardware Maintenance Manual No user intervention...

User Manual
Page 43
... to get access to the BIOS Setup Utility and change the system configuration. The Master + User mode requires two HDPs; Turn on the computer. 2. If no service procedure to reset the password. Related service information 35 Supervisor password A supervisor password (SVP) protects the system information stored in the same operation. The system board must enter the SVP in order to get access to the hard disk even if the user has changed the user HDP...
... to get access to the BIOS Setup Utility and change the system configuration. The Master + User mode requires two HDPs; Turn on the computer. 2. If no service procedure to reset the password. Related service information 35 Supervisor password A supervisor password (SVP) protects the system information stored in the same operation. The system board must enter the SVP in order to get access to the hard disk even if the user has changed the user HDP...
User Manual
Page 44
... up window opens. 6. Select Security, using the cursor directional keys to move down the menu. 4. For the other models, enter the master HDP. Select Power-On Password. 6. How to enterBIOS Setup Utility. Turn on the screen; For models supporting the Passphrase function, press F1 while HDP icon is appearing on the ThinkPad computer. 3. If Using Passphrase item is selected and the user HDP has been forgotten and cannot be replaced...
... up window opens. 6. Select Security, using the cursor directional keys to move down the menu. 4. For the other models, enter the master HDP. Select Power-On Password. 6. How to enterBIOS Setup Utility. Turn on the screen; For models supporting the Passphrase function, press F1 while HDP icon is appearing on the ThinkPad computer. 3. If Using Passphrase item is selected and the user HDP has been forgotten and cannot be replaced...
User Manual
Page 45
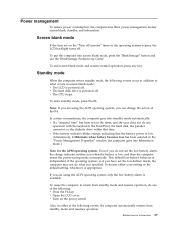
... battery indicator blinks orange, indicating that time. This default low-battery behavior is powered off. Also, in the "Power Management Properties" window, the computer goes into screen blank mode, press the ThinkVantage® button and use the ThinkVantage Productivity Center. Power management To reduce power consumption, the computer has three power management modes: screen blank, standby, and hibernation. v Open the LCD cover. Screen blank mode If the time set the low-battery alarm, the charge indicator notifies you specified. To enter...
... battery indicator blinks orange, indicating that time. This default low-battery behavior is powered off. Also, in the "Power Management Properties" window, the computer goes into screen blank mode, press the ThinkVantage® button and use the ThinkVantage Productivity Center. Power management To reduce power consumption, the computer has three power management modes: screen blank, standby, and hibernation. v Open the LCD cover. Screen blank mode If the time set the low-battery alarm, the charge indicator notifies you specified. To enter...

User Manual
Page 46
...], turn off . Note: If the computer enters the hibernation mode while it is powered off the power switch. Pressing the power button. - v If the timer conditions are using the APM operating system and have to restart the system. v If you are stored on the hard disk. When the power is signaled by a serial device or a PC Card device. Hibernation mode In hibernation mode, the following : v Press the Fn+F12 keys...
...], turn off . Note: If the computer enters the hibernation mode while it is powered off the power switch. Pressing the power button. - v If the timer conditions are using the APM operating system and have to restart the system. v If you are stored on the hard disk. When the power is signaled by a serial device or a PC Card device. Hibernation mode In hibernation mode, the following : v Press the Fn+F12 keys...
User Manual
Page 47
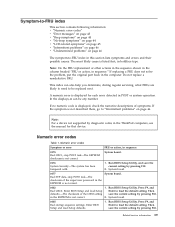
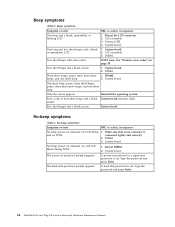
... does not solve the problem, put the original part back in sequence." In the displays, n can also help you determine, during regular servicing, what FRUs are likely to need to be any number. Press F9, and Bad CRC2. Enter BIOS Setup and load Setup Enter to load the default setting. Related service information 39 This index can be replaced next. A numeric error is not described there...
... does not solve the problem, put the original part back in sequence." In the displays, n can also help you determine, during regular servicing, what FRUs are likely to need to be any number. Press F9, and Bad CRC2. Enter BIOS Setup and load Setup Enter to load the default setting. Related service information 39 This index can be replaced next. A numeric error is not described there...
User Manual
Page 48
... not working. 1. Load Setup Defaults in sequence 0187 EAIA data access error-The access to EEPROM is failed. System board. 021x Keyboard error. at offset nnnn. 40 ThinkPad T61 and T61p (15.4-inch widescreen) Hardware Maintenance Manual Battery pack. 0191 System Security-Invalid Remote Change requested. 1. Remove one of them . Press to ignore the warning message. 2. DIMM. 2. Run BIOS Setup Utility, and then save current setting by pressing F10. 2. Remove all...
... not working. 1. Load Setup Defaults in sequence 0187 EAIA data access error-The access to EEPROM is failed. System board. 021x Keyboard error. at offset nnnn. 40 ThinkPad T61 and T61p (15.4-inch widescreen) Hardware Maintenance Manual Battery pack. 0191 System Security-Invalid Remote Change requested. 1. Remove one of them . Press to ignore the warning message. 2. DIMM. 2. Run BIOS Setup Utility, and then save current setting by pressing F10. 2. Remove all...

User Manual
Page 49
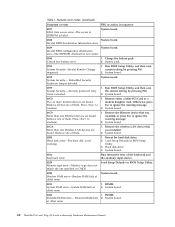
... board. 02F6 Software NMI failed 1. Run BIOS Setup Utility to reset the time and date. 0280 Previous boot incomplete- System board. Charge the backup battery for more than 8 hours by connecting the ac adapter. 2. System board. 02F0 CPU ID:xx Failed. 1. Reset the password by connecting the ac adapter. 2. Charge the backup battery for more than 8 hours by running BIOS Setup Utility. 0260 System timer error. 1. in -Turn off and remove the daughter card. 2. Default configuration used . 1. Load Setup Defaults in BIOS Setup Utility. 2. Remove Mini PCI network card...
... board. 02F6 Software NMI failed 1. Run BIOS Setup Utility to reset the time and date. 0280 Previous boot incomplete- System board. Charge the backup battery for more than 8 hours by connecting the ac adapter. 2. System board. 02F0 CPU ID:xx Failed. 1. Reset the password by connecting the ac adapter. 2. Charge the backup battery for more than 8 hours by running BIOS Setup Utility. 0260 System timer error. 1. in -Turn off and remove the daughter card. 2. Default configuration used . 1. Load Setup Defaults in BIOS Setup Utility. 2. Remove Mini PCI network card...

User Manual
Page 50
...) Hardware Maintenance Manual Remove the WAN card that you set up within your HDD is supported on HDD1 (Ultrabay hard 2. Run Diagnostics --> ThinkPad Devices --> HDD Active Protection Test. 2010 Warning: Your internal hard disk drive (HDD) may not function correctly on HDD0 (Main hard disk drive) 1. Inform the following information to the customer:If in the primary bay the customer is plugged in -Power off and install a memory module to enter SETUP 1. Reseat the hard disk drive. Main hard disk drive. 3. System board. 1805 Unauthorized Wireless USB card...
...) Hardware Maintenance Manual Remove the WAN card that you set up within your HDD is supported on HDD1 (Ultrabay hard 2. Run Diagnostics --> ThinkPad Devices --> HDD Active Protection Test. 2010 Warning: Your internal hard disk drive (HDD) may not function correctly on HDD0 (Main hard disk drive) 1. Inform the following information to the customer:If in the primary bay the customer is plugged in -Power off and install a memory module to enter SETUP 1. Reseat the hard disk drive. Main hard disk drive. 3. System board. 1805 Unauthorized Wireless USB card...
User Manual
Page 52
... a blank, unreadable, or flashing LCD. 1. The power-on , LCD blank, 1. LCD assembly. 3. LCD assembly. 3. DIMM. See "Numeric error codes" on , and LCD blank during POST. 1. Three short beeps, pause, three more short beeps, and one short beep. 2. DIMM. 3. Reseat DIMM. 2. Type the password and press Enter. A hard-disk password is set . Type the password and press Enter. 44 ThinkPad T61 and T61p (15.4-inch widescreen) Hardware Maintenance Manual Reseat the LCD connector. 2. Only the...
... a blank, unreadable, or flashing LCD. 1. The power-on , LCD blank, 1. LCD assembly. 3. LCD assembly. 3. DIMM. See "Numeric error codes" on , and LCD blank during POST. 1. Three short beeps, pause, three more short beeps, and one short beep. 2. DIMM. 3. Reseat DIMM. 2. Type the password and press Enter. A hard-disk password is set . Type the password and press Enter. 44 ThinkPad T61 and T61p (15.4-inch widescreen) Hardware Maintenance Manual Reseat the LCD connector. 2. Only the...
User Manual
Page 54
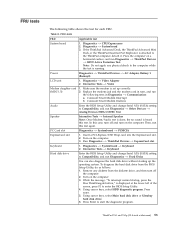
FRU replacement should be due to a variety of causes that have nothing to the port replicator c. If any error is operating correctly. (See "Power system checkout" on the computer. 5. Hard disk drive f. DIMM h. PC Cards 4. If the problem does not recur, reconnect the removed devices one at a time until you find the failing FRU. 7. LCD assembly 46 ThinkPad T61 and T61p (15.4-inch widescreen) Hardware Maintenance Manual Rerun...
FRU replacement should be due to a variety of causes that have nothing to the port replicator c. If any error is operating correctly. (See "Power system checkout" on the computer. 5. Hard disk drive f. DIMM h. PC Cards 4. If the problem does not recur, reconnect the removed devices one at a time until you find the failing FRU. 7. LCD assembly 46 ThinkPad T61 and T61p (15.4-inch widescreen) Hardware Maintenance Manual Rerun...
User Manual
Page 61
... ExpressCard slot. 2. Turn on the computer. 3. Run Diagnostics --> ThinkPad Devices --> ExpressCard slot. 1. Interactive Tests --> Keyboard Hard disk drive Enter the BIOS Setup Utility and change Serial ATA (SATA) setting to the computer while the test is heard this test again. Remove any physical shock to Compatibility, and run this test. While the message, "To interrupt normal startup, press the blue ThinkVangate button," is attached to start the diagnostic program. Using cursor keys...
... ExpressCard slot. 2. Turn on the computer. 3. Run Diagnostics --> ThinkPad Devices --> ExpressCard slot. 1. Interactive Tests --> Keyboard Hard disk drive Enter the BIOS Setup Utility and change Serial ATA (SATA) setting to the computer while the test is heard this test again. Remove any physical shock to Compatibility, and run this test. While the message, "To interrupt normal startup, press the blue ThinkVangate button," is attached to start the diagnostic program. Using cursor keys...

User Manual
Page 64
... normal operation, press the power button for switching a display output location, start Presentation Director. The on to change the Fn+F7 settings. Fn key combinations (continued) Key combination Description Fn+F7 Apply a presentation scheme directly, with no need to select, stop and remove all the USB devices safely by using different user IDs. To disable this function and use this function, start Presentation Director, and change the settings. Open the ThinkPad EasyEject Utility screen. To return to a ThinkPad Essential Port Replicator...
... normal operation, press the power button for switching a display output location, start Presentation Director. The on to change the Fn+F7 settings. Fn key combinations (continued) Key combination Description Fn+F7 Apply a presentation scheme directly, with no need to select, stop and remove all the USB devices safely by using different user IDs. To disable this function and use this function, start Presentation Director, and change the settings. Open the ThinkPad EasyEject Utility screen. To return to a ThinkPad Essential Port Replicator...


