
User Manual
Page 6
... mode 168 Bottom view 169 Rear view (ThinkPad X200 UltraBase) . . . . . 170 Bottom view (ThinkPad X200 UltraBase) . . . . 171 Parts list 173 Overall 174 LCD FRUs for touch panel LCD or direct-bonding glass LCD 207 LCD FRUs for protection plate LCD 216 Keyboard 224 Miscellaneous parts 225 AC adapters Power cords Recovery...
... mode 168 Bottom view 169 Rear view (ThinkPad X200 UltraBase) . . . . . 170 Bottom view (ThinkPad X200 UltraBase) . . . . 171 Parts list 173 Overall 174 LCD FRUs for touch panel LCD or direct-bonding glass LCD 207 LCD FRUs for protection plate LCD 216 Keyboard 224 Miscellaneous parts 225 AC adapters Power cords Recovery...

User Manual
Page 12
such touching can cause personal injury and machine damage. Power supply units - Blowers and fans - Similar units to get medical aid. 4 ThinkPad X200 Tablet and X201 Tablet .... Pumps - v If an electrical accident occurs: - Send another person to listed above This practice ensures correct grounding of a plastic dental mirror. Use caution; v Do not touch live electrical circuits with the power on when they are removed from their normal operating places in a machine: - The surface is conductive; Motor generators - do...
such touching can cause personal injury and machine damage. Power supply units - Blowers and fans - Similar units to get medical aid. 4 ThinkPad X200 Tablet and X201 Tablet .... Pumps - v If an electrical accident occurs: - Send another person to listed above This practice ensures correct grounding of a plastic dental mirror. Use caution; v Do not touch live electrical circuits with the power on when they are removed from their normal operating places in a machine: - The surface is conductive; Motor generators - do...

User Manual
Page 14
v Prevent the part from touching your body. Proper grounding of a grounding system to guard against your skin to electrostatic discharge (ESD.) ESD damage can use an ESD common ground or ...
v Prevent the part from touching your body. Proper grounding of a grounding system to guard against your skin to electrostatic discharge (ESD.) ESD damage can use an ESD common ground or ...

User Manual
Page 87
...v Each one should be used only once. Tighten screws as follows: v Plastic to plastic Turn an additional 90 degrees after the screw head touches the surface of the plastic part: 90 degrees more (Cross-section) v Torque driver If you have a torque screwdriver, tighten all of the...) v Logic card to plastic Turn an additional 180 degrees after the screw head touches the surface of the screws are calibrated correctly following when you removed. Do the following country specifications. © Copyright Lenovo 2008, 2010 79 v Always use a screw that all screws firmly to tighten....
...v Each one should be used only once. Tighten screws as follows: v Plastic to plastic Turn an additional 90 degrees after the screw head touches the surface of the plastic part: 90 degrees more (Cross-section) v Torque driver If you have a torque screwdriver, tighten all of the...) v Logic card to plastic Turn an additional 180 degrees after the screw head touches the surface of the screws are calibrated correctly following when you removed. Do the following country specifications. © Copyright Lenovo 2008, 2010 79 v Always use a screw that all screws firmly to tighten....

User Manual
Page 91
... any FRUs that have been trained and certified. Verify this by using an electrostatic discharge (ESD) strap (P/N 6405959). © Copyright Lenovo 2008, 2010 83 Before touching it, establish personal grounding by touching a ground point with one hand or by shaking the computer gently and listening for rattling sounds. Follow the correct sequence in...
... any FRUs that have been trained and certified. Verify this by using an electrostatic discharge (ESD) strap (P/N 6405959). © Copyright Lenovo 2008, 2010 83 Before touching it, establish personal grounding by touching a ground point with one hand or by shaking the computer gently and listening for rattling sounds. Follow the correct sequence in...

User Manual
Page 111
Close the LCD cover and turn the computer over. Removing and replacing a FRU 103 Attach the touch pad connector firmly to secure the palm rest. Push the front side of the palm rest until it into place. 1 2 1 2 4. Press the left and right top edges of palm rest (continued) When installing: When you attach the palm rest, do as follows: 1. Then fasten the five screws to the system board. 2. Removal steps of the palm rest to fit it clicks into place. 3. Table 16.
Close the LCD cover and turn the computer over. Removing and replacing a FRU 103 Attach the touch pad connector firmly to secure the palm rest. Push the front side of the palm rest until it into place. 1 2 1 2 4. Press the left and right top edges of palm rest (continued) When installing: When you attach the palm rest, do as follows: 1. Then fasten the five screws to the system board. 2. Removal steps of the palm rest to fit it clicks into place. 3. Table 16.

User Manual
Page 152
Removal steps of LCD front bezel for touch panel LCD model or direct-bonding glass LCD model Touch panel LCD model or direct-bonding glass LCD model: 1 1 2 2 2 1 1 1 1 1 1 2 1 2 2 Step 1 2 Screw cap Screw (quantity) M2.5 × 8 mm, wafer-head, nylon-coated (9) M2 × 3 mm, flat-...
Removal steps of LCD front bezel for touch panel LCD model or direct-bonding glass LCD model Touch panel LCD model or direct-bonding glass LCD model: 1 1 2 2 2 1 1 1 1 1 1 2 1 2 2 Step 1 2 Screw cap Screw (quantity) M2.5 × 8 mm, wafer-head, nylon-coated (9) M2 × 3 mm, flat-...
User Manual
Page 153
Removal steps of LCD front bezel for touch panel LCD model or direct-bonding glass LCD model (continued) 4 4 5 When installing: Make sure that attach the fingerprint reader connector firmly. Table 30. Removing and replacing a FRU 145
Removal steps of LCD front bezel for touch panel LCD model or direct-bonding glass LCD model (continued) 4 4 5 When installing: Make sure that attach the fingerprint reader connector firmly. Table 30. Removing and replacing a FRU 145

User Manual
Page 155
Table 31. Removal steps of Micro-Processor card (continued) 2 3 2 2 Protection plate LCD model Step Screw (quantity) Color 2 M2 × 3.5 mm, wafer-head, nylon-coated (3) Silver 3 M2 × 3 mm, height 4.2 mm, stud, nylon-coated (1) Black Touch panel LCD model or direct-bonding glass LCD model Step Screw (quantity) Color 2 M2 × 3.5 mm, wafer-head, nylon-coated (3) Silver 3 M2 × 3 mm, height 5.5 mm, stud, nylon-coated (1) Black Torque 0.181 Nm (1.85 kgfcm) 0.181 Nm (1.85 kgfcm) Torque 0.181 Nm (1.85 kgfcm) 0.181 Nm (1.85 kgfcm) Removing and replacing a FRU 147
Table 31. Removal steps of Micro-Processor card (continued) 2 3 2 2 Protection plate LCD model Step Screw (quantity) Color 2 M2 × 3.5 mm, wafer-head, nylon-coated (3) Silver 3 M2 × 3 mm, height 4.2 mm, stud, nylon-coated (1) Black Touch panel LCD model or direct-bonding glass LCD model Step Screw (quantity) Color 2 M2 × 3.5 mm, wafer-head, nylon-coated (3) Silver 3 M2 × 3 mm, height 5.5 mm, stud, nylon-coated (1) Black Torque 0.181 Nm (1.85 kgfcm) 0.181 Nm (1.85 kgfcm) Torque 0.181 Nm (1.85 kgfcm) 0.181 Nm (1.85 kgfcm) Removing and replacing a FRU 147

User Manual
Page 165
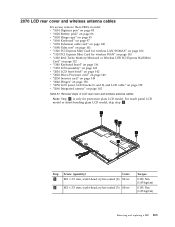
Table 35. Removal steps of LCD panel, LCD bracket L and R, and LCD cable for touch panel LCD model or direct-bonding glass LCD model Touch panel LCD model or direct-bonding glass LCD model: 1 1 1 1 1 Step 1 Screw (quantity) Color M2 × 3.5 mm, wafer-head, nylon-coated (5) Silver Torque 0.181 Nm (1.85 kgfcm) Removing and replacing a FRU 157
Table 35. Removal steps of LCD panel, LCD bracket L and R, and LCD cable for touch panel LCD model or direct-bonding glass LCD model Touch panel LCD model or direct-bonding glass LCD model: 1 1 1 1 1 Step 1 Screw (quantity) Color M2 × 3.5 mm, wafer-head, nylon-coated (5) Silver Torque 0.181 Nm (1.85 kgfcm) Removing and replacing a FRU 157

User Manual
Page 166
For models without the integrated camera, skip step 2 . 2 When installing: Make sure that the connector 2 is only for touch panel LCD model or direct-bonding glass LCD model (continued) Note: Step 2 is attached firmly. 3 158 ThinkPad X200 Tablet and X201 Tablet Hardware Maintenance Manual Table 35. Removal steps of LCD panel, LCD bracket L and R, and LCD cable for models with the integrated camera.
For models without the integrated camera, skip step 2 . 2 When installing: Make sure that the connector 2 is only for touch panel LCD model or direct-bonding glass LCD model (continued) Note: Step 2 is attached firmly. 3 158 ThinkPad X200 Tablet and X201 Tablet Hardware Maintenance Manual Table 35. Removal steps of LCD panel, LCD bracket L and R, and LCD cable for models with the integrated camera.
User Manual
Page 167
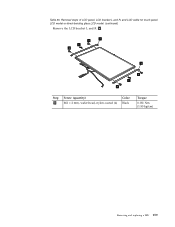
Table 35. Removal steps of LCD panel, LCD bracket L and R, and LCD cable for touch panel LCD model or direct-bonding glass LCD model (continued) Remove the LCD bracket L and R a . a 4 5 4 a 4 5 4 Step 4 Screw (quantity) M2 × 2 mm, wafer-head, nylon-coated (4) Color Black Torque 0.181 Nm (1.85 kgfcm) Removing and replacing a FRU 159
Table 35. Removal steps of LCD panel, LCD bracket L and R, and LCD cable for touch panel LCD model or direct-bonding glass LCD model (continued) Remove the LCD bracket L and R a . a 4 5 4 a 4 5 4 Step 4 Screw (quantity) M2 × 2 mm, wafer-head, nylon-coated (4) Color Black Torque 0.181 Nm (1.85 kgfcm) Removing and replacing a FRU 159

User Manual
Page 168
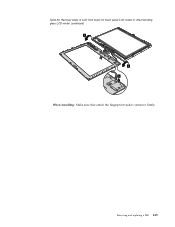
Table 35. Removal steps of LCD panel, LCD bracket L and R, and LCD cable for touch panel LCD model or direct-bonding glass LCD model (continued) Turn the LCD panel over, and then remove the LCD cable b from the LCD panel. Single-touch panel LCD model or direct-bonding glass LCD model: 6 b 7 9 8 When installing: Make sure that the LCD cable connector are attached firmly. 160 ThinkPad X200 Tablet and X201 Tablet Hardware Maintenance Manual
Table 35. Removal steps of LCD panel, LCD bracket L and R, and LCD cable for touch panel LCD model or direct-bonding glass LCD model (continued) Turn the LCD panel over, and then remove the LCD cable b from the LCD panel. Single-touch panel LCD model or direct-bonding glass LCD model: 6 b 7 9 8 When installing: Make sure that the LCD cable connector are attached firmly. 160 ThinkPad X200 Tablet and X201 Tablet Hardware Maintenance Manual

User Manual
Page 169
Table 35. Removal steps of LCD panel, LCD bracket L and R, and LCD cable for touch panel LCD model or direct-bonding glass LCD model (continued) Multitouch panel LCD model: 1 2 3 4 When installing: Make sure that the LCD cable connector are attached firmly. Removing and replacing a FRU 161
Table 35. Removal steps of LCD panel, LCD bracket L and R, and LCD cable for touch panel LCD model or direct-bonding glass LCD model (continued) Multitouch panel LCD model: 1 2 3 4 When installing: Make sure that the LCD cable connector are attached firmly. Removing and replacing a FRU 161
User Manual
Page 171
... Hinges" on page 150 v "2050 LCD panel, LCD bracket L and R, and LCD cable" on page 152 v "2060 Integrated camera" on page 162 Table 37. For touch panel LCD model or direct-bonding glass LCD model, skip step 1 . 1 22 1 2 Step 1 Screw (quantity) Color M2 × 3.5 mm, wafer-head, nylon-coated (2) Silver 2 M2...
... Hinges" on page 150 v "2050 LCD panel, LCD bracket L and R, and LCD cable" on page 152 v "2060 Integrated camera" on page 162 Table 37. For touch panel LCD model or direct-bonding glass LCD model, skip step 1 . 1 22 1 2 Step 1 Screw (quantity) Color M2 × 3.5 mm, wafer-head, nylon-coated (2) Silver 2 M2...

User Manual
Page 175
... (modem) connector (for some models) 7 Microphone jack 8 Stereo headphone jack 9 Universal serial bus (USB) connector 10 TrackPoint pointing stick 11 TrackPoint buttons 12 Touch pad buttons 13 Touch pad 14 UltraNav® 15 Volume control buttons 16 ThinkVantage button 17 Power switch 17 16 15 12 13 12 11 14 10 ©...
... (modem) connector (for some models) 7 Microphone jack 8 Stereo headphone jack 9 Universal serial bus (USB) connector 10 TrackPoint pointing stick 11 TrackPoint buttons 12 Touch pad buttons 13 Touch pad 14 UltraNav® 15 Volume control buttons 16 ThinkVantage button 17 Power switch 17 16 15 12 13 12 11 14 10 ©...

User Manual
Page 181
...CRUs These CRUs are isolated parts within the computer that the part is an Optional-service CRU. v "Overall" on page 174 v "LCD FRUs for touch panel LCD or direct-bonding glass LCD" on page 207 v "LCD FRUs for all types or models, unless specific types or models are available as... options. © Copyright Lenovo 2008, 2010 173 ThinkPad computers contain the following lists of these types of a country designator) should be used for all of the service parts.
...CRUs These CRUs are isolated parts within the computer that the part is an Optional-service CRU. v "Overall" on page 174 v "LCD FRUs for touch panel LCD or direct-bonding glass LCD" on page 207 v "LCD FRUs for all types or models, unless specific types or models are available as... options. © Copyright Lenovo 2008, 2010 173 ThinkPad computers contain the following lists of these types of a country designator) should be used for all of the service parts.

User Manual
Page 183
CRU ID a See "Miscellaneous parts" on page 225. 1 LCD unit (see "LCD FRUs for touch panel LCD or direct-bonding glass LCD" on page 207 or "LCD FRUs for protection plate LCD" on page 216.) 2 Extension cable card assembly for ...
CRU ID a See "Miscellaneous parts" on page 225. 1 LCD unit (see "LCD FRUs for touch panel LCD or direct-bonding glass LCD" on page 207 or "LCD FRUs for protection plate LCD" on page 216.) 2 Extension cable card assembly for ...

User Manual
Page 215
WXGA TFT LCD (Table 39 on page 208) 11 1 3 2 10 3 4 5 b 6 c 9 7 8 Parts list 207 LCD FRUs for touch panel LCD or direct-bonding glass LCD v 12.1-in.
WXGA TFT LCD (Table 39 on page 208) 11 1 3 2 10 3 4 5 b 6 c 9 7 8 Parts list 207 LCD FRUs for touch panel LCD or direct-bonding glass LCD v 12.1-in.
User Manual
Page 217
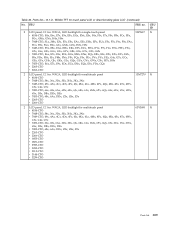
WXGA, LED backlight for single-touch panel 93P5617 v 4184-CTO, E4x, E6x, E7x, E9x, EFx, EGx, ENx, ESx, F4x, F5x, F7x, F8x, FBx, FCx, FFx, FGx, GMx, GNx, H4x, H6x v 7448-..., 6Xx, D3x, DBx, DDx, DEx v 7453-CTO, 68x, 6Ax, DDx, Z3x, Z4x, Z5x v 2263-CTO v 2266-CTO 2 LCD panel, 12.1-in . WXGA, LED backlight for touch panel LCD or direct-bonding glass LCD (continued) No. FRU FRU no. 2 LCD panel, 12.1-in . WXGA TFT for multitouch panel 63Y3000 v 4184-CTO v 7448...
WXGA, LED backlight for single-touch panel 93P5617 v 4184-CTO, E4x, E6x, E7x, E9x, EFx, EGx, ENx, ESx, F4x, F5x, F7x, F8x, FBx, FCx, FFx, FGx, GMx, GNx, H4x, H6x v 7448-..., 6Xx, D3x, DBx, DDx, DEx v 7453-CTO, 68x, 6Ax, DDx, Z3x, Z4x, Z5x v 2263-CTO v 2266-CTO 2 LCD panel, 12.1-in . WXGA, LED backlight for touch panel LCD or direct-bonding glass LCD (continued) No. FRU FRU no. 2 LCD panel, 12.1-in . WXGA TFT for multitouch panel 63Y3000 v 4184-CTO v 7448...