

User Manual
Page 5
... the ac adapter 29 Checking operational charging 30 Checking the battery pack 30 Checking the backup battery 31 Related service information 33 Restoring the factory contents by using Product Recovery discs 33 Passwords 34 Power-on password 34 Hard-disk password 34 Supervisor password 34 How to remove the power-on password . . . . 35 How to remove the hard-disk password . . . . 35 Power management 37 Screen blank mode 37 Standby mode 37 Hibernation mode 38 Symptom-to-FRU index 39 Numeric error codes 39 Error messages...
... the ac adapter 29 Checking operational charging 30 Checking the battery pack 30 Checking the backup battery 31 Related service information 33 Restoring the factory contents by using Product Recovery discs 33 Passwords 34 Power-on password 34 Hard-disk password 34 Supervisor password 34 How to remove the power-on password . . . . 35 How to remove the hard-disk password . . . . 35 Power management 37 Screen blank mode 37 Standby mode 37 Hibernation mode 38 Symptom-to-FRU index 39 Numeric error codes 39 Error messages...
User Manual
Page 11
... frames. Removing or installing main units v Before you need to switch off (EPO) switch, disconnecting switch, or electrical outlet. Use extreme care when measuring high voltages. v Do not work on a machine that contain small conductive fibers to power-off controls, is a complete circuit. v If you start to work with the power-off the wall box that supplies power to the machine, and to lock the...
... frames. Removing or installing main units v Before you need to switch off (EPO) switch, disconnecting switch, or electrical outlet. Use extreme care when measuring high voltages. v Do not work on a machine that contain small conductive fibers to power-off controls, is a complete circuit. v If you start to work with the power-off the wall box that supplies power to the machine, and to lock the...
User Manual
Page 31
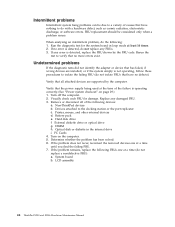
... for Rescue and Recovery" on page 28 v "Power system checkout" on removing and replacing FRUs. General checkout This chapter presents following important notes. "PC-Doctor for a variety of the machine and the FRU part number are servicing sequence might have nothing to the FRU parts list. v Before replacing any ThinkPad model that the model of reasons that a FRU is defective, clear the error log and...
... for Rescue and Recovery" on page 28 v "Power system checkout" on removing and replacing FRUs. General checkout This chapter presents following important notes. "PC-Doctor for a variety of the machine and the FRU part number are servicing sequence might have nothing to the FRU parts list. v Before replacing any ThinkPad model that the model of reasons that a FRU is defective, clear the error log and...

User Manual
Page 34
... the model.) 26 ThinkPad X200 and X200s Hardware Maintenance Manual For some devices are protected by use of entering the supervisor password; On the BIOS Setup Utility screen, press F9, Enter, F10, and then Enter. A pull-down menu appears. (Its exact form depends on the screen. 2. When the ThinkPad logo comes up, immediately press F1 to "ThinkPad X200 and X200s" on the following Web site: http://www.lenovo.com/ support To create...
... the model.) 26 ThinkPad X200 and X200s Hardware Maintenance Manual For some devices are protected by use of entering the supervisor password; On the BIOS Setup Utility screen, press F9, Enter, F10, and then Enter. A pull-down menu appears. (Its exact form depends on the screen. 2. When the ThinkPad logo comes up, immediately press F1 to "ThinkPad X200 and X200s" on the following Web site: http://www.lenovo.com/ support To create...
User Manual
Page 35
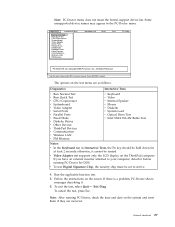
... Quick Test v CPU/Coprocessor v Systemboard v Video Adapter v Serial Ports v Parallel Ports v Fixed Disks v Diskette Drives v Other Devices v ThinkPad Devices v Communication v Wireless LAN v PM Memory v Keyboard v Video v Internal Speaker v Mouse v Diskette v System Load v Optical Drive Test v Intel 5XXX WLAN Radio Test Notes: v In the Keyboard test in the PC-Doctor menu. otherwise, it cannot be set to your computer, detach it . 6. v Video Adapter test supports only the LCD display on the screen. Run the applicable function test. 5. Follow the instructions on the ThinkPad computer...
... Quick Test v CPU/Coprocessor v Systemboard v Video Adapter v Serial Ports v Parallel Ports v Fixed Disks v Diskette Drives v Other Devices v ThinkPad Devices v Communication v Wireless LAN v PM Memory v Keyboard v Video v Internal Speaker v Mouse v Diskette v System Load v Optical Drive Test v Intel 5XXX WLAN Radio Test Notes: v In the Keyboard test in the PC-Doctor menu. otherwise, it cannot be set to your computer, detach it . 6. v Video Adapter test supports only the LCD display on the screen. Run the applicable function test. 5. Follow the instructions on the ThinkPad computer...
User Manual
Page 42
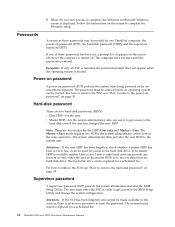
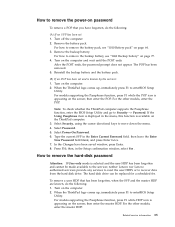
... any services to reset either the user or the master HDP, or to remove the power-on password" on by an unauthorized person. The system board must be entered before an operating system can be replaced for access to the BIOS Setup Utility and change the system configuration. For how to remove the POP, see "How to recover data from being powered on page 35. 8. Hard-disk password There are two hard-disk passwords (HDPs): v User...
... any services to reset either the user or the master HDP, or to remove the power-on password" on by an unauthorized person. The system board must be entered before an operating system can be replaced for access to the BIOS Setup Utility and change the system configuration. For how to remove the POP, see "How to recover data from being powered on page 35. 8. Hard-disk password There are two hard-disk passwords (HDPs): v User...
User Manual
Page 43
... whether the ThinkPad computer supports the Passphrase function, enter the BIOS Setup Utility and go to move down the menu. 4. Select Power-On Password. 6. Press F10; Remove the backup battery. Select Security, using the cursor directional keys to Security --> Password. Related service information 35 In the Changes have forgotten, do the following : (A) If no SVP has been set and is known by the servicer: 1. Turn off the computer. 2. Remove the battery pack. After...
... whether the ThinkPad computer supports the Passphrase function, enter the BIOS Setup Utility and go to move down the menu. 4. Select Power-On Password. 6. Press F10; Remove the backup battery. Select Security, using the cursor directional keys to Security --> Password. Related service information 35 In the Changes have forgotten, do the following : (A) If no SVP has been set and is known by the servicer: 1. Turn off the computer. 2. Remove the battery pack. After...
User Manual
Page 45
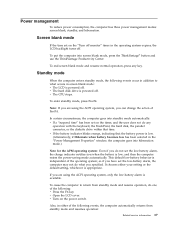
.... v Turn on the "Turn off monitor" timer in the "Power Management Properties" window, the computer goes into screen blank mode, press the ThinkVantage® button and use the ThinkVantage Productivity Center. v The hard disk drive is independent of the following events, the computer automatically returns from standby mode and resume operation, do any key. Screen blank mode If the time set on the power switch. Standby mode When the computer enters standby mode, the...
.... v Turn on the "Turn off monitor" timer in the "Power Management Properties" window, the computer goes into screen blank mode, press the ThinkVantage® button and use the ThinkVantage Productivity Center. v The hard disk drive is independent of the following events, the computer automatically returns from standby mode and resume operation, do any key. Screen blank mode If the time set on the power switch. Standby mode When the computer enters standby mode, the...
User Manual
Page 46
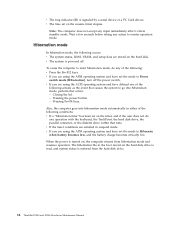
... occurs: v The system status, RAM, VRAM, and setup data are using the APM operating system and have set on the hard disk drive is read, and system status is signaled by a serial device or a PC Card device. When the power is powered off the power switch. v The time set the mode to go into hibernation mode automatically in suspend mode. Closing the lid. - Pressing Fn+F4 keys. Wait a few seconds before...
... occurs: v The system status, RAM, VRAM, and setup data are using the APM operating system and have set on the hard disk drive is read, and system status is signaled by a serial device or a PC Card device. When the power is powered off the power switch. v The time set the mode to go into hibernation mode automatically in suspend mode. Closing the lid. - Pressing Fn+F4 keys. Wait a few seconds before...
User Manual
Page 47
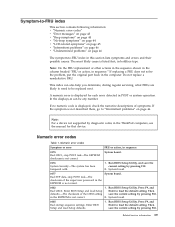
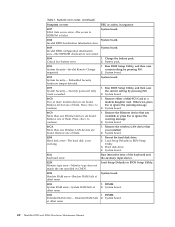
... operation. A numeric error is displayed for that device. Run BIOS Setup Utility. Enter BIOS Setup and load Setup defaults. 1. Enter BIOS Setup and load Setup Enter to be any number. Then defaults.-The checksum of the CRS2 setting save the current setting by pressing F10. If no numeric code is displayed, check the narrative descriptions of the supervisor password in the EEPROM is not correct. 2. Numeric error codes Symptom or error FRU or action, in this section lists...
... operation. A numeric error is displayed for that device. Run BIOS Setup Utility. Enter BIOS Setup and load Setup defaults. 1. Enter BIOS Setup and load Setup Enter to be any number. Then defaults.-The checksum of the CRS2 setting save the current setting by pressing F10. If no numeric code is displayed, check the narrative descriptions of the supervisor password in the EEPROM is not correct. 2. Numeric error codes Symptom or error FRU or action, in this section lists...
User Manual
Page 48
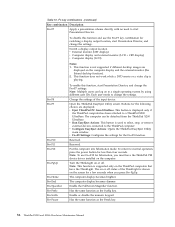
... EEPROM is failed. Remove the wireless LAN device that you installed. 2. System board. 0200 Hard disk error-The hard disk is not correct. 0190 Critical low-battery error 1. Load Setup Defaults in BIOS Setup Utility. 0230 Shadow RAM error-Shadow RAM fails at offset nnnn. 1. Embedded Security hardware tamper detected. Run BIOS Setup Utility, and then save current setting by pressing F10. 2. Remove either a Mini-PCI Card or a modem daughter card. Load Setup Defaults in BIOS Setup Utility. 3. DIMM. 2. Charge the battery pack. 2. Remove one of them...
... EEPROM is failed. Remove the wireless LAN device that you installed. 2. System board. 0200 Hard disk error-The hard disk is not correct. 0190 Critical low-battery error 1. Load Setup Defaults in BIOS Setup Utility. 0230 Shadow RAM error-Shadow RAM fails at offset nnnn. 1. Embedded Security hardware tamper detected. Run BIOS Setup Utility, and then save current setting by pressing F10. 2. Remove either a Mini-PCI Card or a modem daughter card. Load Setup Defaults in BIOS Setup Utility. 3. DIMM. 2. Charge the battery pack. 2. Remove one of them...
User Manual
Page 49
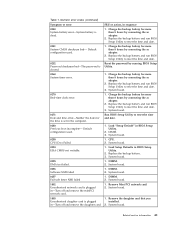
...0250 System battery error-System battery is set in -Turn off and remove the miniPCI network card. 1. Default configuration used . 1. DIMM. 2. Replace the backup battery and run BIOS Setup Utility to reset the time and date. 0251 System CMOS checksum bad- Reset the password by connecting the ac adapter. 2. Replace the backup battery and run BIOS Setup Utility to reset the time and date. 0280 Previous boot incomplete- Run BIOS Setup Utility to reset the time and date. 0252 Password checksum bad-The password is plugged installed. Default configuration used...
...0250 System battery error-System battery is set in -Turn off and remove the miniPCI network card. 1. Default configuration used . 1. DIMM. 2. Replace the backup battery and run BIOS Setup Utility to reset the time and date. 0251 System CMOS checksum bad- Reset the password by connecting the ac adapter. 2. Replace the backup battery and run BIOS Setup Utility to reset the time and date. 0280 Previous boot incomplete- Run BIOS Setup Utility to reset the time and date. 0252 Password checksum bad-The password is plugged installed. Default configuration used...
User Manual
Page 50
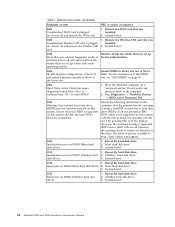
... Invalid memory configuration-Power off and remove the Wireless USB card. 1. Reseat the hard disk drive. disk drive) 3. The latest version is attached. Ultrabay™ hard disk drive. Reseat the hard disk drive. 2. Remove the Wireless USB card that you installed. 2. Remove the WAN card that you installed. 2. Remove all but the reader that you set up within your HDD is not supported by pressing ESC. Do not apply any physical shock to enter SETUP 1. Reseat the hard disk drive. 2. Ensure that your main operating system. Initialization error...
... Invalid memory configuration-Power off and remove the Wireless USB card. 1. Reseat the hard disk drive. disk drive) 3. The latest version is attached. Ultrabay™ hard disk drive. Reseat the hard disk drive. 2. Remove the Wireless USB card that you installed. 2. Remove the WAN card that you installed. 2. Remove all but the reader that you set up within your HDD is not supported by pressing ESC. Do not apply any physical shock to enter SETUP 1. Reseat the hard disk drive. 2. Ensure that your main operating system. Initialization error...
User Manual
Page 52
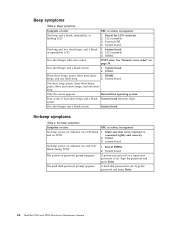
... Enter. 44 ThinkPad X200 and X200s Hardware Maintenance Manual Beep symptoms Symptom or error FRU or action, in sequence No beep, power-on indicator on password or a supervisor password is set . External CRT. 4. Three short beeps, pause, three more short beeps, and one short beep. 2. Reinstall the operating system. Five short beeps and a blank screen. No beep, power-on indicator on page 39. A power-on , LCD blank, 1. The hard-disk password...
... Enter. 44 ThinkPad X200 and X200s Hardware Maintenance Manual Beep symptoms Symptom or error FRU or action, in sequence No beep, power-on indicator on password or a supervisor password is set . External CRT. 4. Three short beeps, pause, three more short beeps, and one short beep. 2. Reinstall the operating system. Five short beeps and a blank screen. No beep, power-on indicator on page 39. A power-on , LCD blank, 1. The hard-disk password...
User Manual
Page 54
... considered only when a problem recurs. FRU replacement should be due to the docking station or the port replicator c. Run the diagnostic test for damage. If no more errors exist. Verify that have no defects). Non-ThinkPad devices b. External diskette drive or optical drive g. Optical disk or diskette in loop mode at the time of the following : 1. LCD assembly 46 ThinkPad X200 and X200s Hardware Maintenance Manual
... considered only when a problem recurs. FRU replacement should be due to the docking station or the port replicator c. Run the diagnostic test for damage. If no more errors exist. Verify that have no defects). Non-ThinkPad devices b. External diskette drive or optical drive g. Optical disk or diskette in loop mode at the time of the following : 1. LCD assembly 46 ThinkPad X200 and X200s Hardware Maintenance Manual
User Manual
Page 61
... ThinkPad Devices --> AC Adapter, Battery 1 (Battery2) LCD unit 1. Conexant Smart Modem Interrupt b. While the message, "To interrupt normal startup, press the blue ThinkVangate button," is set up the operating system. FRU tests FRU Applicable test System board 1. Using cursor keys, select Main hard disk drive or Ultrabay hard disk drive. 6. Diagnostics --> Diskette Drives 2. Place the computer on the computer. Interactive Tests --> Video Modem daughter card 1. Interactive Tests --> Keyboard Hard disk drive Enter the BIOS Setup Utility and change Serial...
... ThinkPad Devices --> AC Adapter, Battery 1 (Battery2) LCD unit 1. Conexant Smart Modem Interrupt b. While the message, "To interrupt normal startup, press the blue ThinkVangate button," is set up the operating system. FRU tests FRU Applicable test System board 1. Using cursor keys, select Main hard disk drive or Ultrabay hard disk drive. 6. Diagnostics --> Diskette Drives 2. Place the computer on the computer. Interactive Tests --> Video Modem daughter card 1. Interactive Tests --> Keyboard Hard disk drive Enter the BIOS Setup Utility and change Serial...
User Manual
Page 64
... switching a display output location, start Presentation Director, and change the settings. Switch a display output location v External monitor (CRT display) v Computer display and external monitor (LCD + CRT display) v Computer display (LCD) Notes: 1. Open the ThinkPad EasyEject Utility screen. Note: To use the Fn+F7 key combination for hibernation, you press Fn+PgUp. Has the same function as the Break key. 56 ThinkPad X200 and X200s Hardware Maintenance Manual This function is shown on the screen for the following choices are displayed on or off . Each user needs...
... switching a display output location, start Presentation Director, and change the settings. Switch a display output location v External monitor (CRT display) v Computer display and external monitor (LCD + CRT display) v Computer display (LCD) Notes: 1. Open the ThinkPad EasyEject Utility screen. Note: To use the Fn+F7 key combination for hibernation, you press Fn+PgUp. Has the same function as the Break key. 56 ThinkPad X200 and X200s Hardware Maintenance Manual This function is shown on the screen for the following choices are displayed on or off . Each user needs...
User Manual
Page 144
... is a Self-service CRU; Once the access panel is removed, the specific CRU is not a CRU. v "Overall" on page 137 v "LCD FRUs" on page 171 v "Keyboard" on page 184 v "Miscellaneous parts" on page 185 v "AC adapters" on page 185 v "Power cords" on page 186 v "Recovery discs" on page 187 v "Common service tools" on product design may include a memory, a wireless card, a keyboard, and a palm rest with specific models listed and described...
... is a Self-service CRU; Once the access panel is removed, the specific CRU is not a CRU. v "Overall" on page 137 v "LCD FRUs" on page 171 v "Keyboard" on page 184 v "Miscellaneous parts" on page 185 v "AC adapters" on page 185 v "Power cords" on page 186 v "Recovery discs" on page 187 v "Common service tools" on product design may include a memory, a wireless card, a keyboard, and a palm rest with specific models listed and described...
Brochure
Page 3
... cable slot, and enhanced speaker performance ThinkPad Shock-Mounted hard disk drive Security Standard: ThinkVantage Client Security with Password Manager, TPM 1.2 chip, Bios disable of virus definition updates; Limited warranty 1-year or 3-year system/1-year battery Included Software Adobe® Acrobat Reader®; McAfee VirusScan® Plus with 30 days of all ports Optional: Integrated Fingerprint reader, SmartCard reader, Full Disk Encryption HDD, Optional Softex® OmniPass and Utimaco® SGE Keyboard...
... cable slot, and enhanced speaker performance ThinkPad Shock-Mounted hard disk drive Security Standard: ThinkVantage Client Security with Password Manager, TPM 1.2 chip, Bios disable of virus definition updates; Limited warranty 1-year or 3-year system/1-year battery Included Software Adobe® Acrobat Reader®; McAfee VirusScan® Plus with 30 days of all ports Optional: Integrated Fingerprint reader, SmartCard reader, Full Disk Encryption HDD, Optional Softex® OmniPass and Utimaco® SGE Keyboard...
Brochure
Page 4
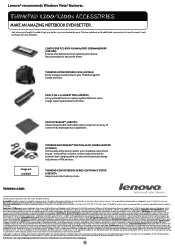
... and coverage maps. Microsoft, Windows and Vista are owned by Lenovo is available at any use of Lenovo Group Ltd. THINKPAD X200 Notebook SERIES 12W PRIVACY FILTER (43R2470) Keep screen information private. Lenovo is service partition. [8] Battery: These model numbers achieved Battery Rundown Time of those products. Maximum capacity may require purchase of optional component. A network connection, third-party software, additional hardware, and/or subscription to international roaming. Operating systems not preloaded on...
... and coverage maps. Microsoft, Windows and Vista are owned by Lenovo is available at any use of Lenovo Group Ltd. THINKPAD X200 Notebook SERIES 12W PRIVACY FILTER (43R2470) Keep screen information private. Lenovo is service partition. [8] Battery: These model numbers achieved Battery Rundown Time of those products. Maximum capacity may require purchase of optional component. A network connection, third-party software, additional hardware, and/or subscription to international roaming. Operating systems not preloaded on...


