
Brochure
Page 3
... drive DVD-ROM, CD-RW/DVD Combo, Multi-Burner Plus DVD Dual Layer Recordable Video graphics Intel Graphics Media Accelerator X3100 (up to 5.9hr Ports Line-in, Microphone, Headphone, Modem, Ethernet, 3xUSB2.0, VGA Out, Docking, IEEE 1394a (select models) Slots 1 Type II PC Card slot 1 ExpressCard 34/54 or Smartcard or 4-in-1 memory card reader support via ExpressCard (select models) ThinkVantage® Active Protection System™ and ThinkPad Shock-Mounted Hard Drive Standard ThinkPad...
... drive DVD-ROM, CD-RW/DVD Combo, Multi-Burner Plus DVD Dual Layer Recordable Video graphics Intel Graphics Media Accelerator X3100 (up to 5.9hr Ports Line-in, Microphone, Headphone, Modem, Ethernet, 3xUSB2.0, VGA Out, Docking, IEEE 1394a (select models) Slots 1 Type II PC Card slot 1 ExpressCard 34/54 or Smartcard or 4-in-1 memory card reader support via ExpressCard (select models) ThinkVantage® Active Protection System™ and ThinkPad Shock-Mounted Hard Drive Standard ThinkPad...

Brochure
Page 4
... to lenovo.com/pc/support and enter your machine type and model number for notebooks and more information. [6] Hard disk drive: GB=1,000,000,000 bytes. Service agreement required. A network connection, third-party software, additional hardware, and/or subscription to which this product is less; Additional restrictions apply. Service is currently in which it connects. [9] The Bluetooth word mark and logos: are based on safe and effective computing. Operating systems...
... to lenovo.com/pc/support and enter your machine type and model number for notebooks and more information. [6] Hard disk drive: GB=1,000,000,000 bytes. Service agreement required. A network connection, third-party software, additional hardware, and/or subscription to which this product is less; Additional restrictions apply. Service is currently in which it connects. [9] The Bluetooth word mark and logos: are based on safe and effective computing. Operating systems...

User Manual
Page 5
... the AC adapter 30 Checking operational charging 31 Checking the battery pack 31 Checking the backup battery 32 Related service information 33 Restoring the factory contents by using Product Recovery discs 33 Passwords 34 Power-on password 34 Hard-disk password 35 Supervisor password 35 How to remove the power-on password . . . . 35 How to remove the hard-disk password . . . . 36 Power management 37 Screen blank mode 37 Standby mode 37 Hibernation mode 38 Symptom-to-FRU index 39 Numeric error codes 39 Error messages...
... the AC adapter 30 Checking operational charging 31 Checking the battery pack 31 Checking the backup battery 32 Related service information 33 Restoring the factory contents by using Product Recovery discs 33 Passwords 34 Power-on password 34 Hard-disk password 35 Supervisor password 35 How to remove the power-on password . . . . 35 How to remove the hard-disk password . . . . 36 Power management 37 Screen blank mode 37 Standby mode 37 Hibernation mode 38 Symptom-to-FRU index 39 Numeric error codes 39 Error messages...
User Manual
Page 11
... following rules when working with powered-on electrical equipment; When using testers, set the controls correctly and use this type of mat to work area. Instructions for that another person, familiar with the power-off . v Do not use worn or broken tools and testers. Safety information 3 v If you from passing through your back. v Always look carefully for safe operational condition. Important: Use only approved...
... following rules when working with powered-on electrical equipment; When using testers, set the controls correctly and use this type of mat to work area. Instructions for that another person, familiar with the power-off . v Do not use worn or broken tools and testers. Safety information 3 v If you from passing through your back. v Always look carefully for safe operational condition. Important: Use only approved...

User Manual
Page 31
... guide" on page 29 - If you replace FRUs, use new nylon-coated screws. Important notes: v Only certified trained personnel should not be replaced because of the machine and the FRU part number are servicing sequence might not apply to replace a nondefective FRU. © Copyright Lenovo 2007, 2008 23 v A FRU should service the computer. v Before replacing any ThinkPad model that a FRU is defective, clear the error log...
... guide" on page 29 - If you replace FRUs, use new nylon-coated screws. Important notes: v Only certified trained personnel should not be replaced because of the machine and the FRU part number are servicing sequence might not apply to replace a nondefective FRU. © Copyright Lenovo 2007, 2008 23 v A FRU should service the computer. v Before replacing any ThinkPad model that a FRU is defective, clear the error log...
User Manual
Page 34
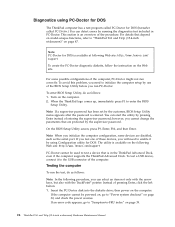
... following Web site: http://www.lenovo.com/ support To create the PC-Doctor diagnostic diskette, follow the instruction on page 30, and check the power sources. If the computer cannot be used to "ThinkPad T61 and T61p (15.4-inch widescreen)" on the computer. To test a USB device, connect it by the customer, BIOS Setup Utility menu appears after the password is an overview of the...
... following Web site: http://www.lenovo.com/ support To create the PC-Doctor diagnostic diskette, follow the instruction on page 30, and check the power sources. If the computer cannot be used to "ThinkPad T61 and T61p (15.4-inch widescreen)" on the computer. To test a USB device, connect it by the customer, BIOS Setup Utility menu appears after the password is an overview of the...

User Manual
Page 35
... 2 seconds; On the first screen, select the model and press Enter. The main panel of PC-Doctor appears. 3. Use the cursor keys and ESC to select. Follow the instructions on the test menu are as follows: Diagnostics Interactive Tests v Run Normal Test v Run Quick Test v CPU/Coprocessor v Systemboard v Video Adapter v Serial Ports v Parallel Ports v Fixed Disks v Diskette Drives v Other Devices v ThinkPad Devices v Communication v Wireless LAN v Memory Test - Some unsupported device names may appear in menus...
... 2 seconds; On the first screen, select the model and press Enter. The main panel of PC-Doctor appears. 3. Use the cursor keys and ESC to select. Follow the instructions on the test menu are as follows: Diagnostics Interactive Tests v Run Normal Test v Run Quick Test v CPU/Coprocessor v Systemboard v Video Adapter v Serial Ports v Parallel Ports v Fixed Disks v Diskette Drives v Other Devices v ThinkPad Devices v Communication v Wireless LAN v Memory Test - Some unsupported device names may appear in menus...
User Manual
Page 42
... Rescue and Recovery" screen where a window "Recovering your system, this process, which will then be booted. The computer does not start until all the files are copied, the computer will restart and return to the "Welcome to insert the remaining recovery discs until the password is entered. Windows setup continues on the desktop and DOS window for it is turned on password (POP), the hard-disk password (HDP...
... Rescue and Recovery" screen where a window "Recovering your system, this process, which will then be booted. The computer does not start until all the files are copied, the computer will restart and return to the "Welcome to insert the remaining recovery discs until the password is entered. Windows setup continues on the desktop and DOS window for it is turned on password (POP), the hard-disk password (HDP...

User Manual
Page 43
... to recover data from the hard disk drive. Remove the backup battery. Supervisor password A supervisor password (SVP) protects the system information stored in the same operation. The POP has been removed. 5. If no SVP has been set . For how to remove the POP, see "1010 Battery pack" on page 80. 4. The system board must enter the SVP in order to get access to the hard disk drive. Related service information 35 Hard-disk password There...
... to recover data from the hard disk drive. Remove the backup battery. Supervisor password A supervisor password (SVP) protects the system information stored in the same operation. The POP has been removed. 5. If no SVP has been set . For how to remove the POP, see "1010 Battery pack" on page 80. 4. The system board must enter the SVP in order to get access to the hard disk drive. Related service information 35 Hard-disk password There...
User Manual
Page 44
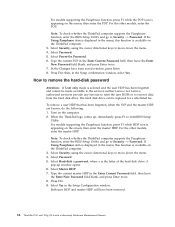
... supports the Passphrase function, enter the BIOS Setup Utility and go to Security --> Password. How to remove the hard-disk password Attention: If User only mode is available on the screen; Turn on the screen; Select Hard-disk x password, where x is appearing on the ThinkPad computer. 3. then enter the POP. For the other models, enter the master HDP. Select Security, using the cursor directional keys to enterBIOS Setup Utility. Select Power-On Password. 6. Type the current SVP in the Setup confirmation window...
... supports the Passphrase function, enter the BIOS Setup Utility and go to Security --> Password. How to remove the hard-disk password Attention: If User only mode is available on the screen; Turn on the screen; Select Hard-disk x password, where x is appearing on the ThinkPad computer. 3. then enter the POP. For the other models, enter the master HDP. Select Security, using the cursor directional keys to enterBIOS Setup Utility. Select Power-On Password. 6. Type the current SVP in the Setup confirmation window...
User Manual
Page 45
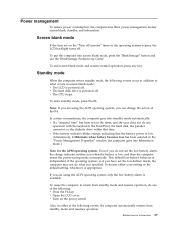
... time" has been set the low-battery alarm, the charge indicator notifies you are using the ACPI operating system, only the low-battery alarm is powered off . v Open the LCD cover. v The CPU stops. To enter standby mode, press Fn+F4. Note: If you are using the ACPI operating system, you specified. This default low-battery behavior is powered off . Screen blank mode If the time set the low-battery alarm, the computer...
... time" has been set the low-battery alarm, the charge indicator notifies you are using the ACPI operating system, only the low-battery alarm is powered off . v Open the LCD cover. v The CPU stops. To enter standby mode, press Fn+F4. Note: If you are using the ACPI operating system, you specified. This default low-battery behavior is powered off . Screen blank mode If the time set the low-battery alarm, the computer...

User Manual
Page 46
... reenter operation mode. v The system is signaled by a serial device or a PC Card device. To cause the computer to Hibernate when battery becomes low, and the battery charge becomes critically low. Pressing the power button. - v If the timer conditions are stored on the resume timer elapses. v The time set on , the computer returns from the hard disk drive. 38 ThinkPad T61 and T61p (15.4-inch widescreen) Hardware Maintenance Manual...
... reenter operation mode. v The system is signaled by a serial device or a PC Card device. To cause the computer to Hibernate when battery becomes low, and the battery charge becomes critically low. Pressing the power button. - v If the timer conditions are stored on the resume timer elapses. v The time set on , the computer returns from the hard disk drive. 38 ThinkPad T61 and T61p (15.4-inch widescreen) Hardware Maintenance Manual...
User Manual
Page 47
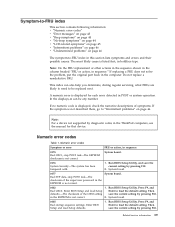
... not replace a nondefective FRU. Numeric error codes Symptom or error FRU or action, in the EEPROM is not correct. Enter BIOS Setup and load Setup Enter to load the default setting. Note: For a device not supported by pressing F10. Run BIOS Setup Utility. Enter BIOS Setup and load Setup defaults. 1. Run BIOS Setup Utility. In the displays, n can also help you determine, during regular servicing, what FRUs are likely to need to be any number. Numeric error codes Table 1. System board...
... not replace a nondefective FRU. Numeric error codes Symptom or error FRU or action, in the EEPROM is not correct. Enter BIOS Setup and load Setup Enter to load the default setting. Note: For a device not supported by pressing F10. Run BIOS Setup Utility. Enter BIOS Setup and load Setup defaults. 1. Run BIOS Setup Utility. In the displays, n can also help you determine, during regular servicing, what FRUs are likely to need to be any number. Numeric error codes Table 1. System board...
User Manual
Page 48
... Monitor type error-Monitor type does not match the one Ethernet devices are found . Run BIOS Setup Utility, and then save the current setting by pressing F10. 2. System board. 01C8 Two or more modem devices are found. Hard disk drive. 4. Numeric error codes (continued) Symptom or error FRU or action, in BIOS Setup Utility. 0230 Shadow RAM error-Shadow RAM fails at offset nnnn. 40 ThinkPad T61 and T61p (15.4-inch widescreen) Hardware Maintenance Manual Remove either a Mini-PCI Card...
... Monitor type error-Monitor type does not match the one Ethernet devices are found . Run BIOS Setup Utility, and then save the current setting by pressing F10. 2. System board. 01C8 Two or more modem devices are found. Hard disk drive. 4. Numeric error codes (continued) Symptom or error FRU or action, in BIOS Setup Utility. 0230 Shadow RAM error-Shadow RAM fails at offset nnnn. 40 ThinkPad T61 and T61p (15.4-inch widescreen) Hardware Maintenance Manual Remove either a Mini-PCI Card...

User Manual
Page 49
...used . 1. System board. 02F5 DMA test failed. 1. Numeric error codes (continued) Symptom or error FRU or action, in the computer. Run BIOS Setup Utility to reset the time and date. 3. Charge the backup battery for more than 8 hours by connecting the ac adapter. 2. Load "Setup Default" in BIOS Setup Utility. 2. Replace the backup battery. 3. DIMM. 2. Remove Mini PCI network card. 2. System board. Table 1. Replace the backup battery and run BIOS Setup Utility to reset the time and date. 0280 Previous boot incomplete- Load Setup Defaults in BIOS...
...used . 1. System board. 02F5 DMA test failed. 1. Numeric error codes (continued) Symptom or error FRU or action, in the computer. Run BIOS Setup Utility to reset the time and date. 3. Charge the backup battery for more than 8 hours by connecting the ac adapter. 2. Load "Setup Default" in BIOS Setup Utility. 2. Replace the backup battery. 3. DIMM. 2. Remove Mini PCI network card. 2. System board. Table 1. Replace the backup battery and run BIOS Setup Utility to reset the time and date. 0280 Previous boot incomplete- Load Setup Defaults in BIOS...

User Manual
Page 50
... board. 42 ThinkPad T61 and T61p (15.4-inch widescreen) Hardware Maintenance Manual disk drive) 3. Reseat the hard disk drive. 2. Install DIMM in Slot-0, but the reader that you installed. 2. Read error on HDD1 (Ultrabay hard disk drive) 1. Numeric error codes (continued) Symptom or error FRU or action, in mind, the customer can still use it is installed. Remove the Wireless USB card that you set up for the authentication. 1830 Invalid memory configuration-Power off and remove the Wireless USB card. 1. Undock docking station or port...
... board. 42 ThinkPad T61 and T61p (15.4-inch widescreen) Hardware Maintenance Manual disk drive) 3. Reseat the hard disk drive. 2. Install DIMM in Slot-0, but the reader that you installed. 2. Read error on HDD1 (Ultrabay hard disk drive) 1. Numeric error codes (continued) Symptom or error FRU or action, in mind, the customer can still use it is installed. Remove the Wireless USB card that you set up for the authentication. 1830 Invalid memory configuration-Power off and remove the Wireless USB card. 1. Undock docking station or port...
User Manual
Page 52
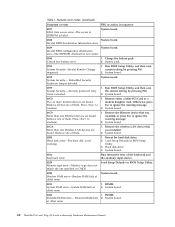
... the operating system. Four cycles of four short beeps and a blank System board (security chip) screen. DIMM. 3. System board. A hard-disk password is set . Reseat the LCD connector. 2. System board. Two short beeps with error codes. System board. Type the password and press Enter. DIMM. DIMM. Five short beeps and a blank screen. No beep, power-on indicator on password prompt appears. System board. 2. beeps, and one short beep. A power-on password or a supervisor password...
... the operating system. Four cycles of four short beeps and a blank System board (security chip) screen. DIMM. 3. System board. A hard-disk password is set . Reseat the LCD connector. 2. System board. Two short beeps with error codes. System board. Type the password and press Enter. DIMM. DIMM. Five short beeps and a blank screen. No beep, power-on indicator on password prompt appears. System board. 2. beeps, and one short beep. A power-on password or a supervisor password...
User Manual
Page 54
..., or software errors. If any error is operating correctly. (See "Power system checkout" on the computer. 5. Remove or disconnect all attached devices are installed, or if the system simply is detected, do not replace a nondefective FRU): a. Battery pack e. External diskette drive or optical drive g. Optical disk or diskette in loop mode at least 10 times. 2. Visually check each FRU for the system board in the internal drive i. Devices attached...
..., or software errors. If any error is operating correctly. (See "Power system checkout" on the computer. 5. Remove or disconnect all attached devices are installed, or if the system simply is detected, do not replace a nondefective FRU): a. Battery pack e. External diskette drive or optical drive g. Optical disk or diskette in loop mode at least 10 times. 2. Visually check each FRU for the system board in the internal drive i. Devices attached...
User Manual
Page 61
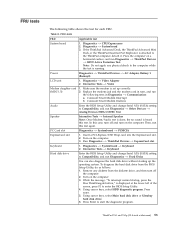
... or the ThinkPad Essential Port Replicator is heard this test. PC Card slot Diagnostics --> Systemboard --> PCMCIA ExpressCard slot Keyboard 1. Turn on the computer. Conexant Smart Modem Interrupt b. Interactive Tests --> Keyboard Hard disk drive Enter the BIOS Setup Utility and change Serial ATA (SATA) setting to Compatibility, and run Diagnostics --> Other Devices --> Analog Devices HDA CODEC Test Speaker Interactive Tests --> Internal Speaker Note: Once Modem/Audio test is done, the no sound is attached...
... or the ThinkPad Essential Port Replicator is heard this test. PC Card slot Diagnostics --> Systemboard --> PCMCIA ExpressCard slot Keyboard 1. Turn on the computer. Conexant Smart Modem Interrupt b. Interactive Tests --> Keyboard Hard disk drive Enter the BIOS Setup Utility and change Serial ATA (SATA) setting to Compatibility, and run Diagnostics --> Other Devices --> Analog Devices HDA CODEC Test Speaker Interactive Tests --> Internal Speaker Note: Once Modem/Audio test is done, the no sound is attached...

User Manual
Page 64
...+End To enable this Utility to start Presentation Director, and change the settings. Open the ThinkPad EasyEject Utility screen. The computer can log on the computer display and the external monitor (the Extend desktop function). 2. Reserved. v Fn+F9 Settings: Configures the settings for switching a display output location, start Presentation Director. The computer display becomes brighter. Note: This function is used to select, stop and remove all the USB devices safely by using different user IDs. Reserved. v Eject ThinkPad PC from...
...+End To enable this Utility to start Presentation Director, and change the settings. Open the ThinkPad EasyEject Utility screen. The computer can log on the computer display and the external monitor (the Extend desktop function). 2. Reserved. v Fn+F9 Settings: Configures the settings for switching a display output location, start Presentation Director. The computer display becomes brighter. Note: This function is used to select, stop and remove all the USB devices safely by using different user IDs. Reserved. v Eject ThinkPad PC from...


