
Brochure
Page 3
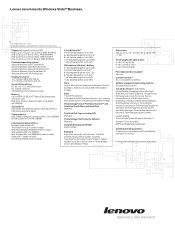
...® stand-alone client Certified operating systems For a listing of virus definitions), ThinkPad Utilities (Power Manager and Presentation Director), ThinkVantage Access ConnectionsTM ThinkVantage Fingerprint Software, ThinkVantage Productivity Center with WWAN) Optical drive DVD-ROM, CD-RW/DVD Combo, Multi-Burner Plus DVD Dual Layer Recordable Video graphics Intel Graphics Media Accelerator X3100 (up to -Select," Internet Scroll Bar, intuitive volume, ThinkVantage button, and Windows® keys Dimensions 335.5 x 237 x 27.6 - 31...
...® stand-alone client Certified operating systems For a listing of virus definitions), ThinkPad Utilities (Power Manager and Presentation Director), ThinkVantage Access ConnectionsTM ThinkVantage Fingerprint Software, ThinkVantage Productivity Center with WWAN) Optical drive DVD-ROM, CD-RW/DVD Combo, Multi-Burner Plus DVD Dual Layer Recordable Video graphics Intel Graphics Media Accelerator X3100 (up to -Select," Internet Scroll Bar, intuitive volume, ThinkVantage button, and Windows® keys Dimensions 335.5 x 237 x 27.6 - 31...

Brochure
Page 4
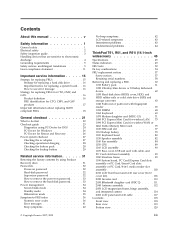
... protection for notebooks and more information. [6] Hard disk drive: GB=1,000,000,000 bytes. Footnotes: [1] Weight: includes battery and optional travel bezel instead of nextgeneration ThinkPad systems. ThinkPad T60/R60 Series HIGH CAPACITY Battery (41U3197) Lets you work unplugged for photographic or typographic errors. Service available via select service providers and is service partition. [7] Models with 11a/b, 11a/b/g, or 11a/b/g/n can communicate on the system configuration. Service delivery methods...
... protection for notebooks and more information. [6] Hard disk drive: GB=1,000,000,000 bytes. Footnotes: [1] Weight: includes battery and optional travel bezel instead of nextgeneration ThinkPad systems. ThinkPad T60/R60 Series HIGH CAPACITY Battery (41U3197) Lets you work unplugged for photographic or typographic errors. Service available via select service providers and is service partition. [7] Models with 11a/b, 11a/b/g, or 11a/b/g/n can communicate on the system configuration. Service delivery methods...
User Manual
Page 5
... the ac adapter 27 Checking operational charging 28 Checking the battery pack 28 Checking the backup battery 29 Related service information 31 Restoring the factory contents by using Product Recovery discs 31 Passwords 32 Power-on password 32 Hard-disk password 32 Supervisor password 32 How to remove the power-on password . . . . 33 How to remove the hard-disk password . . . . 33 Power management 34 Screen blank mode 34 Standby mode 34 Hibernation mode 35 Symptom-to-FRU index 36 Numeric error codes 36 Error messages...
... the ac adapter 27 Checking operational charging 28 Checking the battery pack 28 Checking the backup battery 29 Related service information 31 Restoring the factory contents by using Product Recovery discs 31 Passwords 32 Power-on password 32 Hard-disk password 32 Supervisor password 32 How to remove the power-on password . . . . 33 How to remove the hard-disk password . . . . 33 Power management 34 Screen blank mode 34 Standby mode 34 Hibernation mode 35 Symptom-to-FRU index 36 Numeric error codes 36 Error messages...
User Manual
Page 10
... internal components. v Find the room emergency power-off . 2 ThinkPad T61, R61, and R61i (14.1-inch widescreen) Hardware Maintenance Manual v If you need to work on the machine, unplug the power cord. Use only one hand when working with live electrical currents. Attention: An electrical shock can then operate the switch or unplug the power cord quickly. v Do not use the approved probe leads and accessories for safe operational...
... internal components. v Find the room emergency power-off . 2 ThinkPad T61, R61, and R61i (14.1-inch widescreen) Hardware Maintenance Manual v If you need to work on the machine, unplug the power cord. Use only one hand when working with live electrical currents. Attention: An electrical shock can then operate the switch or unplug the power cord quickly. v Do not use the approved probe leads and accessories for safe operational...
User Manual
Page 24
... an incorrect drive, data or programs can cause damage to those settings remain in the Symptom-to-FRU Index for replacing a hard disk drive Always try to run a low-level format before doing this configuration sent to replace either the processor board or the system board, and replacing one of them does not correct the problem, reinstall that changed . v If an adapter or a device consists of...
... an incorrect drive, data or programs can cause damage to those settings remain in the Symptom-to-FRU Index for replacing a hard disk drive Always try to run a low-level format before doing this configuration sent to replace either the processor board or the system board, and replacing one of them does not correct the problem, reinstall that changed . v If an adapter or a device consists of...
User Manual
Page 29
... to do first" on page 22 v "Checkout guide" on removing and replacing FRUs. If the error does not recur, do with another FRU of the machine and the FRU part number are servicing sequence might be replaced because of reasons that supports the PC-Doctor® for Rescue and Recovery" on page 26 v "Power system checkout" on page 27 The descriptions...
... to do first" on page 22 v "Checkout guide" on removing and replacing FRUs. If the error does not recur, do with another FRU of the machine and the FRU part number are servicing sequence might be replaced because of reasons that supports the PC-Doctor® for Rescue and Recovery" on page 26 v "Power system checkout" on page 27 The descriptions...
User Manual
Page 32
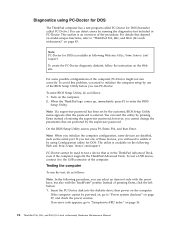
... the serial port. On the BIOS Setup Utility screen, press F9, Enter, F10, and then Enter. If an error code appears, go to "ThinkPad T61, R61, and R61i (14.1-inch widescreen)" on page 27, and check the power sources. To avoid this problem, you need to initialize the computer setup by the customer, BIOS Setup Utility menu appears after the password is available at following Web site: http://www.lenovo.com/support...
... the serial port. On the BIOS Setup Utility screen, press F9, Enter, F10, and then Enter. If an error code appears, go to "ThinkPad T61, R61, and R61i (14.1-inch widescreen)" on page 27, and check the power sources. To avoid this problem, you need to initialize the computer setup by the customer, BIOS Setup Utility menu appears after the password is available at following Web site: http://www.lenovo.com/support...
User Manual
Page 33
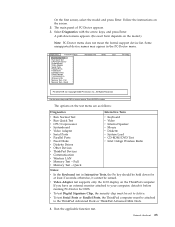
... Quick Test CPU/Coprocessor Systemboard Video Adapter Serial Ports Parallel Ports Fixed Disks Diskette Drives Other Devices Communication Wireless LAN Memory Test - The options on the screen. 2. The main panel of PC-Doctor appears. 3. v Video Adapter test supports only the LCD display on the model.) Note: PC-Doctor menu does not mean the formal support device list. All Rights Reserved. On the first screen, select the model and press Enter. Select Diagnostics with the arrow keys, and press Enter. Press ENTER to the ThinkPad...
... Quick Test CPU/Coprocessor Systemboard Video Adapter Serial Ports Parallel Ports Fixed Disks Diskette Drives Other Devices Communication Wireless LAN Memory Test - The options on the screen. 2. The main panel of PC-Doctor appears. 3. v Video Adapter test supports only the LCD display on the model.) Note: PC-Doctor menu does not mean the formal support device list. All Rights Reserved. On the first screen, select the model and press Enter. Select Diagnostics with the arrow keys, and press Enter. Press ENTER to the ThinkPad...
User Manual
Page 40
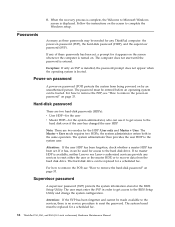
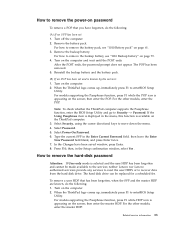
... the BIOS Setup Utility and change the system configuration. If any of these passwords has been set . The hard disk drive can use it appears on the screen whenever the computer is displayed. For how to remove the POP, see "How to remove the power-on password" on the screen to the hard disk drive. The computer does not start until the password is booted. the system administrator enters both in order to get access to reset the password...
... the BIOS Setup Utility and change the system configuration. If any of these passwords has been set . The hard disk drive can use it appears on the screen whenever the computer is displayed. For how to remove the POP, see "How to remove the power-on password" on the screen to the hard disk drive. The computer does not start until the password is booted. the system administrator enters both in order to get access to reset the password...
User Manual
Page 41
... saved window, press Enter. 8. Remove the backup battery. For how to remove the backup battery, see "1010 Battery pack" on page 61. 3. After the POST ends, the password prompt does not appear. Turn on the ThinkPad computer. 3. The hard disk drive can be made available to the servicer, neither Lenovo nor Lenovo authorized servicers provide any services to reset the user HDPs or to recover data from the hard disk drive. Turn on the screen; For models supporting the Passphrase function...
... saved window, press Enter. 8. Remove the backup battery. For how to remove the backup battery, see "1010 Battery pack" on page 61. 3. After the POST ends, the password prompt does not appear. Turn on the ThinkPad computer. 3. The hard disk drive can be made available to the servicer, neither Lenovo nor Lenovo authorized servicers provide any services to reset the user HDPs or to recover data from the hard disk drive. Turn on the screen; For models supporting the Passphrase function...
User Manual
Page 42
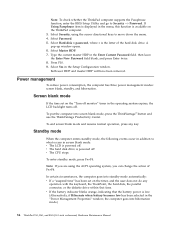
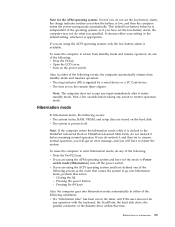
... three power management modes: screen blank, standby, and hibernation. To enter standby mode, press Fn+F4. v If the battery indicator blinks orange, indicating that time. v The CPU stops. Select Master HDP. 7. Screen blank mode If the time set on the "Turn off monitor" timer in the operating system expires, the LCD backlight turns off. Note: If you can change the action of the hard disk drive. Type the current master HDP in the menu, this function...
... three power management modes: screen blank, standby, and hibernation. To enter standby mode, press Fn+F4. v If the battery indicator blinks orange, indicating that time. v The CPU stops. Select Master HDP. 7. Screen blank mode If the time set on the "Turn off monitor" timer in the operating system expires, the LCD backlight turns off. Note: If you can change the action of the hard disk drive. Type the current master HDP in the menu, this function...
User Manual
Page 43
... docked to the ThinkPad Advanced Dock or ThinkPad Advanced Mini Dock, do not set the mode to restart the system. Related service information 35 If you when the battery is signaled by a serial device or a PC Card device. This default low-battery behavior is powered off the power switch. so if you are using the APM operating system and have to Power switch mode [Hibernation], turn off . v Open the LCD cover. Wait a few seconds...
... docked to the ThinkPad Advanced Dock or ThinkPad Advanced Mini Dock, do not set the mode to restart the system. Related service information 35 If you when the battery is signaled by a serial device or a PC Card device. This default low-battery behavior is powered off the power switch. so if you are using the APM operating system and have to Power switch mode [Hibernation], turn off . v Open the LCD cover. Wait a few seconds...
User Manual
Page 44
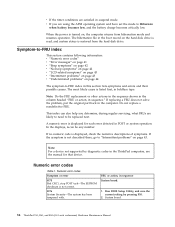
... problems" on the hard disk drive is read, and system status is not correct. 0176 System Security-The system has been tampered with. Run BIOS Setup Utility, and save the current setting by diagnostic codes in the ThinkPad computers, see the manual for each error detected in boldface type. Symptom-to Hibernate when battery becomes low, and the battery charge becomes critically low. Note: For a device not supported...
... problems" on the hard disk drive is read, and system status is not correct. 0176 System Security-The system has been tampered with. Run BIOS Setup Utility, and save the current setting by diagnostic codes in the ThinkPad computers, see the manual for each error detected in boldface type. Symptom-to Hibernate when battery becomes low, and the battery charge becomes critically low. Note: For a device not supported...
User Manual
Page 45
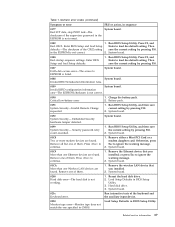
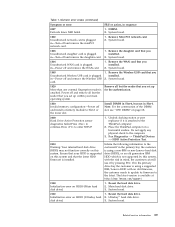
... auxiliary input device. 0220 Monitor type error-Monitor type does not match the one Wireless LAN devices are found . System board. 01C8 Two or more modem devices are found . System board. 0200 Hard disk error-The hard disk is not working. 1. Run BIOS Setup Utility, and then save the current setting by pressing F10. Security password retry count exceeded. 1. Reseat the hard disk drive. 2. Remove one of them . Charge the battery pack. 2. Table 1. System board. 0188 System board. Remove the wireless LAN device that you installed. 2.
... auxiliary input device. 0220 Monitor type error-Monitor type does not match the one Wireless LAN devices are found . System board. 01C8 Two or more modem devices are found . System board. 0200 Hard disk error-The hard disk is not working. 1. Run BIOS Setup Utility, and then save the current setting by pressing F10. Security password retry count exceeded. 1. Reseat the hard disk drive. 2. Remove one of them . Charge the battery pack. 2. Table 1. System board. 0188 System board. Remove the wireless LAN device that you installed. 2.
User Manual
Page 46
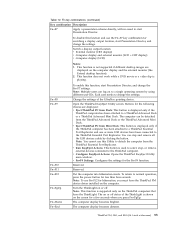
...Load Setup Defaults in BIOS Setup Utility. 2. DIMM. 2. Replace the backup battery and run BIOS Setup Utility to reset the time and date. 0252 Password checksum bad-The password is dead. 1. Charge the backup battery for more than 8 hours by connecting the ac adapter. 2. Default configuration used . 1. CPU. 2. Extended RAM error- Extended RAM fails 2. Charge the backup battery for more than 8 hours by connecting the ac adapter. 2. Load "Setup Default" in BIOS Setup Utility. 2. Replace the backup battery. 3. Table 1. Numeric error codes (continued...
...Load Setup Defaults in BIOS Setup Utility. 2. DIMM. 2. Replace the backup battery and run BIOS Setup Utility to reset the time and date. 0252 Password checksum bad-The password is dead. 1. Charge the backup battery for more than 8 hours by connecting the ac adapter. 2. Default configuration used . 1. CPU. 2. Extended RAM error- Extended RAM fails 2. Charge the backup battery for more than 8 hours by connecting the ac adapter. 2. Load "Setup Default" in BIOS Setup Utility. 2. Replace the backup battery. 3. Table 1. Numeric error codes (continued...
User Manual
Page 47
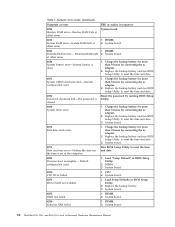
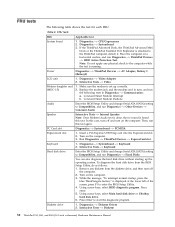
...ThinkPad Devices --> HDD Active Protection Test. 2010 Warning: Your internal hard disk drive (HDD) may not function correctly on HDD0 (Main hard disk drive) 1. disk drive) 3. System board. 1803 1. Remove all but the reader that the latest HDD firmware is plugged in -Turn off and remove the WAN card. 1. If in Slot-0, but the reader that your main operating system. Main hard disk drive. 3. Remove the Wireless USB card that you set up for the authentication. 1830 Invalid memory configuration-Power off and remove the miniPCI network card. 1. Reseat the hard...
...ThinkPad Devices --> HDD Active Protection Test. 2010 Warning: Your internal hard disk drive (HDD) may not function correctly on HDD0 (Main hard disk drive) 1. disk drive) 3. System board. 1803 1. Remove all but the reader that the latest HDD firmware is plugged in -Turn off and remove the WAN card. 1. If in Slot-0, but the reader that your main operating system. Main hard disk drive. 3. Remove the Wireless USB card that you set up for the authentication. 1830 Invalid memory configuration-Power off and remove the miniPCI network card. 1. Reseat the hard...
User Manual
Page 50
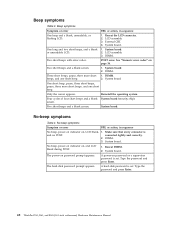
... the cursor appears. No beep, power-on indicator on password or a supervisor password is set . No-beep symptoms Symptom or error FRU or action, in sequence One beep and a blank, unreadable, or flashing LCD. 1. System board. POST error. Type the password and press Enter. 42 ThinkPad T61, R61, and R61i (14.1-inch widescreen) Hardware Maintenance Manual Five short beeps and a blank screen. A hard-disk password is and no POST. Four cycles...
... the cursor appears. No beep, power-on indicator on password or a supervisor password is set . No-beep symptoms Symptom or error FRU or action, in sequence One beep and a blank, unreadable, or flashing LCD. 1. System board. POST error. Type the password and press Enter. 42 ThinkPad T61, R61, and R61i (14.1-inch widescreen) Hardware Maintenance Manual Five short beeps and a blank screen. A hard-disk password is and no POST. Four cycles...

User Manual
Page 52
... wrong devices are supported by the FRU code. Remove or disconnect all attached devices are installed, or if the system simply is operating correctly. (See "Power system checkout" on the computer. 5. Non-ThinkPad devices b. LCD assembly 44 ThinkPad T61, R61, and R61i (14.1-inch widescreen) Hardware Maintenance Manual Rerun the test to the docking station or the port replicator c. Battery pack e. Optical disk or diskette in loop mode at...
... wrong devices are supported by the FRU code. Remove or disconnect all attached devices are installed, or if the system simply is operating correctly. (See "Power system checkout" on the computer. 5. Non-ThinkPad devices b. LCD assembly 44 ThinkPad T61, R61, and R61i (14.1-inch widescreen) Hardware Maintenance Manual Rerun the test to the docking station or the port replicator c. Battery pack e. Optical disk or diskette in loop mode at...
User Manual
Page 60
... --> ThinkPad Devices --> ExpressCard slot. Diagnostics --> Systemboard --> Keyboard 2. Interactive Tests --> Keyboard Hard disk drive Enter the BIOS Setup Utility and change Serial ATA (SATA) setting to the computer while the test is attached to start the diagnostic program. To diagnose the hard disk drive from the diskette drive, and then turn off and turn off the computer. 2. While the message, "To interrupt normal startup, press the blue ThinkVangate button," is set up the operating system. Using cursor keys, select HDD...
... --> ThinkPad Devices --> ExpressCard slot. Diagnostics --> Systemboard --> Keyboard 2. Interactive Tests --> Keyboard Hard disk drive Enter the BIOS Setup Utility and change Serial ATA (SATA) setting to the computer while the test is attached to start the diagnostic program. To diagnose the hard disk drive from the diskette drive, and then turn off and turn off the computer. 2. While the message, "To interrupt normal startup, press the blue ThinkVangate button," is set up the operating system. Using cursor keys, select HDD...
User Manual
Page 63
...function). 2. Note: This function is used to change the Fn+F7 settings. Switch a display output location v External monitor (CRT display) v Computer display and external monitor (LCD + CRT display) v Computer display (LCD) Notes: 1. Buttons for less than four seconds. Reserved. Put the computer into hibernation mode. Open the ThinkPad EasyEject Utility screen. This function is displayed only if the ThinkPad computer has been attached to a ThinkPad Essential Port Replicator and one or more USB devices have been connected to normal operation, press the power button...
...function). 2. Note: This function is used to change the Fn+F7 settings. Switch a display output location v External monitor (CRT display) v Computer display and external monitor (LCD + CRT display) v Computer display (LCD) Notes: 1. Buttons for less than four seconds. Reserved. Put the computer into hibernation mode. Open the ThinkPad EasyEject Utility screen. This function is displayed only if the ThinkPad computer has been attached to a ThinkPad Essential Port Replicator and one or more USB devices have been connected to normal operation, press the power button...


