Brochure
Page 3
... drive DVD-ROM, CD-RW/DVD Combo, Multi-Burner Plus DVD Dual Layer Recordable Video graphics Intel Graphics Media Accelerator X3100 (up to 5.9hr Ports Line-in, Microphone, Headphone, Modem, Ethernet, 3xUSB2.0, VGA Out, Docking, IEEE 1394a (select models) Slots 1 Type II PC Card slot 1 ExpressCard 34/54 or Smartcard or 4-in-1 memory card reader support via ExpressCard (select models) ThinkVantage® Active Protection System™ and ThinkPad Shock-Mounted Hard Drive Standard ThinkPad...
... drive DVD-ROM, CD-RW/DVD Combo, Multi-Burner Plus DVD Dual Layer Recordable Video graphics Intel Graphics Media Accelerator X3100 (up to 5.9hr Ports Line-in, Microphone, Headphone, Modem, Ethernet, 3xUSB2.0, VGA Out, Docking, IEEE 1394a (select models) Slots 1 Type II PC Card slot 1 ExpressCard 34/54 or Smartcard or 4-in-1 memory card reader support via ExpressCard (select models) ThinkVantage® Active Protection System™ and ThinkPad Shock-Mounted Hard Drive Standard ThinkPad...

Brochure
Page 4
... is currently in Ultrabay drive, if applicable. Lenovo makes no representation or warranty regarding third-party products or services. A network connection, third-party software, additional hardware, and/or subscription to a third-party service may vary due to lenovo.com/pc/support and enter your machine type and model number for certain solutions/applications. Fees and restrictions may not provide full feature functionality. Accessible capacity is a trademark of...
... is currently in Ultrabay drive, if applicable. Lenovo makes no representation or warranty regarding third-party products or services. A network connection, third-party software, additional hardware, and/or subscription to a third-party service may vary due to lenovo.com/pc/support and enter your machine type and model number for certain solutions/applications. Fees and restrictions may not provide full feature functionality. Accessible capacity is a trademark of...

User Manual
Page 5
... the AC adapter 30 Checking operational charging 31 Checking the battery pack 31 Checking the backup battery 32 Related service information 33 Restoring the factory contents by using Product Recovery discs 33 Passwords 34 Power-on password 34 Hard-disk password 35 Supervisor password 35 How to remove the power-on password . . . . 35 How to remove the hard-disk password . . . . 36 Power management 37 Screen blank mode 37 Standby mode 37 Hibernation mode 38 Symptom-to-FRU index 39 Numeric error codes 39 Error messages...
... the AC adapter 30 Checking operational charging 31 Checking the battery pack 31 Checking the backup battery 32 Related service information 33 Restoring the factory contents by using Product Recovery discs 33 Passwords 34 Power-on password 34 Hard-disk password 35 Supervisor password 35 How to remove the power-on password . . . . 35 How to remove the hard-disk password . . . . 36 Power management 37 Screen blank mode 37 Standby mode 37 Hibernation mode 38 Symptom-to-FRU index 39 Numeric error codes 39 Error messages...
User Manual
Page 11
... . If you from a circuit. When using testers, set the controls correctly and use the approved probe leads and accessories for these hazards are in your pocket or behind your work alone under hazardous conditions or near power supplies - v Always look carefully for safe operational condition. v Do not work area. Removing or installing main units v Before you start to insulate you cannot unplug...
... . If you from a circuit. When using testers, set the controls correctly and use the approved probe leads and accessories for these hazards are in your pocket or behind your work alone under hazardous conditions or near power supplies - v Always look carefully for safe operational condition. v Do not work area. Removing or installing main units v Before you start to insulate you cannot unplug...

User Manual
Page 31
... supports the PC-Doctor® for DOS diagnostics program. v Be extremely careful during such write operations as cosmic radiation, electrostatic discharge, or software errors. If you suspect that have been altered. "PC-Doctor for a variety of the machine and the FRU part number are servicing sequence might not apply to do not replace the FRU. v Replace a FRU only with a hardware...
... supports the PC-Doctor® for DOS diagnostics program. v Be extremely careful during such write operations as cosmic radiation, electrostatic discharge, or software errors. If you suspect that have been altered. "PC-Doctor for a variety of the machine and the FRU part number are servicing sequence might not apply to do not replace the FRU. v Replace a FRU only with a hardware...
User Manual
Page 34
.... then power on the computer. 2. Turn on the computer. If an error code appears, go to the USB connector of entering the supervisor password; To avoid this problem, you need to initialize the computer setup by use of the BIOS Setup Utility before you initialize the computer configuration, some possible configurations of the procedure. Note: If a supervisor password has been set by the customer, BIOS Setup Utility menu appears after the password is...
.... then power on the computer. 2. Turn on the computer. If an error code appears, go to the USB connector of entering the supervisor password; To avoid this problem, you need to initialize the computer setup by use of the BIOS Setup Utility before you initialize the computer configuration, some possible configurations of the procedure. Note: If a supervisor password has been set by the customer, BIOS Setup Utility menu appears after the password is...

User Manual
Page 35
... in menus. Press ENTER to Active. Full v Memory Test - v Video Adapter test supports only the LCD display on the model.) Note: PC-Doctor menu does not mean the formal support device list. Follow the instructions on the test menu are as follows: Diagnostics Interactive Tests v Run Normal Test v Run Quick Test v CPU/Coprocessor v Systemboard v Video Adapter v Serial Ports v Parallel Ports v Fixed Disks v Diskette Drives v Other Devices v ThinkPad Devices v Communication v Wireless LAN v Memory Test - The options on the screen. 2. Run the applicable function test. On...
... in menus. Press ENTER to Active. Full v Memory Test - v Video Adapter test supports only the LCD display on the model.) Note: PC-Doctor menu does not mean the formal support device list. Follow the instructions on the test menu are as follows: Diagnostics Interactive Tests v Run Normal Test v Run Quick Test v CPU/Coprocessor v Systemboard v Video Adapter v Serial Ports v Parallel Ports v Fixed Disks v Diskette Drives v Other Devices v ThinkPad Devices v Communication v Wireless LAN v Memory Test - The options on the screen. 2. Run the applicable function test. On...
User Manual
Page 42
5. Insert the Product Recovery Disk 1 into the optical drive. The processes updating installed softwares. Then the computer restarts, does some more DOS full screen processing, and restarts again to a Windows desktop where factory preinstallation continues for it is not bootable. 7. In similar fashion, you will be needed for any of these passwords has been set, a prompt for about two minutes and the computer...
5. Insert the Product Recovery Disk 1 into the optical drive. The processes updating installed softwares. Then the computer restarts, does some more DOS full screen processing, and restarts again to a Windows desktop where factory preinstallation continues for it is not bootable. 7. In similar fashion, you will be needed for any of these passwords has been set, a prompt for about two minutes and the computer...

User Manual
Page 43
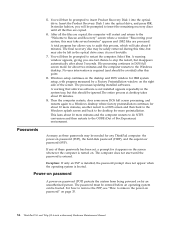
... remove the backup battery, see "How to reset the password. The system administrator then provides the user HDP to recover data from the hard disk drive. If no master HDP is available, neither Lenovo nor Lenovo authorized servicers provide any services to reset either the user or the master HDP, or to the system user. The system board must enter the SVP in order to get access to remove the power-on password To remove...
... remove the backup battery, see "How to reset the password. The system administrator then provides the user HDP to recover data from the hard disk drive. If no master HDP is available, neither Lenovo nor Lenovo authorized servicers provide any services to reset either the user or the master HDP, or to the system user. The system board must enter the SVP in order to get access to remove the power-on password To remove...
User Manual
Page 44
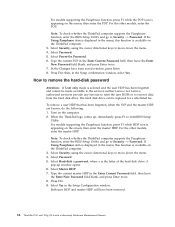
... window opens. 6. then enter the master HDP. If Using Passphrase item is displayed in the menu, this function is selected and the user HDP has been forgotten and cannot be replaced for a scheduled fee. How to move down the menu. 4. then, in the Setup Configuration window. then leave the Enter New Password field blank, and press Enter twice. 8. then enter the POP. Select Power-On Password. 6. Select Password. 5. For models supporting the Passphrase function...
... window opens. 6. then enter the master HDP. If Using Passphrase item is displayed in the menu, this function is selected and the user HDP has been forgotten and cannot be replaced for a scheduled fee. How to move down the menu. 4. then, in the Setup Configuration window. then leave the Enter New Password field blank, and press Enter twice. 8. then enter the POP. Select Power-On Password. 6. Select Password. 5. For models supporting the Passphrase function...
User Manual
Page 45
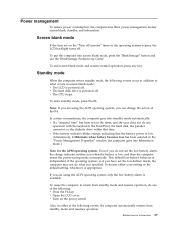
... of the operating system; v Open the LCD cover. Screen blank mode If the time set the low-battery alarm, the charge indicator notifies you do any key. To enter standby mode, press Fn+F4. This default low-battery behavior is low, and then the computer enters the power-saving mode automatically. v The CPU stops. It chooses either of Fn+F4. v Turn on the "Turn off monitor" timer in the "Power Management Properties" window, the computer...
... of the operating system; v Open the LCD cover. Screen blank mode If the time set the low-battery alarm, the charge indicator notifies you do any key. To enter standby mode, press Fn+F4. This default low-battery behavior is low, and then the computer enters the power-saving mode automatically. v The CPU stops. It chooses either of Fn+F4. v Turn on the "Turn off monitor" timer in the "Power Management Properties" window, the computer...

User Manual
Page 46
... the hard disk drive. 38 ThinkPad T61 and T61p (15.4-inch widescreen) Hardware Maintenance Manual Pressing the power button. - v If the timer conditions are using the APM operating system and have set on the timer, and if the user does not do any of the following actions as the event that causes the system to enter hibernation mode, do any operation with the keyboard, the TrackPoint, the hard disk drive...
... the hard disk drive. 38 ThinkPad T61 and T61p (15.4-inch widescreen) Hardware Maintenance Manual Pressing the power button. - v If the timer conditions are using the APM operating system and have set on the timer, and if the user does not do any of the following actions as the event that causes the system to enter hibernation mode, do any operation with the keyboard, the TrackPoint, the hard disk drive...
User Manual
Page 47
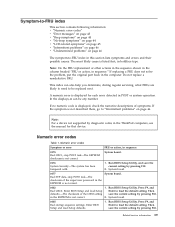
... current setting by diagnostic codes in the ThinkPad computers, see the manual for each error detected in this section lists symptoms and errors and their possible causes. Enter BIOS Setup and load Setup defaults. 1. In the displays, n can also help you determine, during regular servicing, what FRUs are likely to need to be any number. Do not replace a nondefective FRU. Press F9, and Bad CRC2. Run BIOS Setup Utility. Then...
... current setting by diagnostic codes in the ThinkPad computers, see the manual for each error detected in this section lists symptoms and errors and their possible causes. Enter BIOS Setup and load Setup defaults. 1. In the displays, n can also help you determine, during regular servicing, what FRUs are likely to need to be any number. Do not replace a nondefective FRU. Press F9, and Bad CRC2. Run BIOS Setup Utility. Then...
User Manual
Page 48
... BIOS Setup Utility. 0230 Shadow RAM error-Shadow RAM fails at offset nnnn. 40 ThinkPad T61 and T61p (15.4-inch widescreen) Hardware Maintenance Manual Remove the wireless LAN device that you installed. 2. Extended RAM fails 2. Run BIOS Setup Utility, and then save the current setting by pressing F10. 2. Security password retry count exceeded. 1. Press to ignore the warning message. 2. Reseat the hard disk drive. 2. Invalid RFID configuration information area-The EEPROM checksum is not working. 1. System board...
... BIOS Setup Utility. 0230 Shadow RAM error-Shadow RAM fails at offset nnnn. 40 ThinkPad T61 and T61p (15.4-inch widescreen) Hardware Maintenance Manual Remove the wireless LAN device that you installed. 2. Extended RAM fails 2. Run BIOS Setup Utility, and then save the current setting by pressing F10. 2. Security password retry count exceeded. 1. Press to ignore the warning message. 2. Reseat the hard disk drive. 2. Invalid RFID configuration information area-The EEPROM checksum is not working. 1. System board...

User Manual
Page 49
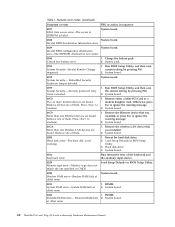
... BIOS Setup Utility to reset the time and date. 0280 Previous boot incomplete- System board. 1802 Unauthorized network card is plugged installed. System board. 0270 Real-time clock error. 1. DIMM. 3. in sequence 0250 System battery error-System battery is dead. 1. Default configuration used . 1. DIMM. 2. Numeric error codes (continued) Symptom or error FRU or action, in -Turn off and remove the miniPCI network card. 1. Charge the backup battery for more than 8 hours by connecting the ac adapter. 2. DIMM. 2. System board. 02F6 Software...
... BIOS Setup Utility to reset the time and date. 0280 Previous boot incomplete- System board. 1802 Unauthorized network card is plugged installed. System board. 0270 Real-time clock error. 1. DIMM. 3. in sequence 0250 System battery error-System battery is dead. 1. Default configuration used . 1. DIMM. 2. Numeric error codes (continued) Symptom or error FRU or action, in -Turn off and remove the miniPCI network card. 1. Charge the backup battery for more than 8 hours by connecting the ac adapter. 2. DIMM. 2. System board. 02F6 Software...

User Manual
Page 50
... widescreen) Hardware Maintenance Manual Remove the Wireless USB card that you installed. 2. Install DIMM in Slot-0, but not in the primary drive bay the customer is not supported by pressing ESC. If in Slot-1. Ultrabay hard disk drive. 3. Remove all but the reader that you set up for the authentication. 1830 Invalid memory configuration-Power off and remove all but the reader that the latest HDD firmware is supported on HDD0 (Main hard disk drive) 1. Undock docking station or port replicator...
... widescreen) Hardware Maintenance Manual Remove the Wireless USB card that you installed. 2. Install DIMM in Slot-0, but not in the primary drive bay the customer is not supported by pressing ESC. If in Slot-1. Ultrabay hard disk drive. 3. Remove all but the reader that you set up for the authentication. 1830 Invalid memory configuration-Power off and remove all but the reader that the latest HDD firmware is supported on HDD0 (Main hard disk drive) 1. Undock docking station or port replicator...
User Manual
Page 52
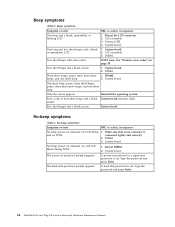
..., three short beeps, pause, three more short 1. The power-on page 39. See "Numeric error codes" on password prompt appears. Reinstall the operating system. A power-on , and LCD blank during POST. 1. Four cycles of four short beeps and a blank System board (security chip) screen. A hard-disk password is set . External CRT. 4. DIMM. Make sure that every connector is set . DIMM. 3. Three short beeps, pause, three more...
..., three short beeps, pause, three more short 1. The power-on page 39. See "Numeric error codes" on password prompt appears. Reinstall the operating system. A power-on , and LCD blank during POST. 1. Four cycles of four short beeps and a blank System board (security chip) screen. A hard-disk password is set . External CRT. 4. DIMM. Make sure that every connector is set . DIMM. 3. Three short beeps, pause, three more...
User Manual
Page 54
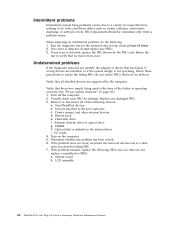
... a hardware defect, such as cosmic radiation, electrostatic discharge, or software errors. Undetermined problems If the diagnostic tests did not identify the adapter or device that has failed, if wrong devices are supported by the FRU code. Visually check each FRU for the system board in the internal drive i. External diskette drive or optical drive g. DIMM h. PC Cards 4. System board b. LCD assembly 46 ThinkPad T61 and T61p (15.4-inch widescreen) Hardware Maintenance Manual
... a hardware defect, such as cosmic radiation, electrostatic discharge, or software errors. Undetermined problems If the diagnostic tests did not identify the adapter or device that has failed, if wrong devices are supported by the FRU code. Visually check each FRU for the system board in the internal drive i. External diskette drive or optical drive g. DIMM h. PC Cards 4. System board b. LCD assembly 46 ThinkPad T61 and T61p (15.4-inch widescreen) Hardware Maintenance Manual
User Manual
Page 61
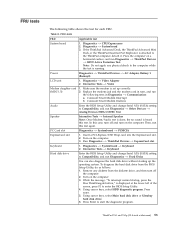
... --> Keyboard Hard disk drive Enter the BIOS Setup Utility and change Serial ATA (SATA) setting to the computer while the test is displayed at the lower left of the screen, press F1 to Compatibility, and run the following table shows the test for each FRU. While the message, "To interrupt normal startup, press the blue ThinkVangate button," is running. Power Diagnostics --> ThinkPad Devices --> AC Adapter, Battery 1 (Battery2) LCD unit 1. PC Card slot Diagnostics...
... --> Keyboard Hard disk drive Enter the BIOS Setup Utility and change Serial ATA (SATA) setting to the computer while the test is displayed at the lower left of the screen, press F1 to Compatibility, and run the following table shows the test for each FRU. While the message, "To interrupt normal startup, press the blue ThinkVangate button," is running. Power Diagnostics --> ThinkPad Devices --> AC Adapter, Battery 1 (Battery2) LCD unit 1. PC Card slot Diagnostics...

User Manual
Page 64
... USB devices have the ThinkLight. Each user needs to the ThinkPad Essential Port Replicator. You can stop , or remove external devices connected to a single operating system by clicking the button. Note: To use Fn+F12 for a few seconds when you must have the ThinkPad PM device driver installed on the computer. The on or off . Switch a display output location v External monitor (CRT display) v Computer display and external monitor (LCD + CRT display) v Computer display (LCD) Notes: 1. Put the computer into hibernation mode. Turn...
... USB devices have the ThinkLight. Each user needs to the ThinkPad Essential Port Replicator. You can stop , or remove external devices connected to a single operating system by clicking the button. Note: To use Fn+F12 for a few seconds when you must have the ThinkPad PM device driver installed on the computer. The on or off . Switch a display output location v External monitor (CRT display) v Computer display and external monitor (LCD + CRT display) v Computer display (LCD) Notes: 1. Put the computer into hibernation mode. Turn...


