User Manual
Page 5
... board and PC Card/ExpressCard slots assembly 103 2010 LCD front bezel 106 2020 Inverter card 107 2030 Bluetooth daughter card (BDC-2) . . . . 108 2040 Wireless WAN antenna cable (MAIN) . . 109 2050 LCD panel, LCD cable, and hinges . . . 110 2060 LCD rear cover and wireless LAN antenna cables 113 Locations 114 Front view 114 Rear view 115 Bottom view 115 Parts list 116 Overall 117 LCD FRUs 197 Keyboard 229 Recovery discs 233 Miscellaneous parts 255 AC adapters...
... board and PC Card/ExpressCard slots assembly 103 2010 LCD front bezel 106 2020 Inverter card 107 2030 Bluetooth daughter card (BDC-2) . . . . 108 2040 Wireless WAN antenna cable (MAIN) . . 109 2050 LCD panel, LCD cable, and hinges . . . 110 2060 LCD rear cover and wireless LAN antenna cables 113 Locations 114 Front view 114 Rear view 115 Bottom view 115 Parts list 116 Overall 117 LCD FRUs 197 Keyboard 229 Recovery discs 233 Miscellaneous parts 255 AC adapters...
User Manual
Page 10
... between IBM or Lenovo and the customer. How to use error messages Use the error codes displayed on the screen to prevent cracking at each BGA (Ball Grid Array) chipset. Running Automatic Configuration may also cause false error codes. Note the current configuration settings (using the View Configuration option); If you are servicing may have been customized. Whatever causes the first error code may alter the settings. Custom Model Variant (CMV...
... between IBM or Lenovo and the customer. How to use error messages Use the error codes displayed on the screen to prevent cracking at each BGA (Ball Grid Array) chipset. Running Automatic Configuration may also cause false error codes. Note the current configuration settings (using the View Configuration option); If you are servicing may have been customized. Whatever causes the first error code may alter the settings. Custom Model Variant (CMV...
User Manual
Page 20
... carefully for safe operational condition. Some hand tools have , near power supplies - Performing a mechanical inspection - Removing or installing Field Replaceable Units (FRUs) v Before you when working with the reflective surface of maintenance information. Use only one hand when working with the power-off position. such touching can occur only when there is conductive; keep the other hand in the off controls, is near...
... carefully for safe operational condition. Some hand tools have , near power supplies - Performing a mechanical inspection - Removing or installing Field Replaceable Units (FRUs) v Before you when working with the reflective surface of maintenance information. Use only one hand when working with the power-off position. such touching can occur only when there is conductive; keep the other hand in the off controls, is near...
User Manual
Page 25
... the customer. © Copyright Lenovo 2007 19 If the error does not recur, do return a FRU, you must include the following information in the parts exchange form or parts return form that you replace a FRU, make sure that you replace FRUs, use new nylon-coated screws. Name and phone number of service __ 3. Date on the display, and beep symptoms __ 6. Read...
... the customer. © Copyright Lenovo 2007 19 If the error does not recur, do return a FRU, you must include the following information in the parts exchange form or parts return form that you replace a FRU, make sure that you replace FRUs, use new nylon-coated screws. Name and phone number of service __ 3. Date on the display, and beep symptoms __ 6. Read...
User Manual
Page 29
... set : 1. The user must be booted. Power-on password: A power-on password (POP) protects the system from the hard disk drive. Turn on password (POP), the hard-disk password (HDP), and the supervisor password (SVP). Turn off the computer. 2. The system board must enter the SVP in the same operation. Remove the backup battery. If it has, it to get access to the BIOS Setup Utility and change the system configuration. The hard disk drive can use it can be replaced for the HDP: User...
... set : 1. The user must be booted. Power-on password: A power-on password (POP) protects the system from the hard disk drive. Turn on password (POP), the hard-disk password (HDP), and the supervisor password (SVP). Turn off the computer. 2. The system board must enter the SVP in the same operation. Remove the backup battery. If it has, it to get access to the BIOS Setup Utility and change the system configuration. The hard disk drive can use it can be replaced for the HDP: User...
User Manual
Page 30
... BIOS Setup Utility screen opens. 4. Select Power-On Password. 7. The computer restarts, and the BIOS Setup Utility screen opens. 4. then leave the Enter New Password field blank, and press Enter twice. 8. Press F10; then, in the menu, this function is displayed in the Setup confirmation window, select Yes . How to recover data from the hard disk drive. The hard disk drive can be made available to the servicer, neither Lenovo nor Lenovo authorized servicers provide any services to reset the user HDPs or to remove the hard-disk password...
... BIOS Setup Utility screen opens. 4. Select Power-On Password. 7. The computer restarts, and the BIOS Setup Utility screen opens. 4. then leave the Enter New Password field blank, and press Enter twice. 8. Press F10; then, in the menu, this function is displayed in the Setup confirmation window, select Yes . How to recover data from the hard disk drive. The hard disk drive can be made available to the servicer, neither Lenovo nor Lenovo authorized servicers provide any services to reset the user HDPs or to remove the hard-disk password...
User Manual
Page 31
... expires, the LCD backlight turns off monitor" timer in the Setup Configuration window. Note: If you are using the ACPI operating system, you can change the action of the operating system; This default low-battery behavior is low, and then the computer enters the power-saving mode automatically. General descriptions 25 Screen blank mode If the time set on the "Turn off . Standby mode When the computer enters standby mode, the following...
... expires, the LCD backlight turns off monitor" timer in the Setup Configuration window. Note: If you are using the ACPI operating system, you can change the action of the operating system; This default low-battery behavior is low, and then the computer enters the power-saving mode automatically. General descriptions 25 Screen blank mode If the time set on the "Turn off . Standby mode When the computer enters standby mode, the following...

User Manual
Page 32
... the system to enter hibernation mode, do not undock it is turned on, the computer returns from the hard disk drive. 26 MT ThinkPad® ThinkPad R60, R60e, R61, and R61i Pressing Fn+F4 keys. Note: The computer does not accept any operation with the keyboard, the TrackPoint, the hard disk drive, the parallel connector, or the diskette drive within that action. - Pressing the power button. - v Open the LCD cover.
... the system to enter hibernation mode, do not undock it is turned on, the computer returns from the hard disk drive. 26 MT ThinkPad® ThinkPad R60, R60e, R61, and R61i Pressing Fn+F4 keys. Note: The computer does not accept any operation with the keyboard, the TrackPoint, the hard disk drive, the parallel connector, or the diskette drive within that action. - Pressing the power button. - v Open the LCD cover.

User Manual
Page 33
... use of the BIOS Setup Utility before you will need to initialize the computer setup by use of these devices, you will need to do as a guide in identifying and correcting problems with the PC-Doctor for the floppy drive; Identify the failing symptoms in as much detail as the serial port. If you test one of non-ThinkPad products, prototype cards, or modified options can detect errors...
... use of the BIOS Setup Utility before you will need to initialize the computer setup by use of these devices, you will need to do as a guide in identifying and correcting problems with the PC-Doctor for the floppy drive; Identify the failing symptoms in as much detail as the serial port. If you test one of non-ThinkPad products, prototype cards, or modified options can detect errors...
User Manual
Page 34
... keys, and press Enter. Instead of PC-Doctor appears. 3. Insert the PC-Doctor disk into the diskette drive; Diagnostics Interactive Tests Run Normal Test Run Quick Test CPU/Coprocessor Systemboard Video Adapter Serial Ports Parallel Ports Fixed Disks Diskette Drives Other Devices Communication Wireless LAN Memory Test - All Rights Reserved. Press ENTER to "Power system checkout" on , go to "Symptom-to move in the PC-Doctor menu. Follow the instructions on the model...
... keys, and press Enter. Instead of PC-Doctor appears. 3. Insert the PC-Doctor disk into the diskette drive; Diagnostics Interactive Tests Run Normal Test Run Quick Test CPU/Coprocessor Systemboard Video Adapter Serial Ports Parallel Ports Fixed Disks Diskette Drives Other Devices Communication Wireless LAN Memory Test - All Rights Reserved. Press ENTER to "Power system checkout" on , go to "Symptom-to move in the PC-Doctor menu. Follow the instructions on the model...

User Manual
Page 35
.... v The options marked *1 are incorrect. Quick v Keyboard v Video v Internal Speaker v Mouse v Diskette v System Load v Optical Drive Test v Intel® Wireless Radio Notes: v In the Keyboard test in Interactive Tests, the Fn key should be sensed. Run the applicable function test. 5. General descriptions 29 If you have an external monitor attached to Active. Checkout guide The options on the ThinkPad computer. Follow the instructions on the system and reset them...
.... v The options marked *1 are incorrect. Quick v Keyboard v Video v Internal Speaker v Mouse v Diskette v System Load v Optical Drive Test v Intel® Wireless Radio Notes: v In the Keyboard test in Interactive Tests, the Fn key should be sensed. Run the applicable function test. 5. General descriptions 29 If you have an external monitor attached to Active. Checkout guide The options on the ThinkPad computer. Follow the instructions on the system and reset them...

User Manual
Page 36
... LCD Info v Hardware Events Log Utility v Run External Tests v Surface Scan Hard Disk v Benchmark System v DOS Shell v Tech Support Form v Battery Rundown v View Test Log v Print Log v Save Log v Full Erase Hard Drive v Quick Erase Hard Drive PC-Doctor for Windows This product is supplied when you turn on the computer. Turn off the computer. 6. Check that the battery pack supplies power when you troubleshoot and resolve problems related to display...
... LCD Info v Hardware Events Log Utility v Run External Tests v Surface Scan Hard Disk v Benchmark System v DOS Shell v Tech Support Form v Battery Rundown v View Test Log v Print Log v Save Log v Full Erase Hard Drive v Quick Erase Hard Drive PC-Doctor for Windows This product is supplied when you turn on the computer. Turn off the computer. 6. Check that the battery pack supplies power when you troubleshoot and resolve problems related to display...
User Manual
Page 39
... a/b/g/n wireless LAN 76 1110 PCI Express Mini Card for wireless WAN for R60 and R61i 78 1120 Backup battery 79 1130 Keyboard bezel and wireless WAN antenna cable (AUX 80 1140 SIM card slot 82 1150 Fan assembly 83 1160 CPU 86 1170 LCD assembly 88 1180 Base cover 91 1190 Speaker assembly 94 1200 Video connector sub card and FFC cable for R61 and R61i 231 Recovery discs 233 Windows...
... a/b/g/n wireless LAN 76 1110 PCI Express Mini Card for wireless WAN for R60 and R61i 78 1120 Backup battery 79 1130 Keyboard bezel and wireless WAN antenna cable (AUX 80 1140 SIM card slot 82 1150 Fan assembly 83 1160 CPU 86 1170 LCD assembly 88 1180 Base cover 91 1190 Speaker assembly 94 1200 Video connector sub card and FFC cable for R61 and R61i 231 Recovery discs 233 Windows...
User Manual
Page 47
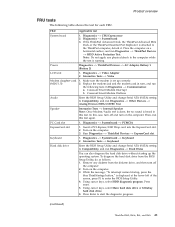
... each FRU. Power Diagnostics --> ThinkPad Devices --> AC Adapter, Battery 1 (Battery 2) LCD unit 1. Conexant Smart Modem Interrupt b. Turn on the computer. 3. Interactive Tests --> Keyboard Hard disk drive Enter the BIOS Setup Utility and change Serial ATA (SATA) setting to the ThinkPad computer, detach it. Using cursor keys, select HDD diagnostic program. FRU Applicable test System board 1. Place the computer on the computer. Press enter. 5. Diagnostics --> Video Adapter 2. While the message, "To interrupt normal startup, press the blue ThinkVantage button," is...
... each FRU. Power Diagnostics --> ThinkPad Devices --> AC Adapter, Battery 1 (Battery 2) LCD unit 1. Conexant Smart Modem Interrupt b. Turn on the computer. 3. Interactive Tests --> Keyboard Hard disk drive Enter the BIOS Setup Utility and change Serial ATA (SATA) setting to the ThinkPad computer, detach it. Using cursor keys, select HDD diagnostic program. FRU Applicable test System board 1. Place the computer on the computer. Press enter. 5. Diagnostics --> Video Adapter 2. While the message, "To interrupt normal startup, press the blue ThinkVantage button," is...

User Manual
Page 50
... a display output location v External monitor (CRT display) v Computer display and external monitor (LCD + CRT display) v Computer display (LCD) Notes: 1. Note: Multiple users can log on the computer display and the external monitor (the Extend desktop function). 2. Open the ThinkPad EasyEject Utility screen. You can be detached from the ThinkPad Essential Port Replicator. Note: You cannot use the Fn+F7 key combination for switching a display output location, start Presentation Director, and change the settings. v Run EasyEject Actions: This button is displayed only if the ThinkPad...
... a display output location v External monitor (CRT display) v Computer display and external monitor (LCD + CRT display) v Computer display (LCD) Notes: 1. Note: Multiple users can log on the computer display and the external monitor (the Extend desktop function). 2. Open the ThinkPad EasyEject Utility screen. You can be detached from the ThinkPad Essential Port Replicator. Note: You cannot use the Fn+F7 key combination for switching a display output location, start Presentation Director, and change the settings. v Run EasyEject Actions: This button is displayed only if the ThinkPad...
User Manual
Page 52
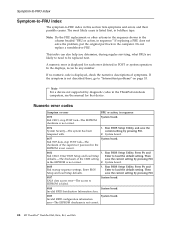
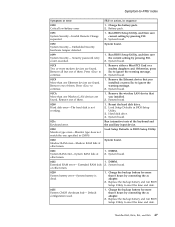
... section lists symptoms and errors and their possible causes. If replacing a FRU does not solve the problem, put the original part back in the EEPROM is displayed, check the narrative descriptions of the supervisor password in POST or system operation. Run BIOS Setup Utility. This index can be replaced next. System board. 0182 1. Then save the current setting by pressing F10. 2. Enter BIOS Setup and load Setup defaults. 1. System board...
... section lists symptoms and errors and their possible causes. If replacing a FRU does not solve the problem, put the original part back in the EEPROM is displayed, check the narrative descriptions of the supervisor password in POST or system operation. Run BIOS Setup Utility. This index can be replaced next. System board. 0182 1. Then save the current setting by pressing F10. 2. Enter BIOS Setup and load Setup defaults. 1. System board...
User Manual
Page 53
.... 0250 System battery error-System battery is not working. 1. Reseat the hard disk drive. 2. Run interactive tests of the keyboard and the auxiliary input device. 0220 Monitor type error-Monitor type does not match the one of them . 1. Extended RAM fails 2. Replace the backup battery and run BIOS Setup Utility to ignore the warning message. 2. Remove one of them. System board. Default configuration used. 1. Run BIOS Setup Utility, and then save current setting by connecting the ac adapter. 2. Press to reset the time...
.... 0250 System battery error-System battery is not working. 1. Reseat the hard disk drive. 2. Run interactive tests of the keyboard and the auxiliary input device. 0220 Monitor type error-Monitor type does not match the one of them . 1. Extended RAM fails 2. Replace the backup battery and run BIOS Setup Utility to ignore the warning message. 2. Remove one of them. System board. Default configuration used. 1. Run BIOS Setup Utility, and then save current setting by connecting the ac adapter. 2. Press to reset the time...
User Manual
Page 54
... card is plugged in-Power off and remove the daughter card. 2. Charge the backup battery for more than 8 hours by connecting the ac adapter. 2. DIMM. 2. System board. 1803 1. System board. 48 MT ThinkPad® ThinkPad R60, R60e, R61, and R61i Default configuration used. 1. DIMM. 3. Remove the Wireless USB card that you Unauthorized daughter card is cleared. Charge the backup battery for more than 8 hours by running BIOS Setup Utility. 0260 System timer error. 1. Remove Mini PCI network card. 2. Remove the daughter card that you installed...
... card is plugged in-Power off and remove the daughter card. 2. Charge the backup battery for more than 8 hours by connecting the ac adapter. 2. DIMM. 2. System board. 1803 1. System board. 48 MT ThinkPad® ThinkPad R60, R60e, R61, and R61i Default configuration used. 1. DIMM. 3. Remove the Wireless USB card that you Unauthorized daughter card is cleared. Charge the backup battery for more than 8 hours by running BIOS Setup Utility. 0260 System timer error. 1. Remove Mini PCI network card. 2. Remove the daughter card that you installed...

User Manual
Page 55
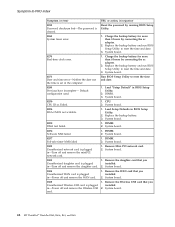
... --> ThinkPad Devices --> HDD Active Protection Test. 2010 Warning: Your internal hard disk drive (HDD) may not function correctly on this system and that you set up within your HDD is not supported by pressing ESC. The latest version is installed. System board. 2102 1. Reseat the hard disk drive. 2. ThinkPad R60, R60e, R61, and R61i 49 Remove all but the reader that the latest HDD firmware is available at http://www.lenovo.com/support 2100 Initialization error...
... --> ThinkPad Devices --> HDD Active Protection Test. 2010 Warning: Your internal hard disk drive (HDD) may not function correctly on this system and that you set up within your HDD is not supported by pressing ESC. The latest version is installed. System board. 2102 1. Reseat the hard disk drive. 2. ThinkPad R60, R60e, R61, and R61i 49 Remove all but the reader that the latest HDD firmware is available at http://www.lenovo.com/support 2100 Initialization error...

User Manual
Page 57
... with error codes. System board. 2. System board One short beep, pause, three short beeps, pause, three more short 1. Reinstall the operating system. Make sure that every connector is set . connected tightly and correctly. 2. No beep, power-on indicator on password or a supervisor password is set . A power-on , and LCD blank during POST. 1. One long and two short beeps, and a blank or unreadable LCD. 1. LCD assembly. 3. The hard-disk password prompt...
... with error codes. System board. 2. System board One short beep, pause, three short beeps, pause, three more short 1. Reinstall the operating system. Make sure that every connector is set . connected tightly and correctly. 2. No beep, power-on indicator on password or a supervisor password is set . A power-on , and LCD blank during POST. 1. One long and two short beeps, and a blank or unreadable LCD. 1. LCD assembly. 3. The hard-disk password prompt...


