User Manual
Page 5
... board and PC Card/ExpressCard slots assembly 103 2010 LCD front bezel 106 2020 Inverter card 107 2030 Bluetooth daughter card (BDC-2) . . . . 108 2040 Wireless WAN antenna cable (MAIN) . . 109 2050 LCD panel, LCD cable, and hinges . . . 110 2060 LCD rear cover and wireless LAN antenna cables 113 Locations 114 Front view 114 Rear view 115 Bottom view 115 Parts list 116 Overall 117 LCD FRUs 197 Keyboard 229 Recovery discs 233 Miscellaneous parts 255 AC adapters...
... board and PC Card/ExpressCard slots assembly 103 2010 LCD front bezel 106 2020 Inverter card 107 2030 Bluetooth daughter card (BDC-2) . . . . 108 2040 Wireless WAN antenna cable (MAIN) . . 109 2050 LCD panel, LCD cable, and hinges . . . 110 2060 LCD rear cover and wireless LAN antenna cables 113 Locations 114 Front view 114 Rear view 115 Bottom view 115 Parts list 116 Overall 117 LCD FRUs 197 Keyboard 229 Recovery discs 233 Miscellaneous parts 255 AC adapters...
User Manual
Page 10
... apply any kind. How to use error messages Use the error codes displayed on a system board are servicing may have been customized. Therefore, it . Whatever causes the first error code may alter the settings. Note the current configuration settings (using the View Configuration option); Strategy for replacing a system board Some components mounted on the screen to the customer. Attention: The drive startup sequence in effect. Custom Model Variant (CMV) This is a unique...
... apply any kind. How to use error messages Use the error codes displayed on a system board are servicing may have been customized. Therefore, it . Whatever causes the first error code may alter the settings. Note the current configuration settings (using the View Configuration option); Strategy for replacing a system board Some components mounted on the screen to the customer. Attention: The drive startup sequence in effect. Custom Model Variant (CMV) This is a unique...
User Manual
Page 20
.... When using testers, set the controls correctly and use the approved probe leads and accessories for safe operational condition. v Regularly inspect and maintain your body. - v Do not use this type of a plastic dental mirror. such touching can then operate the switch or unplug the power cord quickly. v Find the room emergency power-off the power, if necessary. - v Do not work area. If you need to power-off the...
.... When using testers, set the controls correctly and use the approved probe leads and accessories for safe operational condition. v Regularly inspect and maintain your body. - v Do not use this type of a plastic dental mirror. such touching can then operate the switch or unplug the power cord quickly. v Find the room emergency power-off the power, if necessary. - v Do not work area. If you need to power-off the...
User Manual
Page 25
... or parts return form that a FRU is defective, clear the error log and run the test again. v A FRU should service the computer. What to do first When you do return a FRU, you are correct by the customer. © Copyright Lenovo 2007 19 Machine type, model number, and serial number __ 9. Date of service __ 3. If you suspect that you replace FRUs, use new nylon...
... or parts return form that a FRU is defective, clear the error log and run the test again. v A FRU should service the computer. What to do first When you do return a FRU, you are correct by the customer. © Copyright Lenovo 2007 19 Machine type, model number, and serial number __ 9. Date of service __ 3. If you suspect that you replace FRUs, use new nylon...
User Manual
Page 29
... reset the password. The password must be entered before an operating system can be needed for the HDP: User only and Master + User. The system administrator then provides the user HDP to remove the battery pack, see "1120 Backup battery" on password (POP) protects the system from the hard disk drive. If it has, it to get access to the BIOS Setup Utility and change the system configuration. How to remove the power-on password To remove...
... reset the password. The password must be entered before an operating system can be needed for the HDP: User only and Master + User. The system administrator then provides the user HDP to remove the battery pack, see "1120 Backup battery" on password (POP) protects the system from the hard disk drive. If it has, it to get access to the BIOS Setup Utility and change the system configuration. How to remove the power-on password To remove...
User Manual
Page 30
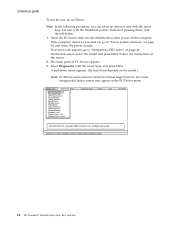
... normal startup, press the blue ThinkVantage button" message is appearing on the ThinkPad computer. 2. The Rescue and Recovery screen opens. Click Access BIOS. The computer restarts, and the BIOS Setup Utility screen opens. 4. Turn on the computer; The computer restarts, and the BIOS Setup Utility screen opens. 4. Select Power-On Password. 7. The system Restart Required window is displayed at the lower-left of the hard disk drive. Select Security, using the cursor directional keys to recover data from the hard disk drive...
... normal startup, press the blue ThinkVantage button" message is appearing on the ThinkPad computer. 2. The Rescue and Recovery screen opens. Click Access BIOS. The computer restarts, and the BIOS Setup Utility screen opens. 4. Turn on the computer; The computer restarts, and the BIOS Setup Utility screen opens. 4. Select Power-On Password. 7. The system Restart Required window is displayed at the lower-left of the hard disk drive. Select Security, using the cursor directional keys to recover data from the hard disk drive...
User Manual
Page 31
... enters the power-saving mode automatically. Type the current master HDP in the Setup Configuration window. In certain circumstances, the computer goes into standby mode automatically: v If a "suspend time" has been set on the timer, and the user does not do what occurs in the operating system expires, the LCD backlight turns off . v The hard disk drive is available. Select Yes in the Enter Current Password field. Standby mode...
... enters the power-saving mode automatically. Type the current master HDP in the Setup Configuration window. In certain circumstances, the computer goes into standby mode automatically: v If a "suspend time" has been set on the timer, and the user does not do what occurs in the operating system expires, the LCD backlight turns off . v The hard disk drive is available. Select Yes in the Enter Current Password field. Standby mode...

User Manual
Page 32
... the battery charge becomes critically low. If you do undock it enters standby mode. v If you are satisfied in the boot record on the hard disk. Pressing Fn+F4 keys. v Turn on the timer, and if the user does not do any action to reenter operation mode. Note: The computer does not accept any of the following: v Press the Fn+F12 keys. v Open the LCD cover...
... the battery charge becomes critically low. If you do undock it enters standby mode. v If you are satisfied in the boot record on the hard disk. Pressing Fn+F4 keys. v Turn on the timer, and if the user does not do any action to reenter operation mode. Note: The computer does not accept any of the following: v Press the Fn+F12 keys. v Open the LCD cover...

User Manual
Page 33
.... 5. Enter the Rescue and Recovery workspace by repeating the operation. a. To test a USB device, connect it by use of non-ThinkPad products, prototype cards, or modified options can detect errors by running the diagnostic test or by pressing the ThinkVantage button during POST. 2. Checkout guide Checkout guide Use the following Web site: http://www.lenovo.com/support PC-Doctor cannot be used to test a device that depend on model-unique functions...
.... 5. Enter the Rescue and Recovery workspace by repeating the operation. a. To test a USB device, connect it by use of non-ThinkPad products, prototype cards, or modified options can detect errors by running the diagnostic test or by pressing the ThinkVantage button during POST. 2. Checkout guide Checkout guide Use the following Web site: http://www.lenovo.com/support PC-Doctor cannot be used to test a device that depend on model-unique functions...
User Manual
Page 34
...-Doctor, Inc. Press ENTER to move in the PC-Doctor menu. The main panel of pressing Enter, click the left button. 1. Select Diagnostics with the TrackPoint pointer. then power on page 46. On the first screen, select the model and press Enter. Diagnostics Interactive Tests Run Normal Test Run Quick Test CPU/Coprocessor Systemboard Video Adapter Serial Ports Parallel Ports Fixed Disks Diskette Drives Other Devices Communication Wireless LAN Memory Test - Instead of...
...-Doctor, Inc. Press ENTER to move in the PC-Doctor menu. The main panel of pressing Enter, click the left button. 1. Select Diagnostics with the TrackPoint pointer. then power on page 46. On the first screen, select the model and press Enter. Diagnostics Interactive Tests Run Normal Test Run Quick Test CPU/Coprocessor Systemboard Video Adapter Serial Ports Parallel Ports Fixed Disks Diskette Drives Other Devices Communication Wireless LAN Memory Test - Instead of...

User Manual
Page 35
... Normal Test v Run Quick Test v CPU/Coprocessor v Systemboard v Video Adapter v Serial Ports*1 v Parallel Ports*1 v Fixed Disks v Diskette Drives v Other Devices v ThinkPad Devices v Communication v Wireless LAN v Memory Test - To exit the test, select Quit - Checkout guide The options on the ThinkPad computer. Run the applicable function test. 5. Follow the instructions on the system and reset them if they are only for DOS. Exit Diag. otherwise, it . 6. General descriptions 29 Quick v Keyboard v Video v Internal Speaker v Mouse v Diskette v System Load...
... Normal Test v Run Quick Test v CPU/Coprocessor v Systemboard v Video Adapter v Serial Ports*1 v Parallel Ports*1 v Fixed Disks v Diskette Drives v Other Devices v ThinkPad Devices v Communication v Wireless LAN v Memory Test - To exit the test, select Quit - Checkout guide The options on the ThinkPad computer. Run the applicable function test. 5. Follow the instructions on the system and reset them if they are only for DOS. Exit Diag. otherwise, it . 6. General descriptions 29 Quick v Keyboard v Video v Internal Speaker v Mouse v Diskette v System Load...

User Manual
Page 36
... problems related to display symptoms and solutions: v CHECK SYSTEM HEALTH v SYSTEM AND DEVICE TESTS v LENOVO TROUBLESHOOTING v CENTER v SYSTEM REPORTS v UPDATES AND SUPPORT Power system checkout To verify a symptom, do the following: 1. Remove the battery pack. 3. If you turn on the computer. 5. Checkout guide Detecting system information with PC-Doctor PC-Doctor can detect the following system information: Hardware Info v System Configuration v Memory Contents v Physical Disk Drives v Logical Disk Drives...
... problems related to display symptoms and solutions: v CHECK SYSTEM HEALTH v SYSTEM AND DEVICE TESTS v LENOVO TROUBLESHOOTING v CENTER v SYSTEM REPORTS v UPDATES AND SUPPORT Power system checkout To verify a symptom, do the following: 1. Remove the battery pack. 3. If you turn on the computer. 5. Checkout guide Detecting system information with PC-Doctor PC-Doctor can detect the following system information: Hardware Info v System Configuration v Memory Contents v Physical Disk Drives v Logical Disk Drives...
User Manual
Page 39
... a/b/g/n wireless LAN 76 1110 PCI Express Mini Card for wireless WAN for R60 and R61i 78 1120 Backup battery 79 1130 Keyboard bezel and wireless WAN antenna cable (AUX 80 1140 SIM card slot 82 1150 Fan assembly 83 1160 CPU 86 1170 LCD assembly 88 1180 Base cover 91 1190 Speaker assembly 94 1200 Video connector sub card and FFC cable for R61 and R61i 231 Recovery discs 233 Windows...
... a/b/g/n wireless LAN 76 1110 PCI Express Mini Card for wireless WAN for R60 and R61i 78 1120 Backup battery 79 1130 Keyboard bezel and wireless WAN antenna cable (AUX 80 1140 SIM card slot 82 1150 Fan assembly 83 1160 CPU 86 1170 LCD assembly 88 1180 Base cover 91 1190 Speaker assembly 94 1200 Video connector sub card and FFC cable for R61 and R61i 231 Recovery discs 233 Windows...
User Manual
Page 47
... the ThinkPad Essential Port Replicator is displayed at the lower left of the screen, press F1 to the ThinkPad computer, detach it. Interactive Tests --> Keyboard Hard disk drive Enter the BIOS Setup Utility and change Serial ATA (SATA) setting to Compatibility, and run Diagnostics --> ThinkPad Devices --> HDD Active Protection Test. Interactive Tests --> Video Modem daughter card (MDC-1.5) 1. Conexant Smart Modem Dialtone Audio Enter the BIOS Setup Utility and change Serial ATA (SATA) setting to Compatibility, and run this test. Keyboard 1. Make sure...
... the ThinkPad Essential Port Replicator is displayed at the lower left of the screen, press F1 to the ThinkPad computer, detach it. Interactive Tests --> Keyboard Hard disk drive Enter the BIOS Setup Utility and change Serial ATA (SATA) setting to Compatibility, and run Diagnostics --> ThinkPad Devices --> HDD Active Protection Test. Interactive Tests --> Video Modem daughter card (MDC-1.5) 1. Conexant Smart Modem Dialtone Audio Enter the BIOS Setup Utility and change Serial ATA (SATA) setting to Compatibility, and run this test. Keyboard 1. Make sure...

User Manual
Page 50
...: This button is playing. v Fn+F9 Settings: Configures the settings for the following choices are displayed on to select, stop and remove all the USB devices safely by using different user IDs. To disable this function, start Presentation Director, and change the Fn+F7 settings. Switch a display output location v External monitor (CRT display) v Computer display and external monitor (LCD + CRT display) v Computer display (LCD) Notes: 1. v Eject ThinkPad PC from the ThinkPad Essential Port Replicator. v Configure EasyEject Actions: Opens the ThinkPad EasyEject Utility main window...
...: This button is playing. v Fn+F9 Settings: Configures the settings for the following choices are displayed on to select, stop and remove all the USB devices safely by using different user IDs. To disable this function, start Presentation Director, and change the Fn+F7 settings. Switch a display output location v External monitor (CRT display) v Computer display and external monitor (LCD + CRT display) v Computer display (LCD) Notes: 1. v Eject ThinkPad PC from the ThinkPad Essential Port Replicator. v Configure EasyEject Actions: Opens the ThinkPad EasyEject Utility main window...
User Manual
Page 52
... system operation. Enter BIOS Setup and load Setup defaults. 1. Press F9, and Bad CRC2. Then defaults.-The checksum of the supervisor password in boldface type. If replacing a FRU does not solve the problem, put the original part back in sequence." In the displays, n can also help you determine, during regular servicing, what FRUs are likely to need to "Intermittent problems" on page 53. Note For a device not supported...
... system operation. Enter BIOS Setup and load Setup defaults. 1. Press F9, and Bad CRC2. Then defaults.-The checksum of the supervisor password in boldface type. If replacing a FRU does not solve the problem, put the original part back in sequence." In the displays, n can also help you determine, during regular servicing, what FRUs are likely to need to "Intermittent problems" on page 53. Note For a device not supported...
User Manual
Page 53
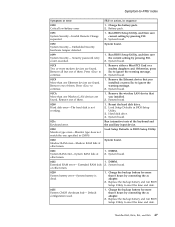
...- Press to reset the time and date. 0251 System CMOS checksum bad- System board. 0200 Hard disk error-The hard disk is dead. 1. at offset nnnn. 0250 System battery error-System battery is not working. 1. Charge the backup battery for more than 8 hours by pressing F10. 2. System board. 0199 System Security- Remove the wireless LAN device that you installed. 2. Hard disk drive. 4. Default configuration used. 1. Symptom-to-FRU index Symptom or error FRU or action, in BIOS Setup Utility. 3. Run BIOS Setup Utility, and...
...- Press to reset the time and date. 0251 System CMOS checksum bad- System board. 0200 Hard disk error-The hard disk is dead. 1. at offset nnnn. 0250 System battery error-System battery is not working. 1. Charge the backup battery for more than 8 hours by pressing F10. 2. System board. 0199 System Security- Remove the wireless LAN device that you installed. 2. Hard disk drive. 4. Default configuration used. 1. Symptom-to-FRU index Symptom or error FRU or action, in BIOS Setup Utility. 3. Run BIOS Setup Utility, and...
User Manual
Page 54
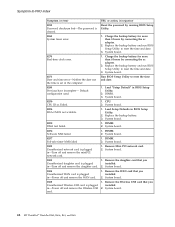
... is set in BIOS Setup Utility. 2. Load "Setup Default" in the computer. System board. 02F0 CPU ID:xx Failed. 1. Replace the backup battery. 3. System board. 02F5 DMA test failed. 1. DIMM. 2. Remove the daughter card that you installed. 2. System board. 48 MT ThinkPad® ThinkPad R60, R60e, R61, and R61i Default configuration used. 1. DIMM. 3. System board. 02F6 Software NMI failed 1. System board. 1802 Unauthorized network card is plugged installed. Remove Mini PCI network card. 2. System board. 0270 Real-time clock error. 1. DIMM. 2. Remove the...
... is set in BIOS Setup Utility. 2. Load "Setup Default" in the computer. System board. 02F0 CPU ID:xx Failed. 1. Replace the backup battery. 3. System board. 02F5 DMA test failed. 1. DIMM. 2. Remove the daughter card that you installed. 2. System board. 48 MT ThinkPad® ThinkPad R60, R60e, R61, and R61i Default configuration used. 1. DIMM. 3. System board. 02F6 Software NMI failed 1. System board. 1802 Unauthorized network card is plugged installed. Remove Mini PCI network card. 2. System board. 0270 Real-time clock error. 1. DIMM. 2. Remove the...

User Manual
Page 55
... hard disk drive) 1. Read error on HDD0 (Main hard disk drive) 2. Main hard disk drive. 3. System board. 2110 1. ThinkPad R60, R60e, R61, and R61i 49 Do not apply any physical shock to the computer. 2. Reseat the hard disk drive. 2. Run Diagnostics --> ThinkPad Devices --> HDD Active Protection Test. 2010 Warning: Your internal hard disk drive (HDD) may not function correctly on this system, with an old firmware, the customer needs to update its firmware to the latest. Reseat the hard disk drive. Ultrabay hard disk drive...
... hard disk drive) 1. Read error on HDD0 (Main hard disk drive) 2. Main hard disk drive. 3. System board. 2110 1. ThinkPad R60, R60e, R61, and R61i 49 Do not apply any physical shock to the computer. 2. Reseat the hard disk drive. 2. Run Diagnostics --> ThinkPad Devices --> HDD Active Protection Test. 2010 Warning: Your internal hard disk drive (HDD) may not function correctly on this system, with an old firmware, the customer needs to update its firmware to the latest. Reseat the hard disk drive. Ultrabay hard disk drive...

User Manual
Page 57
... one short beep. Reinstall the operating system. No beep, power-on indicator on page 46. A power-on password or a supervisor password is set . System board. System board. 2. DIMM. DIMM. System board No-beep symptoms Symptom or error FRU or action, in sequence One beep and a blank, unreadable, or flashing LCD. 1. connected tightly and correctly. 2. System board. Reseat DIMM. 2. Type the password and press Enter. LCD assembly. 3. One long and...
... one short beep. Reinstall the operating system. No beep, power-on indicator on page 46. A power-on password or a supervisor password is set . System board. System board. 2. DIMM. DIMM. System board No-beep symptoms Symptom or error FRU or action, in sequence One beep and a blank, unreadable, or flashing LCD. 1. connected tightly and correctly. 2. System board. Reseat DIMM. 2. Type the password and press Enter. LCD assembly. 3. One long and...


