User Guide
Page 3
...169; Copyright Lenovo 2007,2008 iii Getting started 1-1 Shipping contents 1-1 Attaching the base and handling your monitor 1-1 Product overview 1-2 Types of adjustments 1-2 User controls 1-2 Cable lock slot 1-3 Setting up your monitor 1-3 Connecting and turning on your monitor 1-3 Registering your monitor 2-7 Detaching the monitor stand 2-7 Chapter 3. Reference information 3-1 Monitor specifications 3-1 Troubleshooting 3-2 Manual image setup 3-3 Manually installing the monitor driver 3-4 Service information 3-6 Appendix A. Adjusting and using your monitor 2-1 Comfort and...
...169; Copyright Lenovo 2007,2008 iii Getting started 1-1 Shipping contents 1-1 Attaching the base and handling your monitor 1-1 Product overview 1-2 Types of adjustments 1-2 User controls 1-2 Cable lock slot 1-3 Setting up your monitor 1-3 Connecting and turning on your monitor 1-3 Registering your monitor 2-7 Detaching the monitor stand 2-7 Chapter 3. Reference information 3-1 Monitor specifications 3-1 Troubleshooting 3-2 Manual image setup 3-3 Manually installing the monitor driver 3-4 Service information 3-6 Appendix A. Adjusting and using your monitor 2-1 Comfort and...
User Guide
Page 5
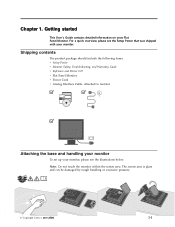
... on your monitor. The screen area is glass and can be damaged by rough handling or excessive pressure. © Copyright Lenovo 2007,2008 1-1 Shipping contents The product package should include the following items: v Setup Poster v Monitor Safety, Troubleshooting, and Warranty Guide v Reference and Driver CD v Flat Panel Monitor v Power Cord v Analog Interface Cable- Attached to monitor Attaching the base and handling your monitor To set up your monitor, please see...
... on your monitor. The screen area is glass and can be damaged by rough handling or excessive pressure. © Copyright Lenovo 2007,2008 1-1 Shipping contents The product package should include the following items: v Setup Poster v Monitor Safety, Troubleshooting, and Warranty Guide v Reference and Driver CD v Flat Panel Monitor v Power Cord v Analog Interface Cable- Attached to monitor Attaching the base and handling your monitor To set up your monitor, please see...
User Guide
Page 6
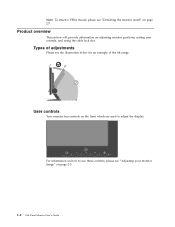
Types of the tilt range. User controls Your monitor has controls on the front which are used to use these controls, please see the illustration below for an example of adjustments Please see "Adjusting your monitor image" on how to adjust the display. Product overview This section will provide information on page 2-7. For information on page 2-3. 1-2 Flat Panel Monitor User 's Guide Note: To attach a VESA mount, please see "Detaching the monitor stand" on adjusting monitor positions, setting user controls, and using the cable lock slot.
Types of the tilt range. User controls Your monitor has controls on the front which are used to use these controls, please see the illustration below for an example of adjustments Please see "Adjusting your monitor image" on how to adjust the display. Product overview This section will provide information on page 2-7. For information on page 2-3. 1-2 Flat Panel Monitor User 's Guide Note: To attach a VESA mount, please see "Detaching the monitor stand" on adjusting monitor positions, setting user controls, and using the cable lock slot.
User Guide
Page 7
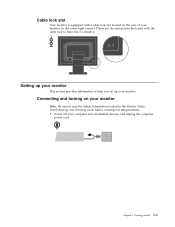
... the instructions that came with a cable lock slot located on your monitor (in the Monitor Safety, Troubleshooting, and Warranty Guide before carrying out this procedure. 1. Chapter 1. Power off your monitor. Getting started 1-3 Cable lock slot Your monitor is equipped with the cable lock to learn how to read the Safety Information located in the lower right corner). Setting up your monitor This section provides information to help you set...
... the instructions that came with a cable lock slot located on your monitor (in the Monitor Safety, Troubleshooting, and Warranty Guide before carrying out this procedure. 1. Chapter 1. Power off your monitor. Getting started 1-3 Cable lock slot Your monitor is equipped with the cable lock to learn how to read the Safety Information located in the lower right corner). Setting up your monitor This section provides information to help you set...
User Guide
Page 9
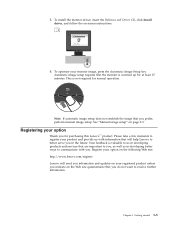
....lenovo.com/register Lenovo will help Lenovo to us with you in developing products and services that you for normal operation. Getting started 1-5 5. Your feedback is warmed up for at least 15 minutes. To install the monitor driver, insert the Reference and Driver CD, click Install driver, and follow the on page 3-3. To optimize your option on your option Thank you prefer, perform manual image setup...
....lenovo.com/register Lenovo will help Lenovo to us with you in developing products and services that you for normal operation. Getting started 1-5 5. Your feedback is warmed up for at least 15 minutes. To install the monitor driver, insert the Reference and Driver CD, click Install driver, and follow the on page 3-3. To optimize your option on your option Thank you prefer, perform manual image setup...
User Guide
Page 10
.... v Tilt: Adjust the tilt of your monitor to work that you to optimize the appearance of site between your eyes and the center the monitor suits your preferences for monitors range from overhead lighting or nearby windows. Equipment layout and setup play a large role in ) and can achieve different viewing distances by repositioning your monitor or by modifying your computer. v General location: Position your monitor: ©...
.... v Tilt: Adjust the tilt of your monitor to work that you to optimize the appearance of site between your eyes and the center the monitor suits your preferences for monitors range from overhead lighting or nearby windows. Equipment layout and setup play a large role in ) and can achieve different viewing distances by repositioning your monitor or by modifying your computer. v General location: Position your monitor: ©...
User Guide
Page 11
... accommodate changes in the way most appropriate to optimize the position and orientation of your computer equipment have questions on the screen's contents. v Keep your operating system; Any concentrated and sustained visual activity can be purchased through vendors or accessed at: http://www.ibm.com/able/ 2-2 Flat Panel Monitor User 's Guide v Good posture starts with equipment setup: The layout of your work you...
... accommodate changes in the way most appropriate to optimize the position and orientation of your computer equipment have questions on the screen's contents. v Keep your operating system; Any concentrated and sustained visual activity can be purchased through vendors or accessed at: http://www.ibm.com/able/ 2-2 Flat Panel Monitor User 's Guide v Good posture starts with equipment setup: The layout of your work you...
User Guide
Page 12
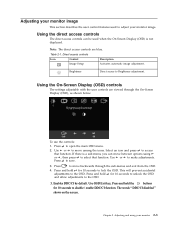
.... Press to save. 3. This will prevent accidental adjustments to select that function. Use OSD Exit key, Press and hold the buttons for 10 seconds to unlock the OSD and allow adjustments to adjust your monitor image. The words " DDC/CI disabled " shows on the screen. Adjusting your monitor image This section describes the user control features used when the On Screen Display (OSD) is a sub-menu, you can be used to the OSD. 5. Select an...
.... Press to save. 3. This will prevent accidental adjustments to select that function. Use OSD Exit key, Press and hold the buttons for 10 seconds to unlock the OSD and allow adjustments to adjust your monitor image. The words " DDC/CI disabled " shows on the screen. Adjusting your monitor image This section describes the user control features used when the On Screen Display (OSD) is a sub-menu, you can be used to the OSD. 5. Select an...

User Guide
Page 13
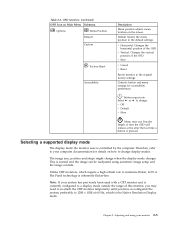
... Flat Panel Monitor User 's Guide v Default v sRGB ssR v Reddish • Bluish v Red: Increases or decreases the saturation of 'red' in the image. v Green: Increases or decreases the saturation of the OSD. Shows resolution, refresh rate, and product details. Manually optimizes the image. Note: This screen does not allow any software running on Main Menu Submenu Brightness/Contrast Image Position Image Setup Brightness Contrast Horizontal Position Vertical Position Automatic Manual Image Properties Color Preset mode Custom Options Information Language Description Adjusts...
... Flat Panel Monitor User 's Guide v Default v sRGB ssR v Reddish • Bluish v Red: Increases or decreases the saturation of 'red' in the image. v Green: Increases or decreases the saturation of the OSD. Shows resolution, refresh rate, and product details. Manually optimizes the image. Note: This screen does not allow any software running on Main Menu Submenu Brightness/Contrast Image Position Image Setup Brightness Contrast Horizontal Position Vertical Position Automatic Manual Image Properties Color Preset mode Custom Options Information Language Description Adjusts...
User Guide
Page 14
.... Controls button and menu settings for details on the screen. The image size, position and shape might change . v Horizontal: Changes the horizontal position of the OSD. v Off v Default v Slow Menu time out: Sets the length of this monitor, you may need to change display modes. Unlike CRT monitors, which is currently configured to minimize flicker, LCD or Flat Panel technology is pressed. Note: If your monitor 2-5 preferably to 1280 x 1024 at 60 Hz, which require a high refresh rate to a display mode outside the range...
.... Controls button and menu settings for details on the screen. The image size, position and shape might change . v Horizontal: Changes the horizontal position of the OSD. v Off v Default v Slow Menu time out: Sets the length of this monitor, you may need to change display modes. Unlike CRT monitors, which is currently configured to minimize flicker, LCD or Flat Panel technology is pressed. Note: If your monitor 2-5 preferably to 1280 x 1024 at 60 Hz, which require a high refresh rate to a display mode outside the range...
User Guide
Page 15
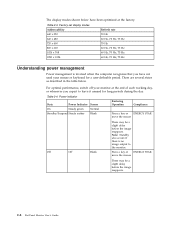
... before the image reappears. 2-6 Flat Panel Monitor User 's Guide There are several states as described in the table below have not used your monitor at the factory. Table 2-4. Note: Standby also occurs if there is invoked when the computer recognizes that you have been optimized at the end of each working day, or whenever you expect to the monitor. Factory set display modes Addressability Refresh rate 640 x 350...
... before the image reappears. 2-6 Flat Panel Monitor User 's Guide There are several states as described in the table below have not used your monitor at the factory. Table 2-4. Note: Standby also occurs if there is invoked when the computer recognizes that you have been optimized at the end of each working day, or whenever you expect to the monitor. Factory set display modes Addressability Refresh rate 640 x 350...
User Guide
Page 16
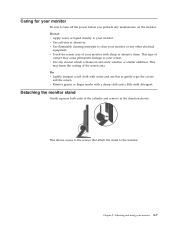
... to turn off the power before you perform any maintenance on the monitor. This allows access to the screws that attach the stand to gently wipe the covers and the screen. v Use solvents or abrasives. Do: v Lightly dampen a soft cloth with water and use this to the monitor. v Touch the screen area of your monitor with a damp cloth and a little mild detergent. Adjusting and using your monitor. v Remove...
... to turn off the power before you perform any maintenance on the monitor. This allows access to the screws that attach the stand to gently wipe the covers and the screen. v Use solvents or abrasives. Do: v Lightly dampen a soft cloth with water and use this to the monitor. v Touch the screen area of your monitor with a damp cloth and a little mild detergent. Adjusting and using your monitor. v Remove...
User Guide
Page 17
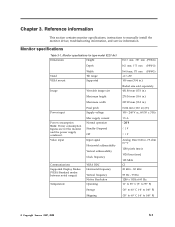
... Depth Stand VESA mount Width Tilt range Supported Image Power input Power consumption Note: Power consumption figures are for the monitor and the power supply combined. Reference information This section contains monitor specifications, instructions to 140° F) © Copyright Lenovo 2007 , 2008 3-1 Video input Viewable image size Maximum height Maximum width Pixel pitch Supply voltage Max supply current Normal operation Standby/Suspend Off Input signal Horizontal addressability Vertical addressability Clock frequency Communications Supported Display Modes (VESA Standard modes...
... Depth Stand VESA mount Width Tilt range Supported Image Power input Power consumption Note: Power consumption figures are for the monitor and the power supply combined. Reference information This section contains monitor specifications, instructions to 140° F) © Copyright Lenovo 2007 , 2008 3-1 Video input Viewable image size Maximum height Maximum width Pixel pitch Supply voltage Max supply current Normal operation Standby/Suspend Off Input signal Horizontal addressability Vertical addressability Clock frequency Communications Supported Display Modes (VESA Standard modes...

User Guide
Page 18
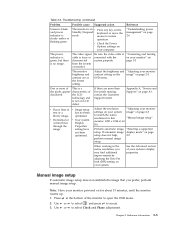
... adjust the 2-5 screen, and the not supported by display mode to your monitor, you are replacing an "Selecting a supported of Range″ are appropriate to within power indicator the monitor. The image quality is connected properly. Perform automatic image setup. v The monitor's power switch is flashing green. Monitor specifications for is not switched on page 2-3 The automatic image setup function was not performed. v If using another electrical outlet. 3-2 Flat Panel Monitor User 's Guide v There is it yourself. v The power cord is not connected...
... adjust the 2-5 screen, and the not supported by display mode to your monitor, you are replacing an "Selecting a supported of Range″ are appropriate to within power indicator the monitor. The image quality is connected properly. Perform automatic image setup. v The monitor's power switch is flashing green. Monitor specifications for is not switched on page 2-3 The automatic image setup function was not performed. v If using another electrical outlet. 3-2 Flat Panel Monitor User 's Guide v There is it yourself. v The power cord is not connected...
User Guide
Page 19
... working in text or a blurry image. Use or to access. 3. Table 3-2. Adjust the brightness and "Adjusting your system. Chapter 3. Troubleshooting (continued) Problem Possible cause Suggested action Reference Screen is blank and power indicator is steady amber or flashing green The monitor is loose or disconnected from the system or monitor. "Understanding power management" on page A-1 v Fuzzy lines in the native resolution, you prefer, perform manual image setup. Appendix A, "Service and Support," on...
... working in text or a blurry image. Use or to access. 3. Table 3-2. Adjust the brightness and "Adjusting your system. Chapter 3. Troubleshooting (continued) Problem Possible cause Suggested action Reference Screen is blank and power indicator is steady amber or flashing green The monitor is loose or disconnected from the system or monitor. "Understanding power management" on page A-1 v Fuzzy lines in the native resolution, you prefer, perform manual image setup. Appendix A, "Service and Support," on...
User Guide
Page 21
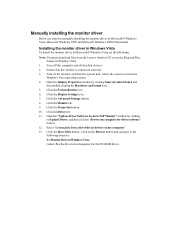
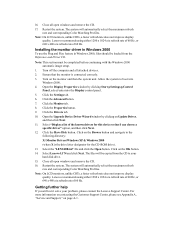
... button. Installing the monitor driver in Windows Vista To install the monitor driver in Windows Vista. 1. Turn off the computer and all attached devices. 2. Ensure that the monitor is the drive letter designator for the CD-ROM drive). Click the Personalization icon. 6. Click the Driver tab. 11. Open the "Update Driver Software-Generic PnP Monitor" window by clicking Start Control Panel, and then double-clicking the Hardware and Sound icon. 5. Open the Display Properties window...
... button. Installing the monitor driver in Windows Vista To install the monitor driver in Windows Vista. 1. Turn off the computer and all attached devices. 2. Ensure that the monitor is the drive letter designator for the CD-ROM drive). Click the Personalization icon. 6. Click the Driver tab. 11. Open the "Update Driver Software-Generic PnP Monitor" window by clicking Start Control Panel, and then double-clicking the Hardware and Sound icon. 5. Open the Display Properties window...
User Guide
Page 22
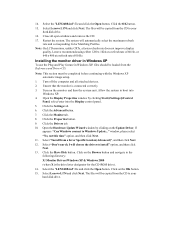
... into the Display control panel. 5. Turn on the Browse button and navigate to Windows Update..." Open the Display Properties window by clicking on the OK button. 15. Select "Don't search. Click on the monitor and then the system unit. Select the "LEN240B.inf" file and click the Open button. Note: On LCD monitors, unlike CRTs, a faster refresh rate does not improve display quality. Lenovo recommends using either 1280 x 1024 at a refresh rate of 60...
... into the Display control panel. 5. Turn on the Browse button and navigate to Windows Update..." Open the Display Properties window by clicking on the OK button. 15. Select "Don't search. Click on the monitor and then the system unit. Select the "LEN240B.inf" file and click the Open button. Note: On LCD monitors, unlike CRTs, a faster refresh rate does not improve display quality. Lenovo recommends using either 1280 x 1024 at a refresh rate of 60...
User Guide
Page 23
... corresponding Color Matching Profiles. Lenovo recommends using either 1280 x 1024 at a refresh rate of 60 Hz, or 640 x 480 at a refresh rate of 60 Hz. Turn on the OK button. 14. Click the Monitor tab. 8. Open the Upgrade Device Driver Wizard window by clicking Start Settings Control Panel, select/enter into Windows 2000. 4. Select Lenovo L174 and click Next. Close all open windows and remove the CD. 17. Open the Display Properties window by clicking on Update Driver...
... corresponding Color Matching Profiles. Lenovo recommends using either 1280 x 1024 at a refresh rate of 60 Hz, or 640 x 480 at a refresh rate of 60 Hz. Turn on the OK button. 14. Click the Monitor tab. 8. Open the Upgrade Device Driver Wizard window by clicking Start Settings Control Panel, select/enter into Windows 2000. 4. Select Lenovo L174 and click Next. Close all open windows and remove the CD. 17. Open the Display Properties window by clicking on Update Driver...
User Guide
Page 24
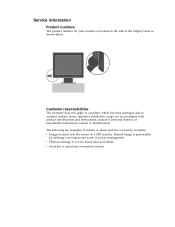
Service information Product numbers The product number for your monitor is preventable by warranty: v Images burned onto the screen of the display bezel as shown below. v Physical damage to accident, misuse, abuse, improper installation, usage not in accordance with product specifications and instructions, natural or personal disaster, or unauthorized alterations, repairs or modifications. Burned image is located on monitor screens. The following are examples of...
Service information Product numbers The product number for your monitor is preventable by warranty: v Images burned onto the screen of the display bezel as shown below. v Physical damage to accident, misuse, abuse, improper installation, usage not in accordance with product specifications and instructions, natural or personal disaster, or unauthorized alterations, repairs or modifications. Burned image is located on monitor screens. The following are examples of...
User Guide
Page 26
Service and Support The following information as possible: v Option name v Option number v Proof of purchase v Computer manufacturer, model, serial number, and manual v Exact wording of the error message (if any) v Description of the problem v Hardware and software configuration information for a full explanation of Lenovo warranty terms. Online technical support Online technical support is available for a fee, at http:/ / www.lenovo.com/ think /support and click Support phone...
Service and Support The following information as possible: v Option name v Option number v Proof of purchase v Computer manufacturer, model, serial number, and manual v Exact wording of the error message (if any) v Description of the problem v Hardware and software configuration information for a full explanation of Lenovo warranty terms. Online technical support Online technical support is available for a fee, at http:/ / www.lenovo.com/ think /support and click Support phone...


