User Guide
Page 3
... B-2 © Copyright Lenovo 2007,2008 iii Reference information 3-1 Monitor specifications 3-1 Troubleshooting 3-2 Manual image setup 3-3 Manually installing the monitor driver 3-4 Service information 3-6 Appendix A. Getting started 1-1 Shipping contents 1-1 Attaching the base and handling your monitor 1-1 Product overview 1-2 Types of adjustments 1-2 User controls 1-2 Cable lock slot 1-3 Setting up your monitor 1-3 Connecting and turning on your monitor 1-3 Registering your monitor 2-7 Detaching the monitor stand 2-7 Chapter 3. Service and Support A-1 Online technical...
... B-2 © Copyright Lenovo 2007,2008 iii Reference information 3-1 Monitor specifications 3-1 Troubleshooting 3-2 Manual image setup 3-3 Manually installing the monitor driver 3-4 Service information 3-6 Appendix A. Getting started 1-1 Shipping contents 1-1 Attaching the base and handling your monitor 1-1 Product overview 1-2 Types of adjustments 1-2 User controls 1-2 Cable lock slot 1-3 Setting up your monitor 1-3 Connecting and turning on your monitor 1-3 Registering your monitor 2-7 Detaching the monitor stand 2-7 Chapter 3. Service and Support A-1 Online technical...
User Guide
Page 5
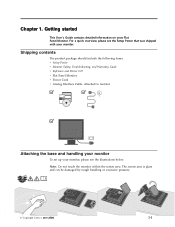
... the screen area. Getting started T his U ser 's G uide contains detailed information on your Flat fFyffFffFffF Panel M onitor. Chapter 1. The screen area is glass and can be damaged by rough handling or excessive pressure. © Copyright Lenovo 2007,2008 1-1 Shipping contents The product package should include the following items: v Setup Poster v Monitor Safety, Troubleshooting, and Warranty Guide v Reference and Driver CD v Flat Panel Monitor v Power Cord v Analog Interface Cable-
... the screen area. Getting started T his U ser 's G uide contains detailed information on your Flat fFyffFffFffF Panel M onitor. Chapter 1. The screen area is glass and can be damaged by rough handling or excessive pressure. © Copyright Lenovo 2007,2008 1-1 Shipping contents The product package should include the following items: v Setup Poster v Monitor Safety, Troubleshooting, and Warranty Guide v Reference and Driver CD v Flat Panel Monitor v Power Cord v Analog Interface Cable-
User Guide
Page 6
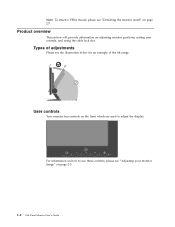
For information on how to adjust the display. Types of the tilt range. User controls Your monitor has controls on the front which are used to use these controls, please see "Adjusting your monitor image" on page 2-3. 1-2 Flat Panel Monitor User 's Guide Note: To attach a VESA mount, please see the illustration below for an example of adjustments Please see "Detaching the monitor stand" on page 2-7. Product overview This section will provide information on adjusting monitor positions, setting user controls, and using the cable lock slot.
For information on how to adjust the display. Types of the tilt range. User controls Your monitor has controls on the front which are used to use these controls, please see "Adjusting your monitor image" on page 2-3. 1-2 Flat Panel Monitor User 's Guide Note: To attach a VESA mount, please see the illustration below for an example of adjustments Please see "Detaching the monitor stand" on page 2-7. Product overview This section will provide information on adjusting monitor positions, setting user controls, and using the cable lock slot.
User Guide
Page 7
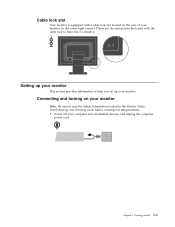
.... 1. Getting started 1-3 Cable lock slot Your monitor is equipped with the cable lock to learn how to read the Safety Information located in the lower right corner). Please see the instructions that came with a cable lock slot located on your monitor. Connecting and turning on the rear of your computer and all attached devices, and unplug the computer power cord. Setting up your monitor This section...
.... 1. Getting started 1-3 Cable lock slot Your monitor is equipped with the cable lock to learn how to read the Safety Information located in the lower right corner). Please see the instructions that came with a cable lock slot located on your monitor. Connecting and turning on the rear of your computer and all attached devices, and unplug the computer power cord. Setting up your monitor This section...
User Guide
Page 9
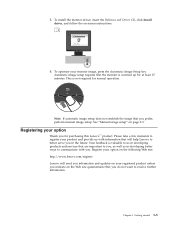
... to you prefer, perform manual image setup. Note: If automatic image setup does not establish the image that are important to us with you information and updates on your option on the Web site questionnaire that the monitor is warmed up for at least 15 minutes. Your feedback is not required for purchasing this Lenovo™ product. 5. See "Manual image setup" on -screen instructions. 6.
... to you prefer, perform manual image setup. Note: If automatic image setup does not establish the image that are important to us with you information and updates on your option on the Web site questionnaire that the monitor is warmed up for at least 15 minutes. Your feedback is not required for purchasing this Lenovo™ product. 5. See "Manual image setup" on -screen instructions. 6.
User Guide
Page 10
... the base of your monitor to match the way you are comfortably seated. v Tilt: Adjust the tilt of your monitor: © Copyright Lenovo 2007,2008 2-1 Comfort and accessibility Good ergonomic practice is most from overhead lighting or nearby windows. Organize your work area to optimize the appearance of site between your eyes and the center the monitor suits your preferences for comfortable viewing...
... the base of your monitor to match the way you are comfortably seated. v Tilt: Adjust the tilt of your monitor: © Copyright Lenovo 2007,2008 2-1 Comfort and accessibility Good ergonomic practice is most from overhead lighting or nearby windows. Organize your work area to optimize the appearance of site between your eyes and the center the monitor suits your preferences for comfortable viewing...
User Guide
Page 11
... from your monitor screen and focus on a far object to take a short break from using your computer. Be sure to optimize the position and orientation of your work . v Use the monitor brightness, contrast, and image adjustment controls, if equipped, to their disability. Avoid assuming any discomforts that your office furniture or equipment provide to best suit your preferences now and as your preferences change in the...
... from your monitor screen and focus on a far object to take a short break from using your computer. Be sure to optimize the position and orientation of your work . v Use the monitor brightness, contrast, and image adjustment controls, if equipped, to their disability. Avoid assuming any discomforts that your office furniture or equipment provide to best suit your preferences now and as your preferences change in the...
User Guide
Page 12
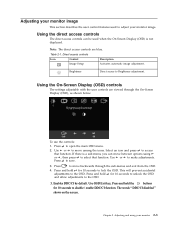
... buttons for 10 seconds to disable / enable DDC/CI function. Use OSD Exit key, Press and hold for 10 seconds to the OSD. Direct access controls Icon Control Description Image Setup Activates automatic image adjustment. Press to make adjustments. Use or to open the main OSD menu. 2. Brightness Direct access to save. 3. Use or to move between options using your monitor image. Press to Brightness adjustment. To use the controls: 1. Chapter 2. Adjusting your monitor image This section describes the user control features used...
... buttons for 10 seconds to disable / enable DDC/CI function. Use OSD Exit key, Press and hold for 10 seconds to the OSD. Direct access controls Icon Control Description Image Setup Activates automatic image adjustment. Press to make adjustments. Use or to open the main OSD menu. 2. Brightness Direct access to save. 3. Use or to move between options using your monitor image. Press to Brightness adjustment. To use the controls: 1. Chapter 2. Adjusting your monitor image This section describes the user control features used...

User Guide
Page 13
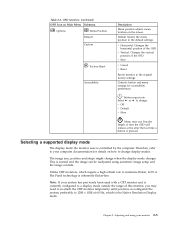
.... v Default v sRGB ssR v Reddish • Bluish v Red: Increases or decreases the saturation of red, green, and blue. Moves the image up or down. See "Manual image setup" on the computer. 2-4 Flat Panel Monitor User 's Guide Automatically optimizes the image. It has no effect on any changes to the settings. Manually optimizes the image. v Clock v Phase v Save Adjusts intensity of 'red' in the image. OSD functions OSD Icon on Main Menu Submenu Brightness/Contrast Image Position Image Setup Brightness Contrast Horizontal Position Vertical Position Automatic Manual Image...
.... v Default v sRGB ssR v Reddish • Bluish v Red: Increases or decreases the saturation of red, green, and blue. Moves the image up or down. See "Manual image setup" on the computer. 2-4 Flat Panel Monitor User 's Guide Automatically optimizes the image. It has no effect on any changes to the settings. Manually optimizes the image. v Clock v Phase v Save Adjusts intensity of 'red' in the image. OSD functions OSD Icon on Main Menu Submenu Brightness/Contrast Image Position Image Setup Brightness Contrast Horizontal Position Vertical Position Automatic Manual Image...
User Guide
Page 14
... refresh rate to change when the display mode changes. Adjusting and using automatic image setup and the image controls. Button repeat rate: Select or to minimize flicker, LCD or Flat Panel technology is normal and the image can be readjusted using your computer documentation for accessibility preferences. The image size, position and shape might change . Note: If your system has previously been used with a CRT monitor and is the Native Resolution Display mode. Controls button and menu settings for details on the screen. Default returns the menu position to...
... refresh rate to change when the display mode changes. Adjusting and using automatic image setup and the image controls. Button repeat rate: Select or to minimize flicker, LCD or Flat Panel technology is normal and the image can be readjusted using your computer documentation for accessibility preferences. The image size, position and shape might change . Note: If your system has previously been used with a CRT monitor and is the Native Resolution Display mode. Controls button and menu settings for details on the screen. Default returns the menu position to...
User Guide
Page 15
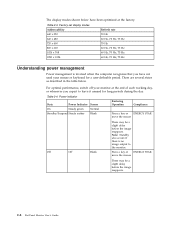
For optimal performance, switch off your mouse or keyboard for long periods during the day. Factory set display modes Addressability Refresh rate 640 x 350 70 Hz 640 x ...Power indicator State Power Indicator Screen Restoring Operation Compliance On Steady green Normal Standby/Suspend Steady amber Blank Press a key or ENERGY STAR move the mouse There may be a slight delay before the image reappears. Table 2-4. Off Off Blank Press a key or ENERGY STAR move the mouse There may be a slight delay before the image reappears. 2-6 Flat Panel Monitor User 's Guide...
For optimal performance, switch off your mouse or keyboard for long periods during the day. Factory set display modes Addressability Refresh rate 640 x 350 70 Hz 640 x ...Power indicator State Power Indicator Screen Restoring Operation Compliance On Steady green Normal Standby/Suspend Steady amber Blank Press a key or ENERGY STAR move the mouse There may be a slight delay before the image reappears. Table 2-4. Off Off Blank Press a key or ENERGY STAR move the mouse There may be a slight delay before the image reappears. 2-6 Flat Panel Monitor User 's Guide...
User Guide
Page 16
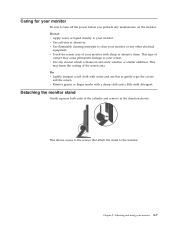
... similar additives. Adjusting and using your monitor. Detaching the monitor stand Gently squeeze both ends of the screen area. This allows access to the screws that attach the stand to turn off the power before you perform any maintenance on the monitor. Do not: v Apply water or liquid directly to gently wipe the covers and the screen. v Use flammable cleaning materials to clean your monitor Be sure...
... similar additives. Adjusting and using your monitor. Detaching the monitor stand Gently squeeze both ends of the screen area. This allows access to the screws that attach the stand to turn off the power before you perform any maintenance on the monitor. Do not: v Apply water or liquid directly to gently wipe the covers and the screen. v Use flammable cleaning materials to clean your monitor Be sure...
User Guide
Page 17
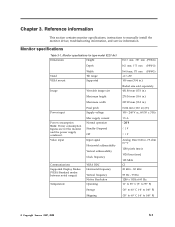
... information This section contains monitor specifications, instructions to 140° F) © Copyright Lenovo 2007 , 2008 3-1 Monitor specifications Table 3-1. Video input Viewable image size Maximum height Maximum width Pixel pitch Supply voltage Max supply current Normal operation Standby/Suspend Off Input signal Horizontal addressability Vertical addressability Clock frequency Communications Supported Display Modes (VESA Standard modes between noted ranges) Temperature VESA DDC Horizontal frequency Vertical frequency Native Resolution Operating Storage Shipping 382...
... information This section contains monitor specifications, instructions to 140° F) © Copyright Lenovo 2007 , 2008 3-1 Monitor specifications Table 3-1. Video input Viewable image size Maximum height Maximum width Pixel pitch Supply voltage Max supply current Normal operation Standby/Suspend Off Input signal Horizontal addressability Vertical addressability Clock frequency Communications Supported Display Modes (VESA Standard modes between noted ranges) Temperature VESA DDC Horizontal frequency Vertical frequency Native Resolution Operating Storage Shipping 382...

User Guide
Page 18
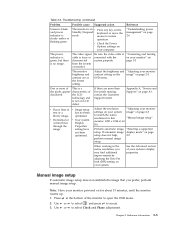
... color setting from the OSD menu. page 1-3 The color settings may be able to solve it and adjust the 2-5 screen, and the not supported by display mode to your monitor" on your problem. Select another electrical outlet. 3-2 Flat Panel Monitor User 's Guide "Adjusting your monitor image" on page 2-3 The power indictator is not lit and there is flashing green. Troubleshooting Problem Possible cause Suggested action Reference The words ″Out The system is set v If you are replacing...
... color setting from the OSD menu. page 1-3 The color settings may be able to solve it and adjust the 2-5 screen, and the not supported by display mode to your monitor" on your problem. Select another electrical outlet. 3-2 Flat Panel Monitor User 's Guide "Adjusting your monitor image" on page 2-3 The power indictator is not lit and there is flashing green. Troubleshooting Problem Possible cause Suggested action Reference The words ″Out The system is set v If you are replacing...
User Guide
Page 19
... this "Manual image setup" monitor: 1280 x 1024 at the lowest setting. Note: Have your monitor" on page A-1 v Fuzzy lines in the native resolution, you prefer, perform manual image setup. Chapter 3. The video signal cable is connected with the system properly. Troubleshooting (continued) Problem Possible cause Suggested action Reference Screen is blank and power indicator is steady amber or flashing green The monitor is no image. Appendix A, "Service and Support," on page 1-3 The monitor brightness and contrast are more...
... this "Manual image setup" monitor: 1280 x 1024 at the lowest setting. Note: Have your monitor" on page A-1 v Fuzzy lines in the native resolution, you prefer, perform manual image setup. Chapter 3. The video signal cable is connected with the system properly. Troubleshooting (continued) Problem Possible cause Suggested action Reference Screen is blank and power indicator is steady amber or flashing green The monitor is no image. Appendix A, "Service and Support," on page 1-3 The monitor brightness and contrast are more...
User Guide
Page 21
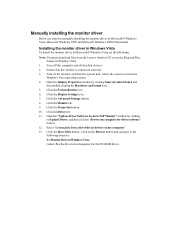
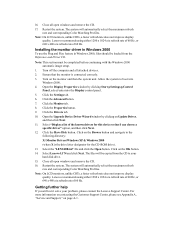
Turn on Update Driver. Click the Advanced Settings button. 8. Open the "Update Driver Software-Generic PnP Monitor" window by clicking Start Control Panel, and then double-clicking the Hardware and Sound icon. 5. Click on my computer" . 13. Installing the monitor driver in Windows Vista To install the monitor driver in Microsoft® Windows Vista, do the following: Note: You must download files from a list of device drivers on the Browse button and navigate to use the Plug and Play...
Turn on Update Driver. Click the Advanced Settings button. 8. Open the "Update Driver Software-Generic PnP Monitor" window by clicking Start Control Panel, and then double-clicking the Hardware and Sound icon. 5. Click on my computer" . 13. Installing the monitor driver in Windows Vista To install the monitor driver in Microsoft® Windows Vista, do the following: Note: You must download files from a list of device drivers on the Browse button and navigate to use the Plug and Play...
User Guide
Page 22
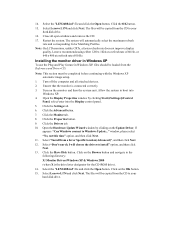
... the maximum refresh rate and corresponding Color Matching Profiles. Select Lenovo L174 and click Next. Restart the system. Installing the monitor driver in Windows XP To use the Plug and Play feature in Windows XP, files should be completed before continuing with the Windows XP automatic image setup. 1. Turn off the computer and all open windows and remove the CD. 17. Select the "LEN240B.inf" file and click the Open button. Note...
... the maximum refresh rate and corresponding Color Matching Profiles. Select Lenovo L174 and click Next. Restart the system. Installing the monitor driver in Windows XP To use the Plug and Play feature in Windows XP, files should be completed before continuing with the Windows XP automatic image setup. 1. Turn off the computer and all open windows and remove the CD. 17. Select the "LEN240B.inf" file and click the Open button. Note...
User Guide
Page 23
... A, "Service and Support," on Update Driver, and then click Next. 11. The system will automatically select the maximum refresh rate and corresponding Color Matching Profiles. Installing the monitor driver in Windows 2000 To use the Plug and Play feature in Windows 2000, files should be completed before continuing with the Windows 2000 automatic image setup. 1. Allow the system to your problem, please contact the Lenovo Support Center. Click the Advanced button...
... A, "Service and Support," on Update Driver, and then click Next. 11. The system will automatically select the maximum refresh rate and corresponding Color Matching Profiles. Installing the monitor driver in Windows 2000 To use the Plug and Play feature in Windows 2000, files should be completed before continuing with the Windows 2000 automatic image setup. 1. Allow the system to your problem, please contact the Lenovo Support Center. Click the Advanced button...
User Guide
Page 24
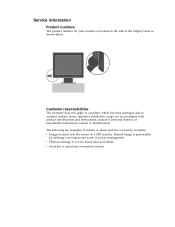
... specifications and instructions, natural or personal disaster, or unauthorized alterations, repairs or modifications. v Scratches or punctures on the side of the display bezel as shown below. Customer responsibilities The warranty does not apply to a product which has been damaged due to covers, bezel, base and cables. Burned image is located on monitor screens. The following are examples of a CRT monitor. Service information Product numbers...
... specifications and instructions, natural or personal disaster, or unauthorized alterations, repairs or modifications. v Scratches or punctures on the side of the display bezel as shown below. Customer responsibilities The warranty does not apply to a product which has been damaged due to covers, bezel, base and cables. Burned image is located on monitor screens. The following are examples of a CRT monitor. Service information Product numbers...
User Guide
Page 26
... v Option number v Proof of purchase v Computer manufacturer, model, serial number, and manual v Exact wording of the error message (if any) v Description of the product. Worldwide telephone list Phone numbers are available for replacement or exchange of your L enovo Service provider 0800-666-0011 (Spanish) 131-426 (English) © Copyright Lenovo 2007,2008 A -1 For the most current phone numbers, go to change without notice...
... v Option number v Proof of purchase v Computer manufacturer, model, serial number, and manual v Exact wording of the error message (if any) v Description of the product. Worldwide telephone list Phone numbers are available for replacement or exchange of your L enovo Service provider 0800-666-0011 (Spanish) 131-426 (English) © Copyright Lenovo 2007,2008 A -1 For the most current phone numbers, go to change without notice...

