User Guide
Page 3
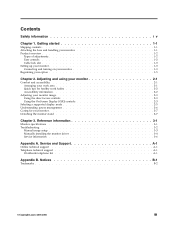
... management 2-6 Caring for your option 1-5 Chapter 2. Service and Support A-1 Online technical support A-1 Telephone technical support A-1 Worldwide telephone list A-1 Appendix B. Reference information 3-1 Monitor specifications 3-1 Troubleshooting 3-2 Manual image setup 3-3 Manually installing the monitor driver 3-4 Service information 3-6 Appendix A. Notices B-1 Trademarks B-2 © Copyright Lenovo 2007,2008 iii Getting started 1-1 Shipping contents 1-1 Attaching the base and handling your...
... management 2-6 Caring for your option 1-5 Chapter 2. Service and Support A-1 Online technical support A-1 Telephone technical support A-1 Worldwide telephone list A-1 Appendix B. Reference information 3-1 Monitor specifications 3-1 Troubleshooting 3-2 Manual image setup 3-3 Manually installing the monitor driver 3-4 Service information 3-6 Appendix A. Notices B-1 Trademarks B-2 © Copyright Lenovo 2007,2008 iii Getting started 1-1 Shipping contents 1-1 Attaching the base and handling your...
User Guide
Page 5
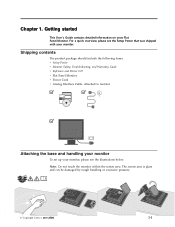
...area is glass and can be damaged by rough handling or excessive pressure. © Copyright Lenovo 2007,2008 1-1 Attached to monitor Attaching the base and handling your monitor To set up your monitor, please see the Setup Poster that was shipped with your Flat fFyffFffFffF Panel M onitor.... Note: Do not touch the monitor within the screen area. Getting started T his U ser 's G uide contains detailed information on your monitor. For a quick overview, please see the illustrations below. Shipping contents The product package...
...area is glass and can be damaged by rough handling or excessive pressure. © Copyright Lenovo 2007,2008 1-1 Attached to monitor Attaching the base and handling your monitor To set up your monitor, please see the Setup Poster that was shipped with your Flat fFyffFffFffF Panel M onitor.... Note: Do not touch the monitor within the screen area. Getting started T his U ser 's G uide contains detailed information on your monitor. For a quick overview, please see the illustrations below. Shipping contents The product package...
User Guide
Page 6
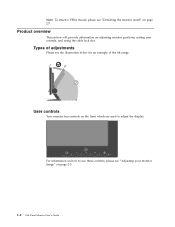
For information on how to adjust the display. Product overview This section will provide information on page 2-3. 1-2 Flat Panel Monitor User 's Guide User controls Your monitor has controls on page 2-7. Types of the tilt range. Note: To attach a VESA mount, please see "Detaching the monitor stand" on the front which are used to use these controls, please see the illustration below for an example of adjustments Please see "Adjusting your monitor image" on adjusting monitor positions, setting user controls, and using the cable lock slot.
For information on how to adjust the display. Product overview This section will provide information on page 2-3. 1-2 Flat Panel Monitor User 's Guide User controls Your monitor has controls on page 2-7. Types of the tilt range. Note: To attach a VESA mount, please see "Detaching the monitor stand" on the front which are used to use these controls, please see the illustration below for an example of adjustments Please see "Adjusting your monitor image" on adjusting monitor positions, setting user controls, and using the cable lock slot.
User Guide
Page 7
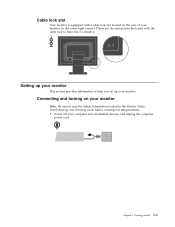
...right corner). Power off your monitor (in the Monitor Safety, Troubleshooting, and Warranty Guide before carrying out this procedure. 1. Getting started 1-3 Please see the instructions that came with a cable lock slot located on your monitor. Setting up your monitor This section provides information to ...help you set up your monitor Note: Be sure to attach it. Connecting and turning on the rear of your computer ...
...right corner). Power off your monitor (in the Monitor Safety, Troubleshooting, and Warranty Guide before carrying out this procedure. 1. Getting started 1-3 Please see the instructions that came with a cable lock slot located on your monitor. Setting up your monitor This section provides information to ...help you set up your monitor Note: Be sure to attach it. Connecting and turning on the rear of your computer ...
User Guide
Page 8
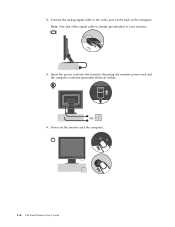
Note: One end of the computer. Power on the back of the signal cable is already pre-attached to the video port on the monitor and the computer. 1-4 Flat Panel Monitor User 's Guide 2. Connect the analog signal cable to your monitor. 3. Insert the power cord into the monitor, then plug the monitor power cord and the computer cord into grounded electrical outlets. 4.
Note: One end of the computer. Power on the back of the signal cable is already pre-attached to the video port on the monitor and the computer. 1-4 Flat Panel Monitor User 's Guide 2. Connect the analog signal cable to your monitor. 3. Insert the power cord into the monitor, then plug the monitor power cord and the computer cord into grounded electrical outlets. 4.
User Guide
Page 9
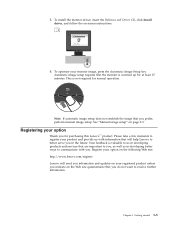
... that will send you information and updates on your monitor image, press the Automatic Image Setup key. Chapter 1. Please take a few moments to better serve you for normal operation. 5. This is not required for purchasing this Lenovo™ product. Registering your product and provide us... 15 minutes. Register your option on the following Web site: http://www.lenovo.com/register Lenovo will help Lenovo to register your option Thank you in the future. Automatic image setup requires that the monitor is valuable to us with you prefer, perform manual image setup. Note:...
... that will send you information and updates on your monitor image, press the Automatic Image Setup key. Chapter 1. Please take a few moments to better serve you for normal operation. 5. This is not required for purchasing this Lenovo™ product. Registering your product and provide us... 15 minutes. Register your option on the following Web site: http://www.lenovo.com/register Lenovo will help Lenovo to register your option Thank you in the future. Automatic image setup requires that the monitor is valuable to us with you prefer, perform manual image setup. Note:...
User Guide
Page 10
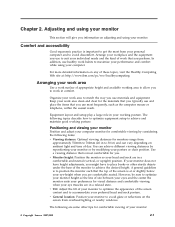
...time of appropriate height and available working area to allow you . Arrange your workplace and the equipment you perform. v Monitor height: Position the monitor so your working posture. In addition, use most from overhead lighting or nearby windows. Equipment layout and setup play ...510mm to 760mm (20 in comfort. However, be sure to optimize your monitor height so the line of the monitor to achieve the desired height. v General location: Position your monitor: © Copyright Lenovo 2007,2008 2-1 The following items: v Viewing distance: Optimal viewing distances ...
...time of appropriate height and available working area to allow you . Arrange your workplace and the equipment you perform. v Monitor height: Position the monitor so your working posture. In addition, use most from overhead lighting or nearby windows. Equipment layout and setup play ...510mm to 760mm (20 in comfort. However, be sure to optimize your monitor height so the line of the monitor to achieve the desired height. v General location: Position your monitor: © Copyright Lenovo 2007,2008 2-1 The following items: v Viewing distance: Optimal viewing distances ...
User Guide
Page 11
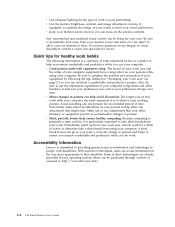
...period of time. Also, be purchased through vendors or accessed at: http://www.ibm.com/able/ 2-2 Flat Panel Monitor User 's Guide Avoid assuming any discomforts that your office furniture or equipment provide to accommodate changes in posture v ...monitor screen clean so you do work habits The following the tips outlined in the way most appropriate to optimize the image on eye fatigue or visual discomfort, consult a vision care specialist for advice. Any concentrated and sustained visual activity can maintain a comfortable and productive posture. Accessibility information Lenovo...
...period of time. Also, be purchased through vendors or accessed at: http://www.ibm.com/able/ 2-2 Flat Panel Monitor User 's Guide Avoid assuming any discomforts that your office furniture or equipment provide to accommodate changes in posture v ...monitor screen clean so you do work habits The following the tips outlined in the way most appropriate to optimize the image on eye fatigue or visual discomfort, consult a vision care specialist for advice. Any concentrated and sustained visual activity can maintain a comfortable and productive posture. Accessibility information Lenovo...
User Guide
Page 12
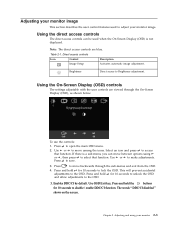
... Press to move backwards through the On-Screen Display (OSD), as shown below. Press to the OSD. Press to move between options using your monitor 2-3 Press and hold for 10 seconds to lock the OSD. Table 2-1. If there is not displayed. Enables DDC/CI by default. Adjusting and... using or , then press to select that function. Adjusting your monitor image This section describes the user control features used when the On Screen Display (OSD) is a sub-menu, you can be used to ...
... Press to move backwards through the On-Screen Display (OSD), as shown below. Press to the OSD. Press to move between options using your monitor 2-3 Press and hold for 10 seconds to lock the OSD. Table 2-1. If there is not displayed. Enables DDC/CI by default. Adjusting and... using or , then press to select that function. Adjusting your monitor image This section describes the user control features used when the On Screen Display (OSD) is a sub-menu, you can be used to ...

User Guide
Page 13
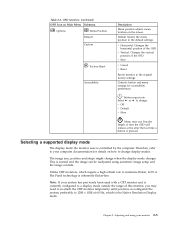
... optimizes the image. v Green: Increases or decreases the saturation of 'green' in the image. This section lists the languages supported by your monitor. v Save: Saves the custom color choices. Note: This screen does not allow any software running on page 3-3. Note: The language chosen only... affects the language of 'red' in the image. See "Manual image setup" on the computer. 2-4 Flat Panel Monitor User 's Guide Shows resolution, refresh rate, and product details. It has no effect on any changes to the settings. Moves the image up or ...
... optimizes the image. v Green: Increases or decreases the saturation of 'green' in the image. This section lists the languages supported by your monitor. v Save: Saves the custom color choices. Note: This screen does not allow any software running on page 3-3. Note: The language chosen only... affects the language of 'red' in the image. See "Manual image setup" on the computer. 2-4 Flat Panel Monitor User 's Guide Shows resolution, refresh rate, and product details. It has no effect on any changes to the settings. Moves the image up or ...
User Guide
Page 14
... size, position and shape might change . preferably to the original factory settings. Default returns the menu position to minimize flicker, LCD or Flat Panel technology is inherently flicker-free. Unlike CRT monitors, which is pressed. Chapter 2. Adjusting and using automatic image setup and the image controls. Therefore, refer to your computer documentation...
... size, position and shape might change . preferably to the original factory settings. Default returns the menu position to minimize flicker, LCD or Flat Panel technology is inherently flicker-free. Unlike CRT monitors, which is pressed. Chapter 2. Adjusting and using automatic image setup and the image controls. Therefore, refer to your computer documentation...
User Guide
Page 15
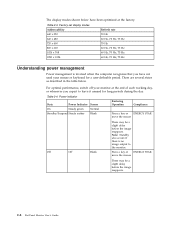
... or keyboard for long periods during the day. Note: Standby also occurs if there is invoked when the computer recognizes that you expect to the monitor. Table 2-4. Factory set display modes Addressability Refresh rate 640 x 350 70 Hz 640 x 480 60 Hz, 72 Hz, 75 Hz 720 x 400 .... Table 2-3. Off Off Blank Press a key or ENERGY STAR move the mouse There may be a slight delay before the image reappears. 2-6 Flat Panel Monitor User 's Guide There are several states as described in the table below have been optimized at the end of each working day, or whenever you...
... or keyboard for long periods during the day. Note: Standby also occurs if there is invoked when the computer recognizes that you expect to the monitor. Table 2-4. Factory set display modes Addressability Refresh rate 640 x 350 70 Hz 640 x 480 60 Hz, 72 Hz, 75 Hz 720 x 400 .... Table 2-3. Off Off Blank Press a key or ENERGY STAR move the mouse There may be a slight delay before the image reappears. 2-6 Flat Panel Monitor User 's Guide There are several states as described in the table below have been optimized at the end of each working day, or whenever you...
User Guide
Page 16
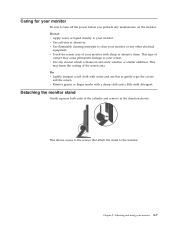
... screen area of the cylinder and remove in the direction shown. Chapter 2. Adjusting and using your monitor. v Use any maintenance on the monitor. This may cause permanent damage to your monitor with water and use this to your monitor 2-7 Caring for your monitor or any other electrical equipment. v Use flammable cleaning materials to clean your...
... screen area of the cylinder and remove in the direction shown. Chapter 2. Adjusting and using your monitor. v Use any maintenance on the monitor. This may cause permanent damage to your monitor with water and use this to your monitor 2-7 Caring for your monitor or any other electrical equipment. v Use flammable cleaning materials to clean your...
User Guide
Page 17
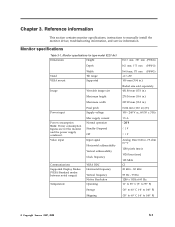
...mm; 173 mm (PSWG) 366.8 mm; 371 mm -4°/+30° 100 mm (3.94 in.) (PSWG) Radial arm sold separately. 431.80 mm (17.0 in.) 270.34 mm (10.6 in.) 337.92 mm (13.3 in.) 0.264 mm (.010 in.) (V) 100 - 240 V ac, 60/50 ... 60° C (-4° to manually install the monitor driver, troubleshooting information, and service information. Reference information This section contains monitor specifications, instructions to 140° F) © Copyright Lenovo 2007 , 2008 3-1 Monitor specifications Table 3-1. Monitor specifications for type-model 9227-Ax1 Dimensions Height Depth Stand...
...mm; 173 mm (PSWG) 366.8 mm; 371 mm -4°/+30° 100 mm (3.94 in.) (PSWG) Radial arm sold separately. 431.80 mm (17.0 in.) 270.34 mm (10.6 in.) 337.92 mm (13.3 in.) 0.264 mm (.010 in.) (V) 100 - 240 V ac, 60/50 ... 60° C (-4° to manually install the monitor driver, troubleshooting information, and service information. Reference information This section contains monitor specifications, instructions to 140° F) © Copyright Lenovo 2007 , 2008 3-1 Monitor specifications Table 3-1. Monitor specifications for type-model 9227-Ax1 Dimensions Height Depth Stand...

User Guide
Page 18
... mode which is flashing green. Table 3-1. your computer. v The power cord is no image. Before calling your dealer or Lenovo, try the suggested actions that are to a display old monitor, reconnect display mode" on page shown on the monitor. "Adjusting your monitor" on page 2-3 The automatic image setup function was not performed. on your...
... mode which is flashing green. Table 3-1. your computer. v The power cord is no image. Before calling your dealer or Lenovo, try the suggested actions that are to a display old monitor, reconnect display mode" on page shown on the monitor. "Adjusting your monitor" on page 2-3 The automatic image setup function was not performed. on your...
User Guide
Page 19
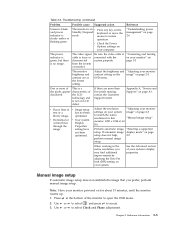
... manual image setup. "Selecting a supported display mode" on page 2-6 The power indicator is green, but there is not an LCD defect. Press at the bottom of the monitor to access. 3. Use or to select and press to open the OSD menu. 2. Use or to match the native resolution for... about 15 minutes, until the monitor warms up. 1. One or more than five pixels missing, contact the Customer Support Center. See the Advanced section of the LCD technology and is no image. Table 3-2. v Check the Power Options settings on page ...
... manual image setup. "Selecting a supported display mode" on page 2-6 The power indicator is green, but there is not an LCD defect. Press at the bottom of the monitor to access. 3. Use or to select and press to open the OSD menu. 2. Use or to match the native resolution for... about 15 minutes, until the monitor warms up. 1. One or more than five pixels missing, contact the Customer Support Center. See the Advanced section of the LCD technology and is no image. Table 3-2. v Check the Power Options settings on page ...
User Guide
Page 20
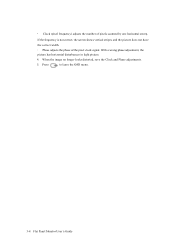
· Clock (pixel frequency) adjusts the number of the pixel clock signal. Press to leave the OSD menu. 3-4 Flat Panel Monitor User 's Guide With a wrong phase adjustment, the picture has horizontal disturbances in light picture. 4. If the frequency is not correct, the screen shows vertical stripes and the picture does not have the correct width. · Phase adjusts the phase of pixels scanned by one horizontal sweep. When the image no longer looks distorted, save the Clock and Phase adjustments. 5.
· Clock (pixel frequency) adjusts the number of the pixel clock signal. Press to leave the OSD menu. 3-4 Flat Panel Monitor User 's Guide With a wrong phase adjustment, the picture has horizontal disturbances in light picture. 4. If the frequency is not correct, the screen shows vertical stripes and the picture does not have the correct width. · Phase adjusts the phase of pixels scanned by one horizontal sweep. When the image no longer looks distorted, save the Clock and Phase adjustments. 5.
User Guide
Page 21
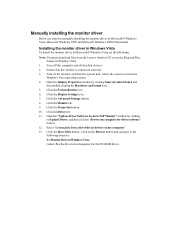
... Properties button. 10. Click the Driver tab. 11. Manually installing the monitor driver Below are steps for manually installing the monitor driver in Microsoft® Windows Vista, do the following directory: X:\Monitor Drivers\Windows Vista (where X is connected correctly. 3. Click the Personalization ...monitor and then the system unit. Installing the monitor driver in Windows Vista To install the monitor driver in Microsoft® Windows Vista, Microsoft Windows XP® and Microsoft Windows 2000 Professional. Click the Monitor tab. 9. Select "Let me pick from the Lenovo Monitor...
... Properties button. 10. Click the Driver tab. 11. Manually installing the monitor driver Below are steps for manually installing the monitor driver in Microsoft® Windows Vista, do the following directory: X:\Monitor Drivers\Windows Vista (where X is connected correctly. 3. Click the Personalization ...monitor and then the system unit. Installing the monitor driver in Windows Vista To install the monitor driver in Microsoft® Windows Vista, Microsoft Windows XP® and Microsoft Windows 2000 Professional. Click the Monitor tab. 9. Select "Let me pick from the Lenovo Monitor...
User Guide
Page 22
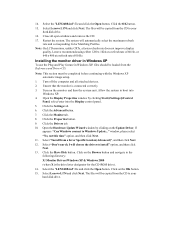
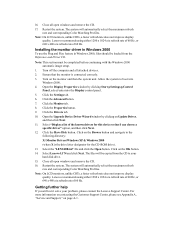
Note: On LCD monitors, unlike CRTs, a faster refresh rate does not improve display quality. Lenovo recommends using either 1280 x 1024 at a refresh rate of ... Turn off the computer and all open windows and remove the CD. 17. Click the Monitor tab. 8. Allow the system to the following directory: X:\Monitor Drivers\Windows XP & Windows 2000 (where X is connected correctly. 3. ...Can Windows connect to install" option, and then click Next. 13. Select Lenovo L174 and click Next. Click on the monitor and then the system unit. The files will automatically select the maximum refresh rate...
Note: On LCD monitors, unlike CRTs, a faster refresh rate does not improve display quality. Lenovo recommends using either 1280 x 1024 at a refresh rate of ... Turn off the computer and all open windows and remove the CD. 17. Click the Monitor tab. 8. Allow the system to the following directory: X:\Monitor Drivers\Windows XP & Windows 2000 (where X is connected correctly. 3. ...Can Windows connect to install" option, and then click Next. 13. Select Lenovo L174 and click Next. Click on the monitor and then the system unit. The files will automatically select the maximum refresh rate...
User Guide
Page 23
... and all open windows and remove the CD. 17. Click the Properties button. 9. For more information on contacting the Customer Support Center, please see Appendix A, "Service and Support," on the monitor and then the system unit. Lenovo recommends using either 1280 x 1024 at a refresh...(where X is the drive letter designator for this device so that the monitor is connected correctly. 3. Select Lenovo L174 and click Next. Note: On LCD monitors, unlike CRTs, a faster refresh rate does not improve display quality. Lenovo recommends using either 1280 x 1024 at a refresh rate of 60 Hz,...
... and all open windows and remove the CD. 17. Click the Properties button. 9. For more information on contacting the Customer Support Center, please see Appendix A, "Service and Support," on the monitor and then the system unit. Lenovo recommends using either 1280 x 1024 at a refresh...(where X is the drive letter designator for this device so that the monitor is connected correctly. 3. Select Lenovo L174 and click Next. Note: On LCD monitors, unlike CRTs, a faster refresh rate does not improve display quality. Lenovo recommends using either 1280 x 1024 at a refresh rate of 60 Hz,...


