User Guide
Page 3
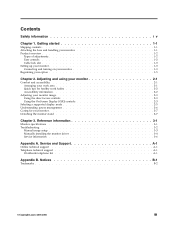
...monitor driver 3-4 Service information 3-6 Appendix A. Service and Support A-1 Online technical support A-1 Telephone technical support A-1 Worldwide telephone list A-1 Appendix B. Adjusting and using your monitor 2-1 Comfort and accessibility 2-1 Arranging your work area 2-1 Quick tips for healthy work habits 2-2 Accessibility information 2-2 Adjusting your monitor...Trademarks B-2 © Copyright Lenovo 2007,2008 iii Contents Safety information i v Chapter 1. Getting started 1-1 Shipping contents 1-1 Attaching the base and handling your monitor 1-1 Product overview 1-2 ...
...monitor driver 3-4 Service information 3-6 Appendix A. Service and Support A-1 Online technical support A-1 Telephone technical support A-1 Worldwide telephone list A-1 Appendix B. Adjusting and using your monitor 2-1 Comfort and accessibility 2-1 Arranging your work area 2-1 Quick tips for healthy work habits 2-2 Accessibility information 2-2 Adjusting your monitor...Trademarks B-2 © Copyright Lenovo 2007,2008 iii Contents Safety information i v Chapter 1. Getting started 1-1 Shipping contents 1-1 Attaching the base and handling your monitor 1-1 Product overview 1-2 ...
User Guide
Page 5
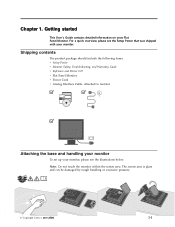
...Setup Poster v Monitor Safety, Troubleshooting, and Warranty Guide v Reference and Driver CD v Flat Panel Monitor v Power Cord v Analog Interface Cable- Note: Do not touch the monitor within the screen area. Attached to monitor Attaching the base and handling your monitor To set up your monitor, please see the... area is glass and can be damaged by rough handling or excessive pressure. © Copyright Lenovo 2007,2008 1-1 Getting started T his U ser 's G uide contains detailed information on your monitor. Chapter 1. For a quick overview, please see the illustrations below.
...Setup Poster v Monitor Safety, Troubleshooting, and Warranty Guide v Reference and Driver CD v Flat Panel Monitor v Power Cord v Analog Interface Cable- Note: Do not touch the monitor within the screen area. Attached to monitor Attaching the base and handling your monitor To set up your monitor, please see the... area is glass and can be damaged by rough handling or excessive pressure. © Copyright Lenovo 2007,2008 1-1 Getting started T his U ser 's G uide contains detailed information on your monitor. Chapter 1. For a quick overview, please see the illustrations below.
User Guide
Page 9
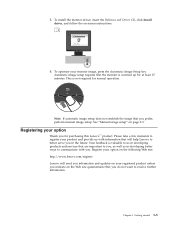
...; product. Register your option on the following Web site: http://www.lenovo.com/register Lenovo will help Lenovo to receive further information. This is not required for at least 15 minutes. To install the monitor driver, insert the Reference and Driver CD, click Install driver, and follow the on page 3-3. Automatic image setup requires that will send...
...; product. Register your option on the following Web site: http://www.lenovo.com/register Lenovo will help Lenovo to receive further information. This is not required for at least 15 minutes. To install the monitor driver, insert the Reference and Driver CD, click Install driver, and follow the on page 3-3. Automatic image setup requires that will send...
User Guide
Page 17
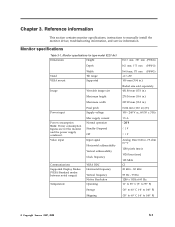
...in.) (PSWG) Radial arm sold separately. 431.80 mm (17.0 in.) 270.34 mm (10.6 in.) 337.92 mm... the monitor driver, troubleshooting information, and service information. Chapter 3. Monitor specifications ...for type-model 9227-Ax1 Dimensions Height Depth Stand VESA mount Width Tilt range Supported Image Power input Power consumption Note: Power consumption figures are for the monitor and the power supply combined. Reference information This section contains monitor specifications, instructions to 140° F) © Copyright Lenovo 2007 , 2008 3-1 Monitor...
...in.) (PSWG) Radial arm sold separately. 431.80 mm (17.0 in.) 270.34 mm (10.6 in.) 337.92 mm... the monitor driver, troubleshooting information, and service information. Chapter 3. Monitor specifications ...for type-model 9227-Ax1 Dimensions Height Depth Stand VESA mount Width Tilt range Supported Image Power input Power consumption Note: Power consumption figures are for the monitor and the power supply combined. Reference information This section contains monitor specifications, instructions to 140° F) © Copyright Lenovo 2007 , 2008 3-1 Monitor...
User Guide
Page 21
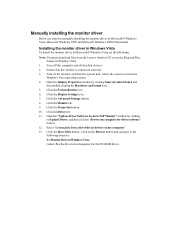
... Sound icon. 5. Click the Have Disk button. Ensure that the monitor is the drive letter designator for the CD-ROM drive). Installing the monitor driver in Windows Vista To install the monitor driver in Windows Vista. 1. Click the Monitor tab. 9. Select "Let me pick from the Lenovo Monitor CD to boot into Windows Vista operating system. 4. Allow the...
... Sound icon. 5. Click the Have Disk button. Ensure that the monitor is the drive letter designator for the CD-ROM drive). Installing the monitor driver in Windows Vista To install the monitor driver in Windows Vista. 1. Click the Monitor tab. 9. Select "Let me pick from the Lenovo Monitor CD to boot into Windows Vista operating system. 4. Allow the...
User Guide
Page 22
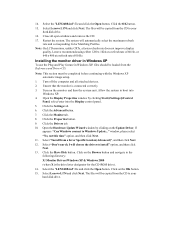
...OK button. 15. Click the Monitor tab. 8. Select Lenovo L174 and click Next. The files ...monitor is the drive letter designator for the CD-ROM drive). 14. Click the Drivers tab. 10. Select "Install from the Reference and Driver CD. Note: On LCD monitors...Monitor Drivers\Windows XP & Windows 2000 (where X is connected correctly. 3. I will automatically select the maximum refresh rate and corresponding Color Matching Profiles. Select the "LEN240B.inf" file and click the Open button. Click the Advanced button. 7. Turn off the computer and all open windows and remove the CD. 17...
...OK button. 15. Click the Monitor tab. 8. Select Lenovo L174 and click Next. The files ...monitor is the drive letter designator for the CD-ROM drive). 14. Click the Drivers tab. 10. Select "Install from the Reference and Driver CD. Note: On LCD monitors...Monitor Drivers\Windows XP & Windows 2000 (where X is connected correctly. 3. I will automatically select the maximum refresh rate and corresponding Color Matching Profiles. Select the "LEN240B.inf" file and click the Open button. Click the Advanced button. 7. Turn off the computer and all open windows and remove the CD. 17...
User Guide
Page 23
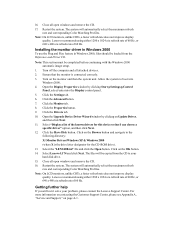
...Lenovo Support Center. Note: On LCD monitors, unlike CRTs, a faster refresh rate does not improve display quality. Note: This section must be completed before continuing with the Windows 2000 automatic image setup. 1. Turn off the computer and all open windows and remove the CD. 17. Click the Monitor tab. 8. Select "Display a list of the known drivers... Appendix A, "Service and Support," on the monitor and then the system unit. Click the Settings tab. 6. Select Lenovo L174 and click Next. Close all attached devices. 2. Lenovo recommends using either 1280 x 1024 at a refresh...
...Lenovo Support Center. Note: On LCD monitors, unlike CRTs, a faster refresh rate does not improve display quality. Note: This section must be completed before continuing with the Windows 2000 automatic image setup. 1. Turn off the computer and all open windows and remove the CD. 17. Click the Monitor tab. 8. Select "Display a list of the known drivers... Appendix A, "Service and Support," on the monitor and then the system unit. Click the Settings tab. 6. Select Lenovo L174 and click Next. Close all attached devices. 2. Lenovo recommends using either 1280 x 1024 at a refresh...


