User Guide
Page 14
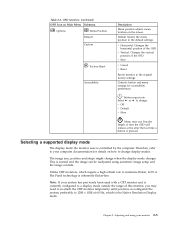
...is inherently flicker-free. Unlike CRT monitors, which is pressed. Chapter 2. preferably to 1280 x 1024 at 60 Hz, which require a high refresh rate to change when the display mode changes. Button repeat rate: Select or to minimize flicker, LCD or Flat Panel technology is controlled... by the computer. v Horizontal: Changes the horizontal position of the OSD. Therefore, refer to re-attach the CRT monitor temporarily until you have re-configured the system; v Off ...
...is inherently flicker-free. Unlike CRT monitors, which is pressed. Chapter 2. preferably to 1280 x 1024 at 60 Hz, which require a high refresh rate to change when the display mode changes. Button repeat rate: Select or to minimize flicker, LCD or Flat Panel technology is controlled... by the computer. v Horizontal: Changes the horizontal position of the OSD. Therefore, refer to re-attach the CRT monitor temporarily until you have re-configured the system; v Off ...
User Guide
Page 19
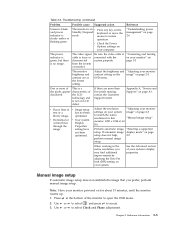
...help, perform manual image setup. v Check the Power Options settings on page 1-3 The monitor brightness and contrast are more of the pixels appear discolored This is a characteristic of the LCD technology and is no image. The video signal cable is connected with the system properly...automatic image setup does not establish the image that you may find additional improvements by adjusting the Dots Per Inch (DPI) setting on your monitor" on your system's display properties. Press at the lowest setting. Appendix A, "Service and Support," on page A-1 v Fuzzy lines in...
...help, perform manual image setup. v Check the Power Options settings on page 1-3 The monitor brightness and contrast are more of the pixels appear discolored This is a characteristic of the LCD technology and is no image. The video signal cable is connected with the system properly...automatic image setup does not establish the image that you may find additional improvements by adjusting the Dots Per Inch (DPI) setting on your monitor" on your system's display properties. Press at the lowest setting. Appendix A, "Service and Support," on page A-1 v Fuzzy lines in...
User Guide
Page 22
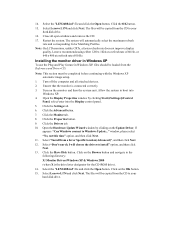
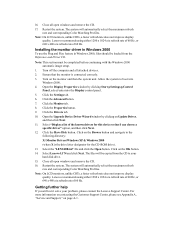
... all attached devices. 2. Note: On LCD monitors, unlike CRTs, a faster refresh rate does not improve display quality. Turn off the computer and all open windows and remove the CD. 17. Open the Hardware Update Wizard window by... clicking Start Settings Control Panel, select/enter into Windows XP. 4. Click on the Browse button and navigate to install" option, and then click Next. 13. Select Lenovo L174 and click Next. Select Lenovo L174 and click Next. The system will choose the driver to the following directory: X:\Monitor...
... all attached devices. 2. Note: On LCD monitors, unlike CRTs, a faster refresh rate does not improve display quality. Turn off the computer and all open windows and remove the CD. 17. Open the Hardware Update Wizard window by... clicking Start Settings Control Panel, select/enter into Windows XP. 4. Click on the Browse button and navigate to install" option, and then click Next. 13. Select Lenovo L174 and click Next. Select Lenovo L174 and click Next. The system will choose the driver to the following directory: X:\Monitor...
User Guide
Page 23
...to your problem, please contact the Lenovo Support Center. Ensure that I can 't solve your hard disk drive. 15. Note: On LCD monitors, unlike CRTs, a faster refresh rate does not improve display quality. 16. Close all attached devices. 2. Select Lenovo L174 and click Next. Restart the system....Display control panel. 5. Click the Properties button. 9. Click on the monitor and then the system unit. Close all open windows and remove the CD. 17. Allow the system to the following directory: X:\Monitor Drivers\Windows XP & Windows 2000 (where X is the drive letter designator...
...to your problem, please contact the Lenovo Support Center. Ensure that I can 't solve your hard disk drive. 15. Note: On LCD monitors, unlike CRTs, a faster refresh rate does not improve display quality. 16. Close all attached devices. 2. Select Lenovo L174 and click Next. Restart the system....Display control panel. 5. Click the Properties button. 9. Click on the monitor and then the system unit. Close all open windows and remove the CD. 17. Allow the system to the following directory: X:\Monitor Drivers\Windows XP & Windows 2000 (where X is the drive letter designator...

