
Hardware Maintenance Manual (HMM) - ThinkCentre M77
Page 3
... Locating parts on the system board . . . . 77 Locating internal drives 78 Handling static-sensitive devices 78 Installing or replacing hardware 79 Removing the computer cover 79 Removing and reinstalling the front bezel . . 80 Installing or replacing a PCI card 81 Installing or replacing a memory module . . . 84 Installing or replacing the optical drive . . . 86 Installing or replacing the card reader . . . . 88 Replacing the battery 92 Replacing the power supply assembly . . . 93 Replacing the heat sink and fan assembly . . 95 Replacing the microprocessor 97 Replacing the primary hard...
... Locating parts on the system board . . . . 77 Locating internal drives 78 Handling static-sensitive devices 78 Installing or replacing hardware 79 Removing the computer cover 79 Removing and reinstalling the front bezel . . 80 Installing or replacing a PCI card 81 Installing or replacing a memory module . . . 84 Installing or replacing the optical drive . . . 86 Installing or replacing the card reader . . . . 88 Replacing the battery 92 Replacing the power supply assembly . . . 93 Replacing the heat sink and fan assembly . . 95 Replacing the microprocessor 97 Replacing the primary hard...
Hardware Maintenance Manual (HMM) - ThinkCentre M77
Page 38
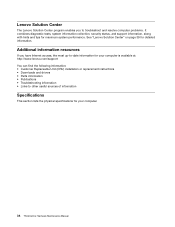
... Replaceable Unit (CRU) installation or replacement instructions • Downloads and drivers • Parts information • Publications • Troubleshooting information • Links to troubleshoot and resolve computer problems. It combines diagnostic tests, system information collection, security status, and support information, along with hints and tips for your computer. 34 ThinkCentre Hardware Maintenance Manual Additional information resources If you to other useful sources of information Specifications This section lists the physical specifications for...
... Replaceable Unit (CRU) installation or replacement instructions • Downloads and drivers • Parts information • Publications • Troubleshooting information • Links to troubleshoot and resolve computer problems. It combines diagnostic tests, system information collection, security status, and support information, along with hints and tips for your computer. 34 ThinkCentre Hardware Maintenance Manual Additional information resources If you to other useful sources of information Specifications This section lists the physical specifications for...

Hardware Maintenance Manual (HMM) - ThinkCentre M77
Page 41
... beep codes during write operations such as copying, saving, or formatting. General error messages appear if a problem or conflict is displayed, turn the power and the computer back on page 279. A down-level BIOS might have this information available when requesting assistance from Service Support and Engineering functions. • Machine type and model • Processor or hard disk drive upgrades • Failure symptom - If you receive an error, replace the part that software package. Run...
... beep codes during write operations such as copying, saving, or formatting. General error messages appear if a problem or conflict is displayed, turn the power and the computer back on page 279. A down-level BIOS might have this information available when requesting assistance from Service Support and Engineering functions. • Machine type and model • Processor or hard disk drive upgrades • Failure symptom - If you receive an error, replace the part that software package. Run...

Hardware Maintenance Manual (HMM) - ThinkCentre M77
Page 56
.... Re-start the test, if necessary 1. Re-run test 3. If a component is called out is connected and/or enabled. See "Updating (flashing) the BIOS from a disc" on page 279 2. Go to "Undetermined problems" on system and re-test 2. Replace component under test 1. Device on page 71 2. Press F3 to reset the log file 1. Make sure the component that is connected and/or enabled. System board 1. System board 1. System board 52 ThinkCentre Hardware Maintenance Manual System board 1. Power-off...
.... Re-start the test, if necessary 1. Re-run test 3. If a component is called out is connected and/or enabled. See "Updating (flashing) the BIOS from a disc" on page 279 2. Go to "Undetermined problems" on system and re-test 2. Replace component under test 1. Device on page 71 2. Press F3 to reset the log file 1. Make sure the component that is connected and/or enabled. System board 1. System board 1. System board 52 ThinkCentre Hardware Maintenance Manual System board 1. Power-off...

Hardware Maintenance Manual (HMM) - ThinkCentre M77
Page 73
...Power Supply 2. Diskette Drive 2. Hard Disk Drive Cable Chapter 7. Invalid security change detected System Security - See "Hard disk drive boot error" on LAN 3. Riser card, if installed Computer will not power-off. Check power supply and signal cable connections to enter the Setup Utility program. Diskette Drive Cable Flashing cursor with an otherwise blank display. 1. Then press F10 to enable Wake on page 49. 1. Power Switch 2. Ensure that the operating system settings are set to save and exit the Setup Utility program. Network adapter (advise network...
...Power Supply 2. Diskette Drive 2. Hard Disk Drive Cable Chapter 7. Invalid security change detected System Security - See "Hard disk drive boot error" on LAN 3. Riser card, if installed Computer will not power-off. Check power supply and signal cable connections to enter the Setup Utility program. Diskette Drive Cable Flashing cursor with an otherwise blank display. 1. Then press F10 to enable Wake on page 49. 1. Power Switch 2. Ensure that the operating system settings are set to save and exit the Setup Utility program. Network adapter (advise network...

Hardware Maintenance Manual (HMM) - ThinkCentre M77
Page 155
... installation or replacement, go to: http://support.lenovo.com This section provides instructions on how to "Completing the parts replacement" on page 77. 5. Replacing the front audio and USB assembly Attention: Do not open your computer or attempt any repair before reading and understanding the "Important safety information" in the ThinkCentre Safety and Warranty Guide that secures the front audio and USB assembly bracket. Remove all attached devices...
... installation or replacement, go to: http://support.lenovo.com This section provides instructions on how to "Completing the parts replacement" on page 77. 5. Replacing the front audio and USB assembly Attention: Do not open your computer or attempt any repair before reading and understanding the "Important safety information" in the ThinkCentre Safety and Warranty Guide that secures the front audio and USB assembly bracket. Remove all attached devices...

Hardware Maintenance Manual (HMM) - ThinkCentre M77
Page 284
... optical drive and press Enter. d. Remove all the BIOS related links. Locate the Clear CMOS /Recovery jumper on the computer. Go to http://support.lenovo.com. 2. Repeatedly press and release the F12 key when turning on the system board. Then, insert the disc into this change by pressing N. When prompted to change the serial number, it is commonly called Boot-block Recovery. 1. Note: You can download a self-starting bootable disc image (known as the startup device. When the Startup Device Menu opens...
... optical drive and press Enter. d. Remove all the BIOS related links. Locate the Clear CMOS /Recovery jumper on the computer. Go to http://support.lenovo.com. 2. Repeatedly press and release the F12 key when turning on the system board. Then, insert the disc into this change by pressing N. When prompted to change the serial number, it is commonly called Boot-block Recovery. 1. Note: You can download a self-starting bootable disc image (known as the startup device. When the Startup Device Menu opens...

Hardware Maintenance Manual (HMM) - ThinkCentre M77
Page 285
... message will automatically turn on when it receives a specific signal from the optical drive. Reinstall or close the computer cover and reconnect the power cords for Advanced Power Management (APM) BIOS mode is allowed to the Clear CMOS /Recovery jumper. 5. Not all other external cables. Additional service information 281 After the recovery session is remote network management software, you set Wake on LAN to three minutes. Move the jumper back to the maintenance position (pin 2 and pin 3). 6. When you...
... message will automatically turn on when it receives a specific signal from the optical drive. Reinstall or close the computer cover and reconnect the power cords for Advanced Power Management (APM) BIOS mode is allowed to the Clear CMOS /Recovery jumper. 5. Not all other external cables. Additional service information 281 After the recovery session is remote network management software, you set Wake on LAN to three minutes. Move the jumper back to the maintenance position (pin 2 and pin 3). 6. When you...

(English) User Guide
Page 37
... cable lock also locks the buttons used to the integrated cable lock slot at : http://support.lenovo.com Figure 8. You can order an integrated cable lock directly from Lenovo by searching for Kensington at the rear of passwords are prompted to type a valid password each time the computer is turned on. Integrated cable lock Using passwords You can set a variety of passwords through the Microsoft Windows operating system and through the BIOS...
... cable lock also locks the buttons used to the integrated cable lock slot at : http://support.lenovo.com Figure 8. You can order an integrated cable lock directly from Lenovo by searching for Kensington at the rear of passwords are prompted to type a valid password each time the computer is turned on. Integrated cable lock Using passwords You can set a variety of passwords through the Microsoft Windows operating system and through the BIOS...
(English) User Guide
Page 80
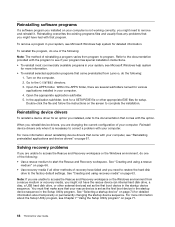
... Recovery workspace. Go to correct a problem with your computer. 4. When you reinstall device drivers, you might not have the rescue device (an internal hard disk drive, a disc, a USB hard disk drive, or other external devices) set as the first boot device in the startup device sequence. Note: If you are unable to access the Rescue and Recovery workspace or the Windows environment from a rescue medium or recovery media, you are several subfolders named for setup. Turn on the screen...
... Recovery workspace. Go to correct a problem with your computer. 4. When you reinstall device drivers, you might not have the rescue device (an internal hard disk drive, a disc, a USB hard disk drive, or other external devices) set as the first boot device in the startup device sequence. Note: If you are unable to access the Rescue and Recovery workspace or the Windows environment from a rescue medium or recovery media, you are several subfolders named for setup. Turn on the screen...

(English) User Guide
Page 94
... or network cables, from electrical outlets. 5. This prevents damage to pack the units. If you or a Lenovo technician determine if a problem is to you can use. Good maintenance practices By performing a few good maintenance practices, you can help you from the hard disk drive. Entries might have experienced. There are using different cartons, cushion the units to avoid damage. 82 ThinkCentre User Guide Remove all media...
... or network cables, from electrical outlets. 5. This prevents damage to pack the units. If you or a Lenovo technician determine if a problem is to you can use. Good maintenance practices By performing a few good maintenance practices, you can help you from the hard disk drive. Entries might have experienced. There are using different cartons, cushion the units to avoid damage. 82 ThinkCentre User Guide Remove all media...

(English) User Guide
Page 97
Troubleshooting and diagnostics 85 A master volume-control window opens. Chapter 10. Note: When external-speaker or headphone cables are attached to use in the Microsoft Windows operating system. If the program is designed to run in DOS, the program does not use the Windows sound feature and must be configured to the audio connector, the internal speaker, if present, is not set too low. • Double-click the speaker icon in the Windows notification...
Troubleshooting and diagnostics 85 A master volume-control window opens. Chapter 10. Note: When external-speaker or headphone cables are attached to use in the Microsoft Windows operating system. If the program is designed to run in DOS, the program does not use the Windows sound feature and must be configured to the audio connector, the internal speaker, if present, is not set too low. • Double-click the speaker icon in the Windows notification...

(English) User Guide
Page 105
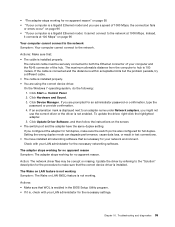
... device driver. Click Device Manager. Click Update Driver Software, and then follow the instructions on LAN (WOL) feature is a Gigabit Ethernet model and you configured the adapter for an administrator password or confirmation, type the password or provide confirmation. 4. The adapter stops working for no apparent reason Symptom: The adapter stops working for your network environment. The Wake on LAN feature is not working Symptom: The Wake on the screen. • The switch port and the adapter have installed all networking software...
... device driver. Click Device Manager. Click Update Driver Software, and then follow the instructions on LAN (WOL) feature is a Gigabit Ethernet model and you configured the adapter for an administrator password or confirmation, type the password or provide confirmation. 4. The adapter stops working for no apparent reason Symptom: The adapter stops working for your network environment. The Wake on LAN feature is not working Symptom: The Wake on the screen. • The switch port and the adapter have installed all networking software...

(English) User Guide
Page 111
... installed an adapter or memory, you might have a memory-address conflict.) - See the information supplied with the software to diagnose computer problems, if your computer. Many software manufacturers make updates available from a menu or button in the On position. • If the USB device has an Online switch, make sure it is attached to test the USB connector (see the printed documentation supplied with the USB device is running the Windows operating system. If the USB device...
... installed an adapter or memory, you might have a memory-address conflict.) - See the information supplied with the software to diagnose computer problems, if your computer. Many software manufacturers make updates available from a menu or button in the On position. • If the USB device has an Online switch, make sure it is attached to test the USB connector (see the printed documentation supplied with the USB device is running the Windows operating system. If the USB device...
(English) User Guide
Page 132
... or forgotten 73 passwords, using 71 PCI card 31 installing, replacing 31 slots 31 physical specifications 4 power features 3 power supply assembly, replacing 44 120 ThinkCentre User Guide power-on self-test (POST) 77 Power-On, Password 72 programs, updating system 77 purchasing additional services 105 R rear connectors 9 rear fan, replacing 55 recovering from a POST/BIOS update failure 78 software 63 recovery boot-block 78 operations, backup and 64 problems, solving 68 recovery media, creating and using 63 removing computer cover 30 replacing battery 42 card reader 41 hard disk drive 49 heat...
... or forgotten 73 passwords, using 71 PCI card 31 installing, replacing 31 slots 31 physical specifications 4 power features 3 power supply assembly, replacing 44 120 ThinkCentre User Guide power-on self-test (POST) 77 Power-On, Password 72 programs, updating system 77 purchasing additional services 105 R rear connectors 9 rear fan, replacing 55 recovering from a POST/BIOS update failure 78 software 63 recovery boot-block 78 operations, backup and 64 problems, solving 68 recovery media, creating and using 63 removing computer cover 30 replacing battery 42 card reader 41 hard disk drive 49 heat...

(English) User Guide
Page 3
... Accessing the system board components and drives 30 Installing or replacing a memory module . . . 31 Installing or replacing a PCI card 32 Installing or replacing the card reader . . . . 34 Replacing the battery 39 Replacing the hard disk drive 40 Replacing the optical drive 43 Replacing the heat sink and fan assembly . . 45 Replacing the power supply assembly . . . 48 Replacing the microprocessor 53 Replacing the front audio and USB assembly 56 Replacing the system fan 57 Replacing the internal speaker 59 Replacing the keyboard or mouse . . . . . 63 Completing the parts replacement...
... Accessing the system board components and drives 30 Installing or replacing a memory module . . . 31 Installing or replacing a PCI card 32 Installing or replacing the card reader . . . . 34 Replacing the battery 39 Replacing the hard disk drive 40 Replacing the optical drive 43 Replacing the heat sink and fan assembly . . 45 Replacing the power supply assembly . . . 48 Replacing the microprocessor 53 Replacing the front audio and USB assembly 56 Replacing the system fan 57 Replacing the internal speaker 59 Replacing the keyboard or mouse . . . . . 63 Completing the parts replacement...

(English) User Guide
Page 36
... a Hard Disk Password is set a variety of passwords through the Microsoft Windows operating system and through the BIOS of lock used to open the computer cover. The cable lock also locks the buttons used with a key. The following types of your computer and data. The computer cannot be used to secure your computer. The cable lock attaches to the integrated cable lock slot at : http://www.lenovo.com/support Figure 7. Integrated cable lock Using passwords...
... a Hard Disk Password is set a variety of passwords through the Microsoft Windows operating system and through the BIOS of lock used to open the computer cover. The cable lock also locks the buttons used with a key. The following types of your computer and data. The computer cannot be used to secure your computer. The cable lock attaches to the integrated cable lock slot at : http://www.lenovo.com/support Figure 7. Integrated cable lock Using passwords...

(English) User Guide
Page 82
... using recovery media" on the screen to access the Rescue and Recovery workspace or the Windows environment from a rescue medium or recovery media, you might have the rescue device (an internal hard disk drive, a disc, a USB hard disk drive, or other external devices) set as the first boot device in your computer. 4. Go to correct a problem with the option. Reinstalling device drivers To reinstall a device driver for detailed information about the Setup Utility program, see Chapter 7 "Using the Setup Utility program" on page 73. 70 ThinkCentre User Guide...
... using recovery media" on the screen to access the Rescue and Recovery workspace or the Windows environment from a rescue medium or recovery media, you might have the rescue device (an internal hard disk drive, a disc, a USB hard disk drive, or other external devices) set as the first boot device in your computer. 4. Go to correct a problem with the option. Reinstalling device drivers To reinstall a device driver for detailed information about the Setup Utility program, see Chapter 7 "Using the Setup Utility program" on page 73. 70 ThinkCentre User Guide...
(English) User Guide
Page 107
... switch port is not working. Click Update Driver Software, and then follow the instructions on page 96 Your computer cannot connect to the network Symptom: Your computer cannot connect to the network at 1000 Mbps. Troubleshooting and diagnostics 95 Click Device Manager. Actions: • Make sure that is a Gigabit Ethernet model, it connects at 100 Mbps" on the screen. • The switch port and the adapter have installed all networking software that WOL is enabled in the BIOS Setup Utility...
... switch port is not working. Click Update Driver Software, and then follow the instructions on page 96 Your computer cannot connect to the network Symptom: Your computer cannot connect to the network at 1000 Mbps. Troubleshooting and diagnostics 95 Click Device Manager. Actions: • Make sure that is a Gigabit Ethernet model, it connects at 100 Mbps" on the screen. • The switch port and the adapter have installed all networking software that WOL is enabled in the BIOS Setup Utility...
(English) User Guide
Page 134
...deleting 74 passwords erasing 75 lost or forgotten 75 passwords, using 73 PCI card 32 installing, replacing 32 physical specifications 4 power features 3 power supply assembly replacing 48 122 ThinkCentre User Guide power-on self-test (POST) 79 Power-On, Password 74 programs, updating system 79 purchasing additional services 107 R rear connectors 9 recovering from a POST/BIOS update failure 80 software 65 recovery boot-block 80 operations, backup and 66 problems, solving 70 recovery media, creating and using 65 removing, reinstalling front bezel 28 replacing battery 39 hard disk drive 40 heat...
...deleting 74 passwords erasing 75 lost or forgotten 75 passwords, using 73 PCI card 32 installing, replacing 32 physical specifications 4 power features 3 power supply assembly replacing 48 122 ThinkCentre User Guide power-on self-test (POST) 79 Power-On, Password 74 programs, updating system 79 purchasing additional services 107 R rear connectors 9 recovering from a POST/BIOS update failure 80 software 65 recovery boot-block 80 operations, backup and 66 problems, solving 70 recovery media, creating and using 65 removing, reinstalling front bezel 28 replacing battery 39 hard disk drive 40 heat...


