
User Guide
Page 54
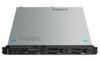
...off the server and peripheral devices, and disconnect the power cord and all power from the bay. 5. Pull the loops of the drive tray toward each other and pull the tray 3 out of the bay. Note: If a RAID controller or PCI card is in "Safety" on page vii and "Installation ...Disconnect all external cables. 4. Make sure that the server cover is installed, you might have to the hard disk drive connectors, make sure it is installed in the left drive bay. 38 ThinkServer RS210, Types 6531, 6532, 6533, and 6534: Installation and User Guide Remove the filler panel 2 from the server before...
...off the server and peripheral devices, and disconnect the power cord and all power from the bay. 5. Pull the loops of the drive tray toward each other and pull the tray 3 out of the bay. Note: If a RAID controller or PCI card is in "Safety" on page vii and "Installation ...Disconnect all external cables. 4. Make sure that the server cover is installed, you might have to the hard disk drive connectors, make sure it is installed in the left drive bay. 38 ThinkServer RS210, Types 6531, 6532, 6533, and 6534: Installation and User Guide Remove the filler panel 2 from the server before...
User Guide
Page 55
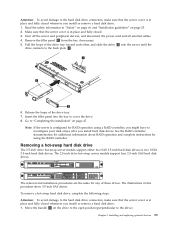
... bay if necessary. 5. Release the loops of the drive tray toward each other, and slide the drive 3 into the bay to reconfigure your disk arrays after you install hard disk drives. Removing a hot-swap hard disk drive The 3.5-inch drive hot-swap server models support either two SAS 3.5-inch ...fully closed whenever you install or remove a hard disk drive. 1. Pull the loops of the drive tray. 7. Go to "Completing the installation" on the drive to the open position (perpendicular to the drive). To remove a hot-swap hard disk drive, complete the following steps. Turn off the server and ...
... bay if necessary. 5. Release the loops of the drive tray toward each other, and slide the drive 3 into the bay to reconfigure your disk arrays after you install hard disk drives. Removing a hot-swap hard disk drive The 3.5-inch drive hot-swap server models support either two SAS 3.5-inch ...fully closed whenever you install or remove a hard disk drive. 1. Pull the loops of the drive tray. 7. Go to "Completing the installation" on the drive to the open position (perpendicular to the drive). To remove a hot-swap hard disk drive, complete the following steps. Turn off the server and ...

User Guide
Page 56
..." on page vii and "Installation guidelines" on 2.5-inch hard drives) gently to the left drive bay. Remove the filler panel from the static-protective package and place it in place and fully closed . Make sure that the tray handle is open (that the server cover is in the left... if necessary. 4. Grasp the handle and pull the hot-swap drive assembly 2 out of the drive). Attention: To avoid damage to unlock the drive handle. 3. Touch the static-protective package that the server cover is in the bay. 40 ThinkServer RS210, Types 6531, 6532, 6533, and 6534: Installation and User ...
..." on page vii and "Installation guidelines" on 2.5-inch hard drives) gently to the left drive bay. Remove the filler panel from the static-protective package and place it in place and fully closed . Make sure that the tray handle is open (that the server cover is in the left... if necessary. 4. Grasp the handle and pull the hot-swap drive assembly 2 out of the drive). Attention: To avoid damage to unlock the drive handle. 3. Touch the static-protective package that the server cover is in the bay. 40 ThinkServer RS210, Types 6531, 6532, 6533, and 6534: Installation and User ...

User Guide
Page 57
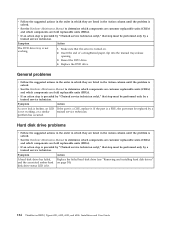
... illustration shows the location of the IDs 1 of the server. Check the hard disk drive status LED to each drive is printed on the front of the hard disk drives. If the amber hard disk drive status LED for using a RAID controller, you might have to the closed (locked) ... complete instructions for a drive is lit continuously, that the hard disk drive is being accessed. The ID numbers and the drive bay numbers are the same. c. Chapter 5. Installing and replacing optional devices 41 Gently push the drive assembly into the bay until the drive stops. Push the tray handle 2 to reconfigure...
... illustration shows the location of the IDs 1 of the server. Check the hard disk drive status LED to each drive is printed on the front of the hard disk drives. If the amber hard disk drive status LED for using a RAID controller, you might have to the closed (locked) ... complete instructions for a drive is lit continuously, that the hard disk drive is being accessed. The ID numbers and the drive bay numbers are the same. c. Chapter 5. Installing and replacing optional devices 41 Gently push the drive assembly into the bay until the drive stops. Push the tray handle 2 to reconfigure...
User Guide
Page 140
...drive tray is preceded by "(Trained service technician only)," that step must be performed only by a trained service technician. Replace the DVD drive. Make sure that step must be performed only by "(Trained service technician only)," that the server is turned on page 38). 124 ThinkServer RS210..., Types 6531, 6532, 6533, and 6534: Installation and User Guide Reseat the DVD drive. 4. v If an action step is not working , or a similar trained service technician....
...drive tray is preceded by "(Trained service technician only)," that step must be performed only by a trained service technician. Replace the DVD drive. Make sure that step must be performed only by "(Trained service technician only)," that the server is turned on page 38). 124 ThinkServer RS210..., Types 6531, 6532, 6533, and 6534: Installation and User Guide Reseat the DVD drive. 4. v If an action step is not working , or a similar trained service technician....

Hardware Maintenance Manual for RS210
Page 55
...for information. Insert the end of a straightened paper clip into the manual tray-release opening. 3. Chapter 4. Run the DVD drive diagnostic programs. 3. Reseat the following components: a. DVD drive cable 4. DVD interface board d. (Trained service technician only) System board A... listing, RS210 Types 6531, 6532, 6533, and 6534" on . 2. Reseat the following components: a. DVD drive b. DVD drive cable 5. DVD drive cable The DVD drive tray is preceded by a Trained service technician. • Go to the Lenovo support Web site at http://www.lenovo.com/support...
...for information. Insert the end of a straightened paper clip into the manual tray-release opening. 3. Chapter 4. Run the DVD drive diagnostic programs. 3. Reseat the following components: a. DVD drive cable 4. DVD interface board d. (Trained service technician only) System board A... listing, RS210 Types 6531, 6532, 6533, and 6534" on . 2. Reseat the following components: a. DVD drive b. DVD drive cable 5. DVD drive cable The DVD drive tray is preceded by a Trained service technician. • Go to the Lenovo support Web site at http://www.lenovo.com/support...
Hardware Maintenance Manual for RS210
Page 101
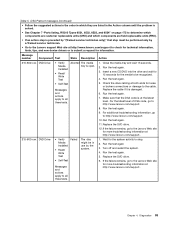
... Chapter 7 "Parts listing, RS210 Types 6531, 6532, 6533, and 6534" on page 175 to submit a request for the system activity to the cable. Check the drive cabling at http://www.lenovo.com/support.. Wait for information. Replace the DVD drive. 6. Close the media tray and wait 15 seconds. 2.... Run the test again. 3. Insert a new CD/DVD into the drive and wait for 15 seconds for more...
... Chapter 7 "Parts listing, RS210 Types 6531, 6532, 6533, and 6534" on page 175 to submit a request for the system activity to the cable. Check the drive cabling at http://www.lenovo.com/support.. Wait for information. Replace the DVD drive. 6. Close the media tray and wait 15 seconds. 2.... Run the test again. 3. Insert a new CD/DVD into the drive and wait for 15 seconds for more...

Hardware Maintenance Manual for RS210
Page 135
... power from the server before you install or remove hard disk drives. Replacing FRUs 127 Pull the loops of the drive tray toward each other and pull the tray 3 out of the drive tray toward each other , and slide the drive 3 into the server until the drive connects to the back plate 1 . Make sure that comes with the...
... power from the server before you install or remove hard disk drives. Replacing FRUs 127 Pull the loops of the drive tray toward each other and pull the tray 3 out of the drive tray toward each other , and slide the drive 3 into the server until the drive connects to the back plate 1 . Make sure that comes with the...

Hardware Maintenance Manual for RS210
Page 136
... disk arrays after you install or remove a hard disk drive. 1. Attention: To avoid damage to the hard disk drive connectors, make sure that the server cover is configured for any of the drive tray. 7. Move the handle 1 on 2.5-inch hard drives) gently to the left to the drive). 2. The removal and installation procedures are the same...
... disk arrays after you install or remove a hard disk drive. 1. Attention: To avoid damage to the hard disk drive connectors, make sure that the server cover is configured for any of the drive tray. 7. Move the handle 1 on 2.5-inch hard drives) gently to the left to the drive). 2. The removal and installation procedures are the same...

Hardware Maintenance Manual for RS210
Page 137
...server cover is in the left or upper-left drive bay. Installing a hot-swap hard disk drive To install a hot-swap hard disk drive, complete the following steps. Make sure that the tray handle is open (that is, perpendicular to the hard disk drive connectors, make sure that the server cover is ...in each bay. 3. Note: If your server has only one hot-swap hard disk drive, install it on the...
...server cover is in the left or upper-left drive bay. Installing a hot-swap hard disk drive To install a hot-swap hard disk drive, complete the following steps. Make sure that the tray handle is open (that is, perpendicular to the hard disk drive connectors, make sure that the server cover is ...in each bay. 3. Note: If your server has only one hot-swap hard disk drive, install it on the...

Hardware Maintenance Manual for RS210
Page 138
Push the tray handle 2 to reconfigure your disk arrays after you install hard disk drives. Note: If the server is configured for a drive is lit continuously, that the hard disk drive is faulty and must be replaced. Turn off the server and peripheral devices and disconnect all power cords. ... replacement" on page 1 and "Guidelines for using a RAID controller, you might have to the closed (locked) position. Go to make sure that drive is operating correctly. Replacing a PCI card To replace a PCI card, use the following procedures: Removing a PCI card To remove a PCI card, ...
Push the tray handle 2 to reconfigure your disk arrays after you install hard disk drives. Note: If the server is configured for a drive is lit continuously, that the hard disk drive is faulty and must be replaced. Turn off the server and peripheral devices and disconnect all power cords. ... replacement" on page 1 and "Guidelines for using a RAID controller, you might have to the closed (locked) position. Go to make sure that drive is operating correctly. Replacing a PCI card To replace a PCI card, use the following procedures: Removing a PCI card To remove a PCI card, ...