
User Manual
Page 3
... Monitor specifications 3-1 Troubleshooting 3-2 Manual image setup 3-4 Manually installing the monitor driver 3-4 Installing the device driver in Windows Vista 3-5 Installing the monitor driver in Windows XP 3-6 Installing the monitor driver in Windows 2000 3-6 Getting further help 3-7 Service information 3-8 Product numbers 3-8 Customer responsibilities 3-8 Service parts 3-9 Appendix A. Notices B-1 Trademarks B-2 © Copyright Lenovo 2008. © ii Adjusting and using your monitor 2-1 Comfort and accessibility 2-1 Arranging your work area 2-1 Positioning and viewing...
... Monitor specifications 3-1 Troubleshooting 3-2 Manual image setup 3-4 Manually installing the monitor driver 3-4 Installing the device driver in Windows Vista 3-5 Installing the monitor driver in Windows XP 3-6 Installing the monitor driver in Windows 2000 3-6 Getting further help 3-7 Service information 3-8 Product numbers 3-8 Customer responsibilities 3-8 Service parts 3-9 Appendix A. Notices B-1 Trademarks B-2 © Copyright Lenovo 2008. © ii Adjusting and using your monitor 2-1 Comfort and accessibility 2-1 Arranging your work area 2-1 Positioning and viewing...
User Manual
Page 5
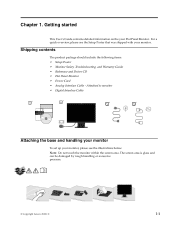
...; Monitor Safety, Troubleshooting, and Warranty Guide • Reference and Driver CD • Flat Panel Monitor • Power Cord • Analog Interface Cable - The screen area is glass and can be damaged by rough handling or excessive pressure. © Copyright Lenovo 2008. © 1-1 Attached to monitor • Digital Interface Cable Attaching the base and handling your monitor To set up your monitor, please see the Setup Poster that was shipped with your Flat Panel Monitor...
...; Monitor Safety, Troubleshooting, and Warranty Guide • Reference and Driver CD • Flat Panel Monitor • Power Cord • Analog Interface Cable - The screen area is glass and can be damaged by rough handling or excessive pressure. © Copyright Lenovo 2008. © 1-1 Attached to monitor • Digital Interface Cable Attaching the base and handling your monitor To set up your monitor, please see the Setup Poster that was shipped with your Flat Panel Monitor...
User Manual
Page 6
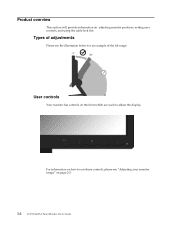
User controls Your monitor has controls on adjusting monitor positions, setting user controls, and using the cable lock slot. Product overview This section will provide information on the front which are used to use these controls, please see the illustration below for an example of adjustments Please see "Adjusting your monitor image" on page 2-3. 1-2 L197 Wide Flat Panel Monitor User's Guide For information on how to adjust the display. Types of the tilt range.
User controls Your monitor has controls on adjusting monitor positions, setting user controls, and using the cable lock slot. Product overview This section will provide information on the front which are used to use these controls, please see the illustration below for an example of adjustments Please see "Adjusting your monitor image" on page 2-3. 1-2 L197 Wide Flat Panel Monitor User's Guide For information on how to adjust the display. Types of the tilt range.
User Manual
Page 7
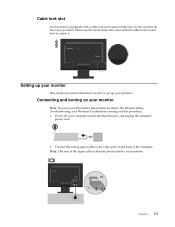
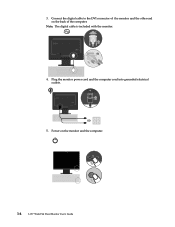
... the cable lock to learn how to the video port on the rear of the computer. Power off your monitor (in the Monitor Safety, Troubleshooting, and Warranty Guide before carrying out this procedure. 1. Connect the analog signal cable to attach it. Please see the instructions that come with a cable lock slot located on the back of your computer and all attached devices, and unplug the computer power cord. 2.
... the cable lock to learn how to the video port on the rear of the computer. Power off your monitor (in the Monitor Safety, Troubleshooting, and Warranty Guide before carrying out this procedure. 1. Connect the analog signal cable to attach it. Please see the instructions that come with a cable lock slot located on the back of your computer and all attached devices, and unplug the computer power cord. 2.
User Manual
Page 8
Power on the back of the monitor and the other end on the monitor and the computer. 1-4 L197 Wide Flat Panel Monitor User's Guide Connect the digital cable to the DVI connector of the computer. Plug the monitor power cord and the computer cord into grounded electrical outlets. 5. Note: The digital cable is included with the monitor. 4. 3.
Power on the back of the monitor and the other end on the monitor and the computer. 1-4 L197 Wide Flat Panel Monitor User's Guide Connect the digital cable to the DVI connector of the computer. Plug the monitor power cord and the computer cord into grounded electrical outlets. 5. Note: The digital cable is included with the monitor. 4. 3.
User Manual
Page 9
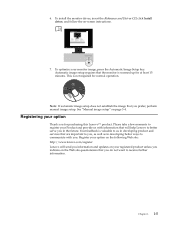
.... To optimize your option on the Web site questionnaire that the monitor is not required for purchasing this Lenovo™ product. This is warmed up for at least 15 minutes. Registering your option Thank you prefer, perform manual image setup. Please take a few moments to register your registered product unless you . See "Manual image setup" on -screen instructions. 7. Chapter 1. 1-5 Automatic image setup requires...
.... To optimize your option on the Web site questionnaire that the monitor is not required for purchasing this Lenovo™ product. This is warmed up for at least 15 minutes. Registering your option Thank you prefer, perform manual image setup. Please take a few moments to register your registered product unless you . See "Manual image setup" on -screen instructions. 7. Chapter 1. 1-5 Automatic image setup requires...
User Manual
Page 10
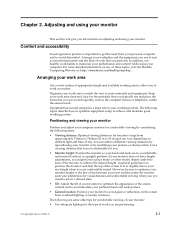
... and comfortable viewing when your preferences for monitors range from approximately 510mm to 760mm (20 in to optimize your monitor height so the line of the screen content and to achieve and maintain good working posture. A general guideline is at : http://www.lenovo.com/healthycomputing/. However, be sure to 30 in a comfortable and neutral (vertical, or upright) position. In addition, use materials...
... and comfortable viewing when your preferences for monitors range from approximately 510mm to 760mm (20 in to optimize your monitor height so the line of the screen content and to achieve and maintain good working posture. A general guideline is at : http://www.lenovo.com/healthycomputing/. However, be sure to 30 in a comfortable and neutral (vertical, or upright) position. In addition, use materials...

User Manual
Page 11
.../lenovobidx?OpenForm 2-2 L197 Wide Flat Panel Monitor User's Guide Avoid assuming any one posture for advice. • Use the monitor brightness, contrast, and image adjustment controls, if equipped, to optimize the image on your screen to meet your visual preferences. • Keep your monitor screen clean so you can maintain a comfortable and productive posture. Be sure to help deter any adjustments that your office furniture or equipment provide to accommodate changes in the way...
.../lenovobidx?OpenForm 2-2 L197 Wide Flat Panel Monitor User's Guide Avoid assuming any one posture for advice. • Use the monitor brightness, contrast, and image adjustment controls, if equipped, to optimize the image on your screen to meet your visual preferences. • Keep your monitor screen clean so you can maintain a comfortable and productive posture. Be sure to help deter any adjustments that your office furniture or equipment provide to accommodate changes in the way...
User Manual
Page 13
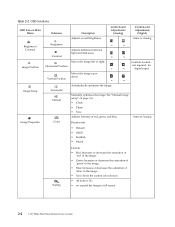
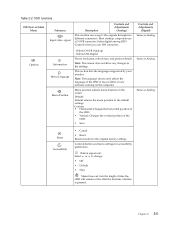
... • Save Adjusts intensity of 'blue' in the image. • Save: Saves the custom color choices. • off native (1:1) • on expand the image to full screen 2-4 L197 Wide Flat Panel Monitor User's Guide Manually optimizes the image. Controls Locked not required for digital input Image Setup Image Properties Automatic Manual Color Automatically optimizes the image. Table 2-2. Preset mode • Default • sRGB • Reddish • Bluish Same as Analog Brightness/ Contrast Image Position Brightness Contrast Adjusts difference between light and dark...
... • Save Adjusts intensity of 'blue' in the image. • Save: Saves the custom color choices. • off native (1:1) • on expand the image to full screen 2-4 L197 Wide Flat Panel Monitor User's Guide Manually optimizes the image. Controls Locked not required for digital input Image Setup Image Properties Automatic Manual Color Automatically optimizes the image. Table 2-2. Preset mode • Default • sRGB • Reddish • Bluish Same as Analog Brightness/ Contrast Image Position Brightness Contrast Adjusts difference between light and dark...
User Manual
Page 14
... button and menu settings for accessibility preferences. Chapter 2. 2-5 Custom: • Horizontal: Changes the horizontal position of the OSD. • Vertical: Changes the vertical position of the OSD. • Save Same as Analog Same as Analog Options Information Menu Language Menu Position - Table 2-2. Most desktop computers use DVI connector. Selects DVI-Digital Shows resolution, refresh rate, and product details. Default: Default returns the menu position to the original factory settings. Note: This screen does not allow any software running on any changes...
... button and menu settings for accessibility preferences. Chapter 2. 2-5 Custom: • Horizontal: Changes the horizontal position of the OSD. • Vertical: Changes the vertical position of the OSD. • Save Same as Analog Same as Analog Options Information Menu Language Menu Position - Table 2-2. Most desktop computers use DVI connector. Selects DVI-Digital Shows resolution, refresh rate, and product details. Default: Default returns the menu position to the original factory settings. Note: This screen does not allow any software running on any changes...

User Manual
Page 15
... 60Hz 60Hz , 70Hz , 72Hz , 75Hz 60Hz , 75Hz 2-6 L197 Wide Flat Panel Monitor User's Guide Unlike CRT monitors, which is inherently flicker-free. Therefore, refer to your system has previously been used with a CRT monitor and is currently configured to a display mode outside the range of this monitor, you may need to minimize flicker, LCD or Flat Panel technology is the Native Resolution Display mode. Selecting a supported display mode The display mode the monitor uses is normal and the image can be readjusted using automatic image setup and the image controls.
... 60Hz 60Hz , 70Hz , 72Hz , 75Hz 60Hz , 75Hz 2-6 L197 Wide Flat Panel Monitor User's Guide Unlike CRT monitors, which is inherently flicker-free. Therefore, refer to your system has previously been used with a CRT monitor and is currently configured to a display mode outside the range of this monitor, you may need to minimize flicker, LCD or Flat Panel technology is the Native Resolution Display mode. Selecting a supported display mode The display mode the monitor uses is normal and the image can be readjusted using automatic image setup and the image controls.
User Manual
Page 17
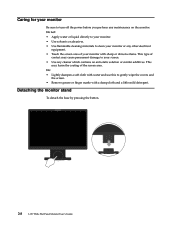
.... Detaching the monitor stand To detach the base by pressing the button. 2-8 L197 Wide Flat Panel Monitor User's Guide Caring for your monitor Be sure to turn off the power before you perform any cleaner which contains an anti-static solution or similar additives. This may harm the coating of contact may cause permanent damage to gently wipe the covers and the screen. • Remove grease or...
.... Detaching the monitor stand To detach the base by pressing the button. 2-8 L197 Wide Flat Panel Monitor User's Guide Caring for your monitor Be sure to turn off the power before you perform any cleaner which contains an anti-static solution or similar additives. This may harm the coating of contact may cause permanent damage to gently wipe the covers and the screen. • Remove grease or...

User Manual
Page 18
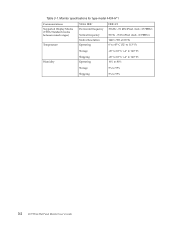
....) Stand VESA mount Image Width Tilt Supported Viewable image size 440.15 mm (17.33 in.) Range: -4°, +30° 100 mm (3.94 in.) 481.4 mm (18.95 in.) Maximum height 255.15 mm (10.0 in.) Maximum width 408.24 mm (16.2 in.) Power input Pixel pitch Supply voltage 0.2835 mm (0.01116 in.) (V) 90-264VAC (100~240VAC+/-10%) - Video input (Analog) Standby/Suspend Off Input signal < 2W (Anolog), Monitor specifications Table...
....) Stand VESA mount Image Width Tilt Supported Viewable image size 440.15 mm (17.33 in.) Range: -4°, +30° 100 mm (3.94 in.) 481.4 mm (18.95 in.) Maximum height 255.15 mm (10.0 in.) Maximum width 408.24 mm (16.2 in.) Power input Pixel pitch Supply voltage 0.2835 mm (0.01116 in.) (V) 90-264VAC (100~240VAC+/-10%) - Video input (Analog) Standby/Suspend Off Input signal < 2W (Anolog), Monitor specifications Table...
User Manual
Page 19
Table 3-1. Monitor specifications for type-model 4434-H*1 Communications Supported Display Modes (VESA Standard modes between noted ranges) Temperature VESA DDC Horizontal frequency Vertical frequency Native Resolution Operating DDC-CI 30 kHz - 81 kHz(Pixel clock
Table 3-1. Monitor specifications for type-model 4434-H*1 Communications Supported Display Modes (VESA Standard modes between noted ranges) Temperature VESA DDC Horizontal frequency Vertical frequency Native Resolution Operating DDC-CI 30 kHz - 81 kHz(Pixel clock

User Manual
Page 20
... or power. "Connecting and turning on . If these options do not work, contact the Support Center. Screen is blank and power indicator is steady amber or flashing green The monitor is no image. • The power cord is not switched on your setup. Chapter 3. 3-3 disconnected. • Power on page 1-3 The color settings may be able to solve it and adjust the display mode to within the specified range for your computer. The video signal cable...
... or power. "Connecting and turning on . If these options do not work, contact the Support Center. Screen is blank and power indicator is steady amber or flashing green The monitor is no image. • The power cord is not switched on your setup. Chapter 3. 3-3 disconnected. • Power on page 1-3 The color settings may be able to solve it and adjust the display mode to within the specified range for your computer. The video signal cable...

User Manual
Page 21
... OSD menu. 3-4 L197 Wide Flat Panel Monitor User's Guide Be sure the video cable is not an LCD defect. If automatic image supported display image. With a wrong phase adjustment, the picture has horizontal disturbances in text or a not been settings on your system's display properties. Press to access. 3. Troubleshooting Problem Possible cause Suggested action Reference The power indicator is green, but there is loose or disconnected from the system or monitor. Adjust the brightness and "Adjusting your contrast setting on the monitor image...
... OSD menu. 3-4 L197 Wide Flat Panel Monitor User's Guide Be sure the video cable is not an LCD defect. If automatic image supported display image. With a wrong phase adjustment, the picture has horizontal disturbances in text or a not been settings on your system's display properties. Press to access. 3. Troubleshooting Problem Possible cause Suggested action Reference The power indicator is green, but there is loose or disconnected from the system or monitor. Adjust the brightness and "Adjusting your contrast setting on the monitor image...

User Manual
Page 22
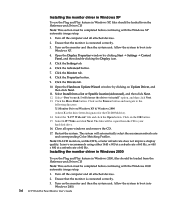
... Hz.. Manually installing the monitor driver Below are steps for the CD-ROM drive). 14. The files will automatically select the maximum refresh rate and corresponding Color Matching Profiles. and Microsoft Windows 2000 Professional. Installing the monitor driver in Windows Vista To install the device driver in Windows Vista. 1. Open the "Update Driver Software-Generic PnP Monitor" window by clicking Start, Control Panel and then double-clicking the Hardware and Sound icon. 5. Lenovo recommends using either 1440...
... Hz.. Manually installing the monitor driver Below are steps for the CD-ROM drive). 14. The files will automatically select the maximum refresh rate and corresponding Color Matching Profiles. and Microsoft Windows 2000 Professional. Installing the monitor driver in Windows Vista To install the device driver in Windows Vista. 1. Open the "Update Driver Software-Generic PnP Monitor" window by clicking Start, Control Panel and then double-clicking the Hardware and Sound icon. 5. Lenovo recommends using either 1440...
User Manual
Page 23
... Specific location(Advanced), and then click Next. 12. Ensure that the monitor is connected correctly. 3. Select the "L197 Wide.inf" file and click the Open button. Click on the monitor and then the system unit. Click the Monitor tab. 8. Open the Hardware Update Wizard window by clicking Start J Settings J Control Panel, and then double-clicking the Display icon. 5. Note: On LCD monitors, unlike CRTs, a faster refresh rate does not improve display quality. Installing the monitor driver...
... Specific location(Advanced), and then click Next. 12. Ensure that the monitor is connected correctly. 3. Select the "L197 Wide.inf" file and click the Open button. Click on the monitor and then the system unit. Click the Monitor tab. 8. Open the Hardware Update Wizard window by clicking Start J Settings J Control Panel, and then double-clicking the Display icon. 5. Note: On LCD monitors, unlike CRTs, a faster refresh rate does not improve display quality. Installing the monitor driver...

User Manual
Page 24
.... Lenovo recommends using either 1440 x 900 at a refresh rate of 60 Hz, or 640 x 480 at a refresh rate of the known drivers for the CD-ROM drive). 13. Chapter 3. 3-7 Open the Display Properties window by clicking on the Browse button and navigate to your problem, please contact the Lenovo Support Center. Open the Upgrade Device Driver Wizard window by clicking Start J Settings J Control Panel, and then double-clicking the Display icon. 5. Click on Update Driver...
.... Lenovo recommends using either 1440 x 900 at a refresh rate of 60 Hz, or 640 x 480 at a refresh rate of the known drivers for the CD-ROM drive). 13. Chapter 3. 3-7 Open the Display Properties window by clicking on the Browse button and navigate to your problem, please contact the Lenovo Support Center. Open the Upgrade Device Driver Wizard window by clicking Start J Settings J Control Panel, and then double-clicking the Display icon. 5. Click on Update Driver...
User Manual
Page 25
... damaged due to covers, bezel, base and cables. • Scratches or punctures on the side of a CRT monitor. Burned image is located on monitor screens. 3-8 L197 Wide Flat Panel Monitor User's Guide The following are examples of misuse or abuse and not covered by utilizing a moving screen saver or power management. • Physical damage to accident, misuse, abuse, improper installation, usage not in accordance with product specifications and instructions, natural or...
... damaged due to covers, bezel, base and cables. • Scratches or punctures on the side of a CRT monitor. Burned image is located on monitor screens. 3-8 L197 Wide Flat Panel Monitor User's Guide The following are examples of misuse or abuse and not covered by utilizing a moving screen saver or power management. • Physical damage to accident, misuse, abuse, improper installation, usage not in accordance with product specifications and instructions, natural or...

