
User Manual
Page 3
... setup 3-4 Manually installing the monitor driver 3-4 Installing the device driver in Windows Vista 3-5 Installing the monitor driver in Windows XP 3-6 Installing the monitor driver in Windows 2000 3-6 Getting further help 3-7 Service information 3-8 Product numbers 3-8 Customer responsibilities 3-8 Service parts 3-9 Appendix A. Service and Support A-1 Online technical support A-1 Telephone technical support A-1 Appendix B. Notices B-1 Trademarks B-2 © Copyright Lenovo 2008. © ii Contents...
... setup 3-4 Manually installing the monitor driver 3-4 Installing the device driver in Windows Vista 3-5 Installing the monitor driver in Windows XP 3-6 Installing the monitor driver in Windows 2000 3-6 Getting further help 3-7 Service information 3-8 Product numbers 3-8 Customer responsibilities 3-8 Service parts 3-9 Appendix A. Service and Support A-1 Online technical support A-1 Telephone technical support A-1 Appendix B. Notices B-1 Trademarks B-2 © Copyright Lenovo 2008. © ii Contents...
User Manual
Page 5
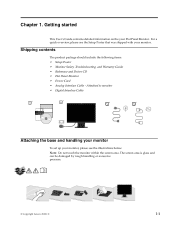
... handling or excessive pressure. © Copyright Lenovo 2008. © 1-1 Getting started This User's Guide contains detailed information on the your monitor. Shipping contents The product package should include the following items: • Setup Poster • Monitor Safety, Troubleshooting, and Warranty Guide • Reference and Driver CD • Flat Panel Monitor • Power Cord • Analog...
... handling or excessive pressure. © Copyright Lenovo 2008. © 1-1 Getting started This User's Guide contains detailed information on the your monitor. Shipping contents The product package should include the following items: • Setup Poster • Monitor Safety, Troubleshooting, and Warranty Guide • Reference and Driver CD • Flat Panel Monitor • Power Cord • Analog...
User Manual
Page 9
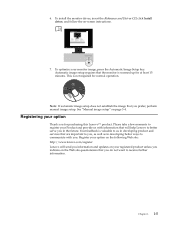
...you . Note: If automatic image setup does not establish the image that the monitor is warmed up for at least 15 minutes. Your feedback is not required for purchasing this Lenovo™ product. 6. This is valuable to us with you prefer, perform ...communicte with information that will help Lenovo to receive further information. See "Manual image setup" on -screen instructions. 7. Registering your monitor image, press the Automatic Image Setup key. Chapter 1. 1-5 To install the monitor driver, insert the Reference and Driver CD, click Install driver, and follow the on page...
...you . Note: If automatic image setup does not establish the image that the monitor is warmed up for at least 15 minutes. Your feedback is not required for purchasing this Lenovo™ product. 6. This is valuable to us with you prefer, perform ...communicte with information that will help Lenovo to receive further information. See "Manual image setup" on -screen instructions. 7. Registering your monitor image, press the Automatic Image Setup key. Chapter 1. 1-5 To install the monitor driver, insert the Reference and Driver CD, click Install driver, and follow the on page...

User Manual
Page 18
Reference information This section contains monitor specifications, instructions to manually install the monitor driver, troubleshooting information, and service information. Power consumption Max supply current Normal operation 1.5 A < 22 W Note: Power consumption figures are for type-model 4434-H*1 Dimensions ...pitch Supply voltage 0.2835 mm (0.01116 in.) (V) 90-264VAC (100~240VAC+/-10%) - Video input (Analog) Standby/Suspend Off Input signal < 2W (Anolog), Chapter 3. Monitor specifications Table 3-1. Monitor specifications for the monitor and the power supply combined.
Reference information This section contains monitor specifications, instructions to manually install the monitor driver, troubleshooting information, and service information. Power consumption Max supply current Normal operation 1.5 A < 22 W Note: Power consumption figures are for type-model 4434-H*1 Dimensions ...pitch Supply voltage 0.2835 mm (0.01116 in.) (V) 90-264VAC (100~240VAC+/-10%) - Video input (Analog) Standby/Suspend Off Input signal < 2W (Anolog), Chapter 3. Monitor specifications Table 3-1. Monitor specifications for the monitor and the power supply combined.

User Manual
Page 22
... directory: X:\Monitor Drivers\Windows Vista (where X is connected correctly. 3. Click the Properties button. 10. Click the Have Disk button. Select the "L197 Wide.inf" file and click the Open button. Chapter 3. 3-5 Click the Personalization icon. 6. Click the Display Settings icon. 7. Restart the computer. Click the Advanced Settings button. 8. Click the OK button. 15. Lenovo recommends...
... directory: X:\Monitor Drivers\Windows Vista (where X is connected correctly. 3. Click the Properties button. 10. Click the Have Disk button. Select the "L197 Wide.inf" file and click the Open button. Chapter 3. 3-5 Click the Personalization icon. 6. Click the Display Settings icon. 7. Restart the computer. Click the Advanced Settings button. 8. Click the OK button. 15. Lenovo recommends...
User Manual
Page 23
...Monitor Drivers\Windows XP & Windows 2000 (where X is connected correctly. 3. Click the Have Disk button. Click on the monitor and then the system unit. Close all attached devices. 2. Note: On LCD monitors, unlike CRTs, a faster refresh rate does not improve display quality. Turn on the Browse button and navigate to boot into Windows 2000. 3-6 L197 Wide... monitor is connected correctly. 3. The system will choose the driver to boot into Windows XP. 4. Ensure that the monitor is the drive letter designator for the CD-ROM drive). 14. Click the Drivers tab. 10. Lenovo ...
...Monitor Drivers\Windows XP & Windows 2000 (where X is connected correctly. 3. Click the Have Disk button. Click on the monitor and then the system unit. Close all attached devices. 2. Note: On LCD monitors, unlike CRTs, a faster refresh rate does not improve display quality. Turn on the Browse button and navigate to boot into Windows 2000. 3-6 L197 Wide... monitor is connected correctly. 3. The system will choose the driver to boot into Windows XP. 4. Ensure that the monitor is the drive letter designator for the CD-ROM drive). 14. Click the Drivers tab. 10. Lenovo ...

User Manual
Page 24
... to your problem, please contact the Lenovo Support Center. Click the Properties button. 9. Select L197 Wide and click Next. Open the Display Properties window by clicking on page A-1. Click the Settings tab. 6. Click the Monitor tab. 8. Getting further help If you still can choose a specific driver, and then click Next. 12.... select the maximum refresh rate and corresponding Color Matching Profiles. Close all open windows and remove the CD. 16. Note: On LCD monitors, unlike CRTs, a faster refresh rate does not improve display quality. Chapter 3. 3-7
... to your problem, please contact the Lenovo Support Center. Click the Properties button. 9. Select L197 Wide and click Next. Open the Display Properties window by clicking on page A-1. Click the Settings tab. 6. Click the Monitor tab. 8. Getting further help If you still can choose a specific driver, and then click Next. 12.... select the maximum refresh rate and corresponding Color Matching Profiles. Close all open windows and remove the CD. 16. Note: On LCD monitors, unlike CRTs, a faster refresh rate does not improve display quality. Chapter 3. 3-7


