ThinkVision LT1712p Monitor - Publications
Page 3
... Monitor specifications ...3-1 Troubleshooting ...3-3 Manual image setup ...3-4 Manually installing the monitor driver ...3-5 Getting further help ...3-8 Service information ...3-8 Product numbers ...3-8 Customer responsibilities ...3-8 Service parts ...3-9 Appendix A. ii Adjusting and using your monitor 2-1 Comfort and accessibility ...2-1 Arranging your work area ...2-1 Positioning and viewing your monitor ...2-1 Quick tips for healthy work habits ...2-2 Accessibility information ...2-3 Adjusting your monitor image ...2-3 Using the direct access controls ...2-3 Using the On-Screen Display...
... Monitor specifications ...3-1 Troubleshooting ...3-3 Manual image setup ...3-4 Manually installing the monitor driver ...3-5 Getting further help ...3-8 Service information ...3-8 Product numbers ...3-8 Customer responsibilities ...3-8 Service parts ...3-9 Appendix A. ii Adjusting and using your monitor 2-1 Comfort and accessibility ...2-1 Arranging your work area ...2-1 Positioning and viewing your monitor ...2-1 Quick tips for healthy work habits ...2-2 Accessibility information ...2-3 Adjusting your monitor image ...2-3 Using the direct access controls ...2-3 Using the On-Screen Display...
ThinkVision LT1712p Monitor - Publications
Page 5
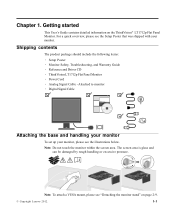
... your monitor, please see "Detaching the monitor stand" on the ThinkVision® LT1712p Flat Panel Monitor. Attached to monitor · Digital Signal Cable Attaching the base and handling your monitor To set up your monitor. Note: To attach a VESA mount, please see the illustrations below. Shipping contents The product package should include the following items: · Setup Poster · Monitor Safety, Troubleshooting, and Warranty Guide · Reference and Driver CD · ThinkVision LT1712p Flat Panel Monitor · Power Cord · Analog Signal Cable -
... your monitor, please see "Detaching the monitor stand" on the ThinkVision® LT1712p Flat Panel Monitor. Attached to monitor · Digital Signal Cable Attaching the base and handling your monitor To set up your monitor. Note: To attach a VESA mount, please see the illustrations below. Shipping contents The product package should include the following items: · Setup Poster · Monitor Safety, Troubleshooting, and Warranty Guide · Reference and Driver CD · ThinkVision LT1712p Flat Panel Monitor · Power Cord · Analog Signal Cable -

ThinkVision LT1712p Monitor - Publications
Page 6
Product overview This section will provide information on adjusting monitor positions, setting user controls, and using the cable lock slot. Height Adjustment After pressing the top of the monitor, remove the fixed pin and adjust the height of the tilt range. Types of adjustments Tilt Please see the illustration below for an example of the monitor. 1-2 LT1712p Flat Panel Monitor User's Guide
Product overview This section will provide information on adjusting monitor positions, setting user controls, and using the cable lock slot. Height Adjustment After pressing the top of the monitor, remove the fixed pin and adjust the height of the tilt range. Types of adjustments Tilt Please see the illustration below for an example of the monitor. 1-2 LT1712p Flat Panel Monitor User's Guide
ThinkVision LT1712p Monitor - Publications
Page 8
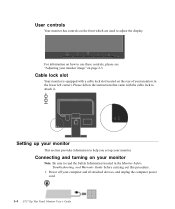
... the computer power cord. 1-4 LT1712p Flat Panel Monitor User's Guide Cable lock slot Your monitor is equipped with the cable lock to adjust the display. Power off your monitor (in the Monitor Safety, Troubleshooting, and Warranty Guide before carrying out this procedure. 1. User controls Your monitor has controls on the front which are used to attach it. Connecting and turning on your monitor Note: Be sure to help you set up your monitor image" on how to use these controls, please see "Adjusting your monitor This...
... the computer power cord. 1-4 LT1712p Flat Panel Monitor User's Guide Cable lock slot Your monitor is equipped with the cable lock to adjust the display. Power off your monitor (in the Monitor Safety, Troubleshooting, and Warranty Guide before carrying out this procedure. 1. User controls Your monitor has controls on the front which are used to attach it. Connecting and turning on your monitor Note: Be sure to help you set up your monitor image" on how to use these controls, please see "Adjusting your monitor This...
ThinkVision LT1712p Monitor - Publications
Page 11
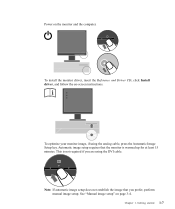
.... Getting started 1-7 To install the monitor driver, insert the Reference and Driver CD, click Install driver, and follow the on page 3-4. To optimize your monitor image, if using the DVI cable. See "Manual image setup" on -screen instructions. Automatic image setup requires that you are using the analog cable, press the Automatic Image Setup key. Note: If automatic image setup does not establish the image that the monitor is not required if you prefer, perform manual image setup. Chapter 1. Power on the monitor and...
.... Getting started 1-7 To install the monitor driver, insert the Reference and Driver CD, click Install driver, and follow the on page 3-4. To optimize your monitor image, if using the DVI cable. See "Manual image setup" on -screen instructions. Automatic image setup requires that you are using the analog cable, press the Automatic Image Setup key. Note: If automatic image setup does not establish the image that the monitor is not required if you prefer, perform manual image setup. Chapter 1. Power on the monitor and...
ThinkVision LT1712p Monitor - Publications
Page 13
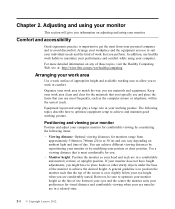
.... The following items: · Viewing distance: Optimal viewing distances for you. · Monitor height: Position the monitor so your monitor does not have height adjustments, you might have to place books or other sturdy objects under the base of the screen is to position the monitor such that you use to achieve and maintain good working posture. Adjusting and using your computer monitor for comfortable viewing by considering the following...
.... The following items: · Viewing distance: Optimal viewing distances for you. · Monitor height: Position the monitor so your monitor does not have height adjustments, you might have to place books or other sturdy objects under the base of the screen is to position the monitor such that you use to achieve and maintain good working posture. Adjusting and using your computer monitor for comfortable viewing by considering the following...
ThinkVision LT1712p Monitor - Publications
Page 14
... is to observe your working posture. A short break from overhead lighting or nearby windows. Avoid assuming any discomforts that might arise. Be sure to optimize the position and orientation of your equipment by following are performing. · Use the monitor brightness, contrast, and image adjustment controls, if equipped, to optimize the image on your screen to meet your visual preferences. · Keep your monitor screen clean so you can...
... is to observe your working posture. A short break from overhead lighting or nearby windows. Avoid assuming any discomforts that might arise. Be sure to optimize the position and orientation of your equipment by following are performing. · Use the monitor brightness, contrast, and image adjustment controls, if equipped, to optimize the image on your screen to meet your visual preferences. · Keep your monitor screen clean so you can...

ThinkVision LT1712p Monitor - Publications
Page 15
...Some of these technologies are viewed through vendors or accessed at: http://www.ibm.com/able/ Adjusting your monitor image. Switches the video input source. others can be purchased through the On-Screen Display (OSD), as shown below. 2-3 LT1712p Flat Panel Monitor User's Guide Table 2-1. Using the On-Screen Display (OSD) controls The settings adjustable with disabilities. Accessibility information Lenovo is not displayed. Direct access controls Icon Control Image Setup Brightness Input Change Description Activates automatic image adjustment. Using the direct access...
...Some of these technologies are viewed through vendors or accessed at: http://www.ibm.com/able/ Adjusting your monitor image. Switches the video input source. others can be purchased through the On-Screen Display (OSD), as shown below. 2-3 LT1712p Flat Panel Monitor User's Guide Table 2-1. Using the On-Screen Display (OSD) controls The settings adjustable with disabilities. Accessibility information Lenovo is not displayed. Direct access controls Icon Control Image Setup Brightness Input Change Description Activates automatic image adjustment. Using the direct access...
ThinkVision LT1712p Monitor - Publications
Page 17
... mode. 2-5 LT1712p Flat Panel Monitor User's Guide Power saving) Moves the image left or right. Reddish . Most desktop computers use DVI connector. · Selects D-SUB (Analog) · Selects DVI (Digital) Shows resolution, refresh rate, and product details. Note: This screen Same as Analog Image Position DPS(Dynamic DPS on any changes to the settings. Bluish Controls Locked not required for digital input Same as Analog Options Custom Input Signal Information Menu Language · Red: Increases or decreases the saturation of "red" in the image. · Green: Increases...
... mode. 2-5 LT1712p Flat Panel Monitor User's Guide Power saving) Moves the image left or right. Reddish . Most desktop computers use DVI connector. · Selects D-SUB (Analog) · Selects DVI (Digital) Shows resolution, refresh rate, and product details. Note: This screen Same as Analog Image Position DPS(Dynamic DPS on any changes to the settings. Bluish Controls Locked not required for digital input Same as Analog Options Custom Input Signal Information Menu Language · Red: Increases or decreases the saturation of "red" in the image. · Green: Increases...
ThinkVision LT1712p Monitor - Publications
Page 18
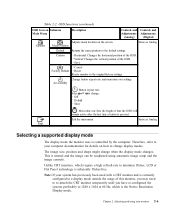
... display mode the monitor uses is currently configured to a display mode outside the range of the OSD. · Save · Cancel · Reset Resets monitor to re-attach the CRT monitor temporarily until you may need to the original factory settings. The image size, position and shape might change when the display mode changes. Table 2-2. OSD functions (continued) OSD Icon on Submenu Main Menu Description Controls and Controls and Adjustments Adjustments (Analog) (Digital) Options Adjusts menu location on how to minimize flicker, LCD or Flat Panel technology is the Native...
... display mode the monitor uses is currently configured to a display mode outside the range of the OSD. · Save · Cancel · Reset Resets monitor to re-attach the CRT monitor temporarily until you may need to the original factory settings. The image size, position and shape might change when the display mode changes. Table 2-2. OSD functions (continued) OSD Icon on Submenu Main Menu Description Controls and Controls and Adjustments Adjustments (Analog) (Digital) Options Adjusts menu location on how to minimize flicker, LCD or Flat Panel technology is the Native...
ThinkVision LT1712p Monitor - Publications
Page 19
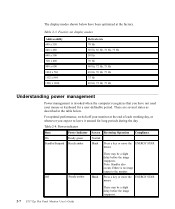
.... 2-7 LT1712p Flat Panel Monitor User's Guide Table 2-3. Note: Standby also occurs if there is invoked when the computer recognizes that you have been optimized at the end of each working day, or whenever you expect to the monitor. The display modes shown below . Table 2-4. Factory set display modes Addressability 640 x 350 640 x 480 640 x 500 720 x 400 800 x 600 1024 x 768 1152 x 864 1280 x 1024 Refresh rate...
.... 2-7 LT1712p Flat Panel Monitor User's Guide Table 2-3. Note: Standby also occurs if there is invoked when the computer recognizes that you have been optimized at the end of each working day, or whenever you expect to the monitor. The display modes shown below . Table 2-4. Factory set display modes Addressability 640 x 350 640 x 480 640 x 500 720 x 400 800 x 600 1024 x 768 1152 x 864 1280 x 1024 Refresh rate...
ThinkVision LT1712p Monitor - Publications
Page 20
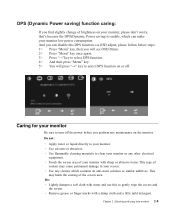
... change of brightness on your monitor, please don't worry, that's because the DPS(Dynamic Power saving) is enable, which contains an anti-static solution or similar additives. This may cause permanent damage to gently wipe the covers and the screen. · Remove grease or finger marks with water and use this DPS function via OSD adjust, please follow below steps: 1> Press "Menu...
... change of brightness on your monitor, please don't worry, that's because the DPS(Dynamic Power saving) is enable, which contains an anti-static solution or similar additives. This may cause permanent damage to gently wipe the covers and the screen. · Remove grease or finger marks with water and use this DPS function via OSD adjust, please follow below steps: 1> Press "Menu...

ThinkVision LT1712p Monitor - Publications
Page 22
... Lenovo 2012. 3-1 Video input (Analog) Video input (Digital) Viewable image size Maximum height Maximum width Pixel pitch Supply voltage Max supply current Normal operation Standby/Suspend Off Input signal Horizontal addressability Vertical addressability Clock frequency Interface Input Signal Horizontal addressability Vertical addressability Clock frequency 430 mm (17 in.) 270.34 mm (10.60 in.) 337.92 mm (13.30 in.) 0.264 mm (.010 in .) Image Power input Power consumption Note: Power consumption figures are for the monitor and the power supply...
... Lenovo 2012. 3-1 Video input (Analog) Video input (Digital) Viewable image size Maximum height Maximum width Pixel pitch Supply voltage Max supply current Normal operation Standby/Suspend Off Input signal Horizontal addressability Vertical addressability Clock frequency Interface Input Signal Horizontal addressability Vertical addressability Clock frequency 430 mm (17 in.) 270.34 mm (10.60 in.) 337.92 mm (13.30 in.) 0.264 mm (.010 in .) Image Power input Power consumption Note: Power consumption figures are for the monitor and the power supply...
ThinkVision LT1712p Monitor - Publications
Page 24
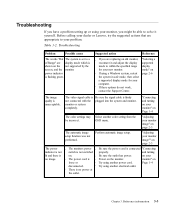
... no image. . If using a Windows system, restart page 2-6 the system in safe mode, then select a supported display mode for your new monitor. OSD menu. "Adjusting your problem. The monitors power . There is shown on page 2-3 The power indicator is not lit and there is flashing green. Reference information 3-3 Troubleshooting If you have a problem setting up or using your monitor, you are replacing an old monitor, "Selecting a reconnect it yourself. Before calling your dealer or Lenovo...
... no image. . If using a Windows system, restart page 2-6 the system in safe mode, then select a supported display mode for your new monitor. OSD menu. "Adjusting your problem. The monitors power . There is shown on page 2-3 The power indicator is not lit and there is flashing green. Reference information 3-3 Troubleshooting If you have a problem setting up or using your monitor, you are replacing an old monitor, "Selecting a reconnect it yourself. Before calling your dealer or Lenovo...

ThinkVision LT1712p Monitor - Publications
Page 25
... image setup does not help, perform manual image setup. Be sure the video cable is no image. adjusting the Dots Per Inch (DPI) setting on your system to match the native image" on page 2-3 One or more than five pixels Appendix A, "Service of the monitor to open the OSD menu. 2. Troubleshooting (continued) Problem Possible cause Suggested action Reference Screen is blank and power indicator is steady amber or flashing green The monitor is not an LCD Support Center. The video signal cable...
... image setup does not help, perform manual image setup. Be sure the video cable is no image. adjusting the Dots Per Inch (DPI) setting on your system to match the native image" on page 2-3 One or more than five pixels Appendix A, "Service of the monitor to open the OSD menu. 2. Troubleshooting (continued) Problem Possible cause Suggested action Reference Screen is blank and power indicator is steady amber or flashing green The monitor is not an LCD Support Center. The video signal cable...
ThinkVision LT1712p Monitor - Publications
Page 26
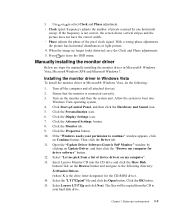
... the Advanced Settings button. 8. Open the "Update Driver Software-Generic PnP Monitor" window by one horizontal sweep. Insert Lenovo Monitor CD into Windows Vista operating system. 4. When the image no longer looks distorted, save the Clock and Phase adjustments. 5. Click the Display Settings icon. 7. If the "Windows needs your hard disk drive. Select Lenovo LT1712p and click Next. Press to select Clock and Phase adjustment. · Clock (pixel frequency) adjusts the number of the pixel clock signal. Select...
... the Advanced Settings button. 8. Open the "Update Driver Software-Generic PnP Monitor" window by one horizontal sweep. Insert Lenovo Monitor CD into Windows Vista operating system. 4. When the image no longer looks distorted, save the Clock and Phase adjustments. 5. Click the Display Settings icon. 7. If the "Windows needs your hard disk drive. Select Lenovo LT1712p and click Next. Press to select Clock and Phase adjustment. · Clock (pixel frequency) adjusts the number of the pixel clock signal. Select...

ThinkVision LT1712p Monitor - Publications
Page 27
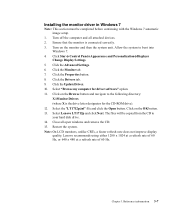
.... Click the Advanced button. 7. Select Lenovo LT1712p and click Next. The files will choose the driver to boot into the Display control panel. 5. Restart the system. Turn on the OK button. 15. Open the Hardware Update Wizard window by clicking Start Settings Control Panel, select/enter into Windows XP. 4. Lenovo recommends using either 1280 x 1024 at a refresh rate of 60 Hz, or 640 x 480 at a refresh rate of 60 Hz. 3-6 LT1712p Flat Panel Monitor User's Guide window, please select "No...
.... Click the Advanced button. 7. Select Lenovo LT1712p and click Next. The files will choose the driver to boot into the Display control panel. 5. Restart the system. Turn on the OK button. 15. Open the Hardware Update Wizard window by clicking Start Settings Control Panel, select/enter into Windows XP. 4. Lenovo recommends using either 1280 x 1024 at a refresh rate of 60 Hz, or 640 x 480 at a refresh rate of 60 Hz. 3-6 LT1712p Flat Panel Monitor User's Guide window, please select "No...
ThinkVision LT1712p Monitor - Publications
Page 28
... Advanced Settings. 6. Click the Drivers tab. 9. Select the "LT1712p.inf" file and click the Open button. Select Lenovo LT1712p and click Next. Click the Properties button. 8. Click the Update Driver. 10. Note: On LCD monitors, unlike CRTs, a faster refresh rate does not improve display quality. Turn off the computer and all open windows and remove the CD. 15. Click on the Browse button and navigate to the following directory: X:\Monitor Drivers (where X is connected...
... Advanced Settings. 6. Click the Drivers tab. 9. Select the "LT1712p.inf" file and click the Open button. Select Lenovo LT1712p and click Next. Click the Properties button. 8. Click the Update Driver. 10. Note: On LCD monitors, unlike CRTs, a faster refresh rate does not improve display quality. Turn off the computer and all open windows and remove the CD. 15. Click on the Browse button and navigate to the following directory: X:\Monitor Drivers (where X is connected...
ThinkVision LT1712p Monitor - Publications
Page 29
... in accordance with product specifications and instructions, natural or personal disaster, or unauthorized alterations, repairs or modifications. Service information Product numbers The product number for your problem, please contact the Lenovo Support Center. Customer responsibilities The warranty does not apply to a product which has been damaged due to covers, bezel, base and cables. · Scratches or punctures on monitor screens. 3-8 LT1712p Flat Panel Monitor User's Guide Burned image is located on...
... in accordance with product specifications and instructions, natural or personal disaster, or unauthorized alterations, repairs or modifications. Service information Product numbers The product number for your problem, please contact the Lenovo Support Center. Customer responsibilities The warranty does not apply to a product which has been damaged due to covers, bezel, base and cables. · Scratches or punctures on monitor screens. 3-8 LT1712p Flat Panel Monitor User's Guide Burned image is located on...

ThinkVision LT1712p Monitor - Publications
Page 31
... Lenovo Limited Warranty for Lenovo Support is installed in a Lenovo computer, you are subject to service at : http://www.lenovo.com/support Product replacement assistance or exchange of defective components also is cancelled, or made available for your system. A Lenovo technical support representative can help you through the Customer Support Center will be entitled to change without notice. Telephone technical support Installation and configuration support through the problem...
... Lenovo Limited Warranty for Lenovo Support is installed in a Lenovo computer, you are subject to service at : http://www.lenovo.com/support Product replacement assistance or exchange of defective components also is cancelled, or made available for your system. A Lenovo technical support representative can help you through the Customer Support Center will be entitled to change without notice. Telephone technical support Installation and configuration support through the problem...


