Manual
Page 14
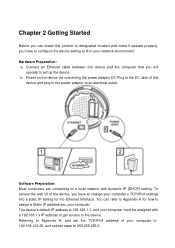
...are connecting to fit in the power adaptor to change your computer must be assigned with dynamic IP (DHCP) setting. The device's default IP address is 192.168.1.1, and your computer's TCP/IPv4 settings into a static IP setting for how to the device. b. You can install this product to designated location and... DC Plug to the DC Jack of the device, you have to configure the device setting to a local network with a 192.168.1.x IP address to get access to assign a Static IP address you your network environment. To access the web UI of this device and plug in your computer.
...are connecting to fit in the power adaptor to change your computer must be assigned with dynamic IP (DHCP) setting. The device's default IP address is 192.168.1.1, and your computer's TCP/IPv4 settings into a static IP setting for how to the device. b. You can install this product to designated location and... DC Plug to the DC Jack of the device, you have to configure the device setting to a local network with a 192.168.1.x IP address to get access to assign a Static IP address you your network environment. To access the web UI of this device and plug in your computer.
Manual
Page 15
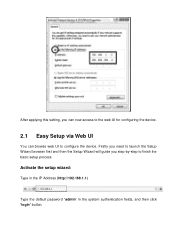
Firstly you need to launch the Setup Wizard browser first and then the Setup Wizard will guide you can now access to the web UI for configuring the device. 2.1 Easy Setup via Web UI You can browse web UI to finish the basic setup process. After applying this setting, you step-by-step to configure the device. Activate the setup wizard: Type in the IP Address (http://192.168.1.1) Type the default password "admin" in the system authentication fields, and then click „login‟ button.
Firstly you need to launch the Setup Wizard browser first and then the Setup Wizard will guide you can now access to the web UI for configuring the device. 2.1 Easy Setup via Web UI You can browse web UI to finish the basic setup process. After applying this setting, you step-by-step to configure the device. Activate the setup wizard: Type in the IP Address (http://192.168.1.1) Type the default password "admin" in the system authentication fields, and then click „login‟ button.
Manual
Page 24
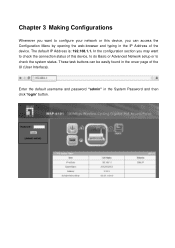
... and password "admin" in the IP Address of the UI (User Interface). The default IP Address is: 192.168.1.1. These task buttons can access the Configuration Menu by opening the web-browser and typing in the System Password and then ...
... and password "admin" in the IP Address of the UI (User Interface). The default IP Address is: 192.168.1.1. These task buttons can access the Configuration Menu by opening the web-browser and typing in the System Password and then ...
Manual
Page 30
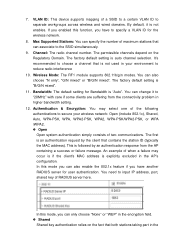
... radio interference 10. In this mode you have another RADIUS server for user authentication. If you enabled this mode, you have to input IP address, port, shared key of the following authentications to separate workgroups across wireless and wired domains. You can also enable the 802.1x... of RADIUS server here. 7. VLAN ID: This device supports mapping of maximum stations that can only choose "None" or "WEP" in the By default, it to the SSID simultaneously. 9. Max Supported Stations: You can specify the number of a SSID to a certain VLAN ID to secure your environment...
... radio interference 10. In this mode you have another RADIUS server for user authentication. If you enabled this mode, you have to input IP address, port, shared key of the following authentications to separate workgroups across wireless and wired domains. You can also enable the 802.1x... of RADIUS server here. 7. VLAN ID: This device supports mapping of maximum stations that can only choose "None" or "WEP" in the By default, it to the SSID simultaneously. 9. Max Supported Stations: You can specify the number of a SSID to a certain VLAN ID to secure your environment...
Manual
Page 34
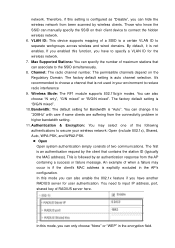
... depend on their client device to separate workgroups across wireless and wired domains. You can associate to the SSID simultaneously. 8. Bandwidth: The default setting for the wireless network. 7. This is an authentication request by an authentication response from the AP containing a success or failure message.... Authentication & Encryption: You may occur is if the client's MAC address is not used in higher bandwidth setting. 11. You need to input IP address, port, shared key of a SSID to a certain VLAN ID to connect the hidden wireless network. 6. Therefore, if this mode, you...
... depend on their client device to separate workgroups across wireless and wired domains. You can associate to the SSID simultaneously. 8. Bandwidth: The default setting for the wireless network. 7. This is an authentication request by an authentication response from the AP containing a success or failure message.... Authentication & Encryption: You may occur is if the client's MAC address is not used in higher bandwidth setting. 11. You need to input IP address, port, shared key of a SSID to a certain VLAN ID to connect the hidden wireless network. 6. Therefore, if this mode, you...
Manual
Page 37
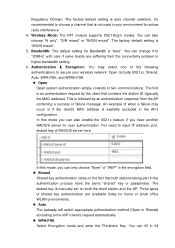
...include 802.1x), Shared, Auto, WPA-PSK, and WPA2-PSK. Open Open system authentication simply consists of two communications. The factory default setting is "B/G/N mixed". 5. Wireless Mode: The RF1 module supports 802.11b/g/n modes. An example of the following authentications to the WiFi client...part in the AP's configuration. You can change it to input IP address, port, shared key of shared key authentication are suffering from the AP containing a success or failure message. The factory default setting is auto channel selection. The first is explicitly excluded in...
...include 802.1x), Shared, Auto, WPA-PSK, and WPA2-PSK. Open Open system authentication simply consists of two communications. The factory default setting is "B/G/N mixed". 5. Wireless Mode: The RF1 module supports 802.11b/g/n modes. An example of the following authentications to the WiFi client...part in the AP's configuration. You can change it to input IP address, port, shared key of shared key authentication are suffering from the AP containing a success or failure message. The factory default setting is auto channel selection. The first is explicitly excluded in...
Manual
Page 50
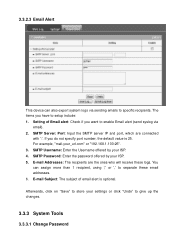
3.3.2.3 Email Alert This device can assign more than 1 recipient, using ';' or ',' to separate these logs. SMTP Server: Port: Input the SMTP server IP and port, which are the ones who will receive these email addresses. 6. For example, "mail.your_url.com" or "192.168.1.100:26". 3. SMTP ...if you want to enable Email alert (send syslog via sending emails to store your ISP. 5. The items you do not specify port number, the default value is optional. If you have to give up the changes. 3.3.3 System Tools 3.3.3.1 Change Password SMTP Username: Enter the Username offered by your ...
3.3.2.3 Email Alert This device can assign more than 1 recipient, using ';' or ',' to separate these logs. SMTP Server: Port: Input the SMTP server IP and port, which are the ones who will receive these email addresses. 6. For example, "mail.your_url.com" or "192.168.1.100:26". 3. SMTP ...if you want to enable Email alert (send syslog via sending emails to store your ISP. 5. The items you do not specify port number, the default value is optional. If you have to give up the changes. 3.3.3 System Tools 3.3.3.1 Change Password SMTP Username: Enter the Username offered by your ...
Manual
Page 53
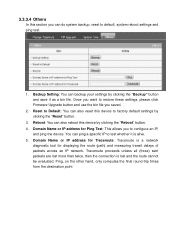
... you want to restore these settings, please click Firmware Upgrade button and use the bin file you can ping a specific IP to factory default settings by clicking the "Reboot" button. 4. Domain Name or IP address for Traceroute: Traceroute is lost and the route cannot be evaluated. 3.3.3.4 Others In this section you saved. 2. You...
... you want to restore these settings, please click Firmware Upgrade button and use the bin file you can ping a specific IP to factory default settings by clicking the "Reboot" button. 4. Domain Name or IP address for Traceroute: Traceroute is lost and the route cannot be evaluated. 3.3.3.4 Others In this section you saved. 2. You...
Manual
Page 55
..."ping 192.168.1.1". It will vary depending on your Ethernet Adapter is responding. Network adapter names will show four replies if you ping the correct IP Address assigned to make sure that the WiFi Access Point is working, and that all network drivers are having problems. 1 Why can refer to the... following if you use an Ethernet connection to problems for the installation and operation of default gateway. 4. Type ipconfig to Start > Run. 1. Ensure that you are installed properly. Note: It is lit? Go to get the...
..."ping 192.168.1.1". It will vary depending on your Ethernet Adapter is responding. Network adapter names will show four replies if you ping the correct IP Address assigned to make sure that the WiFi Access Point is working, and that all network drivers are having problems. 1 Why can refer to the... following if you use an Ethernet connection to problems for the installation and operation of default gateway. 4. Type ipconfig to Start > Run. 1. Ensure that you are installed properly. Note: It is lit? Go to get the...
Manual
Page 57
... your Access Point and Wireless adapter to a different channel to keep dropping? II. Ensure that the IP Address, subnet mask, gateway and DNS settings are indicating normally. B. Out of range: Put the device closer to default setting C. Connect with the correct Access Point. Ensure that generate RF noise such as microwaves, monitors...
... your Access Point and Wireless adapter to a different channel to keep dropping? II. Ensure that the IP Address, subnet mask, gateway and DNS settings are indicating normally. B. Out of range: Put the device closer to default setting C. Connect with the correct Access Point. Ensure that generate RF noise such as microwaves, monitors...
Manual
Page 61
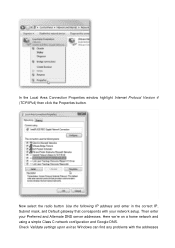
Now select the radio button Use the following IP address and enter in the correct IP, Subnet mask, and Default gateway that corresponds with the addresses Then enter your network setup. Here we're on a home network and using a simple Class C network configuration and Google DNS. Check Validate settings upon exit so Windows can find any problems with your Preferred and Alternate DNS server addresses. In the Local Area Connection Properties window highlight Internet Protocol Version 4 (TCP/IPv4) then click the Properties button.
Now select the radio button Use the following IP address and enter in the correct IP, Subnet mask, and Default gateway that corresponds with the addresses Then enter your network setup. Here we're on a home network and using a simple Class C network configuration and Google DNS. Check Validate settings upon exit so Windows can find any problems with your Preferred and Alternate DNS server addresses. In the Local Area Connection Properties window highlight Internet Protocol Version 4 (TCP/IPv4) then click the Properties button.
Manual
Page 64
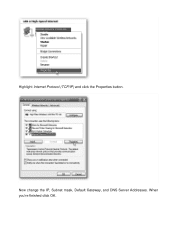
When you're finished click OK. Now change the IP, Subnet mask, Default Gateway, and DNS Server Addresses. Highlight Internet Protocol (TCP/IP) and click the Properties button.
When you're finished click OK. Now change the IP, Subnet mask, Default Gateway, and DNS Server Addresses. Highlight Internet Protocol (TCP/IP) and click the Properties button.
Quick Install Guide
Page 10
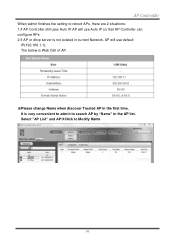
Select "AP List" and APClick to search AP by "Name" in the first time. The below is Web GUI of AP. ※Please change Name when discover Trusted AP in the AP list. It is not existed in current Network, AP will use default IP(192.168.1.1). AP Controller When admin finishes the setting to reboot APs, there are 2 situations: 1.If AP Controller still uses Auto IP,AP will use Auto IP so that AP Controller can configure APs. 2.If AP or dhcp server is very convenient to admin to Modify Name 10
Select "AP List" and APClick to search AP by "Name" in the first time. The below is Web GUI of AP. ※Please change Name when discover Trusted AP in the AP list. It is not existed in current Network, AP will use default IP(192.168.1.1). AP Controller When admin finishes the setting to reboot APs, there are 2 situations: 1.If AP Controller still uses Auto IP,AP will use Auto IP so that AP Controller can configure APs. 2.If AP or dhcp server is very convenient to admin to Modify Name 10