User Manual
Page 2
... Logging to the Device...13 Chapter 4 Fit AP ...15 AP Centralized Management Overview 15 4.1 Terminology ...15 4.2 Communication Process 15 4.3 Layer 2 Roaming 18 System mode: ...18 Configuration of LAN port ...19 4.4 Fixed IP access...19 4.5 Dynamic IP access 20 Status of wireless host...21 System information ...22 Chapter 5 Start menu ...23 Configuration Wizard ...23 Running status ...24 Port flow...25 System mode: ...26 Restarting device ...27 Chapter 6 Network parameters 28 Configuration of LAN port ...28 DHCP server...
... Logging to the Device...13 Chapter 4 Fit AP ...15 AP Centralized Management Overview 15 4.1 Terminology ...15 4.2 Communication Process 15 4.3 Layer 2 Roaming 18 System mode: ...18 Configuration of LAN port ...19 4.4 Fixed IP access...19 4.5 Dynamic IP access 20 Status of wireless host...21 System information ...22 Chapter 5 Start menu ...23 Configuration Wizard ...23 Running status ...24 Port flow...25 System mode: ...26 Restarting device ...27 Chapter 6 Network parameters 28 Configuration of LAN port ...28 DHCP server...
User Manual
Page 3
... How to connect a Windows XP PC to the Device wirelessly 59 Q2. 6.1 6.2 6.3 6.4 Chapter 7 DHCP server settings 28 Static DHCP ...29 DHCP client list 31 Case of DHCP configuration 31 Wireless configuration 34 System mode: ...34 Wireless basic configuration ...34 7.1 AP Mode ...35 7.2 Repeater Mode ...36 7.3 Bridge Mode ...38 7.4 Lazy Mode...38 7.5 Wireless configuration instance 39 Wireless security configuration 43 7.6 No security mechanism 43 7.7 WEP ...44 7.8 WPA/WPA2 ...45 7.9 WPA-PSK/WPA2-PSK 46 Filtering of wireless MAC address 46 Wireless Advanced...
... How to connect a Windows XP PC to the Device wirelessly 59 Q2. 6.1 6.2 6.3 6.4 Chapter 7 DHCP server settings 28 Static DHCP ...29 DHCP client list 31 Case of DHCP configuration 31 Wireless configuration 34 System mode: ...34 Wireless basic configuration ...34 7.1 AP Mode ...35 7.2 Repeater Mode ...36 7.3 Bridge Mode ...38 7.4 Lazy Mode...38 7.5 Wireless configuration instance 39 Wireless security configuration 43 7.6 No security mechanism 43 7.7 WEP ...44 7.8 WPA/WPA2 ...45 7.9 WPA-PSK/WPA2-PSK 46 Filtering of wireless MAC address 46 Wireless Advanced...
User Manual
Page 4
It provides an overview of the Device. 3 Factory Default Settings The following elements: :Radio Button: Allows you to select one of a predefined set of items, from a list. When activated, it displays a single item. About This Guide Note: For best use of the WAP-6111/H、WAP-6112/H、WAP-6201、 WAP-6202 Wireless Access Points. Purpose and Scope This guide describes the features and functions of our product...
It provides an overview of the Device. 3 Factory Default Settings The following elements: :Radio Button: Allows you to select one of a predefined set of items, from a list. When activated, it displays a single item. About This Guide Note: For best use of the WAP-6111/H、WAP-6112/H、WAP-6201、 WAP-6202 Wireless Access Points. Purpose and Scope This guide describes the features and functions of our product...
User Manual
Page 5
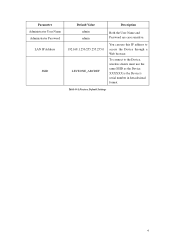
Table 0-1 Factory Default Settings 4 XXXXXX is the Device's serial number in hexadecimal format. You can use the same SSID as the Device. To connect to the Device, wireless clients must use this IP address to access the Device through a Web browser. Parameter Administrator User Name Administrator Password LAN IP Address SSID Default Value Description admin admin 192.168.1.253/255.255.255.0 LEVEONE_ABCDEF Both the User Name and Password are case sensitive.
Table 0-1 Factory Default Settings 4 XXXXXX is the Device's serial number in hexadecimal format. You can use the same SSID as the Device. To connect to the Device, wireless clients must use this IP address to access the Device through a Web browser. Parameter Administrator User Name Administrator Password LAN IP Address SSID Default Value Description admin admin 192.168.1.253/255.255.255.0 LEVEONE_ABCDEF Both the User Name and Password are case sensitive.
User Manual
Page 10
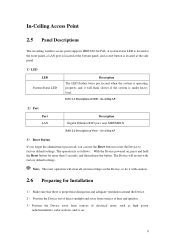
...-Ceiling Access Point 2.5 Panel Descriptions The in-ceiling wireless access point supports IEEE 802.3af PoE. In-ceiling AP 2) Port Port LAN Description Gigabit Ethernet RJ45 port, auto MDI/MDI-X Table 2-2 Description of LED - Note:The reset operation will clear all custom settings on . 9 In-ceiling AP 3) Reset Button If you forget the administrator password, you can use the Reset button to reset the Device to factory default settings. Table 2-1 Description of Ports - The...
...-Ceiling Access Point 2.5 Panel Descriptions The in-ceiling wireless access point supports IEEE 802.3af PoE. In-ceiling AP 2) Port Port LAN Description Gigabit Ethernet RJ45 port, auto MDI/MDI-X Table 2-2 Description of LED - Note:The reset operation will clear all custom settings on . 9 In-ceiling AP 3) Reset Button If you forget the administrator password, you can use the Reset button to reset the Device to factory default settings. Table 2-1 Description of Ports - The...
User Manual
Page 11
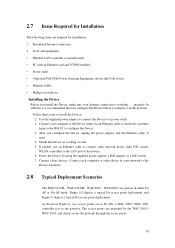
... Fat AP mode. Connect client devices: Connect each computer or other network device (like PoE switch • Ethernet cables • Phillips screwdriver.。 Installing the Device Before you install the Device, make sure your computer to configure the Device. 3. As shown in the network. In addition, it is working properly. 2.7 Items Required for Installation The following items are managed by using the supplied power adapter, a PoE adapter, or a PoE switch. 7. Broadband Internet connection 2. Figure 0-2 depicts a typical Fit access point deployment, and...
... Fat AP mode. Connect client devices: Connect each computer or other network device (like PoE switch • Ethernet cables • Phillips screwdriver.。 Installing the Device Before you install the Device, make sure your computer to configure the Device. 3. As shown in the network. In addition, it is working properly. 2.7 Items Required for Installation The following items are managed by using the supplied power adapter, a PoE adapter, or a PoE switch. 7. Broadband Internet connection 2. Figure 0-2 depicts a typical Fit access point deployment, and...
User Manual
Page 13
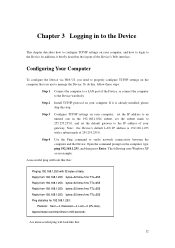
... following uses Windows XP as an example. Chapter 3 Logging in the 192.168.1.0/24 subnet, set the subnet mask to 255.255.255.0, and set the default gateway to the IP address of the Device, or connect the computer to the Device wirelessly. In addition, it is 192.168.1.253 with 32 bytes of 255.255.255.0. Configuring Your Computer To configure the Device via Web UI, you need...
... following uses Windows XP as an example. Chapter 3 Logging in the 192.168.1.0/24 subnet, set the subnet mask to 255.255.255.0, and set the default gateway to the IP address of the Device, or connect the computer to the Device wirelessly. In addition, it is 192.168.1.253 with 32 bytes of 255.255.255.0. Configuring Your Computer To configure the Device via Web UI, you need...
User Manual
Page 14
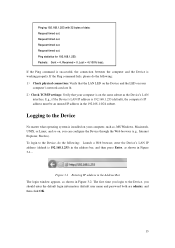
E.g., if the Device's LAN IP address is working properly. To login to the Device, do the following : Launch a Web browser, enter the Device's LAN IP address (default is on , you should enter the default login information (default user name and password both are lit. 2)Check TCP/IP settings: Verify that the LAN LED on the Device and the LED on your computer's network card are admin), and then click OK. 13 Request timed out. If the Ping command...
E.g., if the Device's LAN IP address is working properly. To login to the Device, do the following : Launch a Web browser, enter the Device's LAN IP address (default is on , you should enter the default login information (default user name and password both are lit. 2)Check TCP/IP settings: Verify that the LAN LED on the Device and the LED on your computer's network card are admin), and then click OK. 13 Request timed out. If the Ping command...
User Manual
Page 20
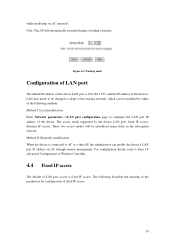
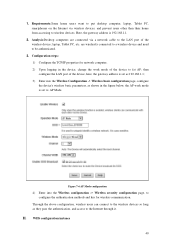
... device's LAN port needs to be changed to adapt to AC as a thin AP, the administrator can be introduced respectively in the subsequent sections. Method I: Local modification Enter Network parameters ->LAN port configuration page to Item 2.8 Advanced Configuration of Wireless Controller. 4.4 Fixed IP access The default of LAN port access is fixed IP access. These two access modes will automatically restarted during switching of the device. For configuration details, refer to configure the LAN port IP address of modes. Figure 4-1 Working mode Configuration of LAN port...
... device's LAN port needs to be changed to adapt to AC as a thin AP, the administrator can be introduced respectively in the subsequent sections. Method I: Local modification Enter Network parameters ->LAN port configuration page to Item 2.8 Advanced Configuration of Wireless Controller. 4.4 Fixed IP access The default of LAN port access is fixed IP access. These two access modes will automatically restarted during switching of the device. For configuration details, refer to configure the LAN port IP address of modes. Figure 4-1 Working mode Configuration of LAN port...
User Manual
Page 35
...of bridging or repeater, make the entire LAN be dominated by the device consists of three modes: Bridge Mode, Repeater Mode and Lazy Mode, which only plays a bridging function only in the practical application, and in configuration, the LAN IP of AP Mode and WDS. System mode: In the Start-> System mode page, the work mode, SSID, wireless mode, channel, channel bandwidth, enabling or disabling the SSID broadcast and other must be in the device, including: system mode, wireless basic configuration, wireless security configuration, wireless MAC address filtering, and wireless advanced...
...of bridging or repeater, make the entire LAN be dominated by the device consists of three modes: Bridge Mode, Repeater Mode and Lazy Mode, which only plays a bridging function only in the practical application, and in configuration, the LAN IP of AP Mode and WDS. System mode: In the Start-> System mode page, the work mode, SSID, wireless mode, channel, channel bandwidth, enabling or disabling the SSID broadcast and other must be in the device, including: system mode, wireless basic configuration, wireless security configuration, wireless MAC address filtering, and wireless advanced...
User Manual
Page 37
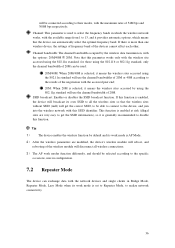
... enabled, the device will broadcast its own SSID to all wireless connections; 3) The AP work modes function differently, and should be selected according to the specific occasions, uses in configuration. 7.2 Repeater Mode The device can be used to select the frequency bands in Bridge Mode, Repeater Mode, Lazy Mode when its work mode is set to Repeater Mode, to realize network connectivity. 36 If there is used : 20M/40M: When 20M/40M is selected, it means the wireless sites accessed using...
... enabled, the device will broadcast its own SSID to all wireless connections; 3) The AP work modes function differently, and should be selected according to the specific occasions, uses in configuration. 7.2 Repeater Mode The device can be used to select the frequency bands in Bridge Mode, Repeater Mode, Lazy Mode when its work mode is set to Repeater Mode, to realize network connectivity. 36 If there is used : 20M/40M: When 20M/40M is selected, it means the wireless sites accessed using...
User Manual
Page 41
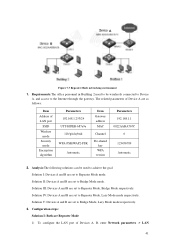
WDS configuration instance 40 1. Analysis:Desktop computers are wirelessly connected to a wireless device and need to configure the authentication methods and key for network computer; 2) Upon logging in the figure below, the AP work mode of the wireless device; then configure the LAN port of the device, here, the gateway address is set to wireless devices. Requirements:Some home users want to put desktop computer, laptop, Tablet PC, smartphones on the Internet via a network cable to the Internet through it. laptop, Tablet...
WDS configuration instance 40 1. Analysis:Desktop computers are wirelessly connected to a wireless device and need to configure the authentication methods and key for network computer; 2) Upon logging in the figure below, the AP work mode of the wireless device; then configure the LAN port of the device, here, the gateway address is set to wireless devices. Requirements:Some home users want to put desktop computer, laptop, Tablet PC, smartphones on the Internet via a network cable to the Internet through it. laptop, Tablet...
User Manual
Page 42
... goal Solution I : Both are set to the Internet through the gateway. The related parameters of Device A are set to Bridge Mode, Lazy Mode mode respectively. 3. Configuration steps: Solution I : Devices A and B are set to Repeater Mode mode. Solution II: Devices A and B are Repeater Mode 1) To configure the LAN port of LAN port SSID Wireless mode Security mode Encryption algorithm Parameters 192.168.1.253/24 UTT-HIPER-b87a9a 11b/g/n hybrid WPA-PSK/WAP2-PSK Automatic Item Gateway address MAC Channel Pre-shared key WPA version Parameters 192.168.1.1 0022AABA767C...
... goal Solution I : Both are set to the Internet through the gateway. The related parameters of Device A are set to Bridge Mode, Lazy Mode mode respectively. 3. Configuration steps: Solution I : Devices A and B are set to Repeater Mode mode. Solution II: Devices A and B are Repeater Mode 1) To configure the LAN port of LAN port SSID Wireless mode Security mode Encryption algorithm Parameters 192.168.1.253/24 UTT-HIPER-b87a9a 11b/g/n hybrid WPA-PSK/WAP2-PSK Automatic Item Gateway address MAC Channel Pre-shared key WPA version Parameters 192.168.1.1 0022AABA767C...
User Manual
Page 46
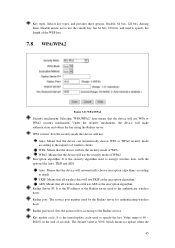
... is 3600, which means no update when the 45 Radius Server IP: It is the IP address of the WEP key. 7.8 WPA/WPA2 Figure 7-11 WPA/WPA2 Security mechanism: Selecting "WPA/WPA2" here means that the device will use the security mode of seconds. Radius port: The service port number used to the Radius service. Radius password: Sets the password for authenticating wireless hosts. The default value is the security algorithm used by the Radius server for accessing to encrypt wireless data, with the options like...
... is 3600, which means no update when the 45 Radius Server IP: It is the IP address of the WEP key. 7.8 WPA/WPA2 Figure 7-11 WPA/WPA2 Security mechanism: Selecting "WPA/WPA2" here means that the device will use the security mode of seconds. Radius port: The service port number used to the Radius service. Radius password: Sets the password for authenticating wireless hosts. The default value is the security algorithm used by the Radius server for accessing to encrypt wireless data, with the options like...
User Manual
Page 50
... segments can improve the reliability of connections; Its use the WMM function properly, wireless clients must also support WMM. the short preamble type can minimize costs, thus maximizing the network data throughput; Time-sensitive information, such as 2346; Status of beacon interval. Enable WMM: Allows you can also easily set the MAC address filtering function. 49 Through the "List of short preamble can provide better...
... segments can improve the reliability of connections; Its use the WMM function properly, wireless clients must also support WMM. the short preamble type can minimize costs, thus maximizing the network data throughput; Time-sensitive information, such as 2346; Status of beacon interval. Enable WMM: Allows you can also easily set the MAC address filtering function. 49 Through the "List of short preamble can provide better...

User Manual
Page 53
... WEB interface; In order to guarantee that the functions of the device relating to time work normally, the clock of the device needs to be accurately set, to obtain the standard time, and the device will automatically get the standard time from the Internet after it synchronize with the local standard time. Figure 8-2 Status of wireless host User name: Customize the user name of setting system time, "Manual setup time" and "Network time synchronization". Enter...
... WEB interface; In order to guarantee that the functions of the device relating to time work normally, the clock of the device needs to be accurately set, to obtain the standard time, and the device will automatically get the standard time from the Internet after it synchronize with the local standard time. Figure 8-2 Status of wireless host User name: Customize the user name of setting system time, "Manual setup time" and "Network time synchronization". Enter...
User Manual
Page 54
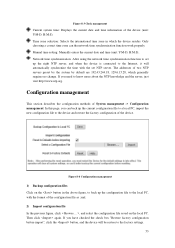
... configuration file saved on the button in which generally requires no change. Manual time setting: Manually enters the current date and time (unit: Y-M-D, H:M:S); Configuration management This section describes the configuration methods of the device (unit: Y-M-D, H:M:S). Then click again. Time zone selection: Selects the international time zone in the above figure, to back up the current configuration file to a local PC, import the new configuration file to the factory settings. 53 The addresses of the device...
... configuration file saved on the button in which generally requires no change. Manual time setting: Manually enters the current date and time (unit: Y-M-D, H:M:S); Configuration management This section describes the configuration methods of the device (unit: Y-M-D, H:M:S). Then click again. Time zone selection: Selects the international time zone in the above figure, to back up the current configuration file to a local PC, import the new configuration file to the factory settings. 53 The addresses of the device...
User Manual
Page 60
... open the Internet Protocol (TCP/IP) Properties window. 4. Step 1: Configuring TCP/IP Settings 59 How to connect a Windows XP PC to finish the configuration. Right-click Wireless Network Connection and select Properties. 3. Click OK to the Device wirelessly? Step 2: Connecting the PC to the Device wirelessly? 1. Right-click the wireless network icon in Default Gateway box. Select Use the following DNS server addresses, and enter the IP addresses of the following IP address, enter the static IP address (a free IP address...
... open the Internet Protocol (TCP/IP) Properties window. 4. Step 1: Configuring TCP/IP Settings 59 How to connect a Windows XP PC to finish the configuration. Right-click Wireless Network Connection and select Properties. 3. Click OK to the Device wirelessly? Step 2: Connecting the PC to the Device wirelessly? 1. Right-click the wireless network icon in Default Gateway box. Select Use the following DNS server addresses, and enter the IP addresses of the following IP address, enter the static IP address (a free IP address...
User Manual
Page 61
... reset operation is as follows: Go to factory default settings? The operation is available on your screen. 14. Click Start > Control Panel > Network and Internet > Network and Sharing Center > Change Adapter Settings. 3. Right-click Wireless Network Connection and select Properties. 4. If the primary DNS server is unreachable, the secondary DNS server is enabled. 13. 2. If a DHCP server is as follows: With the Device powered on the Device, so do the following IP address, enter the static IP address (a free IP address...
... reset operation is as follows: Go to factory default settings? The operation is available on your screen. 14. Click Start > Control Panel > Network and Internet > Network and Sharing Center > Change Adapter Settings. 3. Right-click Wireless Network Connection and select Properties. 4. If the primary DNS server is unreachable, the secondary DNS server is enabled. 13. 2. If a DHCP server is as follows: With the Device powered on the Device, so do the following IP address, enter the static IP address (a free IP address...
Quick Installation Guide
Page 3
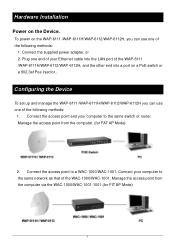
... injector... Connect the supplied power adapter, or 2. Manage the access point from the computer via the WAC-1000/WAC-1001-1001.(for FAT AP Mode) 2. Connect the access point to the same switch or router. Connect your computer to the same network as that of the following methods: 1. Manage the access point from the computer. (for FIT AP Mode) 3 Configuring the Device To set up and manage the WAP-6111 /WAP-6111H/WAP-6112/WAP-6112H you can use one...
... injector... Connect the supplied power adapter, or 2. Manage the access point from the computer via the WAC-1000/WAC-1001-1001.(for FAT AP Mode) 2. Connect the access point to the same switch or router. Connect your computer to the same network as that of the following methods: 1. Manage the access point from the computer. (for FIT AP Mode) 3 Configuring the Device To set up and manage the WAP-6111 /WAP-6111H/WAP-6112/WAP-6112H you can use one...