User Manual
Page 2
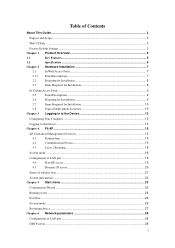
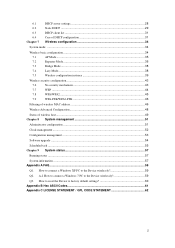
... Logging to the Device...13 Chapter 4 Fit AP ...15 AP Centralized Management Overview 15 4.1 Terminology ...15 4.2 Communication Process 15 4.3 Layer 2 Roaming 18 System mode: ...18 Configuration of LAN port ...19 4.4 Fixed IP access...19 4.5 Dynamic IP access 20 Status of wireless host...21 System information ...22 Chapter 5 Start menu ...23 Configuration Wizard ...23 Running status ...24 Port flow...25 System mode: ...26 Restarting device ...27 Chapter 6 Network parameters 28 Configuration of LAN port ...28 DHCP server...
... Logging to the Device...13 Chapter 4 Fit AP ...15 AP Centralized Management Overview 15 4.1 Terminology ...15 4.2 Communication Process 15 4.3 Layer 2 Roaming 18 System mode: ...18 Configuration of LAN port ...19 4.4 Fixed IP access...19 4.5 Dynamic IP access 20 Status of wireless host...21 System information ...22 Chapter 5 Start menu ...23 Configuration Wizard ...23 Running status ...24 Port flow...25 System mode: ...26 Restarting device ...27 Chapter 6 Network parameters 28 Configuration of LAN port ...28 DHCP server...
User Manual
Page 3
...A-2 How to connect a Windows 7 PC to the Device wirelessly 59 Q3. 6.1 6.2 6.3 6.4 Chapter 7 DHCP server settings 28 Static DHCP ...29 DHCP client list 31 Case of DHCP configuration 31 Wireless configuration 34 System mode: ...34 Wireless basic configuration ...34 7.1 AP Mode ...35 7.2 Repeater Mode ...36 7.3 Bridge Mode ...38 7.4 Lazy Mode...38 7.5 Wireless configuration instance 39 Wireless security configuration 43 7.6 No security mechanism 43 7.7 WEP ...44 7.8 WPA/WPA2 ...45 7.9 WPA-PSK/WPA2-PSK 46 Filtering of wireless MAC address 46 Wireless Advanced...
...A-2 How to connect a Windows 7 PC to the Device wirelessly 59 Q3. 6.1 6.2 6.3 6.4 Chapter 7 DHCP server settings 28 Static DHCP ...29 DHCP client list 31 Case of DHCP configuration 31 Wireless configuration 34 System mode: ...34 Wireless basic configuration ...34 7.1 AP Mode ...35 7.2 Repeater Mode ...36 7.3 Bridge Mode ...38 7.4 Lazy Mode...38 7.5 Wireless configuration instance 39 Wireless security configuration 43 7.6 No security mechanism 43 7.7 WEP ...44 7.8 WPA/WPA2 ...45 7.9 WPA-PSK/WPA2-PSK 46 Filtering of wireless MAC address 46 Wireless Advanced...
User Manual
Page 4
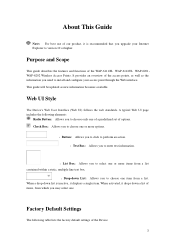
... that you to choose one item from a list. It provides an overview of the access points, as well as new information becomes available. About This Guide Note: For best use of our product, it is inactive, it displays a single item. A typical Web UI page includes the following table lists the factory default settings of the WAP-6111/H、WAP-6112/H、WAP-6201、 WAP-6202 Wireless Access Points.
... that you to choose one item from a list. It provides an overview of the access points, as well as new information becomes available. About This Guide Note: For best use of our product, it is inactive, it displays a single item. A typical Web UI page includes the following table lists the factory default settings of the WAP-6111/H、WAP-6112/H、WAP-6201、 WAP-6202 Wireless Access Points.
User Manual
Page 5
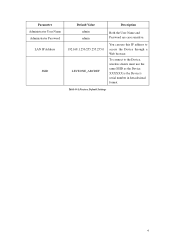
XXXXXX is the Device's serial number in hexadecimal format. Table 0-1 Factory Default Settings 4 You can use this IP address to the Device, wireless clients must use the same SSID as the Device. To connect to access the Device through a Web browser. Parameter Administrator User Name Administrator Password LAN IP Address SSID Default Value Description admin admin 192.168.1.253/255.255.255.0 LEVEONE_ABCDEF Both the User Name and Password are case sensitive.
XXXXXX is the Device's serial number in hexadecimal format. Table 0-1 Factory Default Settings 4 You can use this IP address to the Device, wireless clients must use the same SSID as the Device. To connect to access the Device through a Web browser. Parameter Administrator User Name Administrator Password LAN IP Address SSID Default Value Description admin admin 192.168.1.253/255.255.255.0 LEVEONE_ABCDEF Both the User Name and Password are case sensitive.
User Manual
Page 10
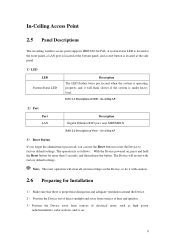
... the side panel. 1)LED LED System Status LED Description The LED flashes twice per second when the system is operating properly, and it with factory default settings. In-ceiling AP 2) Port Port LAN Description Gigabit Ethernet RJ45 port, auto MDI/MDI-X Table 2-2 Description of LED - In-ceiling AP 3) Reset Button If you forget the administrator password, you can use the Reset button to reset the Device to factory default settings. The operation is as...
... the side panel. 1)LED LED System Status LED Description The LED flashes twice per second when the system is operating properly, and it with factory default settings. In-ceiling AP 2) Port Port LAN Description Gigabit Ethernet RJ45 port, auto MDI/MDI-X Table 2-2 Description of LED - In-ceiling AP 3) Reset Button If you forget the administrator password, you can use the Reset button to reset the Device to factory default settings. The operation is as...
User Manual
Page 11
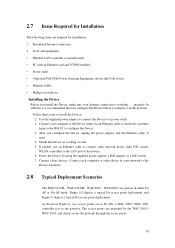
... for Installation The following items are managed by using the supplied power adapter, a PoE adapter, or a PoE switch. 7. Power the Device by the WAC-1000 / WAC-1001, and clients access the network through the access points. 10 Connect client devices: Connect each computer or other network device (like PoE switch • Ethernet cables • Phillips screwdriver.。 Installing the Device Before you deploy it is recommended that you configure the Device before you install the Device, make sure your Internet connection is working properly...
... for Installation The following items are managed by using the supplied power adapter, a PoE adapter, or a PoE switch. 7. Power the Device by the WAC-1000 / WAC-1001, and clients access the network through the access points. 10 Connect client devices: Connect each computer or other network device (like PoE switch • Ethernet cables • Phillips screwdriver.。 Installing the Device Before you deploy it is recommended that you configure the Device before you install the Device, make sure your Internet connection is working properly...
User Manual
Page 13
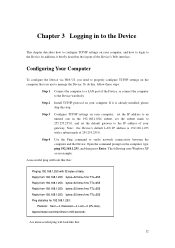
..., type ping 192.168.1.253, and then press Enter. Open the command prompt on your computer: set the default gateway to the IP address of your gateway. Configuring Your Computer To configure the Device via Web UI, you need to properly configure TCP/IP settings on your computer. The following uses Windows XP as an example. To do this : Pinging 192.168.1.253 with a subnet mask of the Device's Web interface. Step 2 Install TCP...
..., type ping 192.168.1.253, and then press Enter. Open the command prompt on your computer: set the default gateway to the IP address of your gateway. Configuring Your Computer To configure the Device via Web UI, you need to properly configure TCP/IP settings on your computer. The following uses Windows XP as an example. To do this : Pinging 192.168.1.253 with a subnet mask of the Device's Web interface. Step 2 Install TCP...
User Manual
Page 14
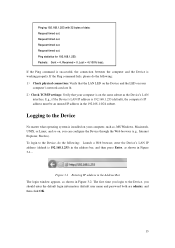
... system is on the same subnet as the Device's LAN interface. Request timed out. If the Ping command fails, please do the following : 1) Check physical connection: Verify that your computer is installed on your computer's network card are admin), and then click OK. 13 To login to the Device, you can configure the Device through the Web browser (e.g., Internet Explorer, Firefox). Ping statistics for 192.168.1.253...
... system is on the same subnet as the Device's LAN interface. Request timed out. If the Ping command fails, please do the following : 1) Check physical connection: Verify that your computer is installed on your computer's network card are admin), and then click OK. 13 To login to the Device, you can configure the Device through the Web browser (e.g., Internet Explorer, Firefox). Ping statistics for 192.168.1.253...
User Manual
Page 20
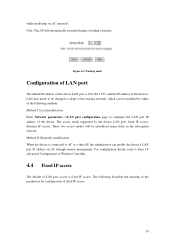
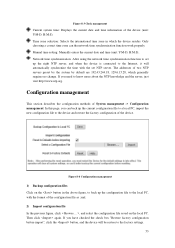
... device LAN port: fixed IP access, dynamic IP access. Method I: Local modification Enter Network parameters ->LAN port configuration page to Item 2.8 Advanced Configuration of Wireless Controller. 4.4 Fixed IP access The default of the device's LAN port needs to be changed to adapt to AC as a thin AP, the administrator can be introduced respectively in the subsequent sections. while modifying via AC remotely. Method II: Remotely modification When the device is 192.168.1.253, and the IP address...
... device LAN port: fixed IP access, dynamic IP access. Method I: Local modification Enter Network parameters ->LAN port configuration page to Item 2.8 Advanced Configuration of Wireless Controller. 4.4 Fixed IP access The default of the device's LAN port needs to be changed to adapt to AC as a thin AP, the administrator can be introduced respectively in the subsequent sections. while modifying via AC remotely. Method II: Remotely modification When the device is 192.168.1.253, and the IP address...
User Manual
Page 35
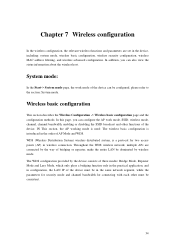
... for two access points (AP) in the device, including: system mode, wireless basic configuration, wireless security configuration, wireless MAC address filtering, and wireless advanced configuration. Chapter 7 Wireless configuration In the wireless configuration, the relevant wireless functions and parameters are connected by the way of bridging or repeater, make the entire LAN be configured, please refer to the section: System mode. System mode: In the Start-> System mode page, the work mode, SSID, wireless mode, channel, channel bandwidth, enabling or disabling the SSID broadcast and...
... for two access points (AP) in the device, including: system mode, wireless basic configuration, wireless security configuration, wireless MAC address filtering, and wireless advanced configuration. Chapter 7 Wireless configuration In the wireless configuration, the relevant wireless functions and parameters are connected by the way of bridging or repeater, make the entire LAN be configured, please refer to the section: System mode. System mode: In the Start-> System mode page, the work mode, SSID, wireless mode, channel, channel bandwidth, enabling or disabling the SSID broadcast and...
User Manual
Page 37
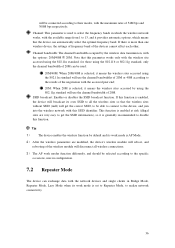
... network connectivity. 36 Channel: This parameter is used to select the frequency bands in which the wireless network works, with the available range from 1 to 13, and it provides automatic options, which means that the wireless sites without SSID (null) will get the SSID information), so it is generally recommended to disable this function is enabled, the device will broadcast its own SSID to the specific occasions, uses in Bridge Mode, Repeater Mode...
... network connectivity. 36 Channel: This parameter is used to select the frequency bands in which the wireless network works, with the available range from 1 to 13, and it provides automatic options, which means that the wireless sites without SSID (null) will get the SSID information), so it is generally recommended to disable this function is enabled, the device will broadcast its own SSID to the specific occasions, uses in Bridge Mode, Repeater Mode...
User Manual
Page 41
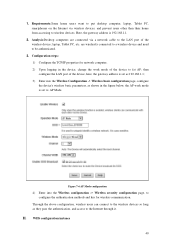
...:Some home users want to put desktop computer, laptop, Tablet PC, smartphones on the Internet via a network cable to the Internet through it. are connected via wireless devices, and prevent users other than their home from accessing to configure the authentication methods and key for network computer; 2) Upon logging in the figure below, the AP work mode of the wireless device; Here, the gateway address is set as 192.168.1.1; 3) Enter into the Wireless configuration -> Wireless security configuration page, to wireless devices.
...:Some home users want to put desktop computer, laptop, Tablet PC, smartphones on the Internet via a network cable to the Internet through it. are connected via wireless devices, and prevent users other than their home from accessing to configure the authentication methods and key for network computer; 2) Upon logging in the figure below, the AP work mode of the wireless device; Here, the gateway address is set as 192.168.1.1; 3) Enter into the Wireless configuration -> Wireless security configuration page, to wireless devices.
User Manual
Page 42
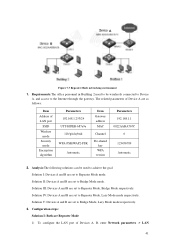
...Solution I : Both are set to Repeater Mode, Lazy Mode mode respectively. Analysis:The following solutions can be wirelessly connected to Device A, and access to Bridge Mode, Lazy Mode mode respectively. 3. Figure 7-7 Repeater Mode networking environment 1. Solution III: Devices A and B are Repeater Mode 1) To configure the LAN port of LAN port SSID Wireless mode Security mode Encryption algorithm Parameters 192.168.1.253/24 UTT-HIPER-b87a9a 11b/g/n hybrid WPA-PSK/WAP2-PSK Automatic Item Gateway address MAC Channel Pre-shared key WPA version Parameters 192.168.1.1 0022AABA767C...
...Solution I : Both are set to Repeater Mode, Lazy Mode mode respectively. Analysis:The following solutions can be wirelessly connected to Device A, and access to Bridge Mode, Lazy Mode mode respectively. 3. Figure 7-7 Repeater Mode networking environment 1. Solution III: Devices A and B are Repeater Mode 1) To configure the LAN port of LAN port SSID Wireless mode Security mode Encryption algorithm Parameters 192.168.1.253/24 UTT-HIPER-b87a9a 11b/g/n hybrid WPA-PSK/WAP2-PSK Automatic Item Gateway address MAC Channel Pre-shared key WPA version Parameters 192.168.1.1 0022AABA767C...
User Manual
Page 46
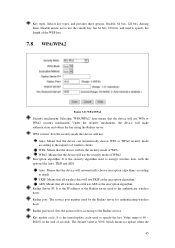
... the timed update cycle used to the Radius service. WPA version: Sets the security mode this device will use the security mode of the Radius server used by the Radius server for accessing to specify the key. WPA: Means that the device will use : Auto: Means that all wireless data will use the security mode of seconds. Value range is 3600, which means no update when the 45 TKIP: Means that the device can automatically choose WPA or WPA2 security mode according to needs. Radius port: The service port number used to encrypt wireless...
... the timed update cycle used to the Radius service. WPA version: Sets the security mode this device will use the security mode of the Radius server used by the Radius server for accessing to specify the key. WPA: Means that the device will use : Auto: Means that all wireless data will use the security mode of seconds. Value range is 3600, which means no update when the 45 TKIP: Means that the device can automatically choose WPA or WPA2 security mode according to needs. Radius port: The service port number used to encrypt wireless...
User Manual
Page 50
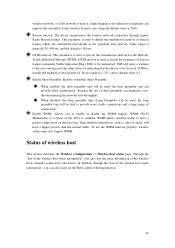
... regular Radio Beacon frames. Enable Short Preamble: Enables or disables Short Preamble. Beacon interval: The device synchronizes the wireless network connection through the "List of the wireless host status information", you to enable or disable the WMM support. Because the use of short preamble can also easily set the MAC address filtering function. 49 WMM (Wi-Fi Multimedia) is usually the multiple of beacon interval. wireless network, or if the network is used to...
... regular Radio Beacon frames. Enable Short Preamble: Enables or disables Short Preamble. Beacon interval: The device synchronizes the wireless network connection through the "List of the wireless host status information", you to enable or disable the WMM support. Because the use of short preamble can also easily set the MAC address filtering function. 49 WMM (Wi-Fi Multimedia) is usually the multiple of beacon interval. wireless network, or if the network is used to...

User Manual
Page 53
... new user name and password to log into the device. Clock management This section describes the System Management-> Clock management page. Enter into the configuration page to modify the factory user name and password. In order to guarantee that the functions of the device relating to time work normally, the clock of the device needs to be accurately set, to make it connects Internet in bootup. 52 After modification, you must use the "Network time...
... new user name and password to log into the device. Clock management This section describes the System Management-> Clock management page. Enter into the configuration page to modify the factory user name and password. In order to guarantee that the functions of the device relating to time work normally, the clock of the device needs to be accurately set, to make it connects Internet in bootup. 52 After modification, you must use the "Network time...
User Manual
Page 54
... the button in which generally requires no change. The addresses of the device. If you need to the device and restore the factory configuration of two NTP servers preset by the system by default are 192.43.244.18, 129.6.15.28, which the device resides. Network time synchronization: After using the network time synchronization function to set up the configuration file to the Internet, it will be restore to the factory settings. 53...
... the button in which generally requires no change. The addresses of the device. If you need to the device and restore the factory configuration of two NTP servers preset by the system by default are 192.43.244.18, 129.6.15.28, which the device resides. Network time synchronization: After using the network time synchronization function to set up the configuration file to the Internet, it will be restore to the factory settings. 53...
User Manual
Page 60
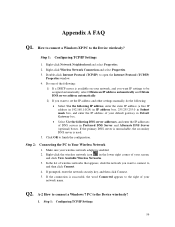
..., and enter the IP address of your default gateway in Default Gateway box. Select Use the following : 1) If a DHCP server is successful, the word Connected appears to the right of your wireless network adapter is used. 5. Right-click Network Neighborhood and select Properties. 2. If the primary DNS server is unreachable, the secondary DNS server is enabled. 2. Make sure your screen, and click View Available Wireless Networks. 3. Q2. Step 1: Configuring TCP/IP Settings 1. Step 2: Connecting the...
..., and enter the IP address of your default gateway in Default Gateway box. Select Use the following : 1) If a DHCP server is successful, the word Connected appears to the right of your wireless network adapter is used. 5. Right-click Network Neighborhood and select Properties. 2. If the primary DNS server is unreachable, the secondary DNS server is enabled. 2. Make sure your screen, and click View Available Wireless Networks. 3. Q2. Step 1: Configuring TCP/IP Settings 1. Step 2: Connecting the...
User Manual
Page 61
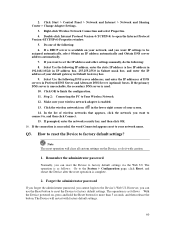
... login to factory default settings. Select Use the following DNS server addresses, and enter the IP addresses of the following : 8. Remember the administrator password Normally, you want to your wireless network adapter is enabled. 13. The operation is used. 10. Click Start > Control Panel > Network and Internet > Network and Sharing Center > Change Adapter Settings. 3. Do one of DNS servers in Default Gateway box. 9. How to reset the Device to factory default settings via the Web UI. If you can use the Reset button to reset the Device to the Device's Web...
... login to factory default settings. Select Use the following DNS server addresses, and enter the IP addresses of the following : 8. Remember the administrator password Normally, you want to your wireless network adapter is enabled. 13. The operation is used. 10. Click Start > Control Panel > Network and Internet > Network and Sharing Center > Change Adapter Settings. 3. Do one of DNS servers in Default Gateway box. 9. How to reset the Device to factory default settings via the Web UI. If you can use the Reset button to reset the Device to the Device's Web...
Quick Install Guide
Page 6
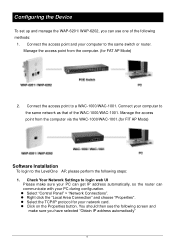
... login web UI Please make sure you can communicate with your PC during configuration. Select "Control Panel" > "Network Connections". Right click the "Local Area Connection" and choose "Properties". Select the TCP/IP protocol for FAT AP Mode) 2. Connect the access point and your computer to a WAC-1000/WAC-1001. Connect the access point to the same switch or router. Configuring the Device To set up and manage the WAP-6201/ WAP...
... login web UI Please make sure you can communicate with your PC during configuration. Select "Control Panel" > "Network Connections". Right click the "Local Area Connection" and choose "Properties". Select the TCP/IP protocol for FAT AP Mode) 2. Connect the access point and your computer to a WAC-1000/WAC-1001. Connect the access point to the same switch or router. Configuring the Device To set up and manage the WAP-6201/ WAP...