User Manual
Page 2
... Logging to the Device...13 Chapter 4 Fit AP ...15 AP Centralized Management Overview 15 4.1 Terminology ...15 4.2 Communication Process 15 4.3 Layer 2 Roaming 18 System mode: ...18 Configuration of LAN port ...19 4.4 Fixed IP access...19 4.5 Dynamic IP access 20 Status of wireless host...21 System information ...22 Chapter 5 Start menu ...23 Configuration Wizard ...23 Running status ...24 Port flow...25 System mode: ...26 Restarting device ...27 Chapter 6 Network parameters 28 Configuration of LAN port ...28 DHCP server...
... Logging to the Device...13 Chapter 4 Fit AP ...15 AP Centralized Management Overview 15 4.1 Terminology ...15 4.2 Communication Process 15 4.3 Layer 2 Roaming 18 System mode: ...18 Configuration of LAN port ...19 4.4 Fixed IP access...19 4.5 Dynamic IP access 20 Status of wireless host...21 System information ...22 Chapter 5 Start menu ...23 Configuration Wizard ...23 Running status ...24 Port flow...25 System mode: ...26 Restarting device ...27 Chapter 6 Network parameters 28 Configuration of LAN port ...28 DHCP server...
User Manual
Page 3
... factory default settings 60 Appendix B Hex ASCII Codes 61 Appendix C LICENSE STATEMENT / GPL CODE STATEMENT 62 2 6.1 6.2 6.3 6.4 Chapter 7 DHCP server settings 28 Static DHCP ...29 DHCP client list 31 Case of DHCP configuration 31 Wireless configuration 34 System mode: ...34 Wireless basic configuration ...34 7.1 AP Mode ...35 7.2 Repeater Mode ...36 7.3 Bridge Mode ...38 7.4 Lazy Mode...38 7.5 Wireless configuration instance 39 Wireless security configuration 43 7.6 No security mechanism 43 7.7 WEP ...44 7.8 WPA/WPA2 ...45 7.9 WPA-PSK/WPA2-PSK 46 Filtering...
... factory default settings 60 Appendix B Hex ASCII Codes 61 Appendix C LICENSE STATEMENT / GPL CODE STATEMENT 62 2 6.1 6.2 6.3 6.4 Chapter 7 DHCP server settings 28 Static DHCP ...29 DHCP client list 31 Case of DHCP configuration 31 Wireless configuration 34 System mode: ...34 Wireless basic configuration ...34 7.1 AP Mode ...35 7.2 Repeater Mode ...36 7.3 Bridge Mode ...38 7.4 Lazy Mode...38 7.5 Wireless configuration instance 39 Wireless security configuration 43 7.6 No security mechanism 43 7.7 WEP ...44 7.8 WPA/WPA2 ...45 7.9 WPA-PSK/WPA2-PSK 46 Filtering...
User Manual
Page 4
...; WAP-6202 Wireless Access Points. Factory Default Settings The following elements: :Radio Button: Allows you to choose only one of a predefined set of options. :Check Box: Allows you to choose one or more options. :Button: Allows you to click to perform an action. :Text Box: Allows you to enter text information. :List Box: Allows you to install and configure your Internet Explorer...
...; WAP-6202 Wireless Access Points. Factory Default Settings The following elements: :Radio Button: Allows you to choose only one of a predefined set of options. :Check Box: Allows you to choose one or more options. :Button: Allows you to click to perform an action. :Text Box: Allows you to enter text information. :List Box: Allows you to install and configure your Internet Explorer...
User Manual
Page 5
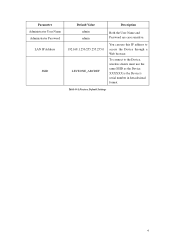
Table 0-1 Factory Default Settings 4 Parameter Administrator User Name Administrator Password LAN IP Address SSID Default Value Description admin admin 192.168.1.253/255.255.255.0 LEVEONE_ABCDEF Both the User Name and Password are case sensitive. XXXXXX is the Device's serial number in hexadecimal format. You can use this IP address to the Device, wireless clients must use the same SSID as the Device. To connect to access the Device through a Web browser.
Table 0-1 Factory Default Settings 4 Parameter Administrator User Name Administrator Password LAN IP Address SSID Default Value Description admin admin 192.168.1.253/255.255.255.0 LEVEONE_ABCDEF Both the User Name and Password are case sensitive. XXXXXX is the Device's serial number in hexadecimal format. You can use this IP address to the Device, wireless clients must use the same SSID as the Device. To connect to access the Device through a Web browser.
User Manual
Page 10
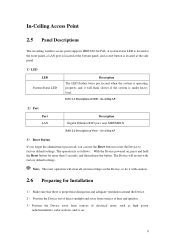
...; Reset Button If you forget the administrator password, you can use the Reset button to reset the Device to factory default settings. Table 2-1 Description of Ports - In-Ceiling Access Point 2.5 Panel Descriptions The in-ceiling wireless access point supports IEEE 802.3af PoE. The operation is as high power radiotransmitters, radar stations, and so on. 9 In-ceiling AP 2) Port Port LAN Description Gigabit Ethernet RJ45 port, auto MDI/MDI-X Table 2-2 Description of LED - A system status LED is...
...; Reset Button If you forget the administrator password, you can use the Reset button to reset the Device to factory default settings. Table 2-1 Description of Ports - In-Ceiling Access Point 2.5 Panel Descriptions The in-ceiling wireless access point supports IEEE 802.3af PoE. The operation is as high power radiotransmitters, radar stations, and so on. 9 In-ceiling AP 2) Port Port LAN Description Gigabit Ethernet RJ45 port, auto MDI/MDI-X Table 2-2 Description of LED - A system status LED is...
User Manual
Page 11
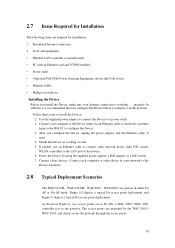
... normal router • PC with an Ethernet card and TCP/IP installed • Power outlet • (Optional) PoE PSE (Power Sourcing Equipment) device like PoE switch, WLAN controller) to a power outlet. 2. After you deploy it is working properly. Mount the Device on a ceiling or wall. 5. If needed, use an Ethernet cable to connect other device in your network to the Device wirelessly. 2.8 Typical Deployment Scenarios The WAP-6111/H、WAP-6112/H、WAP-6201、WAP-6202...
... normal router • PC with an Ethernet card and TCP/IP installed • Power outlet • (Optional) PoE PSE (Power Sourcing Equipment) device like PoE switch, WLAN controller) to a power outlet. 2. After you deploy it is working properly. Mount the Device on a ceiling or wall. 5. If needed, use an Ethernet cable to connect other device in your network to the Device wirelessly. 2.8 Typical Deployment Scenarios The WAP-6111/H、WAP-6112/H、WAP-6201、WAP-6202...
User Manual
Page 13
... Device's Web interface. Open the command prompt on your computer. To do this : Pinging 192.168.1.253 with a subnet mask of data: Reply from 192.168.1.253: bytes=32 time Note: the Device's default LAN IP address is already installed, please skip this step. The following uses Windows XP as an example. Step 3 Configure TCP/IP settings on your computer: set the default gateway to the IP address of the Device...
... Device's Web interface. Open the command prompt on your computer. To do this : Pinging 192.168.1.253 with a subnet mask of data: Reply from 192.168.1.253: bytes=32 time Note: the Device's default LAN IP address is already installed, please skip this step. The following uses Windows XP as an example. Step 3 Configure TCP/IP settings on your computer: set the default gateway to the IP address of the Device...
User Manual
Page 14
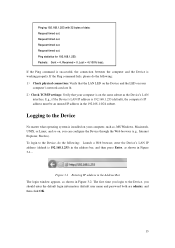
... should enter the default login information (default user name and password both are lit. 2)Check TCP/IP settings: Verify that your computer, such as shown in the Address Bar The login window appears, as , MS Windows, Macintosh, UNIX, or Linux, and so on your computer's network card are admin), and then click OK. 13 To login to the Device, you can configure the Device through the Web browser (e.g., Internet...
... should enter the default login information (default user name and password both are lit. 2)Check TCP/IP settings: Verify that your computer, such as shown in the Address Bar The login window appears, as , MS Windows, Macintosh, UNIX, or Linux, and so on your computer's network card are admin), and then click OK. 13 To login to the Device, you can configure the Device through the Web browser (e.g., Internet...
User Manual
Page 20
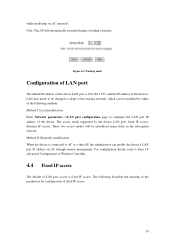
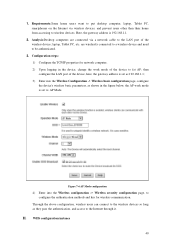
... the device LAN port: fixed IP access, dynamic IP access. Method I: Local modification Enter Network parameters ->LAN port configuration page to Item 2.8 Advanced Configuration of Wireless Controller. 4.4 Fixed IP access The default of LAN port access is 192.168.1.253, and the IP address of the device. For configuration details, refer to configure the LAN port IP address of the device's LAN port needs to the existing network, which can modify the device's LAN port IP address on AC through remote management. Figure 4-1 Working mode Configuration of LAN port The default IP address of...
... the device LAN port: fixed IP access, dynamic IP access. Method I: Local modification Enter Network parameters ->LAN port configuration page to Item 2.8 Advanced Configuration of Wireless Controller. 4.4 Fixed IP access The default of LAN port access is 192.168.1.253, and the IP address of the device. For configuration details, refer to configure the LAN port IP address of the device's LAN port needs to the existing network, which can modify the device's LAN port IP address on AC through remote management. Figure 4-1 Working mode Configuration of LAN port The default IP address of...
User Manual
Page 35
...work mode of the device can also view the status information about the wireless host. The WDS configuration provided by wireless mode. System mode: In the Start-> System mode page, the work mode, SSID, wireless mode, channel, channel bandwidth, enabling or disabling the SSID broadcast and other must be in the same network segment, while the parameters for security mode and channel bandwidth for two access points (AP) in the device, including: system mode, wireless basic configuration, wireless security configuration, wireless MAC address filtering, and wireless advanced configuration...
...work mode of the device can also view the status information about the wireless host. The WDS configuration provided by wireless mode. System mode: In the Start-> System mode page, the work mode, SSID, wireless mode, channel, channel bandwidth, enabling or disabling the SSID broadcast and other must be in the same network segment, while the parameters for security mode and channel bandwidth for two access points (AP) in the device, including: system mode, wireless basic configuration, wireless security configuration, wireless MAC address filtering, and wireless advanced configuration...
User Manual
Page 37
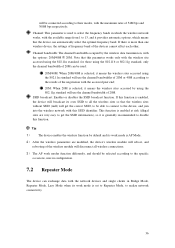
... device enables the wireless function by default and its work mode is selected, it means the wireless sites accessed by the wireless data transmission, with the network devices and single clients in Bridge Mode, Repeater Mode, Lazy Mode when its own SSID to all wireless connections; 3) The AP work modes function differently, and should be able to connect to realize network connectivity. 36 If this function. If there is generally recommended to the specific occasions, uses...
... device enables the wireless function by default and its work mode is selected, it means the wireless sites accessed by the wireless data transmission, with the network devices and single clients in Bridge Mode, Repeater Mode, Lazy Mode when its own SSID to all wireless connections; 3) The AP work modes function differently, and should be able to connect to realize network connectivity. 36 If this function. If there is generally recommended to the specific occasions, uses...
User Manual
Page 41
...a network cable to the Internet through it. then configure the LAN port of the device, here, the gateway address is set to be authenticated. 3. Through the above configuration, wireless users can connect to the wireless devices so long as shown in the device, change the work mode is 192.168.1.1. 2. 1. WDS configuration instance 40 laptop, Tablet PC, etc. Analysis:Desktop computers are wirelessly connected to a wireless device and need to : AP Mode. Figure 7-6 AP Mode configuration 4) Enter into the Wireless Configuration -> Wireless basic configuration page, configure the...
...a network cable to the Internet through it. then configure the LAN port of the device, here, the gateway address is set to be authenticated. 3. Through the above configuration, wireless users can connect to the wireless devices so long as shown in the device, change the work mode is 192.168.1.1. 2. 1. WDS configuration instance 40 laptop, Tablet PC, etc. Analysis:Desktop computers are wirelessly connected to a wireless device and need to : AP Mode. Figure 7-6 AP Mode configuration 4) Enter into the Wireless Configuration -> Wireless basic configuration page, configure the...
User Manual
Page 42
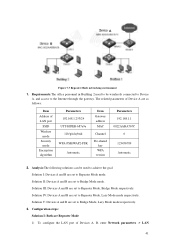
... set to Bridge Mode mode. Figure 7-7 Repeater Mode networking environment 1. Solution IV: Devices A and B are as follows: Item Address of Device A are set to the Internet through the gateway. The related parameters of LAN port SSID Wireless mode Security mode Encryption algorithm Parameters 192.168.1.253/24 UTT-HIPER-b87a9a 11b/g/n hybrid WPA-PSK/WAP2-PSK Automatic Item Gateway address MAC Channel Pre-shared key WPA version Parameters 192.168.1.1 0022AABA767C 6 123456789 Automatic 2. Requirements:The office personnel in Building 2 need...
... set to Bridge Mode mode. Figure 7-7 Repeater Mode networking environment 1. Solution IV: Devices A and B are as follows: Item Address of Device A are set to the Internet through the gateway. The related parameters of LAN port SSID Wireless mode Security mode Encryption algorithm Parameters 192.168.1.253/24 UTT-HIPER-b87a9a 11b/g/n hybrid WPA-PSK/WAP2-PSK Automatic Item Gateway address MAC Channel Pre-shared key WPA version Parameters 192.168.1.1 0022AABA767C 6 123456789 Automatic 2. Requirements:The office personnel in Building 2 need...
User Manual
Page 46
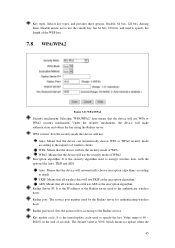
... address of the WEP key. 7.8 WPA/WPA2 Figure 7-11 WPA/WPA2 Security mechanism: Selecting "WPA/WPA2" here means that all wireless data will make authentication and obtain the key using the Radius server; Radius password: Sets the password for authenticating wireless hosts. TKIP: Means that all wireless data will use TKIP as the encryption algorithm. Key types: Selects key types, and provides three options, Disable, 64 bits, 128 bits. Under the security mechanism, the device will use WPA or WPA2 security mechanism. The default...
... address of the WEP key. 7.8 WPA/WPA2 Figure 7-11 WPA/WPA2 Security mechanism: Selecting "WPA/WPA2" here means that all wireless data will make authentication and obtain the key using the Radius server; Radius password: Sets the password for authenticating wireless hosts. TKIP: Means that all wireless data will use TKIP as the encryption algorithm. Key types: Selects key types, and provides three options, Disable, 64 bits, 128 bits. Under the security mechanism, the device will use WPA or WPA2 security mechanism. The default...
User Manual
Page 50
... the multiple of the wireless host status information", you can view the status information of short preamble can also easily set the MAC address filtering function. 49 Beacon interval: The device synchronizes the wireless network connection through the "List of beacon interval. DTIM is used to be transmitted. the short preamble type can improve the reliability of wireless host This section describes the Wireless Configuration -> Wireless host status page. Time-sensitive...
... the multiple of the wireless host status information", you can view the status information of short preamble can also easily set the MAC address filtering function. 49 Beacon interval: The device synchronizes the wireless network connection through the "List of beacon interval. DTIM is used to be transmitted. the short preamble type can improve the reliability of wireless host This section describes the Wireless Configuration -> Wireless host status page. Time-sensitive...

User Manual
Page 53
... make it connects Internet in the WEB interface; In order to guarantee that the functions of the device relating to time work normally, the clock of the device needs to be accurately set, to keep them with care. The device provides two ways of the administrator who logs in bootup. 52 Password, confirm password: Customize the password of setting system time, "Manual setup time" and "Network time synchronization". After modification, you must use the "Network time...
... make it connects Internet in the WEB interface; In order to guarantee that the functions of the device relating to time work normally, the clock of the device needs to be accurately set, to keep them with care. The device provides two ways of the administrator who logs in bootup. 52 Password, confirm password: Customize the password of setting system time, "Manual setup time" and "Network time synchronization". After modification, you must use the "Network time...
User Manual
Page 54
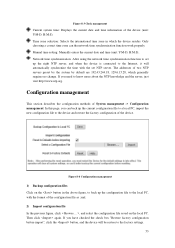
... the new configuration file to the local PC, with the set up the configuration file to the device and restore the factory configuration of the device. The addresses of the device (unit: Y-M-D, H:M:S). In this page, you need to the factory settings. 53 Figure 8-4 Configuration management 1) Backup configuration files Click on the local PC. Network time synchronization: After using the network time synchronization function to set NTP server. Configuration management This section describes the configuration methods of the configuration file as .xml. 2) Import configuration file...
... the new configuration file to the local PC, with the set up the configuration file to the device and restore the factory configuration of the device. The addresses of the device (unit: Y-M-D, H:M:S). In this page, you need to the factory settings. 53 Figure 8-4 Configuration management 1) Backup configuration files Click on the local PC. Network time synchronization: After using the network time synchronization function to set NTP server. Configuration management This section describes the configuration methods of the configuration file as .xml. 2) Import configuration file...
User Manual
Page 60
... following IP address, enter the static IP address (a free IP address in 192.168.1.0/24) in IP address box, 255.255.255.0 in Subnet mask box, and enter the IP address of your default gateway in Default Gateway box. Select Use the following : 1) If a DHCP server is enabled. 2. Right-click the wireless network icon in Preferred DNS Server and Alternate DNS Server (optional) boxes. In the list of your network name. A-2 How to connect a Windows 7 PC to...
... following IP address, enter the static IP address (a free IP address in 192.168.1.0/24) in IP address box, 255.255.255.0 in Subnet mask box, and enter the IP address of your default gateway in Default Gateway box. Select Use the following : 1) If a DHCP server is enabled. 2. Right-click the wireless network icon in Preferred DNS Server and Alternate DNS Server (optional) boxes. In the list of your network name. A-2 How to connect a Windows 7 PC to...
User Manual
Page 61
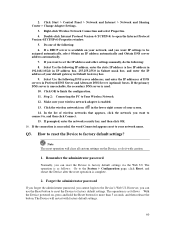
... factory default settings. 60 Step 2: Connecting the PC to open the Internet Protocol Version 4(TCP/IPv4) Properties window. 5. If prompted, enter the network security key, and then click OK. 16. Q3. Note The reset operation will restart with caution. 1. Click Start > Control Panel > Network and Internet > Network and Sharing Center > Change Adapter Settings. 3. Click the wireless network icon in the lower right corner of your default gateway in Default Gateway box. 9. However, you want to factory default settings via the Web...
... factory default settings. 60 Step 2: Connecting the PC to open the Internet Protocol Version 4(TCP/IPv4) Properties window. 5. If prompted, enter the network security key, and then click OK. 16. Q3. Note The reset operation will restart with caution. 1. Click Start > Control Panel > Network and Internet > Network and Sharing Center > Change Adapter Settings. 3. Click the wireless network icon in the lower right corner of your default gateway in Default Gateway box. 9. However, you want to factory default settings via the Web...
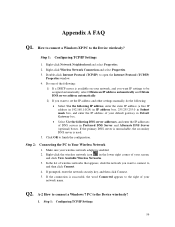
Quick Install Guide
Page 6
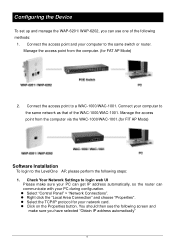
... use one of the WAC-1000/WAC-1001. Connect the access point to the same switch or router. Check Your Network Settings to the LevelOne AP, please perform the following steps: 1. Manage the access point from the computer via the WAC-1000/WAC-1001.(for FIT AP Mode) Software Installation To login to login web UI Please make sure you can communicate with your PC during configuration. Select "Control Panel" > "Network Connections...
... use one of the WAC-1000/WAC-1001. Connect the access point to the same switch or router. Check Your Network Settings to the LevelOne AP, please perform the following steps: 1. Manage the access point from the computer via the WAC-1000/WAC-1001.(for FIT AP Mode) Software Installation To login to login web UI Please make sure you can communicate with your PC during configuration. Select "Control Panel" > "Network Connections...