Manual
Page 4
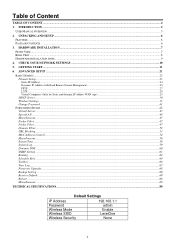
...27 L2TP ...28 Virtual Computers (Only for Static and dynamic IP address WAN type 29 DHCP Server...30 Wireless Settings ...31 Change Password...41 FORWARDING RULES ...42 Virtual Server ...43 Special AP ...44 Miscellaneous ...45 Packet Filter...47 Packet Filter...47 Domain Filter...52...Setting...68 Reset to Default ...68 Reboot ...68 Miscellaneous ...69 TECHNICAL SPECIFICATIONS...80 Default Settings IP Address Password Wireless Mode Wireless SSID Wireless Security 192.168.1.1 admin Enable LevelOne None 4 INTRODUCTION ...5 USER MANUAL OVERVIEW ...5 2. Table of Content TABLE OF CONTENT ...4 1.
...27 L2TP ...28 Virtual Computers (Only for Static and dynamic IP address WAN type 29 DHCP Server...30 Wireless Settings ...31 Change Password...41 FORWARDING RULES ...42 Virtual Server ...43 Special AP ...44 Miscellaneous ...45 Packet Filter...47 Packet Filter...47 Domain Filter...52...Setting...68 Reset to Default ...68 Reboot ...68 Miscellaneous ...69 TECHNICAL SPECIFICATIONS...80 Default Settings IP Address Password Wireless Mode Wireless SSID Wireless Security 192.168.1.1 admin Enable LevelOne None 4 INTRODUCTION ...5 USER MANUAL OVERVIEW ...5 2. Table of Content TABLE OF CONTENT ...4 1.
Manual
Page 15
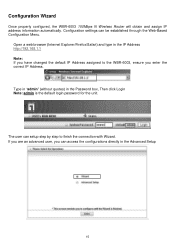
The user can setup step by step to the WBR-6003, ensure you enter the correct IP Address. Configuration Wizard Once properly configured, the WBR-6003 150Mbps N Wireless Router will obtain and assign IP address information automatically. Open a web browser (Internet Explorer/Firefox/Safari) and type ... the default IP Address assigned to finish the connection with Wizard. Configuration settings can access the configurations directly in the Password box, Then click Login Note: admin is the default login password for the unit. Type in "admin" (without quotes) in the Advanced Setup 15
The user can setup step by step to the WBR-6003, ensure you enter the correct IP Address. Configuration Wizard Once properly configured, the WBR-6003 150Mbps N Wireless Router will obtain and assign IP address information automatically. Open a web browser (Internet Explorer/Firefox/Safari) and type ... the default IP Address assigned to finish the connection with Wizard. Configuration settings can access the configurations directly in the Password box, Then click Login Note: admin is the default login password for the unit. Type in "admin" (without quotes) in the Advanced Setup 15
Manual
Page 26
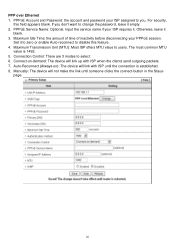
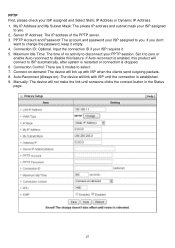
...disconnecting your ISP requires it to zero or enable Auto-reconnect to select: 6. page. 26 PPP over Ethernet 1. PPPoE Account and Password: the account and password your ISP assigned to you don't want to users. PPPoE Service Name: Optional. Connection Control: There are 3 modes to disable ...the connection is 1492. 5. Input the service name if your PPPoE session. Maximum Transmission Unit (MTU): Most ISP offers MTU value to change the password, leave it blank. 3. Auto-Reconnect (Always-on -demand: The device will link with ISP when the clients send outgoing packets. 7. Connect-...
...disconnecting your ISP requires it to zero or enable Auto-reconnect to select: 6. page. 26 PPP over Ethernet 1. PPPoE Account and Password: the account and password your ISP assigned to you don't want to users. PPPoE Service Name: Optional. Connection Control: There are 3 modes to disable ...the connection is 1492. 5. Input the service name if your PPPoE session. Maximum Transmission Unit (MTU): Most ISP offers MTU value to change the password, leave it blank. 3. Auto-Reconnect (Always-on -demand: The device will link with ISP when the clients send outgoing packets. 7. Connect-...
Manual
Page 27
... Dynamic IP Address. 1. Maximum Idle Time: The time of the PPTP server. 3. PPTP Account and Password: The account and password your ISP requires it. 5. Connection Control: There are 3 modes to you don't want to change the password, keep it to zero or enable Auto-reconnect to disable this product will not make the...
... Dynamic IP Address. 1. Maximum Idle Time: The time of the PPTP server. 3. PPTP Account and Password: The account and password your ISP requires it. 5. Connection Control: There are 3 modes to you don't want to change the password, keep it to zero or enable Auto-reconnect to disable this product will not make the...
Manual
Page 28
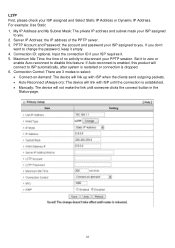
My IP Address and My Subnet Mask: The private IP address and subnet mask your ISP assigned to you don't want to change the password, keep it empty. 4. Input the connection ID if your ISP assigned and Select Static IP Address or Dynamic IP Address. If you . 2. L2TP First, .... • Manually: The device will link with ISP until someone clicks the connect-button in the Status-page. 28 PPTP Account and Password: the account and password your PPTP session. Server IP Address: the IP address of no activity to disconnect your ISP assigned to disable this product will connect to...
My IP Address and My Subnet Mask: The private IP address and subnet mask your ISP assigned to you don't want to change the password, keep it empty. 4. Input the connection ID if your ISP assigned and Select Static IP Address or Dynamic IP Address. If you . 2. L2TP First, .... • Manually: The device will link with ISP until someone clicks the connect-button in the Status-page. 28 PPTP Account and Password: the account and password your PPTP session. Server IP Address: the IP address of no activity to disconnect your ISP assigned to disable this product will connect to...
Manual
Page 41
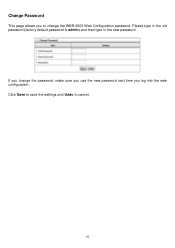
If you change the password, make sure you use the new password next time you to cancel. 41 Click Save to save the settings and Undo to change the WBR-6003 Web Configuration password. Change Password This page allows you log into the web configuration. Please type in the old password (factory default password is admin) and then type in the new password.
If you change the password, make sure you use the new password next time you to cancel. 41 Click Save to save the settings and Undo to change the WBR-6003 Web Configuration password. Change Password This page allows you log into the web configuration. Please type in the old password (factory default password is admin) and then type in the new password.
Manual
Page 59
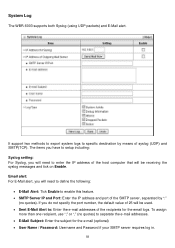
... Port: Enter the IP address and port of the SMTP server, separated by means of the recipients for the e-mail (optional) • User Name / Password: Username and Password if your SMTP server requires log in. 59 To assign more than one recipient, use ";" or "," (no quotes). Email alert: For E-Mail alert, you... the following: • E-Mail Alert: Tick Enable to separate the e-mail addresses. • E-Mail Subject: Enter the subject for the email logs. System Log The WBR-6003 supports both Syslog (using UDP packets) and E-Mail alert.
... Port: Enter the IP address and port of the SMTP server, separated by means of the recipients for the e-mail (optional) • User Name / Password: Username and Password if your SMTP server requires log in. 59 To assign more than one recipient, use ";" or "," (no quotes). Email alert: For E-Mail alert, you... the following: • E-Mail Alert: Tick Enable to separate the e-mail addresses. • E-Mail Subject: Enter the subject for the email logs. System Log The WBR-6003 supports both Syslog (using UDP packets) and E-Mail alert.
Manual
Page 60
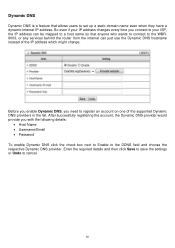
... a dynamic internet IP address. So even if your IP address changes every time you with the following details: • Host Name • Username/Email • Password To enable Dynamic DNS click the check box next to the WBR6003, or any services behind the router from the internet can just use the...
... a dynamic internet IP address. So even if your IP address changes every time you with the following details: • Host Name • Username/Email • Password To enable Dynamic DNS click the check box next to the WBR6003, or any services behind the router from the internet can just use the...
Manual
Page 61
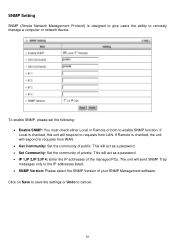
... requests from WAN. • Get Community: Set the community of your SNMP Management software. This will act as a password. • Set Community: Set the community of the managed PCs. This will act as a password. • IP 1,IP 2,IP 3,IP 4: Enter the IP addresses of private. If Local is checked, this unit will...
... requests from WAN. • Get Community: Set the community of your SNMP Management software. This will act as a password. • Set Community: Set the community of the managed PCs. This will act as a password. • IP 1,IP 2,IP 3,IP 4: Enter the IP addresses of private. If Local is checked, this unit will...
Quick Install Guide
Page 2
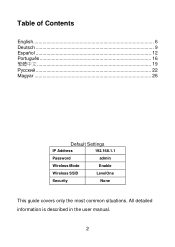
All detailed information is described in the user manual. 2 Table of Contents English 6 Deutsch 9 Español 12 Português 16 19 22 Magyar 26 Default Settings IP Address 192.168.1.1 Password admin Wireless Mode Enable Wireless SSID LevelOne Security None This guide covers only the most common situations.
All detailed information is described in the user manual. 2 Table of Contents English 6 Deutsch 9 Español 12 Português 16 19 22 Magyar 26 Default Settings IP Address 192.168.1.1 Password admin Wireless Mode Enable Wireless SSID LevelOne Security None This guide covers only the most common situations.
Quick Install Guide
Page 6
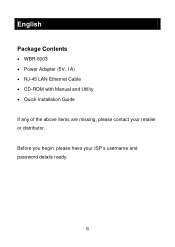
Before you begin, please have your retailer or distributor. English Package Contents • WBR-6003 • Power Adapter (5V, 1A) • RJ-45 LAN Ethernet Cable • CD-ROM with Manual and Utility • Quick Installation Guide If any of the above items are missing, please contact your ISP's username and password details ready. 6
Before you begin, please have your retailer or distributor. English Package Contents • WBR-6003 • Power Adapter (5V, 1A) • RJ-45 LAN Ethernet Cable • CD-ROM with Manual and Utility • Quick Installation Guide If any of the above items are missing, please contact your ISP's username and password details ready. 6
Quick Install Guide
Page 8
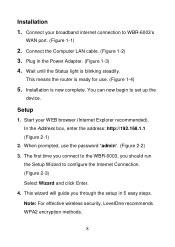
...ready for use the password "admin". (Figure 2-2) 3. This wizard will guide you should run the Setup Wizard to set up the device. Installation is blinking steadily. Start your broadband internet connection to WBR-6003's WAN port. (...Figure 1-1) 2. In the Address box, enter the address: http://192.168.1.1 (Figure 2-1) 2. Plug in 5 easy steps. The first time you connect to the WBR-6003, you through the setup in the Power Adapter. (Figure 1-3) 4. Connect the Computer LAN cable. (Figure 1-2) 3. Setup 1. Note: For effective wireless security, LevelOne...
...ready for use the password "admin". (Figure 2-2) 3. This wizard will guide you should run the Setup Wizard to set up the device. Installation is blinking steadily. Start your broadband internet connection to WBR-6003's WAN port. (...Figure 1-1) 2. In the Address box, enter the address: http://192.168.1.1 (Figure 2-1) 2. Plug in 5 easy steps. The first time you connect to the WBR-6003, you through the setup in the Power Adapter. (Figure 1-3) 4. Connect the Computer LAN cable. (Figure 1-2) 3. Setup 1. Note: For effective wireless security, LevelOne...