Manual
Page 2
... the interference by turning the equipment off and on a circuit different from that to which can be downloaded at: http://www.levelone.eu/support.php The specification is subject to change or modification is in compliance with the limits for help. This equipment generates... more of Directive 1999/5/EC. CE Marking Warning Hereby, Digital Data Communications, declares that interference will not occur in the instruction manual. WBR-6003) is made. If this equipment may generate or use radio frequency energy. The CE-Declaration of Conformity can radiate radio frequency ...
... the interference by turning the equipment off and on a circuit different from that to which can be downloaded at: http://www.levelone.eu/support.php The specification is subject to change or modification is in compliance with the limits for help. This equipment generates... more of Directive 1999/5/EC. CE Marking Warning Hereby, Digital Data Communications, declares that interference will not occur in the instruction manual. WBR-6003) is made. If this equipment may generate or use radio frequency energy. The CE-Declaration of Conformity can radiate radio frequency ...
Manual
Page 4
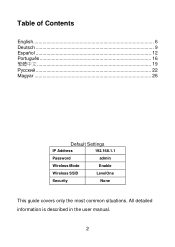
... Default ...68 Reboot ...68 Miscellaneous ...69 TECHNICAL SPECIFICATIONS...80 Default Settings IP Address Password Wireless Mode Wireless SSID Wireless Security 192.168.1.1 admin Enable LevelOne None 4 INTRODUCTION ...5 USER MANUAL OVERVIEW ...5 2. UNPACKING AND SETUP...6 FEATURES ...6 PACKAGE CONTENTS ...6 3. HARDWARE INSTALLATION ...7 FRONT VIEW ...7 REAR VIEW ...8 HARDWARE INSTALLATION STEPS...9 4. GETTING START ...11 6. Table of Content TABLE...
... Default ...68 Reboot ...68 Miscellaneous ...69 TECHNICAL SPECIFICATIONS...80 Default Settings IP Address Password Wireless Mode Wireless SSID Wireless Security 192.168.1.1 admin Enable LevelOne None 4 INTRODUCTION ...5 USER MANUAL OVERVIEW ...5 2. UNPACKING AND SETUP...6 FEATURES ...6 PACKAGE CONTENTS ...6 3. HARDWARE INSTALLATION ...7 FRONT VIEW ...7 REAR VIEW ...8 HARDWARE INSTALLATION STEPS...9 4. GETTING START ...11 6. Table of Content TABLE...
Manual
Page 5
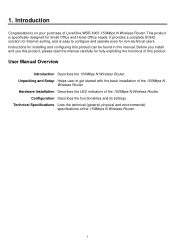
... Lists the technical (general, physical and environmental) specifications of the 150Mbps N Wireless Router. Hardware Installation Describes the LED indicators of LevelOne WBR-6003 150Mbps N Wireless Router. Before you install and use this manual. Configuration Describes the functionalities and its settings. Introduction Congratulations on your purchase of the 150Mbps N Wireless Router. This product is easy...
... Lists the technical (general, physical and environmental) specifications of the 150Mbps N Wireless Router. Hardware Installation Describes the LED indicators of LevelOne WBR-6003 150Mbps N Wireless Router. Before you install and use this manual. Configuration Describes the functionalities and its settings. Introduction Congratulations on your purchase of the 150Mbps N Wireless Router. This product is easy...
Manual
Page 6
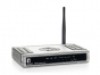
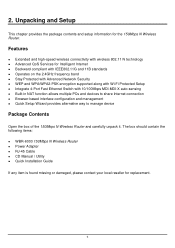
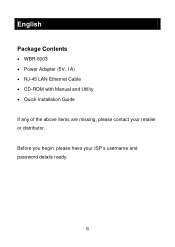
... Ethernet Switch with wireless 802.11 N technology Advanced QoS Services for the 150Mbps N Wireless Router. The box should contain the following items: WBR-6003 150Mbps N Wireless Router Power Adapter RJ-45 Cable CD Manual / Utility Quick Installation Guide If any item is found missing or damaged, please contact your local reseller for replacement. 6
... Ethernet Switch with wireless 802.11 N technology Advanced QoS Services for the 150Mbps N Wireless Router. The box should contain the following items: WBR-6003 150Mbps N Wireless Router Power Adapter RJ-45 Cable CD Manual / Utility Quick Installation Guide If any item is found missing or damaged, please contact your local reseller for replacement. 6
Manual
Page 13
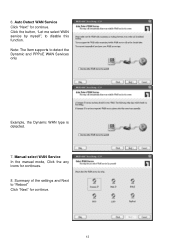
Summary of the settings and Next to "Reboot" Click "Next" for continue. Auto Detect WAN Service Click "Next" for continue. 13 Manual select WAN Service In the manual mode, Click the any icons for continues. 8. Note: The Item supports to disable this function. Click the button, "Let me select WAN service by myself", to detect the Dynamic and PPPoE WAN Services only Example, the Dynamic WAN type is detected. 7. 6.
Summary of the settings and Next to "Reboot" Click "Next" for continue. Auto Detect WAN Service Click "Next" for continue. 13 Manual select WAN Service In the manual mode, Click the any icons for continues. 8. Note: The Item supports to disable this function. Click the button, "Let me select WAN service by myself", to detect the Dynamic and PPPoE WAN Services only Example, the Dynamic WAN type is detected. 7. 6.
Manual
Page 17
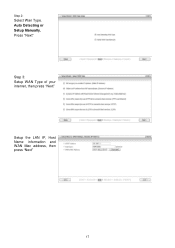
Press "Next" Step 3: Setup WAN Type of your internet, then press "Next" Setup the LAN IP, Host Name information and WAN Mac address, then press "Next" 17 Step 2: Select Wan Type. Auto Detecting or Setup Manually.
Press "Next" Step 3: Setup WAN Type of your internet, then press "Next" Setup the LAN IP, Host Name information and WAN Mac address, then press "Next" 17 Step 2: Select Wan Type. Auto Detecting or Setup Manually.
Manual
Page 20
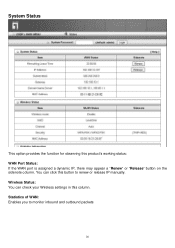
Statistics of WAN: Enables you to renew or release IP manually. System Status This option provides the function for observing this button to monitor inbound and outbound packets 20 You can check your Wireless settings in this column. Wireless Status: You can click this product's working status: WAN Port Status: If the WAN port is assigned a dynamic IP, there may appear a "Renew" or "Release" button on the sidenote column.
Statistics of WAN: Enables you to renew or release IP manually. System Status This option provides the function for observing this button to monitor inbound and outbound packets 20 You can check your Wireless settings in this column. Wireless Status: You can click this product's working status: WAN Port Status: If the WAN port is assigned a dynamic IP, there may appear a "Renew" or "Release" button on the sidenote column.
Manual
Page 26
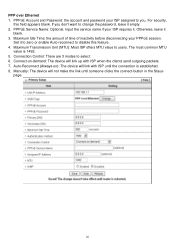
... your PPPoE session. PPP over Ethernet 1. PPPoE Service Name: Optional. Otherwise, leave it . page. 26 Set it empty. 2. The most common MTU value is established. 8. Manually: The device will link up with ISP until someone clicks the connect-button in the Staus- Auto-Reconnect (Always-on -demand: The device will not...
... your PPPoE session. PPP over Ethernet 1. PPPoE Service Name: Optional. Otherwise, leave it . page. 26 Set it empty. 2. The most common MTU value is established. 8. Manually: The device will link up with ISP until someone clicks the connect-button in the Staus- Auto-Reconnect (Always-on -demand: The device will not...
Manual
Page 27
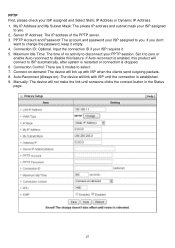
... the clients send outgoing packets. 8. If you don't want to you . If Auto-reconnect is dropped. 6. Maximum Idle Time: The time of the PPTP server. 3. Manually: The device will link up with ISP until someone clicks the connect-button in the Status page. 27 PPTP First, please check your ISP requires...
... the clients send outgoing packets. 8. If you don't want to you . If Auto-reconnect is dropped. 6. Maximum Idle Time: The time of the PPTP server. 3. Manually: The device will link up with ISP until someone clicks the connect-button in the Status page. 27 PPTP First, please check your ISP requires...
Manual
Page 28
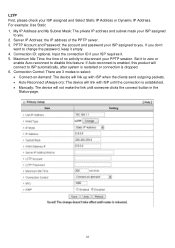
... IP Address: the IP address of no activity to disconnect your ISP assigned to ISP automatically, after system is restarted or connection is established. • Manually: The device will link with ISP until someone clicks the connect-button in the Status-page. 28
... IP Address: the IP address of no activity to disconnect your ISP assigned to ISP automatically, after system is restarted or connection is established. • Manually: The device will link with ISP until someone clicks the connect-button in the Status-page. 28
Manual
Page 55
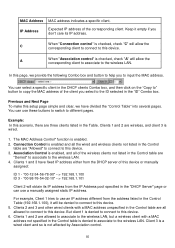
..."ID" Combo box. IP Address Expected IP address of the wireless clients not listed in the "DHCP Server" page or can use a manually assigned static IP address. The MAC Address Control" function is not affected by Association control. 55 Example: In this scenario, there are "... enabled, and all allowed to connect to this device. In this device. 6. Clients 1 and 2 are "Denied" to associate to this device or manually assigned: ID 1 - Clients 2 and 3 and other wired clients with a MAC address unspecified in the Control table are allowed to associate to the wireless...
..."ID" Combo box. IP Address Expected IP address of the wireless clients not listed in the "DHCP Server" page or can use a manually assigned static IP address. The MAC Address Control" function is not affected by Association control. 55 Example: In this scenario, there are "... enabled, and all allowed to connect to this device. In this device. 6. Clients 1 and 2 are "Denied" to associate to this device or manually assigned: ID 1 - Clients 2 and 3 and other wired clients with a MAC address unspecified in the Control table are allowed to associate to the wireless...
Manual
Page 58
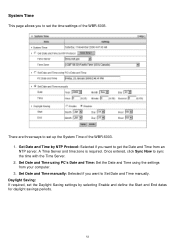
... Time using the settings from an NTP server. Once entered, click Sync Now to sync the time with the Time Server. 2. Set Date and Time manually: Selected if you want to get the Date and Time from your computer. 3. Daylight Saving: If required, set the Daylight Saving settings by NTP Protocol...: Selected if you want to Set Date and Time manually. A Time Server and time zone is required. There are three ways to set up the System Time of the WBR-6003. System Time This page allows you to set the time settings of the WBR-6003. 1. Get Date and Time by selecting Enable and define...
... Time using the settings from an NTP server. Once entered, click Sync Now to sync the time with the Time Server. 2. Set Date and Time manually: Selected if you want to get the Date and Time from your computer. 3. Daylight Saving: If required, set the Daylight Saving settings by NTP Protocol...: Selected if you want to Set Date and Time manually. A Time Server and time zone is required. There are three ways to set up the System Time of the WBR-6003. System Time This page allows you to set the time settings of the WBR-6003. 1. Get Date and Time by selecting Enable and define...
Manual
Page 68
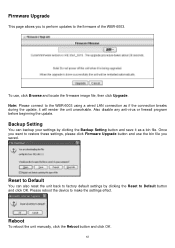
... you want to factory default settings by clicking the Backup Setting button and save it will render the unit unworkable. Reboot To reboot the unit manually, click the Reboot button and click OK. 68 Please reboot the device to Default button and click OK. Backup Setting You can also reset the... button and use , click Browse and locate the firmware image file, then click Upgrade. To use the bin file you to perform updates to the WBR-6003 using a wired LAN connection as if the connection breaks during the update, it as a bin file. Note: Please connect to the firmware of the...
... you want to factory default settings by clicking the Backup Setting button and save it will render the unit unworkable. Reboot To reboot the unit manually, click the Reboot button and click OK. 68 Please reboot the device to Default button and click OK. Backup Setting You can also reset the... button and use , click Browse and locate the firmware image file, then click Upgrade. To use the bin file you to perform updates to the WBR-6003 using a wired LAN connection as if the connection breaks during the update, it as a bin file. Note: Please connect to the firmware of the...
Quick Install Guide
Page 2
All detailed information is described in the user manual. 2 Table of Contents English 6 Deutsch 9 Español 12 Português 16 19 22 Magyar 26 Default Settings IP Address 192.168.1.1 Password admin Wireless Mode Enable Wireless SSID LevelOne Security None This guide covers only the most common situations.
All detailed information is described in the user manual. 2 Table of Contents English 6 Deutsch 9 Español 12 Português 16 19 22 Magyar 26 Default Settings IP Address 192.168.1.1 Password admin Wireless Mode Enable Wireless SSID LevelOne Security None This guide covers only the most common situations.
Quick Install Guide
Page 6
English Package Contents • WBR-6003 • Power Adapter (5V, 1A) • RJ-45 LAN Ethernet Cable • CD-ROM with Manual and Utility • Quick Installation Guide If any of the above items are missing, please contact your ISP's username and password details ready. 6 Before you begin, please have your retailer or distributor.
English Package Contents • WBR-6003 • Power Adapter (5V, 1A) • RJ-45 LAN Ethernet Cable • CD-ROM with Manual and Utility • Quick Installation Guide If any of the above items are missing, please contact your ISP's username and password details ready. 6 Before you begin, please have your retailer or distributor.