
User Guide
Page 3
...Installing a duplex unit ...8 Installing the printer ...9 Installing an output expander ...9 Installing a 5-bin mailbox ...11 Installing a StapleSmart finisher ...12 Installing memory and option cards ...13 Removing memory and option cards ...18 Chapter 2: Printing ...24 Understanding the printer operator panel ...24 Sending a job ...feeder ...35 Printing on specialty media (transparencies, labels, other 37 Linking trays ...38 Linking output bins ...39 Holding a job in the printer ...39 Printing confidential jobs ...40 Tips for successful printing ...44 Chapter 3: Media specifications 46 Media...
...Installing a duplex unit ...8 Installing the printer ...9 Installing an output expander ...9 Installing a 5-bin mailbox ...11 Installing a StapleSmart finisher ...12 Installing memory and option cards ...13 Removing memory and option cards ...18 Chapter 2: Printing ...24 Understanding the printer operator panel ...24 Sending a job ...feeder ...35 Printing on specialty media (transparencies, labels, other 37 Linking trays ...38 Linking output bins ...39 Holding a job in the printer ...39 Printing confidential jobs ...40 Tips for successful printing ...44 Chapter 3: Media specifications 46 Media...

User Guide
Page 4
...container ...60 Fuser and ITU ...60 Recycling Lexmark products ...61 Chapter 5: Clearing paper jams 62 Identifying jams ...62 Access doors and trays ...63 Understanding jam messages ...64 Clearing the entire paper path ...65 Clearing mailbox, finisher, or output expander jams (Area...Chapter 7: Troubleshooting 88 Online customer support ...88 Calling for service ...88 Checking an unresponsive printer ...88 Printing multi-language PDFs ...88 Solving printing problems ...89 Solving mailbox problems ...90 Solving option problems ...91 Solving paper feed problems ...93 Solving print quality ...
...container ...60 Fuser and ITU ...60 Recycling Lexmark products ...61 Chapter 5: Clearing paper jams 62 Identifying jams ...62 Access doors and trays ...63 Understanding jam messages ...64 Clearing the entire paper path ...65 Clearing mailbox, finisher, or output expander jams (Area...Chapter 7: Troubleshooting 88 Online customer support ...88 Calling for service ...88 Checking an unresponsive printer ...88 Printing multi-language PDFs ...88 Solving printing problems ...89 Solving mailbox problems ...90 Solving option problems ...91 Solving paper feed problems ...93 Solving print quality ...
User Guide
Page 5
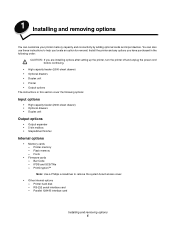
... • Optional drawers • Duplex unit Output options • Output expander • 5-bin mailbox • StapleSmart finisher Internal options • Memory cards - Bar Code - RS-232 serial interface card - Printer memory - Fonts • Firmware cards - PrintCryption™ Note: Use a Phillips screwdriver to ... If you locate an option for removal. Parallel 1284-B interface card Installing and removing options 5 You can customize your printer memory capacity and connectivity by adding optional cards and input devices. 1 Installing and removing options You can also use these...
... • Optional drawers • Duplex unit Output options • Output expander • 5-bin mailbox • StapleSmart finisher Internal options • Memory cards - Bar Code - RS-232 serial interface card - Printer memory - Fonts • Firmware cards - PrintCryption™ Note: Use a Phillips screwdriver to ... If you locate an option for removal. Parallel 1284-B interface card Installing and removing options 5 You can customize your printer memory capacity and connectivity by adding optional cards and input devices. 1 Installing and removing options You can also use these...
User Guide
Page 11
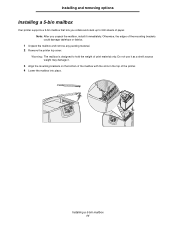
... of the mounting brackets could damage tabletops or fabrics. 1 Unpack the mailbox and remove any packing material. 2 Remove the printer top cover. Do not use it immediately. Installing a 5-bin mailbox 11 Installing and removing options Installing a 5-bin mailbox Your printer supports a 5-bin mailbox that lets you unpack the mailbox, install it as a shelf; excess weight may damage it. 3 Align the...
... of the mounting brackets could damage tabletops or fabrics. 1 Unpack the mailbox and remove any packing material. 2 Remove the printer top cover. Do not use it immediately. Installing a 5-bin mailbox 11 Installing and removing options Installing a 5-bin mailbox Your printer supports a 5-bin mailbox that lets you unpack the mailbox, install it as a shelf; excess weight may damage it. 3 Align the...
User Guide
Page 12
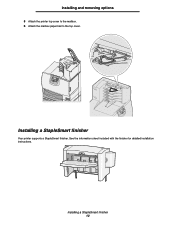
Installing a StapleSmart finisher Your printer supports a StapleSmart finisher. Installing a StapleSmart finisher 12 See the information sheet included with the finisher for detailed installation instructions. Installing and removing options 5 Attach the printer top cover to the mailbox. 6 Attach the mailbox paper bail to the top cover.
Installing a StapleSmart finisher Your printer supports a StapleSmart finisher. Installing a StapleSmart finisher 12 See the information sheet included with the finisher for detailed installation instructions. Installing and removing options 5 Attach the printer top cover to the mailbox. 6 Attach the mailbox paper bail to the top cover.

User Guide
Page 39
... disk. Printing Linking output bins If you attach an optional finisher or mailbox to your printer, you can link output bins, or otherwise specify how the printer sends jobs to the bins, by changing the Configure Bins settings in memory. The printer then sends all print jobs to go to the printer and use the printer operator panel to specify...
... disk. Printing Linking output bins If you attach an optional finisher or mailbox to your printer, you can link output bins, or otherwise specify how the printer sends jobs to the bins, by changing the Configure Bins settings in memory. The printer then sends all print jobs to go to the printer and use the printer operator panel to specify...
User Guide
Page 45
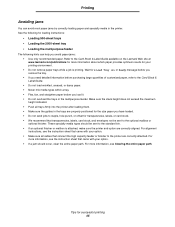
...for your option. • Make sure all trays firmly into the printer after loading them. • Make sure the guides in the printer. Refer to the Card Stock & Label Guide available on the Lexmark Web site at www.lexmark.com/publications for more information, see the instruction sheet that transparencies, labels...in the trays are properly positioned for the size paper you have loaded. • Do not send jobs to the standard bin. • If an optional finisher or mailbox is printing. Wait for a Load Tray or Ready message before you remove the tray. • If you need detailed ...
...for your option. • Make sure all trays firmly into the printer after loading them. • Make sure the guides in the printer. Refer to the Card Stock & Label Guide available on the Lexmark Web site at www.lexmark.com/publications for more information, see the instruction sheet that transparencies, labels...in the trays are properly positioned for the size paper you have loaded. • Do not send jobs to the standard bin. • If an optional finisher or mailbox is printing. Wait for a Load Tray or Ready message before you remove the tray. • If you need detailed ...
User Guide
Page 56
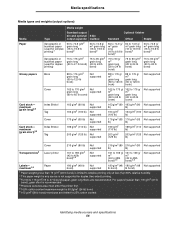
... (47 lb bond), grain short is recommended. 4 Pressure sensitive area must enter the printer first. 5 100% cotton content maximum weight is not supported for duplex printing) Book Cover Index Bristol ...Tag Cover Index Bristol Tag Standard output bin and optional output expander 60 to 74.9 g/m2 grain long (16 to 19.9 lb bond)2 5-bin mailbox 60 to 74.9 g/ m2 grain long (16 to...m2 (80 lb) Not supported 216 g/m2 (80 216 g/m2 (80 Not supported lb) lb) Transparencies2 Laser printer 161 to 169 g/m2 (43 to 45lb bond)4,5 Not supported 161 to 169 g/ 161 to 169 g/ m2 m2...
... (47 lb bond), grain short is recommended. 4 Pressure sensitive area must enter the printer first. 5 100% cotton content maximum weight is not supported for duplex printing) Book Cover Index Bristol ...Tag Cover Index Bristol Tag Standard output bin and optional output expander 60 to 74.9 g/m2 grain long (16 to 19.9 lb bond)2 5-bin mailbox 60 to 74.9 g/ m2 grain long (16 to...m2 (80 lb) Not supported 216 g/m2 (80 216 g/m2 (80 Not supported lb) lb) Transparencies2 Laser printer 161 to 169 g/m2 (43 to 45lb bond)4,5 Not supported 161 to 169 g/ 161 to 169 g/ m2 m2...
User Guide
Page 57
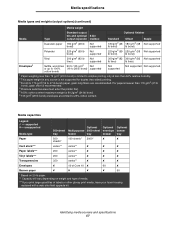
supported ✘- Media specifications Media types and weights (output options) (continued) Media weight Media Type Standard output bin and optional 5-bin output expander mailbox Optional finisher Standard Offset Staple Dual-web paper 180 g/m2 (48 lb bond) Not supported 180 g/m2 (48 180 g/m2 (48 Not... is limited to simplex printing only at less than 176 g/m2 (47 lb bond), grain short is recommended. 4 Pressure sensitive area must enter the printer first. 5 100% cotton content maximum weight is not supported for duplex (two-sided) printing. 3 For 60 to 176 g/m2(16 to 47 ...
supported ✘- Media specifications Media types and weights (output options) (continued) Media weight Media Type Standard output bin and optional 5-bin output expander mailbox Optional finisher Standard Offset Staple Dual-web paper 180 g/m2 (48 lb bond) Not supported 180 g/m2 (48 180 g/m2 (48 Not... is limited to simplex printing only at less than 176 g/m2 (47 lb bond), grain short is recommended. 4 Pressure sensitive area must enter the printer first. 5 100% cotton content maximum weight is not supported for duplex (two-sided) printing. 3 For 60 to 176 g/m2(16 to 47 ...

User Guide
Page 90
... more informations, see Linking trays or see the Menus and Messages Guide. Solution Realign the mailbox and the printer. Solving mailbox problems 90 The printer is too complex. We recommend Lexmark part number 1329605 (10 ft) or 1427498 (20 ft) for both size and type are set for the correct size media. • Make sure...
... more informations, see Linking trays or see the Menus and Messages Guide. Solution Realign the mailbox and the printer. Solving mailbox problems 90 The printer is too complex. We recommend Lexmark part number 1329605 (10 ft) or 1427498 (20 ft) for both size and type are set for the correct size media. • Make sure...

User Guide
Page 111
... 49 page orientation 49 printing 49 Lexmark Authorized Supplies Dealers 58 linking 38 bins 39 trays 38 loading 2000-sheet tray 33 500-sheet trays 31 multipurpose feeder 35 lock feature, security 83 M Macintosh 29, 37, 38, 40, 42 mailbox 11 maintaining the printer 58 ordering a print cartridge 59 ...disabling menus 78 enabling menus 79 option cards installing 16 internal print server Parallel Interface Card 16 Serial Interface Card 16 options 5-bin mailbox 11 duplex unit 8 interface cards 16 internal print servers 16 ordering image transfer unit 61 transfer roller 61 ordering, print cartridge 59 ...
... 49 page orientation 49 printing 49 Lexmark Authorized Supplies Dealers 58 linking 38 bins 39 trays 38 loading 2000-sheet tray 33 500-sheet trays 31 multipurpose feeder 35 lock feature, security 83 M Macintosh 29, 37, 38, 40, 42 mailbox 11 maintaining the printer 58 ordering a print cartridge 59 ...disabling menus 78 enabling menus 79 option cards installing 16 internal print server Parallel Interface Card 16 Serial Interface Card 16 options 5-bin mailbox 11 duplex unit 8 interface cards 16 internal print servers 16 ordering image transfer unit 61 transfer roller 61 ordering, print cartridge 59 ...

User Guide
Page 112
Index mailbox 90 frequent jams 90 operator panel 89 blank 89 displays black diamonds 89 paper feed blank pages in output bin 93 frequent jams 93 jammed page does not reprint 93 Paper Jam message remains after clearing jam 93 print time seems long 89 tray linking ...does not work 90 unexpected page breaks 90 R removing firmware card 22 flash memory option 19 option cards 19 printer memory option 19...
Index mailbox 90 frequent jams 90 operator panel 89 blank 89 displays black diamonds 89 paper feed blank pages in output bin 93 frequent jams 93 jammed page does not reprint 93 Paper Jam message remains after clearing jam 93 print time seems long 89 tray linking ...does not work 90 unexpected page breaks 90 R removing firmware card 22 flash memory option 19 option cards 19 printer memory option 19...


