

Setup Guide
Page 2
... the product and easily accessible. • Refer service or repairs, other products, programs, or services, except those described in the operating instructions, to a professional service person. • This product is subject to Lexmark International, Inc., Department F95/032-2, 740 West New Circle Road, Lexington, Kentucky 40550, U.S.A. UNITED STATES GOVERNMENT RESTRICTED RIGHTS This software and documentation are the user's responsibility. The safety...
... the product and easily accessible. • Refer service or repairs, other products, programs, or services, except those described in the operating instructions, to a professional service person. • This product is subject to Lexmark International, Inc., Department F95/032-2, 740 West New Circle Road, Lexington, Kentucky 40550, U.S.A. UNITED STATES GOVERNMENT RESTRICTED RIGHTS This software and documentation are the user's responsibility. The safety...

Setup Guide
Page 3
... model only Turn off the printer If your printer. Label locations are labeled with a colored triangle. Troubleshooting If you lift the printer using the handholds. Lexmark T Family T622 model only 500 sheet drawer - Getting started 137.16 cm (4.5 ft) 1 Select a well-ventilated place to set up, make sure the printer power is already set up the printer, refer to the Lexmark T620/T622 Publications CD. 1 If any options. Options compatibility Options compatible with Lexmark T Family printers...
... model only Turn off the printer If your printer. Label locations are labeled with a colored triangle. Troubleshooting If you lift the printer using the handholds. Lexmark T Family T622 model only 500 sheet drawer - Getting started 137.16 cm (4.5 ft) 1 Select a well-ventilated place to set up, make sure the printer power is already set up the printer, refer to the Lexmark T620/T622 Publications CD. 1 If any options. Options compatibility Options compatible with Lexmark T Family printers...

Setup Guide
Page 4
...page 24 Local printing - page 33 Order of installation Setup Install paper options and printer 1 5-Bin mailbox page 13 * Output expander page 11 High-capacity output stacker page 15 Finisher page 10 Envelope feeder page 16 Printer page 7 Print cartridge page 7 Duplex unit page 6 250-Sheet drawer page 5 * 500-Sheet drawer page 5 2000-Sheet drawer page 4 * Option install order may be reversed. Install memory and option cards 2 Printer/flash memory page 19 Optional firmware card page 20 Access printer system board page 17 Load print material 3 Option cards page 21 See page...
...page 24 Local printing - page 33 Order of installation Setup Install paper options and printer 1 5-Bin mailbox page 13 * Output expander page 11 High-capacity output stacker page 15 Finisher page 10 Envelope feeder page 16 Printer page 7 Print cartridge page 7 Duplex unit page 6 250-Sheet drawer page 5 * 500-Sheet drawer page 5 2000-Sheet drawer page 4 * Option install order may be reversed. Install memory and option cards 2 Printer/flash memory page 19 Optional firmware card page 20 Access printer system board page 17 Load print material 3 Option cards page 21 See page...

Setup Guide
Page 6
Installing the 2000-sheet drawer Lexmark T Family label (colored triangle) Your printer supports one 2000-sheet drawer. It gives your printer added capacity by letting you may have purchased. 4 The 2000-sheet drawer is packaged with a User's Guide that contains detailed instructions for installation, setup, and use, including loading paper and removing paper jams. When you have finished installing the 2000-sheet drawer, install any other drawers or an optional duplex unit that you load up to four reams (approximately 2,000 sheets) of 20 lb paper.
Installing the 2000-sheet drawer Lexmark T Family label (colored triangle) Your printer supports one 2000-sheet drawer. It gives your printer added capacity by letting you may have purchased. 4 The 2000-sheet drawer is packaged with a User's Guide that contains detailed instructions for installation, setup, and use, including loading paper and removing paper jams. When you have finished installing the 2000-sheet drawer, install any other drawers or an optional duplex unit that you load up to four reams (approximately 2,000 sheets) of 20 lb paper.

Setup Guide
Page 9
... the duplex unit help you seat the printer so the edges are not under the printer when you set it down. 1 Ask someone to help you lift the printer by the hand grip and pull the print cartridge up the printer In order to ensure adequate clearance when installing system board options, see "Install memory and option cards" on page 17 before you position the printer if...
... the duplex unit help you seat the printer so the edges are not under the printer when you set it down. 1 Ask someone to help you lift the printer by the hand grip and pull the print cartridge up the printer In order to ensure adequate clearance when installing system board options, see "Install memory and option cards" on page 17 before you position the printer if...

Setup Guide
Page 12
... the printer and below other output options. Lexmark T Family label (colored triangle) Warning! After you carefully unpack the finisher, install it as a shelf; The finisher tray is designed to hold the weight of the mounting brackets could damage tabletops or fabrics. otherwise, the edges of print material only. Do not use it immediately; Note: The finisher must be used with a staple cartridge already installed...
... the printer and below other output options. Lexmark T Family label (colored triangle) Warning! After you carefully unpack the finisher, install it as a shelf; The finisher tray is designed to hold the weight of the mounting brackets could damage tabletops or fabrics. otherwise, the edges of print material only. Do not use it immediately; Note: The finisher must be used with a staple cartridge already installed...
Setup Guide
Page 13
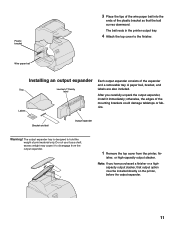
Wire paper bail Installing an output expander Tray Lexmark T Family label Labels Each output expander consists of the mounting brackets could damage tabletops or fabrics. Do not use it to disengage from the output expander. 1 Remove the top cover from the printer, fin- isher, or high-capacity output stacker. Plastic bracket 3 Place the tips of the wire paper bail into the ends of the plastic bracket...
Wire paper bail Installing an output expander Tray Lexmark T Family label Labels Each output expander consists of the mounting brackets could damage tabletops or fabrics. Do not use it to disengage from the output expander. 1 Remove the top cover from the printer, fin- isher, or high-capacity output stacker. Plastic bracket 3 Place the tips of the wire paper bail into the ends of the plastic bracket...

Setup Guide
Page 18
... envelope feeder into the opening until it snaps into place. Slots 3 Align the tabs on the envelope feeder with the slots on both sides of your printer behind the lower front door. It can be removed when you are not using the envelope feeder. Installing the envelope feeder Lexmark T Family label The envelope feeder attaches to the Lexmark T620/T622 Publications CD for details about using it, making the printer more compact. The envelope feeder...
... envelope feeder into the opening until it snaps into place. Slots 3 Align the tabs on the envelope feeder with the slots on both sides of your printer behind the lower front door. It can be removed when you are not using the envelope feeder. Installing the envelope feeder Lexmark T Family label The envelope feeder attaches to the Lexmark T620/T622 Publications CD for details about using it, making the printer more compact. The envelope feeder...
Setup Guide
Page 19
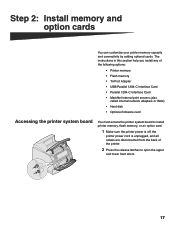
The instructions in this section help you install any of the following options: • Printer memory • Flash memory • Tri-Port Adapter • USB/Parallel 1284-C Interface Card • Parallel 1284-C Interface Card • MarkNet internal print servers (also called internal network adapters or INAs) • Hard disk • Optional firmware card Accessing the printer system board You must access the printer system board to install printer memory, flash memory, or an option card. 1 Make sure the printer power is off, the printer power cord is unplugged...
The instructions in this section help you install any of the following options: • Printer memory • Flash memory • Tri-Port Adapter • USB/Parallel 1284-C Interface Card • Parallel 1284-C Interface Card • MarkNet internal print servers (also called internal network adapters or INAs) • Hard disk • Optional firmware card Accessing the printer system board You must access the printer system board to install printer memory, flash memory, or an option card. 1 Make sure the printer power is off, the printer power cord is unplugged...

Setup Guide
Page 25
... the Lexmark T620/T622 Publications CD for special paper loading instructions. 4 Place the paper into any of the printer. 7 Reinstall the tray. All paper trays are loading. it lightly rests against the edge of the paper stack. 6 Adjust the knob to load print material into the paper tray with the recommended print side face down for single-sided printing and face up for the size paper you are loaded in the same way. 1 Remove the paper tray...
... the Lexmark T620/T622 Publications CD for special paper loading instructions. 4 Place the paper into any of the printer. 7 Reinstall the tray. All paper trays are loading. it lightly rests against the edge of the paper stack. 6 Adjust the knob to load print material into the paper tray with the recommended print side face down for single-sided printing and face up for the size paper you are loaded in the same way. 1 Remove the paper tray...

Setup Guide
Page 29
... "Printing a network setup page". Click Printing, and then click Understanding printer messages. 3 Go to the Lexmark T620/T622 Publications CD for instructions. Refer to "Printing a menu settings page" on page 28. During this period, the message Performing Self Test appears on the operator panel display. If you configure for network printing. 27 After the printer completes its internal tests, the Ready message indicates the printer is ready to receive jobs. Note: You can change the language that will turn...
... "Printing a network setup page". Click Printing, and then click Understanding printer messages. 3 Go to the Lexmark T620/T622 Publications CD for instructions. Refer to "Printing a menu settings page" on page 28. During this period, the message Performing Self Test appears on the operator panel display. If you configure for network printing. 27 After the printer completes its internal tests, the Ready message indicates the printer is ready to receive jobs. Note: You can change the language that will turn...

Setup Guide
Page 30
...If Status is displayed. 3 Verify that the options you installed are listed under "Printer Information." 5 Verify that printer options are configured for use with later instructions. 4 See "Printing a menu settings page". Consult your network support person, and then print another network setup page to verify that you see Print Net1 Setup. Save the network setup page for the sizes and types of memory installed is "Connected." The message Printing Menus is "Not Connected," your LAN drop may be active or your network. Printing a menu settings page Print the menu settings...
...If Status is displayed. 3 Verify that the options you installed are listed under "Printer Information." 5 Verify that printer options are configured for use with later instructions. 4 See "Printing a menu settings page". Consult your network support person, and then print another network setup page to verify that you see Print Net1 Setup. Save the network setup page for the sizes and types of memory installed is "Connected." The message Printing Menus is "Not Connected," your LAN drop may be active or your network. Printing a menu settings page Print the menu settings...

Setup Guide
Page 31
... optional MarkNet card installed in slot 1, you see Network Option 1. Standard Network appears if you have TCP/IP available on -board network port. One of setting the IP address in the online documentation on the drivers CD that you see TCP/IP, and then press Select. 5 Press Menu until you assign an IP address to increase (or decrease) each number. If you purchased a printer with step 2. The message...
... optional MarkNet card installed in slot 1, you see Network Option 1. Standard Network appears if you have TCP/IP available on -board network port. One of setting the IP address in the online documentation on the drivers CD that you see TCP/IP, and then press Select. 5 Press Menu until you assign an IP address to increase (or decrease) each number. If you purchased a printer with step 2. The message...

Setup Guide
Page 32
... a reply. Use the information in "Printing a network setup page" on a network computer type "ping" followed by the new printer IP address: ping xxx.xxx.xxx.xx If the printer is shipped with the firmware card if you expected. For detailed configuration instructions, refer to your printer has an ImageQuick™ optional firmware card installed, you can configure for Pull Printing (ImageQuick) If your printer. Verifying the IP settings 1 Print another network setup page and make sure the IP Address, Netmask...
... a reply. Use the information in "Printing a network setup page" on a network computer type "ping" followed by the new printer IP address: ping xxx.xxx.xxx.xx If the printer is shipped with the firmware card if you expected. For detailed configuration instructions, refer to your printer has an ImageQuick™ optional firmware card installed, you can configure for Pull Printing (ImageQuick) If your printer. Verifying the IP settings 1 Print another network setup page and make sure the IP Address, Netmask...

Setup Guide
Page 34
... network printing on TCP/IP networks, printer driver installation, and the process involved in the downloadable Web package available on the drivers CD. Launch this software on the desktop of a printer to install the PPDs. The user's guide contained in each network client using the LaserWriter 8 printer driver and the Lexmark T Family PostScript Printer Description (PPD) file. You must be found in UNIX environments. 32 Specific information about the capabilities of each supported...
... network printing on TCP/IP networks, printer driver installation, and the process involved in the downloadable Web package available on the drivers CD. Launch this software on the desktop of a printer to install the PPDs. The user's guide contained in each network client using the LaserWriter 8 printer driver and the Lexmark T Family PostScript Printer Description (PPD) file. You must be found in UNIX environments. 32 Specific information about the capabilities of each supported...

Setup Guide
Page 35
... custom printer driver provides enhanced functionality, such as printer status alerts. Depending on the drivers CD that shipped with NDPS so you install the Lexmark NDPS IP Gateway. NetWare Your Lexmark T Family printer works with your printer. Local printing The following printer connections are available on the Lexmark Web site at www.lexmark.com/networking/ndps.html. You can get the gateway, the snap-ins, the support files and a white paper with installation instructions...
... custom printer driver provides enhanced functionality, such as printer status alerts. Depending on the drivers CD that shipped with NDPS so you install the Lexmark NDPS IP Gateway. NetWare Your Lexmark T Family printer works with your printer. Local printing The following printer connections are available on the Lexmark Web site at www.lexmark.com/networking/ndps.html. You can get the gateway, the snap-ins, the support files and a white paper with installation instructions...

Setup Guide
Page 36
... are setting up . After the printer is correctly set up the printer for local printing, you need to verify your printer. Lexmark provides a printer driver package for each package gives detailed instructions for installing and using a parallel connection. Detailed instructions are available at www.lexmark.com/drivers. The Lexmark T Family PPD and specific information about local printer installation. UNIX/Linux Your printer supports many UNIX platforms, such as Sun Solaris and Linux. The user's guide contained...
... are setting up . After the printer is correctly set up the printer for local printing, you need to verify your printer. Lexmark provides a printer driver package for each package gives detailed instructions for installing and using a parallel connection. Detailed instructions are available at www.lexmark.com/drivers. The Lexmark T Family PPD and specific information about local printer installation. UNIX/Linux Your printer supports many UNIX platforms, such as Sun Solaris and Linux. The user's guide contained...

Roadmap
Page 1
... Output Stacker Installation Instructions • Setup Guide • Roadmap P/N 11K3116 E.C. 1K0911 Printed in all languages. POutbhleicrations Drivers CD Lets you through printer and options setup. www.lexmark.com Printed on a network for other users. All rights reserved. Publications CD URseefre'srence Takes you to find what you need Setup Guide Guides you install drivers, MarkVision™ and utilities. Printer publications and software are also on how to clear paper jams, load paper, change printer settings, manage memory, and perform maintenance. Lexmark...
... Output Stacker Installation Instructions • Setup Guide • Roadmap P/N 11K3116 E.C. 1K0911 Printed in all languages. POutbhleicrations Drivers CD Lets you through printer and options setup. www.lexmark.com Printed on a network for other users. All rights reserved. Publications CD URseefre'srence Takes you to find what you need Setup Guide Guides you install drivers, MarkVision™ and utilities. Printer publications and software are also on how to clear paper jams, load paper, change printer settings, manage memory, and perform maintenance. Lexmark...

Finisher Quick Reference
Page 1
... paper size for 282 Staple Jam only). 283 Staple Jam Check Stapler 1 Press the latch to open the stapler access door. 2 Firmly pull the colored tab to remove the staple cartridge holder from the storage position. Troubleshooting If stapled print jobs do not bind together in U.S.A. To use part number 99A2480. Lexmark™ T620 and T622 StapleSmart™ Finisher Quick Reference Attaching the stacking paper bail 1 Lift the finisher output bin cover...
... paper size for 282 Staple Jam only). 283 Staple Jam Check Stapler 1 Press the latch to open the stapler access door. 2 Firmly pull the colored tab to remove the staple cartridge holder from the storage position. Troubleshooting If stapled print jobs do not bind together in U.S.A. To use part number 99A2480. Lexmark™ T620 and T622 StapleSmart™ Finisher Quick Reference Attaching the stacking paper bail 1 Lift the finisher output bin cover...

High-Capacity Output Stacker Installation Instructions
Page 11
... Paper Jam Remove Cartridge refer to the Ready state. High-Capacity Output Stacker Installation Instructions 7 To print a menu settings page: 1 Make sure the printer power is on and the Ready status message appears on the display. 2 On the operator panel, press Menu> or or until the page prints, and then the printer returns to the User's Guide on the Publications CD for more information. 7 Verify that it does not appear on the second line of...
... Paper Jam Remove Cartridge refer to the Ready state. High-Capacity Output Stacker Installation Instructions 7 To print a menu settings page: 1 Make sure the printer power is on and the Ready status message appears on the display. 2 On the operator panel, press Menu> or or until the page prints, and then the printer returns to the User's Guide on the Publications CD for more information. 7 Verify that it does not appear on the second line of...

