
Setup Guide
Page 2
... logo are the property of purchase. Lexmark is near the product and easily accessible. • Refer service or repairs, other countries, and are provided with Part 15 of operation in later editions. Lexmark and Lexmark with the use of other replacement parts. • Your product uses a laser, exercise CAUTION: Use of controls or adjustments or performance of specific Lexmark components. Changes are trademarks of publications related to this...
... logo are the property of purchase. Lexmark is near the product and easily accessible. • Refer service or repairs, other countries, and are provided with Part 15 of operation in later editions. Lexmark and Lexmark with the use of other replacement parts. • Your product uses a laser, exercise CAUTION: Use of controls or adjustments or performance of specific Lexmark components. Changes are trademarks of publications related to this...

Setup Guide
Page 3
... printer for service or storage. Tray number decals - Lexmark T Family T622 model only 500 sheet drawer - Troubleshooting If you lift the printer using the handholds. Getting started 137.16 cm (4.5 ft) 1 Select a well-ventilated place to set the printer. 304.8 mm (12 in.) 508 mm (20 in.) Printer Handhold Power switch cover Power cord 304.8 mm (12 in.) 304.8 mm (12 in.) CDs Paper bail and bracket Operator panel...
... printer for service or storage. Tray number decals - Lexmark T Family T622 model only 500 sheet drawer - Troubleshooting If you lift the printer using the handholds. Getting started 137.16 cm (4.5 ft) 1 Select a well-ventilated place to set the printer. 304.8 mm (12 in.) 508 mm (20 in.) Printer Handhold Power switch cover Power cord 304.8 mm (12 in.) 304.8 mm (12 in.) CDs Paper bail and bracket Operator panel...

Setup Guide
Page 4
...29 Install printer drivers 7 See page 31 Network printing - page 31 Local printing - page 33 Install memory and option cards 2 Printer/flash memory page 19 Optional firmware card page 20 Access printer system board page 17 Load print material 3 Option cards page 21 See page 23 Attach cables 4 Verify setup 5 See page 24 Network printing - Order of installation Setup Install paper options and printer 1 5-Bin mailbox page 13 * Output expander page 11 High-capacity output stacker page 15 Finisher page 10 Envelope feeder page 16 Printer page 7 Print cartridge page 7 Duplex unit...
...29 Install printer drivers 7 See page 31 Network printing - page 31 Local printing - page 33 Install memory and option cards 2 Printer/flash memory page 19 Optional firmware card page 20 Access printer system board page 17 Load print material 3 Option cards page 21 See page 23 Attach cables 4 Verify setup 5 See page 24 Network printing - Order of installation Setup Install paper options and printer 1 5-Bin mailbox page 13 * Output expander page 11 High-capacity output stacker page 15 Finisher page 10 Envelope feeder page 16 Printer page 7 Print cartridge page 7 Duplex unit...

Setup Guide
Page 6
It gives your printer added capacity by letting you may have purchased. 4 The 2000-sheet drawer is packaged with a User's Guide that contains detailed instructions for installation, setup, and use, including loading paper and removing paper jams. When you have finished installing the 2000-sheet drawer, install any other drawers or an optional duplex unit that you load up to four reams (approximately 2,000 sheets) of 20 lb paper. Installing the 2000-sheet drawer Lexmark T Family label (colored triangle) Your printer supports one 2000-sheet drawer.
It gives your printer added capacity by letting you may have purchased. 4 The 2000-sheet drawer is packaged with a User's Guide that contains detailed instructions for installation, setup, and use, including loading paper and removing paper jams. When you have finished installing the 2000-sheet drawer, install any other drawers or an optional duplex unit that you load up to four reams (approximately 2,000 sheets) of 20 lb paper. Installing the 2000-sheet drawer Lexmark T Family label (colored triangle) Your printer supports one 2000-sheet drawer.
Setup Guide
Page 7
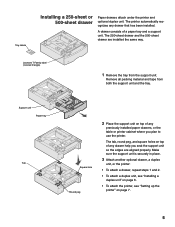
... support unit. Make sure the support unit is securely in place. 3 Attach another optional drawer, a duplex unit, or the printer: • To attach a drawer, repeat steps 1 and 2. • To attach a duplex unit, see "Installing a duplex unit" on page 6. • To attach the printer, see "Setting up the printer" on top of any drawer that has been installed. The tab, round peg, and square holes on top of a paper tray and a support unit. Lexmark T Family label (colored...
... support unit. Make sure the support unit is securely in place. 3 Attach another optional drawer, a duplex unit, or the printer: • To attach a drawer, repeat steps 1 and 2. • To attach a duplex unit, see "Installing a duplex unit" on page 6. • To attach the printer, see "Setting up the printer" on top of any drawer that has been installed. The tab, round peg, and square holes on top of a paper tray and a support unit. Lexmark T Family label (colored...

Setup Guide
Page 9
... the printer when you set it down. 1 Ask someone to help you lift the printer by the hand grip and pull the print cartridge up the printer In order to ensure adequate clearance when installing system board options, see "Install memory and option cards" on the left side of any drawer or the duplex unit help you position the printer if: • You plan to install memory or option cards...
... the printer when you set it down. 1 Ask someone to help you lift the printer by the hand grip and pull the print cartridge up the printer In order to ensure adequate clearance when installing system board options, see "Install memory and option cards" on the left side of any drawer or the duplex unit help you position the printer if: • You plan to install memory or option cards...

Setup Guide
Page 12
...the edges of the printer. Note: The finisher must be used with a staple cartridge already installed. Installing a finisher The finisher is shipped with the highcapacity output option. After you carefully unpack the finisher, install it as a shelf; Do not use it immediately; Mounting ...The finisher tray is seated securely. 10 Make sure the finisher is designed to hold the weight of print material only. Lexmark T Family label (colored triangle) Warning! excess weight may damage it. 1 Remove the top cover or any previously installed output options from the printer. It ...
...the edges of the printer. Note: The finisher must be used with a staple cartridge already installed. Installing a finisher The finisher is shipped with the highcapacity output option. After you carefully unpack the finisher, install it as a shelf; Do not use it immediately; Mounting ...The finisher tray is seated securely. 10 Make sure the finisher is designed to hold the weight of print material only. Lexmark T Family label (colored triangle) Warning! excess weight may damage it. 1 Remove the top cover or any previously installed output options from the printer. It ...
Setup Guide
Page 13
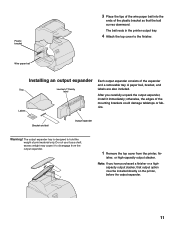
.... The bail rests in the printer output tray. 4 Attach the top cover to disengage from the output expander. 1 Remove the top cover from the printer, fin- Wire paper bail Installing an output expander Tray Lexmark T Family label Labels Each output expander consists of the mounting brackets could damage tabletops or fabrics. The output expander tray is designed to hold the weight of print material only. Do not use it immediately;
.... The bail rests in the printer output tray. 4 Attach the top cover to disengage from the output expander. 1 Remove the top cover from the printer, fin- Wire paper bail Installing an output expander Tray Lexmark T Family label Labels Each output expander consists of the mounting brackets could damage tabletops or fabrics. The output expander tray is designed to hold the weight of print material only. Do not use it immediately;

Setup Guide
Page 18
Installing the envelope feeder Lexmark T Family label The envelope feeder attaches to the Lexmark T620/T622 Publications CD for details about using it is installed properly. 16 Slots 3 Align the tabs on the envelope feeder with the slots on both sides of your printer behind the lower front door. Refer to the front of the printer, and then gently push the envelope feeder into the opening until it snaps into...
Installing the envelope feeder Lexmark T Family label The envelope feeder attaches to the Lexmark T620/T622 Publications CD for details about using it is installed properly. 16 Slots 3 Align the tabs on the envelope feeder with the slots on both sides of your printer behind the lower front door. Refer to the front of the printer, and then gently push the envelope feeder into the opening until it snaps into...
Setup Guide
Page 19
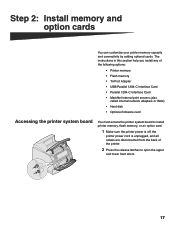
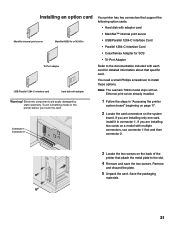
... memory capacity and connectivity by adding optional cards. The instructions in this section help you install any of the following options: • Printer memory • Flash memory • Tri-Port Adapter • USB/Parallel 1284-C Interface Card • Parallel 1284-C Interface Card • MarkNet internal print servers (also called internal network adapters or INAs) • Hard disk • Optional firmware card Accessing the printer system board You must access the printer system board to install printer memory, flash memory, or an option card. 1 Make sure the printer power...
... memory capacity and connectivity by adding optional cards. The instructions in this section help you install any of the following options: • Printer memory • Flash memory • Tri-Port Adapter • USB/Parallel 1284-C Interface Card • Parallel 1284-C Interface Card • MarkNet internal print servers (also called internal network adapters or INAs) • Hard disk • Optional firmware card Accessing the printer system board You must access the printer system board to install printer memory, flash memory, or an option card. 1 Make sure the printer power...
Setup Guide
Page 23
... are installing two cards on a model with multiple connectors, use connector 1 first and then connector 2. 3 Locate the two screws on the printer before you are easily damaged by static electricity. If you touch the card. Installing an option card MarkNet internal print server MarkNet N2501e or N2401e Tri-Port adapter USB/Parallel 1284-C interface card hard disk with adapter Your printer has two connectors that support the following option cards: • Hard disk with adapter card •...
... are installing two cards on a model with multiple connectors, use connector 1 first and then connector 2. 3 Locate the two screws on the printer before you are easily damaged by static electricity. If you touch the card. Installing an option card MarkNet internal print server MarkNet N2501e or N2401e Tri-Port adapter USB/Parallel 1284-C interface card hard disk with adapter Your printer has two connectors that support the following option cards: • Hard disk with adapter card •...
Setup Guide
Page 24
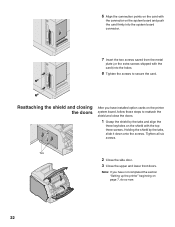
Tabs 2 Close the side door. 3 Close the upper and lower front doors. Holding the shield by the tabs and align the three keyholes on the system board and push the card firmly into the system board connector. 7 Insert the two screws saved from the metal plate (or ...and closing the doors After you have installed option cards on the printer system board, follow these steps to secure the card. Tighten all six screws. Note: If you have not completed the section "Setting up the printer" beginning on page 7, do so now. 22 6 Align the connection points on the card with the connector...
Tabs 2 Close the side door. 3 Close the upper and lower front doors. Holding the shield by the tabs and align the three keyholes on the system board and push the card firmly into the system board connector. 7 Insert the two screws saved from the metal plate (or ...and closing the doors After you have installed option cards on the printer system board, follow these steps to secure the card. Tighten all six screws. Note: If you have not completed the section "Setting up the printer" beginning on page 7, do so now. 22 6 Align the connection points on the card with the connector...

Setup Guide
Page 25
... Width guide tab Width guide Width guide tab Width guide Complete these instructions to load print material into the paper tray with the recommended print side face down for single-sided printing and face up for the size paper you are loading. Note: This setting serves as a visual reminder only; Knob 23 it lightly rests against the edge of the paper stack. 6 Adjust the knob to the correct position for duplex printing...
... Width guide tab Width guide Width guide tab Width guide Complete these instructions to load print material into the paper tray with the recommended print side face down for single-sided printing and face up for the size paper you are loading. Note: This setting serves as a visual reminder only; Knob 23 it lightly rests against the edge of the paper stack. 6 Adjust the knob to the correct position for duplex printing...

Setup Guide
Page 29
... the printer power cord into a properly grounded outlet. 2 Turn on the printer. After the printer completes its internal tests, the Ready message indicates the printer is attached to a network, print a network setup page to the Lexmark T620/T622 Publications CD for instructions on clearing the message. If you configure for instructions. Refer to receive jobs. Note: You can change the language that will turn it on. You will help you see "Printing a network setup page". If you turn...
... the printer power cord into a properly grounded outlet. 2 Turn on the printer. After the printer completes its internal tests, the Ready message indicates the printer is attached to a network, print a network setup page to the Lexmark T620/T622 Publications CD for instructions on clearing the message. If you configure for instructions. Refer to receive jobs. Note: You can change the language that will turn it on. You will help you see "Printing a network setup page". If you turn...

Setup Guide
Page 30
... of memory installed is installed in the printer. 28 Printing a menu settings page Print the menu settings page to review the default printer settings and to verify that the paper trays are configured for use with later instructions. 4 See "Printing a menu settings page". The message Printing Menus is "Connected." The network setup page prints and the printer returns to Ready status. 3 Check the first section on the network setup page and confirm that Status is displayed. 3 Verify that you see Print Menus, and then press Select to print the page. Consult your network support...
... of memory installed is installed in the printer. 28 Printing a menu settings page Print the menu settings page to review the default printer settings and to verify that the paper trays are configured for use with later instructions. 4 See "Printing a menu settings page". The message Printing Menus is "Connected." The network setup page prints and the printer returns to Ready status. 3 Check the first section on the network setup page and confirm that Status is displayed. 3 Verify that you see Print Menus, and then press Select to print the page. Consult your network support...

Setup Guide
Page 31
... your network is using DHCP, then you purchased a printer with an on-board network port. One of setting the IP address in "Printing a network setup page" on page 27. 2 Go to "Verifying the IP settings" on page 30 and begin with your network is not using DHCP, an address is automatically assigned. 1 Look for the address under the TCP/IP heading on the network setup page you printed in the online documentation on the drivers CD...
... your network is using DHCP, then you purchased a printer with an on-board network port. One of setting the IP address in "Printing a network setup page" on page 27. 2 Go to "Verifying the IP settings" on page 30 and begin with your network is not using DHCP, an address is automatically assigned. 1 Look for the address under the TCP/IP heading on the network setup page you printed in the online documentation on the drivers CD...

Setup Guide
Page 32
... the firmware card if you need help. 2 Ping the printer and verify that have the ImageQuick optional firmware card pre-installed, and also with printers that it separately. 30 Verifying the IP settings 1 Print another network setup page and make sure the IP Address, Netmask, and Gateway are what you can configure for Pull Printing once an IP address has been assigned to the online documentation on the network, you...
... the firmware card if you need help. 2 Ping the printer and verify that have the ImageQuick optional firmware card pre-installed, and also with printers that it separately. 30 Verifying the IP settings 1 Print another network setup page and make sure the IP Address, Netmask, and Gateway are what you can configure for Pull Printing once an IP address has been assigned to the online documentation on the network, you...

Setup Guide
Page 34
... instructions for network printer installation. Macintosh Your Lexmark T Family printer connects automatically to AppleTalk networks and becomes readily visible to UNIX or Macintosh drivers or applications. UNIX/Linux Your printer supports many UNIX platforms, such as Sun Solaris and Linux. The user's guide contained in each network client using the LaserWriter 8 printer driver and the Lexmark T Family PostScript Printer Description (PPD) file. If you choose to -peer) Creating ports and installing drivers Read the detailed instructions...
... instructions for network printer installation. Macintosh Your Lexmark T Family printer connects automatically to AppleTalk networks and becomes readily visible to UNIX or Macintosh drivers or applications. UNIX/Linux Your printer supports many UNIX platforms, such as Sun Solaris and Linux. The user's guide contained in each network client using the LaserWriter 8 printer driver and the Lexmark T Family PostScript Printer Description (PPD) file. If you choose to -peer) Creating ports and installing drivers Read the detailed instructions...

Setup Guide
Page 35
... instructions explain how to install a printer driver on the drivers CD and look for network printer installation. Additional information about Lexmark support for non-NDPS (queue-based) environments, click View Documentation on a printer attached to them. Local printing The following printer connections are available on the Web at www.lexmark.com/publications or on the CD. NetWare Your Lexmark T Family printer works with installation instructions on the drivers CD. 33 Novell Distributed Print Services...
... instructions explain how to install a printer driver on the drivers CD and look for network printer installation. Additional information about Lexmark support for non-NDPS (queue-based) environments, click View Documentation on a printer attached to them. Local printing The following printer connections are available on the Web at www.lexmark.com/publications or on the CD. NetWare Your Lexmark T Family printer works with installation instructions on the drivers CD. 33 Novell Distributed Print Services...

Setup Guide
Page 36
After the printer is installed, print a test page to verify your printer is located both on the drivers CD and on the drivers CD. The driver package for installing and using a parallel connection. Installation instructions Read the detailed online instructions on the Lexmark Web site at www.lexmark.com/drivers. Detailed instructions are setting up . The user's guide contained in UNIX environments. You can be found on the CD. 34 Macintosh If you need to Sun...
After the printer is installed, print a test page to verify your printer is located both on the drivers CD and on the drivers CD. The driver package for installing and using a parallel connection. Installation instructions Read the detailed online instructions on the Lexmark Web site at www.lexmark.com/drivers. Detailed instructions are setting up . The user's guide contained in UNIX environments. You can be found on the CD. 34 Macintosh If you need to Sun...

