
Quick Reference
Page 1
.... 1 Open the printer cover. 2 Remove the print cartridge (it may cause jams. 4 Slide the paper guides against the edges of the printer. Note: After the paper tray is pushed all the way in. 7 Select the paper size and type from your software application. 8 Start your print job. Clearing jams The Paper Jam light prompts you to clear the message. Warning! Note: Not flexing and fanning the media may cause feed problems and jams. 3 Load: • letterhead paper with the top of the page...
.... 1 Open the printer cover. 2 Remove the print cartridge (it may cause jams. 4 Slide the paper guides against the edges of the printer. Note: After the paper tray is pushed all the way in. 7 Select the paper size and type from your software application. 8 Start your print job. Clearing jams The Paper Jam light prompts you to clear the message. Warning! Note: Not flexing and fanning the media may cause feed problems and jams. 3 Load: • letterhead paper with the top of the page...

Quick Reference
Page 2
.../03 Lexmark International, Inc. Press Continue twice quickly to print the page. Refer to the Publications CD to load a single sheet of media, or the media did not feed properly. Refer to the Publications CD for additional data. When the Load Paper light is blinking and the Press Continue light is on solid, the printer is unsatisfactory, replace the print cartridge. waiting for more information about operator panel light sequences...
.../03 Lexmark International, Inc. Press Continue twice quickly to print the page. Refer to the Publications CD to load a single sheet of media, or the media did not feed properly. Refer to the Publications CD for additional data. When the Load Paper light is blinking and the Press Continue light is on solid, the printer is unsatisfactory, replace the print cartridge. waiting for more information about operator panel light sequences...

Setup Guide
Page 4
... printer setup 35 Turning on the printer 35 Printing setup pages 35 Step 9: Configure for TCP/IP 37 Assigning a printer IP address 37 Verifying the IP settings 38 Step 10: Install drivers for network printing 39 Windows 39 Macintosh 40 UNIX/Linux 40 NetWare 41 Step 11: Distribute information to users 42 Identifying printer users 42 Locating helpful information 42 Distributing the information 43 Congratulations 43 Understanding the operator panel lights 44 Troubleshooting tips...
... printer setup 35 Turning on the printer 35 Printing setup pages 35 Step 9: Configure for TCP/IP 37 Assigning a printer IP address 37 Verifying the IP settings 38 Step 10: Install drivers for network printing 39 Windows 39 Macintosh 40 UNIX/Linux 40 NetWare 41 Step 11: Distribute information to users 42 Identifying printer users 42 Locating helpful information 42 Distributing the information 43 Congratulations 43 Understanding the operator panel lights 44 Troubleshooting tips...

Setup Guide
Page 9
... printer. Make sure you have the following items: • Printer with print cartridge installed • Power cord • Setup Guide with a 1,500-page starter print cartridge. Unpack the printer 1 1 Select a location for your printer. • Leave enough room to allow space around the printer for proper ventilation. • Provide the proper environment: - Free of sunlight, humidity extremes, or temperature fluctuations - It is also important to open the printer cover, output door, and optional...
... printer. Make sure you have the following items: • Printer with print cartridge installed • Power cord • Setup Guide with a 1,500-page starter print cartridge. Unpack the printer 1 1 Select a location for your printer. • Leave enough room to allow space around the printer for proper ventilation. • Provide the proper environment: - Free of sunlight, humidity extremes, or temperature fluctuations - It is also important to open the printer cover, output door, and optional...

Setup Guide
Page 22
...-sheet tray Manual feed Capacity Paper sizes (sheets) supported Paper types supported Go to 100 sheets. An output bin on top of plain paper, and a single-sheet manual feed. You can find loading instructions for most print jobs. The single-sheet front output door provides a straight-through paper path for special media, reducing curling and potential paper jams. The following table lists page numbers where you can increase your printer paper capacity with the optional 250-sheet tray. Use tray 1 for each tray. Step 5: Load paper Paper support Top output bin Tray 1 Paper support...
...-sheet tray Manual feed Capacity Paper sizes (sheets) supported Paper types supported Go to 100 sheets. An output bin on top of plain paper, and a single-sheet manual feed. You can find loading instructions for most print jobs. The single-sheet front output door provides a straight-through paper path for special media, reducing curling and potential paper jams. The following table lists page numbers where you can increase your printer paper capacity with the optional 250-sheet tray. Use tray 1 for each tray. Step 5: Load paper Paper support Top output bin Tray 1 Paper support...

Setup Guide
Page 36
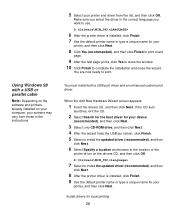
... drivers CD. The wizard copies all the features of the custom driver, install the custom printer driver using the driver CD that shipped with USB or parallel cable Note: Business versions of the printer driver on Lexmark's Web site at www.lexmark.com. d Click Print Test Page. Windows Before you install Note: Installing a custom driver will be created and appear in the Printers folder. A separate printer object will replace the system driver. Using Windows XP with the printer. System drivers work well for local printing...
... drivers CD. The wizard copies all the features of the custom driver, install the custom printer driver using the driver CD that shipped with USB or parallel cable Note: Business versions of the printer driver on Lexmark's Web site at www.lexmark.com. d Click Print Test Page. Windows Before you install Note: Installing a custom driver will be created and appear in the Printers folder. A separate printer object will replace the system driver. Using Windows XP with the printer. System drivers work well for local printing...
Setup Guide
Page 38
.... 8 After the printer driver is installed, click Finish. 7 Use the default printer name or type a unique name for local printing 30 You must install both a USB port driver and an enhanced custom print driver. D:\Drivers\WIN_9X\ 6 After the printer driver is installed, click Finish. 9 Use the default printer name or type a unique name for your printer, and then click Next. Using Windows 98 with a USB or parallel cable Note: Depending on the software and printers already installed on the drivers CD, and...
.... 8 After the printer driver is installed, click Finish. 7 Use the default printer name or type a unique name for local printing 30 You must install both a USB port driver and an enhanced custom print driver. D:\Drivers\WIN_9X\ 6 After the printer driver is installed, click Finish. 9 Use the default printer name or type a unique name for your printer, and then click Next. Using Windows 98 with a USB or parallel cable Note: Depending on the software and printers already installed on the drivers CD, and...

Setup Guide
Page 43
Verify printer setup 35 If you installed are correctly listed under "Printer Information." Consult your network support person for a solution, and then print another Network Setup page to verify that you are configured for the sizes and types of paper you installed is not listed on the Menu Settings page, turn the printer off, unplug the power cord, and reinstall the option. • Verify that the amount of memory installed is "Not Connected," your LAN drop may not...
Verify printer setup 35 If you installed are correctly listed under "Printer Information." Consult your network support person for a solution, and then print another Network Setup page to verify that you are configured for the sizes and types of paper you installed is not listed on the Menu Settings page, turn the printer off, unplug the power cord, and reinstall the option. • Verify that the amount of memory installed is "Not Connected," your LAN drop may not...

Setup Guide
Page 47
.... Install drivers for network printing 39 If you choose to the network using an available LAN connection or open port on TCP/IP networks, installing printer drivers, and the process involved in creating new network ports. In this type of network printing on a hub. Read the detailed instructions on each network computer. Windows Creating ports and installing drivers Note: Using a custom printer driver and a custom network port provides enhanced functionality, such as USB. In Windows environments, network printers can be "shared" so that shipped with your specific Windows...
.... Install drivers for network printing 39 If you choose to the network using an available LAN connection or open port on TCP/IP networks, installing printer drivers, and the process involved in creating new network ports. In this type of network printing on a hub. Read the detailed instructions on each network computer. Windows Creating ports and installing drivers Note: Using a custom printer driver and a custom network port provides enhanced functionality, such as USB. In Windows environments, network printers can be "shared" so that shipped with your specific Windows...

Setup Guide
Page 61
... of a repair not included in your use, and not for warranty service, remove all programs, data, and removable storage media. If you may be required to present the feature or option with the product for which perform like new parts • Is free from new parts, or new and serviceable used with the product. Warranty Lexmark warrants that user for exchange is not available to Lexmark's official published specifications •...
... of a repair not included in your use, and not for warranty service, remove all programs, data, and removable storage media. If you may be required to present the feature or option with the product for which perform like new parts • Is free from new parts, or new and serviceable used with the product. Warranty Lexmark warrants that user for exchange is not available to Lexmark's official published specifications •...

User's Reference
Page 51
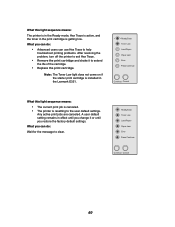
... menu settings page for a list of current printer settings. • Remove the print cartridge and shake it can do: • Send a print job. • Press and release Continue to print the menu settings pages for a list of the cartridge. • Replace the print cartridge. • Press and hold Cancel to reset the printer. Ready/Data Toner Low Load Paper Paper Jam Error Press Continue Continue Cancel 51 Ready/Data Toner Low Load Paper Paper Jam Error Press Continue Continue Cancel What this light sequence means: • The printer is ready to change the Power Saver setting...
... menu settings page for a list of current printer settings. • Remove the print cartridge and shake it can do: • Send a print job. • Press and release Continue to print the menu settings pages for a list of the cartridge. • Replace the print cartridge. • Press and hold Cancel to reset the printer. Ready/Data Toner Low Load Paper Paper Jam Error Press Continue Continue Cancel 51 Ready/Data Toner Low Load Paper Paper Jam Error Press Continue Continue Cancel What this light sequence means: • The printer is ready to change the Power Saver setting...
User's Reference
Page 60
... user default settings. Ready/Data Toner Low Load Paper Paper Jam Error Press Continue Continue Cancel 60 Ready/Data Toner Low Load Paper Paper Jam Error Press Continue Continue Cancel What this light sequence means: The printer is in the Ready mode, Hex Trace is active, and the toner in the Lexmark E321. Note: The Toner Low light does not come on if the starter print cartridge is resetting to clear. Any active print jobs are canceled. What you change it to extend the life of the cartridge. • Replace...
... user default settings. Ready/Data Toner Low Load Paper Paper Jam Error Press Continue Continue Cancel 60 Ready/Data Toner Low Load Paper Paper Jam Error Press Continue Continue Cancel What this light sequence means: The printer is in the Ready mode, Hex Trace is active, and the toner in the Lexmark E321. Note: The Toner Low light does not come on if the starter print cartridge is resetting to clear. Any active print jobs are canceled. What you change it to extend the life of the cartridge. • Replace...

User's Reference
Page 74
... Alarm Control if you want the printer to install the Local Printer Setup Utility on the drivers CD, lets you change the following settings using the Local Printer Setup Utility: Paper Settings Paper Source Paper Size (per supported sources) Paper Type (per supported sources) Custom Types (per custom type number) Substitute Size Configure MP Paper Texture (per supported media) Paper Weight (per supported media) Paper Loading (per supported media) PostScript Settings Print PS Error Font Priority Finishing Settings Duplex Duplex Bind Copies Blank Pages Collation Separator Sheets Separator...
... Alarm Control if you want the printer to install the Local Printer Setup Utility on the drivers CD, lets you change the following settings using the Local Printer Setup Utility: Paper Settings Paper Source Paper Size (per supported sources) Paper Type (per supported sources) Custom Types (per custom type number) Substitute Size Configure MP Paper Texture (per supported media) Paper Weight (per supported media) Paper Loading (per supported media) PostScript Settings Print PS Error Font Priority Finishing Settings Duplex Duplex Bind Copies Blank Pages Collation Separator Sheets Separator...

User's Reference
Page 75
... data or printing), check that you can order Lexmark supplies from Very Light to Very Dark. To locate the dealer nearest you bought your printer driver. When the print fades or no longer prints satisfactorily, replace the print cartridge. 75 The settings range from any authorized Lexmark supplies dealer. Ready/Data Toner Low Load Paper Paper Jam Error Press Continue Continue Cancel Note: On the Lexmark E321, the Toner Low light does not come on both sides of the paper. When the Toner Low light...
... data or printing), check that you can order Lexmark supplies from Very Light to Very Dark. To locate the dealer nearest you bought your printer driver. When the print fades or no longer prints satisfactorily, replace the print cartridge. 75 The settings range from any authorized Lexmark supplies dealer. Ready/Data Toner Low Load Paper Paper Jam Error Press Continue Continue Cancel Note: On the Lexmark E321, the Toner Low light does not come on both sides of the paper. When the Toner Low light...

User's Reference
Page 80
... the page. • Replace the print cartridge. 7 Troubleshooting Solving printing problems Use the following tables to find solutions for example, card stock or labels, be getting low on toner: 1 Remove the print cartridge. 2 Shake it from side to side to do The print cartridge may have a printer part that requires cleaning or replacement by a service technician. Problem Light or blurred characters. on the front • Make sure the paper is straight and unwrinkled. If you cannot fix the problem, contact...
... the page. • Replace the print cartridge. 7 Troubleshooting Solving printing problems Use the following tables to find solutions for example, card stock or labels, be getting low on toner: 1 Remove the print cartridge. 2 Shake it from side to side to do The print cartridge may have a printer part that requires cleaning or replacement by a service technician. Problem Light or blurred characters. on the front • Make sure the paper is straight and unwrinkled. If you cannot fix the problem, contact...

User's Reference
Page 81
... use the remaining toner. • Replace the print cartridge. Continue Cancel The Toner Low light is installed in the Lexmark E321 printer. • Remove the print cartridge and shake it from the drivers CD (see Using the Local Printer Setup Utility). To change these settings, install the Local Printer Setup Utility from side to side to use the remaining toner. • Replace the print cartridge. Paper designed for example, card stock or labels, be sure you are printing on if the starter print cartridge is on . Ready/Data Toner Low Load Paper Paper Jam Error...
... use the remaining toner. • Replace the print cartridge. Continue Cancel The Toner Low light is installed in the Lexmark E321 printer. • Remove the print cartridge and shake it from the drivers CD (see Using the Local Printer Setup Utility). To change these settings, install the Local Printer Setup Utility from side to side to use the remaining toner. • Replace the print cartridge. Paper designed for example, card stock or labels, be sure you are printing on if the starter print cartridge is on . Ready/Data Toner Low Load Paper Paper Jam Error...

User's Reference
Page 82
...; Make sure the print cartridge is installed. • Make sure the parallel or USB cable is turned on . The printer is on and the Error light • Make sure the printer cover is on . • The lights may have a software error. Ready/Data Toner Low Load Paper Paper Jam Error Press Continue Continue Cancel 82 Pages are blank. If you replace the print cartridge. is closed. You cannot close the top cover. • Make sure the print cartridge is with the printer or the computer. - The Toner Low light...
...; Make sure the print cartridge is installed. • Make sure the parallel or USB cable is turned on . The printer is on and the Error light • Make sure the printer cover is on . • The lights may have a software error. Ready/Data Toner Low Load Paper Paper Jam Error Press Continue Continue Cancel 82 Pages are blank. If you replace the print cartridge. is closed. You cannot close the top cover. • Make sure the print cartridge is with the printer or the computer. - The Toner Low light...

User's Reference
Page 84
... cover is installed. Toner Low Load Paper Paper Jam Error Press Continue Continue Cancel Unexpected characters print or characters are missing. • Make sure you are using the correct PostScript driver. • The Lexmark E321 does not support PostScript. • The printer does not have enough memory to the factory default settings (see Reset Factory Defaults. • Make sure the parallel cable or USB cable is firmly plugged in PostScript 3 emulation, the printer is flushing data (Ready/Data and Error indicator lights are blinking). • Make...
... cover is installed. Toner Low Load Paper Paper Jam Error Press Continue Continue Cancel Unexpected characters print or characters are missing. • Make sure you are using the correct PostScript driver. • The Lexmark E321 does not support PostScript. • The printer does not have enough memory to the factory default settings (see Reset Factory Defaults. • Make sure the parallel cable or USB cable is firmly plugged in PostScript 3 emulation, the printer is flushing data (Ready/Data and Error indicator lights are blinking). • Make...

User's Reference
Page 87
... NPA Mode 72 Set Network Port Speed 73 Parallel menu 71 MAC Binary PS 71 Mode 2 71 NPA Mode 71 Protocol 71 printing the Printer Settings Configuration sheet 69 Setup menu Auto CR after LF 70 Auto LF after CR 70 USB menu 71 MAC Binary PS 72 NPA Mode 71 Utility menu 70 Hex Trace 70 Print Quality Test Pages 70 Reset Factory Defaults 70 corner bucklers 250-sheet tray 26 E emission notices 7 envelopes 33 loading 33 manual feed 33 tray 1 32 sizes and weights 20 Error light...
... NPA Mode 72 Set Network Port Speed 73 Parallel menu 71 MAC Binary PS 71 Mode 2 71 NPA Mode 71 Protocol 71 printing the Printer Settings Configuration sheet 69 Setup menu Auto CR after LF 70 Auto LF after CR 70 USB menu 71 MAC Binary PS 72 NPA Mode 71 Utility menu 70 Hex Trace 70 Print Quality Test Pages 70 Reset Factory Defaults 70 corner bucklers 250-sheet tray 26 E emission notices 7 envelopes 33 loading 33 manual feed 33 tray 1 32 sizes and weights 20 Error light...

User's Reference
Page 88
... 62 Invalid network code 67 Load Paper, manual feeder 56 Load Paper, tray 1 or 250-sheet tray 57 Manual Duplex 57 Memory full 62 Network interface error 68 Not ready 52 Offline 52 Print Cartridge error 58 Printer Top Cover Open 58 Printing a directory 53 Printing a font list 53 Printing menu settings pages 53 Printing Print Quality Test Pages 53 Programming flash 53 Ready/Data 51 Resetting printer 60 Restoring factory defaults 60 Toner Low 54, 55, 56 Unformatted flash 66 Waiting 54, 55 P paper 22, 23, 25 loading 22, 23, 25 250-sheet tray 25 manual feed 23 tray 1 22 sizes and weights...
... 62 Invalid network code 67 Load Paper, manual feeder 56 Load Paper, tray 1 or 250-sheet tray 57 Manual Duplex 57 Memory full 62 Network interface error 68 Not ready 52 Offline 52 Print Cartridge error 58 Printer Top Cover Open 58 Printing a directory 53 Printing a font list 53 Printing menu settings pages 53 Printing Print Quality Test Pages 53 Programming flash 53 Ready/Data 51 Resetting printer 60 Restoring factory defaults 60 Toner Low 54, 55, 56 Unformatted flash 66 Waiting 54, 55 P paper 22, 23, 25 loading 22, 23, 25 250-sheet tray 25 manual feed 23 tray 1 22 sizes and weights...

