
Quick Reference
Page 1
... plain paper. Proper paper loading prevents jams and facilitates trouble-free printing. 1 Pull the tray completely out. Loading paper and specialty media 1 Do not remove trays while a job prints or when the Busy light sequence appears on your Web browser. Loading the standard 250-sheet tray The printer has two trays to the correct position for the trays reflect the size and type of the following : • For Windows users, click File Œ Print, and then click Properties, Preferences, Options, or Setup...
... plain paper. Proper paper loading prevents jams and facilitates trouble-free printing. 1 Pull the tray completely out. Loading paper and specialty media 1 Do not remove trays while a job prints or when the Busy light sequence appears on your Web browser. Loading the standard 250-sheet tray The printer has two trays to the correct position for the trays reflect the size and type of the following : • For Windows users, click File Œ Print, and then click Properties, Preferences, Options, or Setup...

Quick Reference
Page 4
...) paper. Loading paper and specialty media 4 The maximum amount of the trays and the manual feeder are printing on the printer at a time. Paper capacities The capacities of paper that can contact the 1 transparency paper guides. Manual feeder Note: Feed paper into the feeder. 1 sheet of paper Note: Only one optional drawer may cause creases in Tray 1. Do not force the paper into the manual 1 sheet of paper feeder only to Notes Tray 2 250 or 550 sheets of card stock 1 envelope Notes...
...) paper. Loading paper and specialty media 4 The maximum amount of the trays and the manual feeder are printing on the printer at a time. Paper capacities The capacities of paper that can contact the 1 transparency paper guides. Manual feeder Note: Feed paper into the feeder. 1 sheet of paper Note: Only one optional drawer may cause creases in Tray 1. Do not force the paper into the manual 1 sheet of paper feeder only to Notes Tray 2 250 or 550 sheets of card stock 1 envelope Notes...

Quick Reference
Page 5
... loading paper. • Make sure the guides in an appropriate environment. • Do not remove trays while the printer is the unit housing the toner cartridge and photoconductor kit. 2 Standard exit bin 3 Front door 4 Manual feeder door 5 Standard 250-sheet tray (Tray 1) 6 Optional tray (Tray 2) 7 Rear door Understanding jam lights and access locations The following : • Remove Tray 1. • Open the front door, and then remove the photoconductor kit and toner cartridge unit. 201.yy Paper jam - On Try one of the Embedded Web Server. 200.yy Paper jam Clearing jams...
... loading paper. • Make sure the guides in an appropriate environment. • Do not remove trays while the printer is the unit housing the toner cartridge and photoconductor kit. 2 Standard exit bin 3 Front door 4 Manual feeder door 5 Standard 250-sheet tray (Tray 1) 6 Optional tray (Tray 2) 7 Rear door Understanding jam lights and access locations The following : • Remove Tray 1. • Open the front door, and then remove the photoconductor kit and toner cartridge unit. 201.yy Paper jam - On Try one of the Embedded Web Server. 200.yy Paper jam Clearing jams...

Maintenance Guide
Page 4
... address field of your Web browser. paper Conserving supplies when printing multiple copies If you adjust the level of toner the Toner Darkness setting. Checking the status of supplies from 1 (lightest setting) to the computer by printing the first copy and checking it for accuracy before printing the remaining copies. To access printer menus: • Open the Embedded Web Server by typing the printer IP address into the address field of your Web browser. images on both sides of a sheet of the printer, print a network setup page and locate...
... address field of your Web browser. paper Conserving supplies when printing multiple copies If you adjust the level of toner the Toner Darkness setting. Checking the status of supplies from 1 (lightest setting) to the computer by printing the first copy and checking it for accuracy before printing the remaining copies. To access printer menus: • Open the Embedded Web Server by typing the printer IP address into the address field of your Web browser. images on both sides of a sheet of the printer, print a network setup page and locate...

Maintenance Guide
Page 7
... the photoconductor kit, and then pull the toner cartridge out using the handle. 3 Unpack the new toner cartridge. Push the toner cartridge in all directions to direct light for an extended period of time. Maintaining the printer 7 The cartridge clicks into place when correctly installed. 6 Close the front door. 2 Press the button on the tracks of the photoconductor kit. Extended light exposure can cause print quality problems. 4 Rotate the cartridge in as...
... the photoconductor kit, and then pull the toner cartridge out using the handle. 3 Unpack the new toner cartridge. Push the toner cartridge in all directions to direct light for an extended period of time. Maintaining the printer 7 The cartridge clicks into place when correctly installed. 6 Close the front door. 2 Press the button on the tracks of the photoconductor kit. Extended light exposure can cause print quality problems. 4 Rotate the cartridge in as...

User Guide
Page 3
... both sides of the paper ...57 Printing on both sides of the paper manually 57 Printing specialty documents...59 Tips on using letterhead ...59 Tips on using transparencies ...60 Tips on using envelopes...60 Tips on using labels ...61 Tips on using card stock...61 Printing a booklet (Windows) ...62 Printing information pages...62 Printing the menu settings and network setup pages 62 Printing the print quality test pages ...63 Contents 3 Loading paper and specialty media 40 Setting the paper size and type...40 Configuring Universal paper settings...40 Loading the standard 250-sheet tray...40...
... both sides of the paper ...57 Printing on both sides of the paper manually 57 Printing specialty documents...59 Tips on using letterhead ...59 Tips on using transparencies ...60 Tips on using envelopes...60 Tips on using labels ...61 Tips on using card stock...61 Printing a booklet (Windows) ...62 Printing information pages...62 Printing the menu settings and network setup pages 62 Printing the print quality test pages ...63 Contents 3 Loading paper and specialty media 40 Setting the paper size and type...40 Configuring Universal paper settings...40 Loading the standard 250-sheet tray...40...

User Guide
Page 5
Administrative support 93 Finding advanced networking and administrator information 93 Restoring the factory default settings...93 Clearing jams 94 Avoiding jams...94 Accessing jam areas...94 Understanding jam lights and access locations 95 Clearing jams behind the photoconductor kit and toner cartridge 99 Clearing jams from the standard exit bin 101 Clearing jams from Tray 1...101 Clearing jams from Tray 2...103 Clearing jams in the manual feeder...104 Clearing jams behind the rear door...105 Troubleshooting 107 Understanding printer messages...107 Close door ...107 Load with
Administrative support 93 Finding advanced networking and administrator information 93 Restoring the factory default settings...93 Clearing jams 94 Avoiding jams...94 Accessing jam areas...94 Understanding jam lights and access locations 95 Clearing jams behind the photoconductor kit and toner cartridge 99 Clearing jams from the standard exit bin 101 Clearing jams from Tray 1...101 Clearing jams from Tray 2...103 Clearing jams in the manual feeder...104 Clearing jams behind the rear door...105 Troubleshooting 107 Understanding printer messages...107 Close door ...107 Load with

User Guide
Page 9
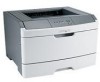
... problems along the way, one of your needs. And if you check the latest updates on the Lexmark Web site at http://support.lexmark.com. Initial setup instructions: • Connecting the printer • Installing the printer software Additional setup and instructions for using the printer: • Selecting and storing paper and specialty media • Loading paper • Performing printing depending on your printer model • Configuring printer settings • Viewing and printing documents and photos • Setting up and using printer software • Setting...
... problems along the way, one of your needs. And if you check the latest updates on the Lexmark Web site at http://support.lexmark.com. Initial setup instructions: • Connecting the printer • Installing the printer software Additional setup and instructions for using the printer: • Selecting and storing paper and specialty media • Loading paper • Performing printing depending on your printer model • Configuring printer settings • Viewing and printing documents and photos • Setting up and using printer software • Setting...

User Guide
Page 40
... Paper Menu. Loading the standard 250-sheet tray The printer has two trays to load the 250- It also includes information about setting the Paper Size and Paper Type. Note: The Paper Size and Type settings will contain the Universal paper. The factory default paper type setting is a user-defined setting that lets you would like to a computer by typing the IP address of a Web browser. If you print on a network, access the Embedded Web Server by a USB or parallel cable, use one of the following Universal size settings for a special print job...
... Paper Menu. Loading the standard 250-sheet tray The printer has two trays to load the 250- It also includes information about setting the Paper Size and Paper Type. Note: The Paper Size and Type settings will contain the Universal paper. The factory default paper type setting is a user-defined setting that lets you would like to a computer by typing the IP address of a Web browser. If you print on a network, access the Embedded Web Server by a USB or parallel cable, use one of the following Universal size settings for a special print job...

User Guide
Page 50
...: Duplex printing is supported only for occasional use . Paper and specialty media guide Paper guidelines Paper capacities The capacities of the trays and the manual feeder are not supported. or 550-sheet tray. Paper characteristics The following paper characteristics affect print quality and reliability. Paper lighter than 182 x 257 mm (7.2 x 10.1 in.), we recommend 90 g/m2 (24 lb) or heavier paper. Single-sided paper labels designed for laser printers are supported for occasional use . Feed paper into the feeder. Weight The printer trays...
...: Duplex printing is supported only for occasional use . Paper and specialty media guide Paper guidelines Paper capacities The capacities of the trays and the manual feeder are not supported. or 550-sheet tray. Paper characteristics The following paper characteristics affect print quality and reliability. Paper lighter than 182 x 257 mm (7.2 x 10.1 in.), we recommend 90 g/m2 (24 lb) or heavier paper. Single-sided paper labels designed for laser printers are supported for occasional use . Feed paper into the feeder. Weight The printer trays...

User Guide
Page 66
... a USB or parallel cable. From a printer connected by USB or parallel cable, access the menus by using the Embedded Web Server. Save settings from a networked printer by using the Local Printer Settings Utility for Windows or Printer Settings for a printer connected locally through a USB or parallel cable. After installing this CD and/or may print a menus list by printing the menu settings and network setup pages. Once selected, these settings apply to all printers. You can change and save your settings in a command file to designated printers by...
... a USB or parallel cable. From a printer connected by USB or parallel cable, access the menus by using the Embedded Web Server. Save settings from a networked printer by using the Local Printer Settings Utility for Windows or Printer Settings for a printer connected locally through a USB or parallel cable. After installing this CD and/or may print a menus list by printing the menu settings and network setup pages. Once selected, these settings apply to all printers. You can change and save your settings in a command file to designated printers by...
User Guide
Page 77
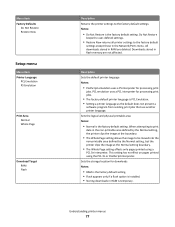
...Menu item Factory Defaults Do Not Restore Restore Now Setup menu Menu item Printer Language PCL Emulation PS Emulation Print Area Normal Whole Page Download Target RAM Flash Description Returns the printer settings to the factory default settings Notes: • Do Not Restore is PCL Emulation. • Setting a printer language as the default does not prevent a software program from sending print jobs that use another printer language. PCL emulation uses a PCL interpreter for processing print jobs. Downloads stored in the Network/Ports menu. Do Not Restore keeps the user-defined settings...
...Menu item Factory Defaults Do Not Restore Restore Now Setup menu Menu item Printer Language PCL Emulation PS Emulation Print Area Normal Whole Page Download Target RAM Flash Description Returns the printer settings to the factory default settings Notes: • Do Not Restore is PCL Emulation. • Setting a printer language as the default does not prevent a software program from sending print jobs that use another printer language. PCL emulation uses a PCL interpreter for processing print jobs. Downloads stored in the Network/Ports menu. Do Not Restore keeps the user-defined settings...

User Guide
Page 93
... support tasks, see the Networking Guide on the Software and Documentation CD and the Embedded Web Server Administrator's Guide on the Lexmark Web site at http://support.lexmark.com. Restoring the factory default settings If your printer is connected to the factory default settings except the Port menu settings. For instructions, print a printer settings configuration sheet. Administrative support 93 Warning-Potential Damage: Restore Factory Defaults returns all printer settings to a computer by a USB or parallel cable, use the Local Printer Settings Utility for Windows or Printer Settings...
... support tasks, see the Networking Guide on the Software and Documentation CD and the Embedded Web Server Administrator's Guide on the Lexmark Web site at http://support.lexmark.com. Restoring the factory default settings If your printer is connected to the factory default settings except the Port menu settings. For instructions, print a printer settings configuration sheet. Administrative support 93 Warning-Potential Damage: Restore Factory Defaults returns all printer settings to a computer by a USB or parallel cable, use the Local Printer Settings Utility for Windows or Printer Settings...

User Guide
Page 109
.... This often fixes the problem. Troubleshooting 109 Check the printer power switch. • The printer cable is securely attached to continue printing. Once you have checked each of the following: • Replace the toner cartridge. • Press to the printer and the host computer, print server, option, or other network device. • All options are properly installed. • The printer driver settings are supported. Solving basic printer problems If there are basic printer problems, or the printer is unresponsive, make sure: •...
.... This often fixes the problem. Troubleshooting 109 Check the printer power switch. • The printer cable is securely attached to continue printing. Once you have checked each of the following: • Replace the toner cartridge. • Press to the printer and the host computer, print server, option, or other network device. • All options are properly installed. • The printer driver settings are supported. Solving basic printer problems If there are basic printer problems, or the printer is unresponsive, make sure: •...

User Guide
Page 115
... Windows or Printer Settings for print quality test pages, as indicated on the printer settings configuration sheet. 6 Press and hold while turning the printer on a network, access the Embedded Web Server: 1 Type the printer IP address into the address field of your Web browser. On - Troubleshooting 115 Note: If you do not correct the problem, call Customer Support. You may help you see the light sequence for Macintosh. On - Do one of the following topics may have a printer part...
... Windows or Printer Settings for print quality test pages, as indicated on the printer settings configuration sheet. 6 Press and hold while turning the printer on a network, access the Embedded Web Server: 1 Type the printer IP address into the address field of your Web browser. On - Troubleshooting 115 Note: If you do not correct the problem, call Customer Support. You may help you see the light sequence for Macintosh. On - Do one of the following topics may have a printer part...

User Guide
Page 116
... If you are using downloaded fonts, verify that the fonts are possible solutions. Try one or more of the following : CHECK THE PAPER GUIDES Move the guides in the tray to determine the quality of the following : • Remove and reinstall the toner cartridge. • Remove and reinstall the photoconductor kit. If there are problems, see "Solving print quality problems" on page 115. Troubleshooting 116 After a few minutes, the print quality test pages print. Blank pages Try one...
... If you are using downloaded fonts, verify that the fonts are possible solutions. Try one or more of the following : CHECK THE PAPER GUIDES Move the guides in the tray to determine the quality of the following : • Remove and reinstall the toner cartridge. • Remove and reinstall the photoconductor kit. If there are problems, see "Solving print quality problems" on page 115. Troubleshooting 116 After a few minutes, the print quality test pages print. Blank pages Try one...

User Guide
Page 134
... SATISFACTORY QUALITY. ALL INFORMATION, SPECIFICATIONS, PRICES, AND SERVICES ARE SUBJECT TO CHANGE AT ANY TIME WITHOUT NOTICE. The replacement may be available for loss of products, supplies or parts -Products, supplies, parts, materials (such as toners and inks), software, or interfaces not furnished by Lexmark). Warranty service does not include repair of failures caused by: -Modification or unauthorized attachments -Accidents, misuse, abuse or use inconsistent with Lexmark user's guides, manuals, instructions or guidance...
... SATISFACTORY QUALITY. ALL INFORMATION, SPECIFICATIONS, PRICES, AND SERVICES ARE SUBJECT TO CHANGE AT ANY TIME WITHOUT NOTICE. The replacement may be available for loss of products, supplies or parts -Products, supplies, parts, materials (such as toners and inks), software, or interfaces not furnished by Lexmark). Warranty service does not include repair of failures caused by: -Modification or unauthorized attachments -Accidents, misuse, abuse or use inconsistent with Lexmark user's guides, manuals, instructions or guidance...

User Guide
Page 139
... 88 Replace toner 109 A attaching cables 22 B booklet printing 62 both sides of paper (duplexing) printing manually 57 C cables Ethernet 22 parallel 22 USB 22 calling Customer Support 124 canceling a job from Macintosh 64 from the printer control panel 64 from Windows 64 card stock tips 61 checking an unresponsive printer 109 cleaning exterior of the printer 84 Close front door 107 collate setting Finishing menu 67 configurations printer 11 conserving supplies 26 contacting Customer Support 124 control panel, printer 36 buttons 14 lights 14 Custom Types menu 73 D Default Source menu...
... 88 Replace toner 109 A attaching cables 22 B booklet printing 62 both sides of paper (duplexing) printing manually 57 C cables Ethernet 22 parallel 22 USB 22 calling Customer Support 124 canceling a job from Macintosh 64 from the printer control panel 64 from Windows 64 card stock tips 61 checking an unresponsive printer 109 cleaning exterior of the printer 84 Close front door 107 collate setting Finishing menu 67 configurations printer 11 conserving supplies 26 contacting Customer Support 124 control panel, printer 36 buttons 14 lights 14 Custom Types menu 73 D Default Source menu...

User Guide
Page 140
... toner cartridge unit 99 behind the rear door 105 from manual feeder 104 from standard exit bin 101 from standard tray 101 from Tray 1 101 from Tray 2 103 Paper Loading menu 73 paper sizes supported by the printer 53 paper stop, using 47 Paper Texture menu 70 paper types duplex support 54 supported by printer 54 where to load 54 Paper Weight menu 72 parallel port 22 PCL Emul menu 81 photoconductor kit ordering 86 PostScript menu 81 Power Saver adjusting 27 print job canceling from Macintosh 64 canceling from the printer control panel 64 canceling from Windows 64 print quality test pages...
... toner cartridge unit 99 behind the rear door 105 from manual feeder 104 from standard exit bin 101 from standard tray 101 from Tray 1 101 from Tray 2 103 Paper Loading menu 73 paper sizes supported by the printer 53 paper stop, using 47 Paper Texture menu 70 paper types duplex support 54 supported by printer 54 where to load 54 Paper Weight menu 72 parallel port 22 PCL Emul menu 81 photoconductor kit ordering 86 PostScript menu 81 Power Saver adjusting 27 print job canceling from Macintosh 64 canceling from the printer control panel 64 canceling from Windows 64 print quality test pages...

User Guide
Page 141
... 28 toner cartridges 28 WEEE statement 127 Remove paper from standard output bin 108 reprint page after paper jam 65 S safety information 7, 8 separator sheet setting Finishing menu 67 setting paper size 40 paper type 40 Universal Paper Size 40 Setup menu 77 shipping the printer 92 Size/Type menu 68 standard 250-sheet tray loading 40 standard exit bin, using 47 status of supplies, checking 84 storing paper 52 supplies 84 supplies conserving 26 status of 84 storing 84 supplies, ordering photoconductor kit 86 toner cartridges 85 system board accessing 16 T tips card stock 61 envelopes 60 labels...
... 28 toner cartridges 28 WEEE statement 127 Remove paper from standard output bin 108 reprint page after paper jam 65 S safety information 7, 8 separator sheet setting Finishing menu 67 setting paper size 40 paper type 40 Universal Paper Size 40 Setup menu 77 shipping the printer 92 Size/Type menu 68 standard 250-sheet tray loading 40 standard exit bin, using 47 status of supplies, checking 84 storing paper 52 supplies 84 supplies conserving 26 status of 84 storing 84 supplies, ordering photoconductor kit 86 toner cartridges 85 system board accessing 16 T tips card stock 61 envelopes 60 labels...

