
Quick Reference
Page 5
...curled paper. • Flex, fan, and straighten paper before removing a tray. On • Do not load the manual feeder while the printer is the unit housing the toner cartridge and photoconductor kit. 2 Standard exit bin 3 Front door 4 Manual feeder door 5 Standard 250-sheet tray (Tray 1) 6 Optional tray (... media. • Do not load too much paper. On Open the front door, and then remove the photoconductor kit and toner cartridge unit. Inside this door is printing. More detailed instructions follow. On - The light sequence for the light to open the front door...
...curled paper. • Flex, fan, and straighten paper before removing a tray. On • Do not load the manual feeder while the printer is the unit housing the toner cartridge and photoconductor kit. 2 Standard exit bin 3 Front door 4 Manual feeder door 5 Standard 250-sheet tray (Tray 1) 6 Optional tray (... media. • Do not load too much paper. On Open the front door, and then remove the photoconductor kit and toner cartridge unit. Inside this door is printing. More detailed instructions follow. On - The light sequence for the light to open the front door...

Quick Reference
Page 7
...jammed paper. 251.yy Paper jam - On - Use the cartridge handle whenever you are holding the cartridge. Clearing jams 7 5 Close the front door. 6 Press to remove the paper. 4 Align and reinstall the unit. Try one of the printer might be hot. On - Set the unit aside on the ...a hot component, allow the surface to the printer using a paper size not supported for duplex printing. CAUTION-HOT SURFACE: The inside of the following: • Remove Tray 1. • Open the front door, and then remove the photoconductor kit and toner cartridge unit. • Remove Tray 2. On -...
...jammed paper. 251.yy Paper jam - On - Use the cartridge handle whenever you are holding the cartridge. Clearing jams 7 5 Close the front door. 6 Press to remove the paper. 4 Align and reinstall the unit. Try one of the printer might be hot. On - Set the unit aside on the ...a hot component, allow the surface to the printer using a paper size not supported for duplex printing. CAUTION-HOT SURFACE: The inside of the following: • Remove Tray 1. • Open the front door, and then remove the photoconductor kit and toner cartridge unit. • Remove Tray 2. On -...

Quick Reference
Page 9
... behind the photoconductor kit and toner cartridge unit. Clearing jams 9 If the paper is exiting the printer, pull the paper out. To reduce the risk of the printer might be removed this way, check for jammed paper behind the rear door If the paper is not exiting the printer: 1 Push the release button, and.... Paper jammed in the standard exit bin. If the jam cannot be hot. For more information, see "Clearing jams behind the photoconductor kit and toner cartridge" on page 7.
... behind the photoconductor kit and toner cartridge unit. Clearing jams 9 If the paper is exiting the printer, pull the paper out. To reduce the risk of the printer might be removed this way, check for jammed paper behind the rear door If the paper is not exiting the printer: 1 Push the release button, and.... Paper jammed in the standard exit bin. If the jam cannot be hot. For more information, see "Clearing jams behind the photoconductor kit and toner cartridge" on page 7.

Maintenance Guide
Page 2
Contents Maintaining the printer 3 Cleaning the exterior of the printer...3 Storing supplies...3 Conserving supplies...3 Checking the status of supplies...4 Checking the status of supplies from a network computer 4 Ordering supplies...5 Ordering toner cartridges ...5 Ordering a photoconductor kit ...5 Replacing supplies...6 Replacing the toner cartridge ...6 Replacing the photoconductor kit ...8 Recycling Lexmark products...11 Moving the printer...11 Before moving the printer ...11 Moving the printer to another location...11 Shipping the printer ...11 Contents 2
Contents Maintaining the printer 3 Cleaning the exterior of the printer...3 Storing supplies...3 Conserving supplies...3 Checking the status of supplies...4 Checking the status of supplies from a network computer 4 Ordering supplies...5 Ordering toner cartridges ...5 Ordering a photoconductor kit ...5 Replacing supplies...6 Replacing the toner cartridge ...6 Replacing the photoconductor kit ...8 Recycling Lexmark products...11 Moving the printer...11 Before moving the printer ...11 Moving the printer to another location...11 Shipping the printer ...11 Contents 2

Maintenance Guide
Page 5
... at 1-800-539-6275 for information about Lexmark authorized supplies dealers in the U.S., contact Lexmark at www.lexmark.comor contact the place where you purchased the printer. Note: All life estimates for your area. The recommended toner cartridges specifically designed for printer supplies assume printing on your printer model, the printer issues a message or a light sequence to let...
... at 1-800-539-6275 for information about Lexmark authorized supplies dealers in the U.S., contact Lexmark at www.lexmark.comor contact the place where you purchased the printer. Note: All life estimates for your area. The recommended toner cartridges specifically designed for printer supplies assume printing on your printer model, the printer issues a message or a light sequence to let...

Maintenance Guide
Page 6
... can check to redistribute the toner, and then reinsert it and continue printing. Maintaining the printer 6 When shaking the cartridge no longer improves the print quality, replace the toner cartridge. Part name Photoconductor kit Replacing supplies Replacing the toner cartridge Light sequence Toner is low Part number E260X22G • ‑ On • ‑ On...
... can check to redistribute the toner, and then reinsert it and continue printing. Maintaining the printer 6 When shaking the cartridge no longer improves the print quality, replace the toner cartridge. Part name Photoconductor kit Replacing supplies Replacing the toner cartridge Light sequence Toner is low Part number E260X22G • ‑ On • ‑ On...

Maintenance Guide
Page 7
...tracks of the photoconductor kit. Push the toner cartridge in all directions to direct light for an extended period of the photoconductor kit, and then pull the toner cartridge out using the handle. 3 Unpack the new toner cartridge. The cartridge clicks into place when correctly installed. 6 Close... the front door. Extended light exposure can cause print quality problems. 4 Rotate the cartridge in as far as it will go...
...tracks of the photoconductor kit. Push the toner cartridge in all directions to direct light for an extended period of the photoconductor kit, and then pull the toner cartridge out using the handle. 3 Unpack the new toner cartridge. The cartridge clicks into place when correctly installed. 6 Close... the front door. Extended light exposure can cause print quality problems. 4 Rotate the cartridge in as far as it will go...

Maintenance Guide
Page 9
...the handle. 4 Unpack the new photoconductor kit. Doing so may affect the print quality of the printer by pulling on the toner cartridge handle. Maintaining the printer 9 Note: The photoconductor kit and toner cartridge form a unit. To replace the photoconductor kit: 1 Open the front door by pressing the ...button on the left side of the printer and lowering the front door. 2 Pull the photoconductor kit and toner cartridge together as a unit out of future print jobs. Place the unit on a flat, clean surface. 3 Press...
...the handle. 4 Unpack the new photoconductor kit. Doing so may affect the print quality of the printer by pulling on the toner cartridge handle. Maintaining the printer 9 Note: The photoconductor kit and toner cartridge form a unit. To replace the photoconductor kit: 1 Open the front door by pressing the ...button on the left side of the printer and lowering the front door. 2 Pull the photoconductor kit and toner cartridge together as a unit out of future print jobs. Place the unit on a flat, clean surface. 3 Press...

Maintenance Guide
Page 10
... the rollers on the guides of the unit with the arrows in the printer. To reset the counter, see the instruction sheet that came with the tracks. Maintaining the printer 10 Push the toner cartridge in until it will go. 7 After you replace the photoconductor kit, reset...into place. 6 Install the unit into the photoconductor kit by aligning the arrows on the toner cartridge with the new photoconductor kit. Warning-Potential Damage: Resetting the photoconductor counter without replacing the photoconductor kit may damage your printer and void your warranty. 8 Close the front door.
... the rollers on the guides of the unit with the arrows in the printer. To reset the counter, see the instruction sheet that came with the tracks. Maintaining the printer 10 Push the toner cartridge in until it will go. 7 After you replace the photoconductor kit, reset...into place. 6 Install the unit into the photoconductor kit by aligning the arrows on the toner cartridge with the new photoconductor kit. Warning-Potential Damage: Resetting the photoconductor counter without replacing the photoconductor kit may damage your printer and void your warranty. 8 Close the front door.

Technical Reference
Page 19
Printing states E260/E260d/E260dn Average current while printing 100 V 120 V 230 V 8.6 A 7.6 A 3.7 A E360d/E360dn/E460dn 8.6 A 7.6 A 3.7 A E460dw 8.6 A 7.6 A 3.7 A Lexmark X203n MFP and X204n MFP nominal average power requirements Printing states Off Power Saver Mode on Standby Mode Simplex printing (one-sided printing) Copying continuously Scanning continuously Maximum current while printing 120 V 230 V X203n and X204n 0 W
Printing states E260/E260d/E260dn Average current while printing 100 V 120 V 230 V 8.6 A 7.6 A 3.7 A E360d/E360dn/E460dn 8.6 A 7.6 A 3.7 A E460dw 8.6 A 7.6 A 3.7 A Lexmark X203n MFP and X204n MFP nominal average power requirements Printing states Off Power Saver Mode on Standby Mode Simplex printing (one-sided printing) Copying continuously Scanning continuously Maximum current while printing 120 V 230 V X203n and X204n 0 W

Technical Reference
Page 20
...print cartridge 13.53 kg (29.77 lb) and photoconductor unit shipped with the printer E360d/E360dn E460dn 12.3 kg (27.06 lb) 12.5 kg (27.5 lb) E460dw 12.52 kg (27.54 lb) 13.83 kg (30.43 lb) 14.03 kg (30.87 lb) 14.05 kg (30.91 lb) Lexmark... amount is installed, allow enough room to the ADF paper support height on the X204n MFP. Environmental conditions Note: When shipping or storing printers, always pack the printer supplies (cartridges and photoconductors, for example) separately. Clearance requirements Model Left side Right side Front Rear Top E260, 260d/dn, E360d/dn, 12.7 mm (0.5 ...
...print cartridge 13.53 kg (29.77 lb) and photoconductor unit shipped with the printer E360d/E360dn E460dn 12.3 kg (27.06 lb) 12.5 kg (27.5 lb) E460dw 12.52 kg (27.54 lb) 13.83 kg (30.43 lb) 14.03 kg (30.87 lb) 14.05 kg (30.91 lb) Lexmark... amount is installed, allow enough room to the ADF paper support height on the X204n MFP. Environmental conditions Note: When shipping or storing printers, always pack the printer supplies (cartridges and photoconductors, for example) separately. Clearance requirements Model Left side Right side Front Rear Top E260, 260d/dn, E360d/dn, 12.7 mm (0.5 ...

Technical Reference
Page 50
... Scheduled X X maintenance ADF kit 35 Insufficient X X memory to support Resource Save feature 35 Res Save Off Deficient Memory 37 Insufficient X X Collation Area 36 Printer service X X required Empty Box M X X Empty Hole Punch X X Box Insert Box M X X Insert staple X X cartridge Insert Stapler X X Priming Failed, X X Retry. Go/Stop? 54 Network X X Software Error Appendix B: PJL support 50
... Scheduled X X maintenance ADF kit 35 Insufficient X X memory to support Resource Save feature 35 Res Save Off Deficient Memory 37 Insufficient X X Collation Area 36 Printer service X X required Empty Box M X X Empty Hole Punch X X Box Insert Box M X X Insert staple X X cartridge Insert Stapler X X Priming Failed, X X Retry. Go/Stop? 54 Network X X Software Error Appendix B: PJL support 50

Technical Reference
Page 53
...- 40038 Fuser Exhausted Intervention Required - 40038 Fuser Life Warning Intervention Required - 40038 Fuser Maintenance Intervention Required - 40038 ITU Maintenance Printer model Return string E260, E260d/dn, E360d/dn, E460dn/ X203n MFP, dw X204n MFP 80 Fuser/Belt Life X X ... disk Intervention Required - 40010 Insert Hole Punch X X Insert Hole Punch Box Box Intervention Required - 40010 Insert PC X X Insert PC Cartridge Cartridge Intervention Required - 40010 30 CMYK* Print X X 30 CMYK* Print Unit Unit Missing Missing * This message contains a subset of letters ...
...- 40038 Fuser Exhausted Intervention Required - 40038 Fuser Life Warning Intervention Required - 40038 Fuser Maintenance Intervention Required - 40038 ITU Maintenance Printer model Return string E260, E260d/dn, E360d/dn, E460dn/ X203n MFP, dw X204n MFP 80 Fuser/Belt Life X X ... disk Intervention Required - 40010 Insert Hole Punch X X Insert Hole Punch Box Box Intervention Required - 40010 Insert PC X X Insert PC Cartridge Cartridge Intervention Required - 40010 30 CMYK* Print X X 30 CMYK* Print Unit Unit Missing Missing * This message contains a subset of letters ...

Technical Reference
Page 54
... Required - 40020 Install MICR X X Install MICR cartridge cartridge Intervention Required - 40021 Cartridge Life X X Cartridge Life Expired Expired CMYK* Intervention Required - 40021 Cartridge Life X X Cartridge Life Warning Warning CMYK* Intervention Required - 40021 Change Cartridge X X Change Cartridge Invalid Invalid Refill Refill Intervention Required - 40021 Close Cover X X Close Cover Intervention Required - 40021 Close Cover X X Printer Cover Open Intervention Required - 40021 Close Cover...
... Required - 40020 Install MICR X X Install MICR cartridge cartridge Intervention Required - 40021 Cartridge Life X X Cartridge Life Expired Expired CMYK* Intervention Required - 40021 Cartridge Life X X Cartridge Life Warning Warning CMYK* Intervention Required - 40021 Change Cartridge X X Change Cartridge Invalid Invalid Refill Refill Intervention Required - 40021 Close Cover X X Close Cover Intervention Required - 40021 Close Cover X X Printer Cover Open Intervention Required - 40021 Close Cover...
Technical Reference
Page 55
... Intervention Required - 40021 Close Tray Top X X Close Tray Top Cover Cover Intervention Required - 40021 Cover Open, Close X X Printer Upper Door Open Top Covers, Close Door, or Insert Cartridge Intervention Required - 40021 Insert Print X X Insert Print Cartridge Cartridge Intervention Required - 40021 Open Cover X X Open Cover Intervention Required - 40021 Open Rear Door X X Open Rear Door Intervention...
... Intervention Required - 40021 Close Tray Top X X Close Tray Top Cover Cover Intervention Required - 40021 Cover Open, Close X X Printer Upper Door Open Top Covers, Close Door, or Insert Cartridge Intervention Required - 40021 Insert Print X X Insert Print Cartridge Cartridge Intervention Required - 40021 Open Cover X X Open Cover Intervention Required - 40021 Open Rear Door X X Open Rear Door Intervention...
Technical Reference
Page 56
... = Supported X = Not supported Printer model Message Status code Return string E260, E260d/dn, E360d/dn, E460dn/ X203n MFP, dw X204n MFP Intervention Required - 40021 31 Missing X X Missing Printhead Printhead Intervention Required - 40021 31 Replace X X Defective Print Cartridge defective cartridge Intervention Required - 40021 31.yy Invalid X X Invalid Refill refill, change cartridge Intervention Required - 40021 31...
... = Supported X = Not supported Printer model Message Status code Return string E260, E260d/dn, E360d/dn, E460dn/ X203n MFP, dw X204n MFP Intervention Required - 40021 31 Missing X X Missing Printhead Printhead Intervention Required - 40021 31 Replace X X Defective Print Cartridge defective cartridge Intervention Required - 40021 31.yy Invalid X X Invalid Refill refill, change cartridge Intervention Required - 40021 31...
Technical Reference
Page 57
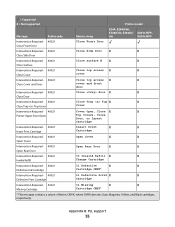
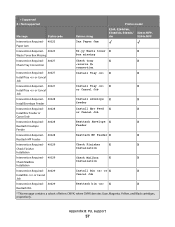
= Supported X = Not supported Printer model Message Status code Return string E260, E260d/dn, E360d/dn, E460dn/ X203n MFP, dw X204n MFP Intervention Required - 40022 Paper Jam 2xx Paper Jam ... Cancel Job Job Intervention Required - 40029 Reattach bin X X Reattach Bin * This message contains a subset of letters CMYK, where CMYK denotes Cyan, Magenta, Yellow, and Black cartridges, respectively. Appendix B: PJL support 57
= Supported X = Not supported Printer model Message Status code Return string E260, E260d/dn, E360d/dn, E460dn/ X203n MFP, dw X204n MFP Intervention Required - 40022 Paper Jam 2xx Paper Jam ... Cancel Job Job Intervention Required - 40029 Reattach bin X X Reattach Bin * This message contains a subset of letters CMYK, where CMYK denotes Cyan, Magenta, Yellow, and Black cartridges, respectively. Appendix B: PJL support 57

Technical Reference
Page 58
Appendix B: PJL support 58 = Supported X = Not supported Printer model Message Status code Return string E260, E260d/dn, E360d/dn, E460dn/ X203n MFP, dw X204n MFP Intervention Required - 40029 ...Kit Intervention Required - 40038 Replace PC Kit To X X Replace PC Kit To Continue Continue Intervention Required - 40038 Replace Toner X X Replace Toner Cartridge Cartridge Intervention Required - 40038 Replace Toner To X X Replace Toner Cartridge Continue To Continue * This message contains a subset of letters CMYK, where CMYK denotes Cyan, Magenta, Yellow, and Black...
Appendix B: PJL support 58 = Supported X = Not supported Printer model Message Status code Return string E260, E260d/dn, E360d/dn, E460dn/ X203n MFP, dw X204n MFP Intervention Required - 40029 ...Kit Intervention Required - 40038 Replace PC Kit To X X Replace PC Kit To Continue Continue Intervention Required - 40038 Replace Toner X X Replace Toner Cartridge Cartridge Intervention Required - 40038 Replace Toner To X X Replace Toner Cartridge Continue To Continue * This message contains a subset of letters CMYK, where CMYK denotes Cyan, Magenta, Yellow, and Black...

Technical Reference
Page 59
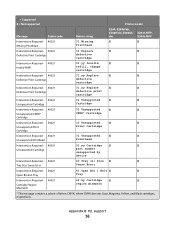
Appendix B: PJL support 59 = Supported X = Not supported Printer model Message Status code Return string E260, E260d/dn, E360d/dn, E460dn/ X203n MFP, dw X204n MFP Intervention Required - ... X 84 Color Photo Dev Life Life Warning Warning Intervention Required - 40038 88 Cartridge Low X X Cartridge Low Intervention Required - 40038 Cartridge Low 88 Cartridge is low Intervention Required - 40038 88 Cartridge low X X Toner Low Intervention Required - 40038 88 Cartridge X X Cartridge Low Low Intervention Required - 40038 88 Toner is low X X Toner Low Intervention...
Appendix B: PJL support 59 = Supported X = Not supported Printer model Message Status code Return string E260, E260d/dn, E360d/dn, E460dn/ X203n MFP, dw X204n MFP Intervention Required - ... X 84 Color Photo Dev Life Life Warning Warning Intervention Required - 40038 88 Cartridge Low X X Cartridge Low Intervention Required - 40038 Cartridge Low 88 Cartridge is low Intervention Required - 40038 88 Cartridge low X X Toner Low Intervention Required - 40038 88 Cartridge X X Cartridge Low Low Intervention Required - 40038 88 Toner is low X X Toner Low Intervention...
Technical Reference
Page 60
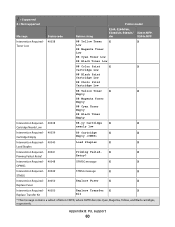
...Printer model Message Status code Return string E260, E260d/dn, E360d/dn, E460dn/ X203n MFP, dw X204n MFP Intervention Required - 40038 88 Yellow Toner X X Toner Low Low 88 Magenta Toner Low 88 Cyan Toner Low 88 Black Toner Low 88 Color Print X X Cartridge Low 88 Black Print Cartridge... 88 Cyan Toner Empty 88 Black Toner Empty Intervention Required - 40038 88.yy Cartridge X X Cartridge Nearly Low nearly low Intervention Required - 40039 89 Cartridge X X Cartridge Empty Empty Intervention Required - 40040 Load Staples X X Load Staples Intervention Required...
...Printer model Message Status code Return string E260, E260d/dn, E360d/dn, E460dn/ X203n MFP, dw X204n MFP Intervention Required - 40038 88 Yellow Toner X X Toner Low Low 88 Magenta Toner Low 88 Cyan Toner Low 88 Black Toner Low 88 Color Print X X Cartridge Low 88 Black Print Cartridge... 88 Cyan Toner Empty 88 Black Toner Empty Intervention Required - 40038 88.yy Cartridge X X Cartridge Nearly Low nearly low Intervention Required - 40039 89 Cartridge X X Cartridge Empty Empty Intervention Required - 40040 Load Staples X X Load Staples Intervention Required...


