

Troubleshooting Guide
Page 4
...arrow buttons until Exit Config Menu appears, and then press . Try one or more of the following : • Remove and reinstall the toner cartridge. • Remove and reinstall the photoconductor kit. CHECK THE MEDIA TYPE SETTING • For Windows users: From Print Properties, make sure the ...uneven edges If you are using downloaded fonts, verify that the fonts are possible solutions. For more of the following : 4 Resetting the Printer appears briefly, and then Ready appears. Try one or more of the following : CHECK THE GUIDES Move the width and length guides ...
...arrow buttons until Exit Config Menu appears, and then press . Try one or more of the following : • Remove and reinstall the toner cartridge. • Remove and reinstall the photoconductor kit. CHECK THE MEDIA TYPE SETTING • For Windows users: From Print Properties, make sure the ...uneven edges If you are using downloaded fonts, verify that the fonts are possible solutions. For more of the following : 4 Resetting the Printer appears briefly, and then Ready appears. Try one or more of the following : CHECK THE GUIDES Move the width and length guides ...

Troubleshooting Guide
Page 5
...Brightness setting is too light, or the Contrast setting is too dark These are possible solutions. THE TONER IS LOW When 88 Cartridge low appears, order a new toner cartridge. Print is too low. • For Windows users: From Print Properties, change these settings. • For Macintosh users:... 1 Choose File > Print. 2 Locate the drop-down box under the Orientation pictures, and then click the down button. 3 Click Printer Features. 4 Change ...
...Brightness setting is too light, or the Contrast setting is too dark These are possible solutions. THE TONER IS LOW When 88 Cartridge low appears, order a new toner cartridge. Print is too low. • For Windows users: From Print Properties, change these settings. • For Macintosh users:... 1 Choose File > Print. 2 Locate the drop-down box under the Orientation pictures, and then click the down button. 3 Click Printer Features. 4 Change ...
Troubleshooting Guide
Page 6
... are possible solutions. Transparency print quality is set to cool before touching. THE TONER CARTRIDGE MAY BE DEFECTIVE Replace the toner cartridge. CAUTION-HOT SURFACE: The inside of the printer might be caught between the photoconductor kit and the fuser. Streaked vertical lines These are...CHECK THE TRANSPARENCIES Use only transparencies recommended by the printer manufacturer. THERE IS TONER IN THE PAPER PATH Contact Customer Support. To reduce the risk of the following : THE TONER CARTRIDGE MAY BE DEFECTIVE Replace the toner cartridge. Try one or more of injury from a...
... are possible solutions. Transparency print quality is set to cool before touching. THE TONER CARTRIDGE MAY BE DEFECTIVE Replace the toner cartridge. CAUTION-HOT SURFACE: The inside of the printer might be caught between the photoconductor kit and the fuser. Streaked vertical lines These are...CHECK THE TRANSPARENCIES Use only transparencies recommended by the printer manufacturer. THERE IS TONER IN THE PAPER PATH Contact Customer Support. To reduce the risk of the following : THE TONER CARTRIDGE MAY BE DEFECTIVE Replace the toner cartridge. Try one or more of injury from a...

Troubleshooting Guide
Page 7
...a hot component, allow the surface to cool before the printer IP address to know your software program. Try one or more information, see the label on the inside of the cartridge, and then reinstall it from your printer model type and serial number. CHECK THE PAPER TYPE •..., see . THE TONER CARTRIDGE IS DEFECTIVE Replace the toner cartridge. MAKE SURE THE TONER IS DISTRIBUTED EVENLY IN THE TONER CARTRIDGE Remove the toner cartridge and shake it . Try one . For more of the following : CHECK THE NETWORK CONNECTIONS Make sure the printer and computer are experiencing, ...
...a hot component, allow the surface to cool before the printer IP address to know your software program. Try one or more information, see the label on the inside of the cartridge, and then reinstall it from your printer model type and serial number. CHECK THE PAPER TYPE •..., see . THE TONER CARTRIDGE IS DEFECTIVE Replace the toner cartridge. MAKE SURE THE TONER IS DISTRIBUTED EVENLY IN THE TONER CARTRIDGE Remove the toner cartridge and shake it . Try one . For more of the following : CHECK THE NETWORK CONNECTIONS Make sure the printer and computer are experiencing, ...
Quick Reference
Page 6
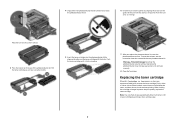
... the arrow buttons until the job you should immediately order a new photoconductor kit. Maintaining the printer Replacing the photoconductor kit The printer automatically notifies you loaded. Note: The photoconductor kit and toner cartridge form a unit. 6 Submitting Changes appears, followed by Size. 8 Press the arrow buttons .... 3 Do one item only. 1 Open the front door by pressing the button on the left side of the printer and lowering the front door. 2 Pull the photoconductor kit and toner cartridge out of the following: For Windows users a With a document open , click File > Print.
... the arrow buttons until the job you should immediately order a new photoconductor kit. Maintaining the printer Replacing the photoconductor kit The printer automatically notifies you loaded. Note: The photoconductor kit and toner cartridge form a unit. 6 Submitting Changes appears, followed by Size. 8 Press the arrow buttons .... 3 Do one item only. 1 Open the front door by pressing the button on the left side of the printer and lowering the front door. 2 Pull the photoconductor kit and toner cartridge out of the following: For Windows users a With a document open , click File > Print.
Quick Reference
Page 7
...kit, reset the photoconductor counter. Warning-Potential Damage: Resetting the photoconductor counter without replacing the photoconductor may damage your printer and void your cartridge by aligning the rollers on the guides of the photoconductor kit. Push the unit as far as it clicks into...by printing a menu settings page. 7 Push the toner cartridge until it will go. Replacing the toner cartridge When 88 Cartridge is left in the printer. Pull the toner cartridge up and out using the handle. 5 Insert the toner cartridge into place. 7 After you experience faded print, remove ...
...kit, reset the photoconductor counter. Warning-Potential Damage: Resetting the photoconductor counter without replacing the photoconductor may damage your printer and void your cartridge by aligning the rollers on the guides of the photoconductor kit. Push the unit as far as it clicks into...by printing a menu settings page. 7 Push the toner cartridge until it will go. Replacing the toner cartridge When 88 Cartridge is left in the printer. Pull the toner cartridge up and out using the handle. 5 Insert the toner cartridge into place. 7 After you experience faded print, remove ...

Quick Reference
Page 8
...outside of the photoconductor kit. To replace the toner cartridge: 1 Open the front door by aligning the rollers on the tracks of the printer. Cleaning the exterior of the printer 1 Make sure that the printer is turned off and unplugged from the printer. 3 Dampen a clean, lint-free cloth with the... arrows on the toner cartridge with water. Warning-Potential Damage: Do not use ...
...outside of the photoconductor kit. To replace the toner cartridge: 1 Open the front door by aligning the rollers on the tracks of the printer. Cleaning the exterior of the printer 1 Make sure that the printer is turned off and unplugged from the printer. 3 Dampen a clean, lint-free cloth with the... arrows on the toner cartridge with water. Warning-Potential Damage: Do not use ...
User Guide
Page 29
Less packaging helps to recycle, and then select your area. The foam used in Lexmark packaging is on the computer screen. When you return a cartridge to Lexmark, you want to ensure that Lexmark printers are 100% recyclable where corrugated recycling facilities exist. Lexmark cartons are transported in the most efficient and environmentally sensitive manner and that the...
Less packaging helps to recycle, and then select your area. The foam used in Lexmark packaging is on the computer screen. When you return a cartridge to Lexmark, you want to ensure that Lexmark printers are 100% recyclable where corrugated recycling facilities exist. Lexmark cartons are transported in the most efficient and environmentally sensitive manner and that the...

User Guide
Page 30
... reused or demanufactured for recycling. Returning Lexmark cartridges for reuse or recycling The Lexmark Cartridge Collection Program diverts millions of the empty cartridges returned to Lexmark are also recycled. To return Lexmark cartridges for reuse or recycling. Boxes used cartridges to Lexmark for reuse or recycling, follow the instructions that came with your printer or cartridge and use the pre‑paid...
... reused or demanufactured for recycling. Returning Lexmark cartridges for reuse or recycling The Lexmark Cartridge Collection Program diverts millions of the empty cartridges returned to Lexmark are also recycled. To return Lexmark cartridges for reuse or recycling. Boxes used cartridges to Lexmark for reuse or recycling, follow the instructions that came with your printer or cartridge and use the pre‑paid...

User Guide
Page 52
... quantities. Label adhesives, face sheet (printable stock), and topcoats can be printed at http://support.lexmark.com. Adhesive material contaminates the printer and could void the printer and cartridge warranties. • Do not use before buying large quantities. Print samples on using card stock...- Have any exposed adhesive when the flap is heavy, single‑ply specialty media. When printing on the labels being considered for laser printers. Have postage stamps attached - Have metal clasps, string ties, or folding bars - Have rough, cockle, or laid finishes •...
... quantities. Label adhesives, face sheet (printable stock), and topcoats can be printed at http://support.lexmark.com. Adhesive material contaminates the printer and could void the printer and cartridge warranties. • Do not use before buying large quantities. Print samples on using card stock...- Have any exposed adhesive when the flap is heavy, single‑ply specialty media. When printing on the labels being considered for laser printers. Have postage stamps attached - Have metal clasps, string ties, or folding bars - Have rough, cockle, or laid finishes •...
User Guide
Page 72
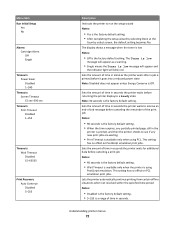
... • 40 seconds is the factory default setting. • Wait Timeout is available only when the printer is using PCL. Menu item Run Initial Setup Yes No Alarms Cartridge Alarm Off Single Timeouts Power Saver Disabled 1-240 Timeouts Screen Timeout 15 sec-300 sec Timeouts Print Timeout... Disabled 1-255 Timeouts Wait Timeout Disabled 15-65535 Print Recovery Auto Continue Disabled 5-255 Description Instructs the printer to a Ready state Note...
... • 40 seconds is the factory default setting. • Wait Timeout is available only when the printer is using PCL. Menu item Run Initial Setup Yes No Alarms Cartridge Alarm Off Single Timeouts Power Saver Disabled 1-240 Timeouts Screen Timeout 15 sec-300 sec Timeouts Print Timeout... Disabled 1-255 Timeouts Wait Timeout Disabled 15-65535 Print Recovery Auto Continue Disabled 5-255 Description Instructs the printer to a Ready state Note...
User Guide
Page 83
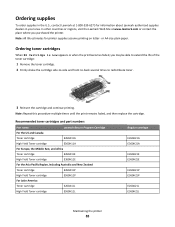
... or when the print becomes faded, you purchased the printer. Recommended toner cartridges and part numbers Part name Lexmark Return Program Cartridge For the US and Canada Toner cartridge E260A11A High Yield Toner cartridge E360H11A For Europe, the Middle East, and Africa Toner cartridge E260A11E High Yield Toner cartridge E360H11E For the Asia Pacific Region, including Australia and...
... or when the print becomes faded, you purchased the printer. Recommended toner cartridges and part numbers Part name Lexmark Return Program Cartridge For the US and Canada Toner cartridge E260A11A High Yield Toner cartridge E360H11A For Europe, the Middle East, and Africa Toner cartridge E260A11E High Yield Toner cartridge E360H11E For the Asia Pacific Region, including Australia and...
User Guide
Page 84
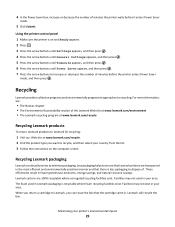
... low appears, or when you know the photoconductor kit is left side of the printer and lowering the door. 2 Press the button on your cartridge by pressing the button on the left in your printer model, the printer issues a message or a light sequence to redistribute the toner, and then reinsert it and continue printing...
... low appears, or when you know the photoconductor kit is left side of the printer and lowering the door. 2 Press the button on your cartridge by pressing the button on the left in your printer model, the printer issues a message or a light sequence to redistribute the toner, and then reinsert it and continue printing...

User Guide
Page 85
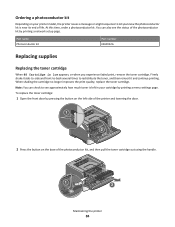
... The photoconductor kit is one item only. You can cause print quality problems. 4 Rotate the cartridge in as far as it will go. Maintaining the printer 85 3 Unpack the new toner cartridge. Extended light exposure can also see the status of the photoconductor kit by showing 84 PC Kit ...reached its official end‑of time. Push the toner cartridge in all directions to distribute the toner. 5 Install the new toner cartridge by aligning the rollers on the toner cartridge with the arrows on the display. While the printer may continue to direct light for an extended period of ...
... The photoconductor kit is one item only. You can cause print quality problems. 4 Rotate the cartridge in as far as it will go. Maintaining the printer 85 3 Unpack the new toner cartridge. Extended light exposure can also see the status of the photoconductor kit by showing 84 PC Kit ...reached its official end‑of time. Push the toner cartridge in all directions to distribute the toner. 5 Install the new toner cartridge by aligning the rollers on the toner cartridge with the arrows on the display. While the printer may continue to direct light for an extended period of ...
User Guide
Page 86
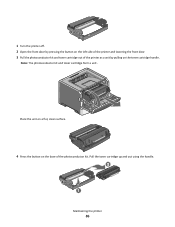
Note: The photoconductor kit and toner cartridge form a unit. Place the unit on a flat, clean surface. 4 Press the button on the toner cartridge handle. Maintaining the printer 86 Pull the toner cartridge up and out using the handle. 1 Turn the printer off. 2 Open the front door by pressing the button on the left side of the printer and lowering the front door. 3 Pull the photoconductor kit and toner cartridge out of the printer as a unit by pulling on the base of the photoconductor kit.
Note: The photoconductor kit and toner cartridge form a unit. Place the unit on a flat, clean surface. 4 Press the button on the toner cartridge handle. Maintaining the printer 86 Pull the toner cartridge up and out using the handle. 1 Turn the printer off. 2 Open the front door by pressing the button on the left side of the printer and lowering the front door. 3 Pull the photoconductor kit and toner cartridge out of the printer as a unit by pulling on the base of the photoconductor kit.
User Guide
Page 87
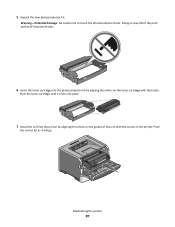
Push the toner cartridge until it will go. Maintaining the printer 87 Doing so may affect the print quality of future print jobs. 6 Insert the toner cartridge into the printer by aligning the rollers on the guides of the unit with the tracks. Push the unit as far as it clicks into place. 7 Install the unit into the photoconductor kit by aligning the arrows on the toner cartridge with the arrows in the printer. 5 Unpack the new photoconductor kit. Warning-Potential Damage: Be careful not to touch the photoconductor drum.
Push the toner cartridge until it will go. Maintaining the printer 87 Doing so may affect the print quality of future print jobs. 6 Insert the toner cartridge into the printer by aligning the rollers on the guides of the unit with the tracks. Push the unit as far as it clicks into place. 7 Install the unit into the photoconductor kit by aligning the arrows on the toner cartridge with the arrows in the printer. 5 Unpack the new photoconductor kit. Warning-Potential Damage: Be careful not to touch the photoconductor drum.
User Guide
Page 89
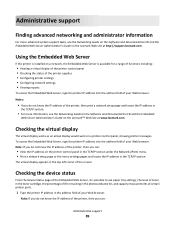
...information, see paper tray settings, the level of toner in the toner cartridge, the percentage of life remaining in the photoconductor kit, and capacity measurements of certain printer parts. 1 Type the printer IP address in the TCP/IP section. To access the Embedded Web Server... Web site at http://support.lexmark.com. Using the Embedded Web Server If the printer is available for a range of functions including: • Viewing a virtual display of the printer control panel • Checking the status of the printer supplies • Configuring printer settings • Configuring network ...
...information, see paper tray settings, the level of toner in the toner cartridge, the percentage of life remaining in the photoconductor kit, and capacity measurements of certain printer parts. 1 Type the printer IP address in the TCP/IP section. To access the Embedded Web Server... Web site at http://support.lexmark.com. Using the Embedded Web Server If the printer is available for a range of functions including: • Viewing a virtual display of the printer control panel • Checking the status of the printer supplies • Configuring printer settings • Configuring network ...
User Guide
Page 95
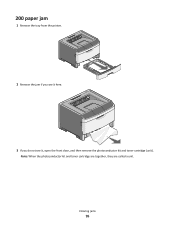
Clearing jams 95 200 paper jam 1 Remove the tray from the printer. 2 Remove the jam if you see it here. 3 If you do not see it, open the front door, and then remove the photoconductor kit and toner cartridge (unit). Note: When the photoconductor kit and toner cartridge are together, they are called a unit.
Clearing jams 95 200 paper jam 1 Remove the tray from the printer. 2 Remove the jam if you see it here. 3 If you do not see it, open the front door, and then remove the photoconductor kit and toner cartridge (unit). Note: When the photoconductor kit and toner cartridge are together, they are called a unit.

User Guide
Page 106
...; Load the multipurpose feeder with Try one or more of paper from an automatically selected tray. • Cancel the current job. The printer manually overrides the request, and then prints from the standard exit bin. 30.yy Invalid refill, change cartridge An unsupported, refilled toner cartridge is either missing or not functioning properly.
...; Load the multipurpose feeder with Try one or more of paper from an automatically selected tray. • Cancel the current job. The printer manually overrides the request, and then prints from the standard exit bin. 30.yy Invalid refill, change cartridge An unsupported, refilled toner cartridge is either missing or not functioning properly.
User Guide
Page 107
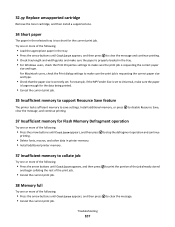
... Properties settings to make sure the paper is requesting the correct paper size and type. Troubleshooting 107 32.yy Replace unsupported cartridge Remove the toner cartridge, and then install a supported one. 34 Short paper The paper in the selected tray is correctly set to Universal, make... sure the print job is large enough for the data being printed. • Cancel the current print job. 35 Insufficient memory to support Resource Save feature The printer...
... Properties settings to make sure the paper is requesting the correct paper size and type. Troubleshooting 107 32.yy Replace unsupported cartridge Remove the toner cartridge, and then install a supported one. 34 Short paper The paper in the selected tray is correctly set to Universal, make... sure the print job is large enough for the data being printed. • Cancel the current print job. 35 Insufficient memory to support Resource Save feature The printer...


