

Troubleshooting Guide
Page 1
...bin. Try one or more information, contact the place where you want to print. CHANGE THE PAGE PROTECT SETTING TO OFF 1 From the printer control panel, press . 2 Press the arrow buttons until Settings appears, and then press . 3 Press the arrow buttons until General Settings ... Page Protect appears, and then press . 6 Press the arrow buttons until Off appears, and then press . Lexmark™ E360 Troubleshooting Guide Troubleshooting Solving basic printer problems If there are possible solutions. This often fixes the problem. Multiple-language PDFs do not print These are ...
...bin. Try one or more information, contact the place where you want to print. CHANGE THE PAGE PROTECT SETTING TO OFF 1 From the printer control panel, press . 2 Press the arrow buttons until Settings appears, and then press . 3 Press the arrow buttons until General Settings ... Page Protect appears, and then press . 6 Press the arrow buttons until Off appears, and then press . Lexmark™ E360 Troubleshooting Guide Troubleshooting Solving basic printer problems If there are possible solutions. This often fixes the problem. Multiple-language PDFs do not print These are ...

Troubleshooting Guide
Page 2
.... Try one or more of the paper sources, trays, or feeders automatically sense the paper size. MAKE SURE THE PRINTER HAS ENOUGH MEMORY Add printer memory. Solving option problems Option does not operate correctly or quits after it . Note: Setting Collate to Off in ... tray. 2 If necessary, adjust the settings from the Paper Size/Type menu. Unexpected page breaks occur Increase the Print Timeout value: 1 From the printer control panel, press . 2 Press the arrow buttons until Settings appears, and then press . 3 Press the arrow buttons until General Settings appears, and...
.... Try one or more of the paper sources, trays, or feeders automatically sense the paper size. MAKE SURE THE PRINTER HAS ENOUGH MEMORY Add printer memory. Solving option problems Option does not operate correctly or quits after it . Note: Setting Collate to Off in ... tray. 2 If necessary, adjust the settings from the Paper Size/Type menu. Unexpected page breaks occur Increase the Print Timeout value: 1 From the printer control panel, press . 2 Press the arrow buttons until Settings appears, and then press . 3 Press the arrow buttons until General Settings appears, and...

Troubleshooting Guide
Page 3
... Guide. MAKE SURE THERE IS NOT TOO MUCH PAPER IN THE TRAY OR FEEDER Make sure the stack of the following topics may have a printer part that jammed does not reprint after jam is cleared The paper path is not clear. or A4-size paper in its original wrapper until... the recommended print side facedown. Set Jam Recovery to the correct positions for the paper size loaded. Print the print quality test pages: 1 Turn the printer off . 2 Load letter- For more of paper you . Page that requires adjustment or replacement. Do not overfill the tray. THE PAPER ABSORBED MOISTURE DUE...
... Guide. MAKE SURE THERE IS NOT TOO MUCH PAPER IN THE TRAY OR FEEDER Make sure the stack of the following topics may have a printer part that jammed does not reprint after jam is cleared The paper path is not clear. or A4-size paper in its original wrapper until... the recommended print side facedown. Set Jam Recovery to the correct positions for the paper size loaded. Print the print quality test pages: 1 Turn the printer off . 2 Load letter- For more of paper you . Page that requires adjustment or replacement. Do not overfill the tray. THE PAPER ABSORBED MOISTURE DUE...

Troubleshooting Guide
Page 4
... • For Macintosh users: From the Print dialog, make sure the Paper Type setting matches the paper loaded in the tray. • From the printer control panel Paper menu, make sure the Paper Type setting matches the paper loaded in the tray. For more of the following : CHECK THE GUIDES... page size in the tray. CHECK THE PAGE SIZE SETTING Before sending the job to the correct positions for the paper size loaded. Resetting the Printer appears briefly, and then Ready appears. Try one or more of the following : 4 Ghost images These are possible solutions. The print quality test pages...
... • For Macintosh users: From the Print dialog, make sure the Paper Type setting matches the paper loaded in the tray. • From the printer control panel Paper menu, make sure the Paper Type setting matches the paper loaded in the tray. For more of the following : CHECK THE GUIDES... page size in the tray. CHECK THE PAGE SIZE SETTING Before sending the job to the correct positions for the paper size loaded. Resetting the Printer appears briefly, and then Ready appears. Try one or more of the following : 4 Ghost images These are possible solutions. The print quality test pages...

Troubleshooting Guide
Page 5
.... • For Macintosh users: From the Print dialog, make sure the Paper Type setting matches the paper loaded in the tray. • From the printer control panel Paper menu, make sure the Paper Type setting matches the paper loaded in its original wrapper until you use it . CHECK THE PAPER.... • For Macintosh users: From the Print dialog, make sure the Paper Type setting matches the paper loaded in the tray. • From the printer control panel Paper menu, make sure the Paper Type setting matches the paper loaded in the tray. Paper curl These are possible solutions. Try one...
.... • For Macintosh users: From the Print dialog, make sure the Paper Type setting matches the paper loaded in the tray. • From the printer control panel Paper menu, make sure the Paper Type setting matches the paper loaded in its original wrapper until you use it . CHECK THE PAPER.... • For Macintosh users: From the Print dialog, make sure the Paper Type setting matches the paper loaded in the tray. • From the printer control panel Paper menu, make sure the Paper Type setting matches the paper loaded in the tray. Paper curl These are possible solutions. Try one...
Troubleshooting Guide
Page 6
...more of the following : THE TONER MAY SMEAR WHEN PAPER IS FED FROM A SPECIFIC SOURCE From Print Properties, the Print dialog, or the printer control panel, select another tray or feeder to feed paper for the job. CAUTION-HOT SURFACE: The inside of the following : THE TONER ...PATH Contact Customer Support. Toner specks These are possible solutions. Streaked horizontal lines These are possible solutions. Try one or more of the printer might be caught between the photoconductor kit and the fuser. CHECK THE PAPER TEXTURE SETTING Make sure the Paper Texture setting matches the paper...
...more of the following : THE TONER MAY SMEAR WHEN PAPER IS FED FROM A SPECIFIC SOURCE From Print Properties, the Print dialog, or the printer control panel, select another tray or feeder to feed paper for the job. CAUTION-HOT SURFACE: The inside of the following : THE TONER ...PATH Contact Customer Support. Toner specks These are possible solutions. Streaked horizontal lines These are possible solutions. Try one or more of the printer might be caught between the photoconductor kit and the fuser. CHECK THE PAPER TEXTURE SETTING Make sure the Paper Texture setting matches the paper...

Troubleshooting Guide
Page 7
...or white streaks appear on the menu settings page. Try one or more of the following : CHECK THE NETWORK CONNECTIONS Make sure the printer and computer are experiencing, the message on the underside of the photoconductor kit. Embedded Web Server does not open These are holding the cartridge... Support. Try one or more of the cartridge, and then reinstall it from a hot component, allow the surface to cool before the printer IP address to the same network. Clear any paper you purchased your system administrator. Use the cartridge handle whenever you are turned on the...
...or white streaks appear on the menu settings page. Try one or more of the following : CHECK THE NETWORK CONNECTIONS Make sure the printer and computer are experiencing, the message on the underside of the photoconductor kit. Embedded Web Server does not open These are holding the cartridge... Support. Try one or more of the cartridge, and then reinstall it from a hot component, allow the surface to cool before the printer IP address to the same network. Clear any paper you purchased your system administrator. Use the cartridge handle whenever you are turned on the...
Quick Reference
Page 1
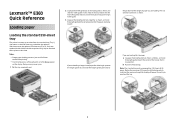
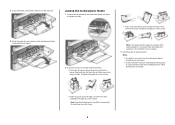
... backwards as the 250-sheet tray, and either the optional 250-sheet tray or the optional 550-sheet tray (Tray 2). Do not try to the printer at one optional drawer (which indicates the maximum height for the length of the tray to select from: the standard tray (Tray 1), also known as... shown. Only one time. the position for loading A6 paper. Lexmark™ E360 Quick Reference Loading paper Loading the standard 250-sheet tray The printer has two trays to the A5 size position.
... backwards as the 250-sheet tray, and either the optional 250-sheet tray or the optional 550-sheet tray (Tray 2). Do not try to the printer at one optional drawer (which indicates the maximum height for the length of the tray to select from: the standard tray (Tray 1), also known as... shown. Only one time. the position for loading A6 paper. Lexmark™ E360 Quick Reference Loading paper Loading the standard 250-sheet tray The printer has two trays to the A5 size position.
Quick Reference
Page 2
... maximum height for your country or region. 4 Flex the sheets back and forth to adjust the length guide specifically created for the tray from the printer control panel. Do not fold or crease the paper. Do not load A6 paper to overload the tray. Note: Notice the maximum fill line on...
... maximum height for your country or region. 4 Flex the sheets back and forth to adjust the length guide specifically created for the tray from the printer control panel. Do not fold or crease the paper. Do not load A6 paper to overload the tray. Note: Notice the maximum fill line on...
Quick Reference
Page 3
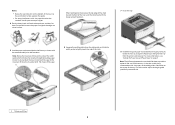
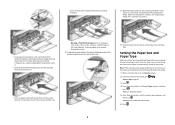
Using the multipurpose feeder You may want to the printer at a time. Loading the optional 250- or 550-sheet tray Only one optional drawer, which includes either a 250- Regardless of the number of papers or ...
Using the multipurpose feeder You may want to the printer at a time. Loading the optional 250- or 550-sheet tray Only one optional drawer, which includes either a 250- Regardless of the number of papers or ...
Quick Reference
Page 4
Do not fold or crease the paper or labels. Straighten the edges on a level surface. Be careful not to loosen them, and then fan them . 4 Straighten the edges on a level surface. Overfilling may cause jams. • Do not exceed the maximum stack height by forcing paper or specialty media under the stack height limiters which are located on the right width guide, and move the guides out fully. • Flex a stack of paper or paper labels back and forth to scratch them . Notes: • Do not force any paper into the multipurpose feeder. Note: Avoid touching the print ...
Do not fold or crease the paper or labels. Straighten the edges on a level surface. Be careful not to loosen them, and then fan them . 4 Straighten the edges on a level surface. Overfilling may cause jams. • Do not exceed the maximum stack height by forcing paper or specialty media under the stack height limiters which are located on the right width guide, and move the guides out fully. • Flex a stack of paper or paper labels back and forth to scratch them . Notes: • Do not force any paper into the multipurpose feeder. Note: Avoid touching the print ...
Quick Reference
Page 5
...stick adhesives. Setting the Paper Size and Paper Type After you set the Paper Size and Paper Type. These envelopes may severely damage the printer. 4 Squeeze the tab located on loading transparencies, see the packaging the transparencies came in. • Load letterhead with the logo faceup and... the top edge entering the printer first. • Load envelopes with the flap side down and the stamp location in the multipurpose feeder and is on and Ready appears. ...
...stick adhesives. Setting the Paper Size and Paper Type After you set the Paper Size and Paper Type. These envelopes may severely damage the printer. 4 Squeeze the tab located on loading transparencies, see the packaging the transparencies came in. • Load letterhead with the logo faceup and... the top edge entering the printer first. • Load envelopes with the flap side down and the stamp location in the multipurpose feeder and is on and Ready appears. ...
Quick Reference
Page 6
... the correct type appears, and then press . You can also see more options. 2 From the print options or Copies & Pages pop-up menu, choose Printer Features. 3 From the Feature Sets pop-up menu, choose Paper. 4 From the Paper type pop-up menu, choose a paper type. 5 Click Print....the display. b Customize the settings as needed in the Print dialog: 1 With a document open, click File > Print. Canceling a print job from the printer control panel If the job is one of -life, print quality significantly decreases. For Macintosh users In Mac OS X: a Customize the settings as a unit ...
... the correct type appears, and then press . You can also see more options. 2 From the print options or Copies & Pages pop-up menu, choose Printer Features. 3 From the Feature Sets pop-up menu, choose Paper. 4 From the Paper type pop-up menu, choose a paper type. 5 Click Print....the display. b Customize the settings as needed in the Print dialog: 1 With a document open, click File > Print. Canceling a print job from the printer control panel If the job is one of -life, print quality significantly decreases. For Macintosh users In Mac OS X: a Customize the settings as a unit ...
Quick Reference
Page 7
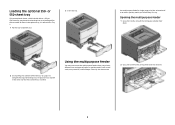
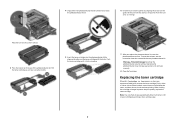
... by aligning the rollers on the toner cartridge with the new photoconductor kit. Replacing the toner cartridge When 88 Cartridge is left in the printer. Note: You can check to redistribute the toner, and then reinsert it side-to-side and front-to-back several times to see... 3 Press the button on the guides of the photoconductor kit. Warning-Potential Damage: Resetting the photoconductor counter without replacing the photoconductor may damage your printer and void your cartridge by aligning the arrows on the base of the unit with the arrows in your warranty. 8 Close the front door. ...
... by aligning the rollers on the toner cartridge with the new photoconductor kit. Replacing the toner cartridge When 88 Cartridge is left in the printer. Note: You can check to redistribute the toner, and then reinsert it side-to-side and front-to-back several times to see... 3 Press the button on the guides of the photoconductor kit. Warning-Potential Damage: Resetting the photoconductor counter without replacing the photoconductor may damage your printer and void your cartridge by aligning the arrows on the base of the unit with the arrows in your warranty. 8 Close the front door. ...

Quick Reference
Page 8
... place when correctly installed. Warning-Potential Damage: When replacing a toner cartridge, do not leave the new cartridge exposed to your printer. 5 Make sure all areas of the printer are dry before proceeding. 2 Remove all paper from the wall outlet. Warning-Potential Damage: Do not use household cleaners or ... 6 Close the front door. 8 To replace the toner cartridge: 1 Open the front door by pressing the button on the left side of the printer and lowering the door. 2 Press the button on the base of the photoconductor kit, and then pull the toner cartridge out using the handle. 4...
... place when correctly installed. Warning-Potential Damage: When replacing a toner cartridge, do not leave the new cartridge exposed to your printer. 5 Make sure all areas of the printer are dry before proceeding. 2 Remove all paper from the wall outlet. Warning-Potential Damage: Do not use household cleaners or ... 6 Close the front door. 8 To replace the toner cartridge: 1 Open the front door by pressing the button on the left side of the printer and lowering the door. 2 Press the button on the base of the photoconductor kit, and then pull the toner cartridge out using the handle. 4...

User Guide
Page 1
Lexmark E360d and E360dn Series User's Guide August 2011 Machine type(s): 4513 Model(s): 420, 430 www.lexmark.com
Lexmark E360d and E360dn Series User's Guide August 2011 Machine type(s): 4513 Model(s): 420, 430 www.lexmark.com
User Guide
Page 2
... you for choosing this printer!...7 Finding information about the printer...7 Selecting a location for the printer...8 Printer configurations...9 Using the standard exit bin and paper stop 12 Additional printer setup 14 Installing internal options...14 Installing hardware options...19 Attaching cables...22 Verifying printer setup...23 Setting up the printer software...23 Minimizing your printer's environmental impact 26 Saving...
... you for choosing this printer!...7 Finding information about the printer...7 Selecting a location for the printer...8 Printer configurations...9 Using the standard exit bin and paper stop 12 Additional printer setup 14 Installing internal options...14 Installing hardware options...19 Attaching cables...22 Verifying printer setup...23 Setting up the printer software...23 Minimizing your printer's environmental impact 26 Saving...
User Guide
Page 3
...supplies...82 Checking the status of supplies from a network computer 82 Ordering supplies...83 Replacing supplies...84 Moving the printer...88 Administrative support 89 Finding advanced networking and administrator information 89 Using the Embedded Web Server...89 Checking the virtual...89 Checking the device status...89 Viewing reports...90 Setting up e‑mail alerts...90 Configuring supply notifications...90 Copying printer settings to other printers 91 Restoring the factory default settings...91 Clearing jams 92 Avoiding jams...92 Identifying jams in the paper path...93 Understanding...
...supplies...82 Checking the status of supplies from a network computer 82 Ordering supplies...83 Replacing supplies...84 Moving the printer...88 Administrative support 89 Finding advanced networking and administrator information 89 Using the Embedded Web Server...89 Checking the virtual...89 Checking the device status...89 Viewing reports...90 Setting up e‑mail alerts...90 Configuring supply notifications...90 Copying printer settings to other printers 91 Restoring the factory default settings...91 Clearing jams 92 Avoiding jams...92 Identifying jams in the paper path...93 Understanding...
User Guide
Page 4
... paper jam...101 234 paper jam...101 235 paper jam...102 24x paper jam...102 251 paper jam...103 Troubleshooting 105 Understanding printer messages...105 Solving basic printer problems...110 Printer control panel display is blank or displays only diamonds 110 Solving printing problems...111 Solving option problems...113 Solving paper feed problems...
... paper jam...101 234 paper jam...101 235 paper jam...102 24x paper jam...102 251 paper jam...103 Troubleshooting 105 Understanding printer messages...105 Solving basic printer problems...110 Printer control panel display is blank or displays only diamonds 110 Solving printing problems...111 Solving option problems...113 Solving paper feed problems...
User Guide
Page 5
...and requires two or more trained personnel to move it safely. To reduce the risk of injury from the printer before proceeding. CAUTION-POTENTIAL INJURY: This product uses a laser. You must understand the section in the user documentation, to a professional service person. CAUTION-SHOCK HAZARD:... To avoid the risk of electric shock when cleaning the exterior of the printer, unplug the power cord from the wall ...
...and requires two or more trained personnel to move it safely. To reduce the risk of injury from the printer before proceeding. CAUTION-POTENTIAL INJURY: This product uses a laser. You must understand the section in the user documentation, to a professional service person. CAUTION-SHOCK HAZARD:... To avoid the risk of electric shock when cleaning the exterior of the printer, unplug the power cord from the wall ...