
Quick Reference
Page 2
... Paper Menu Paper Source Paper Size Paper Type Custom Types Universal Setup Output Bin Configure Bins Overflow Bin Assign Type/Bin Substitute Size Configure MP Envelope Enhance Paper Texture Paper Weight Paper Loading Finishing Menu Duplex Duplex Bind Copies Blank Pages Collation Separator Sheets Separator Source Multipage Print Multipage Order Multipage View Multipage Border Staple Job Staple Prime Src Offset Pages Utilities Menu Print Menus Print Net Setup Print Fonts Print Directory Factory Defaults Format Flash Defragment Flash Format Disk Job Acct Stat Hex Trace Page 2 of 8 Job Menu...
... Paper Menu Paper Source Paper Size Paper Type Custom Types Universal Setup Output Bin Configure Bins Overflow Bin Assign Type/Bin Substitute Size Configure MP Envelope Enhance Paper Texture Paper Weight Paper Loading Finishing Menu Duplex Duplex Bind Copies Blank Pages Collation Separator Sheets Separator Source Multipage Print Multipage Order Multipage View Multipage Border Staple Job Staple Prime Src Offset Pages Utilities Menu Print Menus Print Net Setup Print Fonts Print Directory Factory Defaults Format Flash Defragment Flash Format Disk Job Acct Stat Hex Trace Page 2 of 8 Job Menu...

Quick Reference
Page 8
... output stacker and finisher not shown) 202 Paper Jam Printer rear door 23x Paper Jam Duplex rear door 250 Paper Jam Lower front door (down when envelope feeder is installed) 24x Paper Jam Standard input tray 200 Paper Jam 201 Paper Jam Upper front door 260 Paper Jam Envelope feeder 23x Paper Jam Duplex front access cover (remove standard input tray) 24x Paper Jam Paper trays Warning: Do not attempt to access jam areas. The illustration shows the location of 8 Accessing jam areas You open doors and covers, remove trays, and remove options to clear any print jobs from the standard bin...
... output stacker and finisher not shown) 202 Paper Jam Printer rear door 23x Paper Jam Duplex rear door 250 Paper Jam Lower front door (down when envelope feeder is installed) 24x Paper Jam Standard input tray 200 Paper Jam 201 Paper Jam Upper front door 260 Paper Jam Envelope feeder 23x Paper Jam Duplex front access cover (remove standard input tray) 24x Paper Jam Paper trays Warning: Do not attempt to access jam areas. The illustration shows the location of 8 Accessing jam areas You open doors and covers, remove trays, and remove options to clear any print jobs from the standard bin...

Setup Guide
Page 3
... 2000-sheet drawer 6 Installing the 2000-sheet drawer 8 Changing the 2000-sheet drawer paper size 10 Installing a 250-sheet or 500-sheet drawer 11 Installing a duplex unit 13 Setting up the printer 14 Installing an envelope feeder 17 Installing a finisher 19 Installing a high-capacity output stacker 22 Installing an output expander 24 Installing a 5-bin mailbox 27 Attaching labels to print media handling options 29 Step 3: Install memory and option cards 30 Accessing the printer system board 30 Installing printer memory 32 Installing an optional flash memory or firmware card 33...
... 2000-sheet drawer 6 Installing the 2000-sheet drawer 8 Changing the 2000-sheet drawer paper size 10 Installing a 250-sheet or 500-sheet drawer 11 Installing a duplex unit 13 Setting up the printer 14 Installing an envelope feeder 17 Installing a finisher 19 Installing a high-capacity output stacker 22 Installing an output expander 24 Installing a 5-bin mailbox 27 Attaching labels to print media handling options 29 Step 3: Install memory and option cards 30 Accessing the printer system board 30 Installing printer memory 32 Installing an optional flash memory or firmware card 33...

Setup Guide
Page 50
... is installed. 5 Print a test page to the location of Windows XP require that shipped with Windows XP. c Click File Properties. When a test page prints successfully, printer setup is created and appears in downloadable software packages on your Windows software. Install drivers for simple printing, but they contain less functionality than our enhanced custom driver. Using Windows XP with your computer and your computer. Drivers are also available in the Printers folder. System drivers work well for local printing 45 Windows...
... is installed. 5 Print a test page to the location of Windows XP require that shipped with Windows XP. c Click File Properties. When a test page prints successfully, printer setup is created and appears in downloadable software packages on your Windows software. Install drivers for simple printing, but they contain less functionality than our enhanced custom driver. Using Windows XP with your computer and your computer. Drivers are also available in the Printers folder. System drivers work well for local printing 45 Windows...

Setup Guide
Page 56
... printer and computer, or when a parallel interface is transferred one bit at a time. in each package gives detailed instructions for installing and using a parallel connection. The driver package for a complete list of distance between your printer. 1 On the printer operator panel, press Menu until Print Menus appears on the display, and then press Select. 2 Press Menu until you see Serial Standard (or Serial Option X if you installed a serial interface card), and then press Select. 3 Press Menu...
... printer and computer, or when a parallel interface is transferred one bit at a time. in each package gives detailed instructions for installing and using a parallel connection. The driver package for a complete list of distance between your printer. 1 On the printer operator panel, press Menu until Print Menus appears on the display, and then press Select. 2 Press Menu until you see Serial Standard (or Serial Option X if you installed a serial interface card), and then press Select. 3 Press Menu...

Setup Guide
Page 58
... to print to verify printer installation. Go to the same serial parameters in the printer. 1 Click Start Settings Control Panel, and then double-click System. 2 On the Device Manager tab, click + to expand the list of available ports. 3 Select the communications port you assigned to the printer (COM1 or COM2). 4 Click Properties. 5 On the Port Settings tab, set the serial parameters to page... 54 Install drivers for the printer settings under the Serial Standard (or Serial Option...
... to print to verify printer installation. Go to the same serial parameters in the printer. 1 Click Start Settings Control Panel, and then double-click System. 2 On the Device Manager tab, click + to expand the list of available ports. 3 Select the communications port you assigned to the printer (COM1 or COM2). 4 Click Properties. 5 On the Port Settings tab, set the serial parameters to page... 54 Install drivers for the printer settings under the Serial Standard (or Serial Option...

Setup Guide
Page 59
... an option is not listed, you are configured for the sizes and types of memory installed is also a good time to verify the network connection. Print a menu settings page to review the default printer settings and to a network. The Network Setup page provides information that printer options are installed correctly. 1 Make sure the printer is needed if you need to check your printer to verify that is on page 55. Printing a network setup page If the printer is not listed, turn the printer off, unplug the power cord...
... an option is not listed, you are configured for the sizes and types of memory installed is also a good time to verify the network connection. Print a menu settings page to review the default printer settings and to a network. The Network Setup page provides information that printer options are installed correctly. 1 Make sure the printer is needed if you need to check your printer to verify that is on page 55. Printing a network setup page If the printer is not listed, turn the printer off, unplug the power cord...

Setup Guide
Page 63
... your specific Windows environment. In this type of network printing, printer drivers are typically installed on each network computer. Read the detailed instructions on the network computer attached to the printer. The printer is attached directly to install without using a local printer cable such as printer status alerts. During the driver installation, the printer is set up to be configured for direct printing or shared printing. • Direct printing means the printer is installed on the drivers CD. Install drivers for network printing After...
... your specific Windows environment. In this type of network printing, printer drivers are typically installed on each network computer. Read the detailed instructions on the network computer attached to the printer. The printer is attached directly to install without using a local printer cable such as printer status alerts. During the driver installation, the printer is set up to be configured for direct printing or shared printing. • Direct printing means the printer is installed on the drivers CD. Install drivers for network printing After...

User's Reference
Page 3
... the multipurpose feeder 67 Using and loading the optional envelope feeder 68 Using and loading the optional 2000-sheet drawer 71 Changing the print media size for the 2000-sheet drawer 74 Linking trays ...76 Using the duplex function 76 Duplex printing on letterhead 76 Using Duplex Bind 77 Using the output bins ...78 Using the support extension in the standard bin 80 Chapter 4: Maintenance 81 Maintaining your printer 81 Determining the status of supplies 81 Conserving supplies ...82 Ordering supplies ...82 Ordering a print cartridge 82 Maintenance kit ...83 3
... the multipurpose feeder 67 Using and loading the optional envelope feeder 68 Using and loading the optional 2000-sheet drawer 71 Changing the print media size for the 2000-sheet drawer 74 Linking trays ...76 Using the duplex function 76 Duplex printing on letterhead 76 Using Duplex Bind 77 Using the output bins ...78 Using the support extension in the standard bin 80 Chapter 4: Maintenance 81 Maintaining your printer 81 Determining the status of supplies 81 Conserving supplies ...82 Ordering supplies ...82 Ordering a print cartridge 82 Maintenance kit ...83 3

User's Reference
Page 25
... PCL Fonts or PS Fonts appears on the operator panel until you see Understanding the printer messages for your printer: 1 Make sure the printer is available in the printer. 5 Press Select. Printing the menu settings page Printing the menu settings page The menu settings page shows current settings (user default settings) for the menus, a list of all the fonts currently available for more information. You can use this page, see Print Menus, and then press Select. The message Printing Menu Settings appears while the page prints...
... PCL Fonts or PS Fonts appears on the operator panel until you see Understanding the printer messages for your printer: 1 Make sure the printer is available in the printer. 5 Press Select. Printing the menu settings page Printing the menu settings page The menu settings page shows current settings (user default settings) for the menus, a list of all the fonts currently available for more information. You can use this page, see Print Menus, and then press Select. The message Printing Menu Settings appears while the page prints...

User's Reference
Page 82
... Finishing Menu Duplex printing is available when you conserve toner and paper: Supply Toner Print media Print media Setting What the setting does For more page images on a sheet of a multiple-copy job to be sure it is unsatisfactory, you examine the first copy of print media. Lets you can print a few hundred pages after the 88 Toner Low message comes on both sides of a sheet of paper. It lets you should order a new print cartridge. You can cancel the job. Ordering a print cartridge When the 88 Toner Low message...
... Finishing Menu Duplex printing is available when you conserve toner and paper: Supply Toner Print media Print media Setting What the setting does For more page images on a sheet of a multiple-copy job to be sure it is unsatisfactory, you examine the first copy of print media. Lets you can print a few hundred pages after the 88 Toner Low message comes on both sides of a sheet of paper. It lets you should order a new print cartridge. You can cancel the job. Ordering a print cartridge When the 88 Toner Low message...

User's Reference
Page 94
See Ordering supplies for detailed installation information. 1 Turn the printer off and unplug the printer power cord. 2 Open the front doors and remove the print cartridge. 3 Locate the used transfer roller on the lower floor of the print cartridge housing. 4 Pry the left side of the transfer roller up from its slot to loosen it. (Use any kind of small tool.) 94 Refer to replace the transfer roller. Complete the following steps to the documentation...
See Ordering supplies for detailed installation information. 1 Turn the printer off and unplug the printer power cord. 2 Open the front doors and remove the print cartridge. 3 Locate the used transfer roller on the lower floor of the print cartridge housing. 4 Pry the left side of the transfer roller up from its slot to loosen it. (Use any kind of small tool.) 94 Refer to replace the transfer roller. Complete the following steps to the documentation...

User's Reference
Page 116
.... • Make sure the Paper Size setting is loaded correctly. Reinstall the high-capacity output stacker. If the 5-bin mailbox is securely connected to the hard disk adapter card. Envelope feeder • Make sure the connection between the two infrared ports. • No bright light, such as direct sunshine, is interfering with communication. • No objects are using a print media size compatible with adapter Make sure the hard disk is listed on the menu settings page, but print media jams when...
.... • Make sure the Paper Size setting is loaded correctly. Reinstall the high-capacity output stacker. If the 5-bin mailbox is securely connected to the hard disk adapter card. Envelope feeder • Make sure the connection between the two infrared ports. • No bright light, such as direct sunshine, is interfering with communication. • No objects are using a print media size compatible with adapter Make sure the hard disk is listed on the menu settings page, but print media jams when...

User's Reference
Page 186
... printer driver. Using the Local Printer Setup Utility Detailed instructions for the following settings: Paper Settings Paper Source Paper Size (per supported sources) Paper Type (per supported sources) Custom Types (per custom type number) Substitute Size Configure MP Paper Texture (per supported media) Paper Weight (per supported media) Paper Loading (per supported media) PostScript Settings Print PS Error Font Priority Finishing Settings Duplex Duplex Bind Copies Blank Pages Collation Separator Sheets Separator Source Multipage Print Multipage Order Multipage View Multipage Border PCL...
... printer driver. Using the Local Printer Setup Utility Detailed instructions for the following settings: Paper Settings Paper Source Paper Size (per supported sources) Paper Type (per supported sources) Custom Types (per custom type number) Substitute Size Configure MP Paper Texture (per supported media) Paper Weight (per supported media) Paper Loading (per supported media) PostScript Settings Print PS Error Font Priority Finishing Settings Duplex Duplex Bind Copies Blank Pages Collation Separator Sheets Separator Source Multipage Print Multipage Order Multipage View Multipage Border PCL...

User's Reference
Page 212
Using the printer menus Select a menu or menu item for more details Paper Menu Paper Source Paper Size Paper Type Custom Types Universal Setup Output Bin Configure Bins Overflow Bin Assign Type/Bin Substitute Size Configure MP Envelope Enhance Paper Texture Paper Weight Paper Loading Finishing Menu Duplex Duplex Bind Copies Blank Pages Collation Separator Sheets Separator Source Multipage Print Multipage Order Multipage View Multipage Border Staple Job Staple Prime Src Offset Pages PostScript Menu Print PS Error Font Priority PDF Menu PCL Emul Menu Font Source Font Name Point Size Pitch ...
Using the printer menus Select a menu or menu item for more details Paper Menu Paper Source Paper Size Paper Type Custom Types Universal Setup Output Bin Configure Bins Overflow Bin Assign Type/Bin Substitute Size Configure MP Envelope Enhance Paper Texture Paper Weight Paper Loading Finishing Menu Duplex Duplex Bind Copies Blank Pages Collation Separator Sheets Separator Source Multipage Print Multipage Order Multipage View Multipage Border Staple Job Staple Prime Src Offset Pages PostScript Menu Print PS Error Font Priority PDF Menu PCL Emul Menu Font Source Font Name Point Size Pitch ...

User's Reference
Page 265
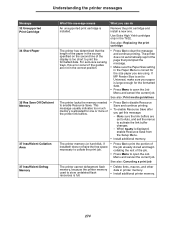
... Door or Insert Cartridge The upper front door is open or the toner cartridge is deleting all held jobs. Wait for service. Close the finisher side door to clear the message. Close the finisher top cover to clear the message. Wait for the message to clear. Understanding the printer messages Message What this message is displayed. Remove the indicated print cartridge and install a new one or more held jobs. • Press Go to clear. means: • Tray x with x being trays 2 - 5 • Duplex...
... Door or Insert Cartridge The upper front door is open or the toner cartridge is deleting all held jobs. Wait for service. Close the finisher side door to clear the message. Close the finisher top cover to clear the message. Wait for the message to clear. Understanding the printer messages Message What this message is displayed. Remove the indicated print cartridge and install a new one or more held jobs. • Press Go to clear. means: • Tray x with x being trays 2 - 5 • Duplex...
User's Reference
Page 274
... enable Resource Save. For auto-size sensing trays, this error occurs if the guides are set to Universal, make sure your paper is installed. If MP Feeder Size is set to Auto, and exit the menus to activate the link buffer changes. - This message usually indicates too much memory is allocated for one . See also: Print media guidelines The printer lacks the memory needed to clear the message and continue printing. Understanding the printer messages Message 32 Unsupported Print Cartridge...
... enable Resource Save. For auto-size sensing trays, this error occurs if the guides are set to Universal, make sure your paper is installed. If MP Feeder Size is set to Auto, and exit the menus to activate the link buffer changes. - This message usually indicates too much memory is allocated for one . See also: Print media guidelines The printer lacks the memory needed to clear the message and continue printing. Understanding the printer messages Message 32 Unsupported Print Cartridge...

User's Reference
Page 285
... Mode (USB Menu) 257 NPA mode, setting network port 253 parallel port 249 serial port 259 USB port 257 numbers, operator panel 208 numerical values, selecting 208 O Offset Pages (Finishing Menu) 226 operator panel 207 buttons 207 disabling menus 174 enabling menus 174 LCD 207 light 207 menus disabled 209 messages 264 numbers 208 See also messages and jam messages using 207 options verifying installation with menu settings page 25 ordering, print cartridge 83 Prebate 83 regular 83 Orientation (PCL Emul Menu) 244 Orientation (PDF Menu) 247 Output Bin (Paper Menu) 216 Overflow Bin (Paper Menu...
... Mode (USB Menu) 257 NPA mode, setting network port 253 parallel port 249 serial port 259 USB port 257 numbers, operator panel 208 numerical values, selecting 208 O Offset Pages (Finishing Menu) 226 operator panel 207 buttons 207 disabling menus 174 enabling menus 174 LCD 207 light 207 menus disabled 209 messages 264 numbers 208 See also messages and jam messages using 207 options verifying installation with menu settings page 25 ordering, print cartridge 83 Prebate 83 regular 83 Orientation (PCL Emul Menu) 244 Orientation (PDF Menu) 247 Output Bin (Paper Menu) 216 Overflow Bin (Paper Menu...

User's Reference
Page 287
... (Job Menu) 233 print and hold jobs 187 Print Buffer (Job Menu) 233 print cartridge installing 88 ordering 82 storing 86 Print Directory (Utilities Menu) 228 Print Fonts (Utilities Menu) 227 print media guidelines 29 card stock 37 envelopes 35 labels 36 letterhead 32 letterhead, printing 33 paper 29 transparencies 34 letterhead guidelines 32 loading instructions based on source 33 storing 37, 85 transparencies guidelines 34 print media jams avoiding 22, 120 clearing 120 print media size window 52 print media specifications characteristics 29 sizes 39 types...
... (Job Menu) 233 print and hold jobs 187 Print Buffer (Job Menu) 233 print cartridge installing 88 ordering 82 storing 86 Print Directory (Utilities Menu) 228 Print Fonts (Utilities Menu) 227 print media guidelines 29 card stock 37 envelopes 35 labels 36 letterhead 32 letterhead, printing 33 paper 29 transparencies 34 letterhead guidelines 32 loading instructions based on source 33 storing 37, 85 transparencies guidelines 34 print media jams avoiding 22, 120 clearing 120 print media size window 52 print media specifications characteristics 29 sizes 39 types...

User's Reference
Page 289
... maintenance kit 83 print cartridge 83 Prebate 83 regular 83 Symbol Set (PCL Emul Menu) 243 symbol sets, definition 184 T taking printer offline 208 with Menu button 208 with Stop button 208 test printing Hex Trace mode 230 menus page 227 timeout print 237 wait 238 toner alarm 240 Toner Alarm (Setup Menu) 240 Toner Darkness (Quality Menu) 235 transfer roll replacing 94 transparencies guidelines 34 loading input tray 49 multipurpose feeder 61 tray linking 76 Tray Renumber (PCL Emul Menu) 245 troubleshooting basic printer problems 109 clearing operator panel error messages...
... maintenance kit 83 print cartridge 83 Prebate 83 regular 83 Symbol Set (PCL Emul Menu) 243 symbol sets, definition 184 T taking printer offline 208 with Menu button 208 with Stop button 208 test printing Hex Trace mode 230 menus page 227 timeout print 237 wait 238 toner alarm 240 Toner Alarm (Setup Menu) 240 Toner Darkness (Quality Menu) 235 transfer roll replacing 94 transparencies guidelines 34 loading input tray 49 multipurpose feeder 61 tray linking 76 Tray Renumber (PCL Emul Menu) 245 troubleshooting basic printer problems 109 clearing operator panel error messages...

