

IPDS Printer and Host Setup Guide
Page 9
... (See your Network Administrator for address.) Local location LCLLOCNAME *NETATR Mode MODE QSPWTR User-defined options USRDFNOPT *NONE User-defined object: USRDFNOBJ Object > IPDSPRT Library > QGPL Object type > *PSFCFG (Note: PSFCFG object and library created in bold. Online at IPL ONLINE Attached controller CTL Language type LNGTYPE Print quality PRTQLTY Font: FONT Identifier Point size Form feed FORMFEED Separator drawer SEPDRAWER Separator program SEPPGM Library Number of drawers NBRDRAWER Printer error message PRTERRMSG *YES...
... (See your Network Administrator for address.) Local location LCLLOCNAME *NETATR Mode MODE QSPWTR User-defined options USRDFNOPT *NONE User-defined object: USRDFNOBJ Object > IPDSPRT Library > QGPL Object type > *PSFCFG (Note: PSFCFG object and library created in bold. Online at IPL ONLINE Attached controller CTL Language type LNGTYPE Print quality PRTQLTY Font: FONT Identifier Point size Form feed FORMFEED Separator drawer SEPDRAWER Separator program SEPPGM Library Number of drawers NBRDRAWER Printer error message PRTERRMSG *YES...

IPDS Printer and Host Setup Guide
Page 18
... AFPATTACH Port number PORT *WSC >2 (Note: Twinax address selected for IPDS printing.) Switch setting SWTSET >0 Local location address............LOCADR Auxiliary printer AUXPRT Emulating ASCII device............EMLASCII *NO Physical attachment ATTACH Online at IPL ONLINE *YES Attached controller CTL > CTL01 Language type LNGTYPE *SYSVAL Print quality PRTQLTY *STD Font: FONT Identifier > 11 Point size *NONE Form feed FORMFEED > *AUTOCUT Separator drawer SEPDRAWER *FILE Separator program SEPPGM *NONE Library Number of a device description...
... AFPATTACH Port number PORT *WSC >2 (Note: Twinax address selected for IPDS printing.) Switch setting SWTSET >0 Local location address............LOCADR Auxiliary printer AUXPRT Emulating ASCII device............EMLASCII *NO Physical attachment ATTACH Online at IPL ONLINE *YES Attached controller CTL > CTL01 Language type LNGTYPE *SYSVAL Print quality PRTQLTY *STD Font: FONT Identifier > 11 Point size *NONE Form feed FORMFEED > *AUTOCUT Separator drawer SEPDRAWER *FILE Separator program SEPPGM *NONE Library Number of a device description...

IPDS Printer and Host Setup Guide
Page 27
..." under MENU/Menus > Option Card Menu > IPDS MENU > EMULATION. 1 "Resident" is important to Step 6 [page 27]. If you specified Port 5001 or 9600 in the IPDS Emulation User's Guide. Step 6 Select the IPDS Emulation, Bar Code Size, Host Resolution, and Fax Interrupt Settings It is the default setting. This disables the network job timeout. 3 Save/Submit any changes and return to the Ready screen. 7 To verify the new print server settings, print a Network Setup Page. Follow...
..." under MENU/Menus > Option Card Menu > IPDS MENU > EMULATION. 1 "Resident" is important to Step 6 [page 27]. If you specified Port 5001 or 9600 in the IPDS Emulation User's Guide. Step 6 Select the IPDS Emulation, Bar Code Size, Host Resolution, and Fax Interrupt Settings It is the default setting. This disables the network job timeout. 3 Save/Submit any changes and return to the Ready screen. 7 To verify the new print server settings, print a Network Setup Page. Follow...

IPDS Printer and Host Setup Guide
Page 28
... Control Unit (AFCCU). IPDS Printer and Host Setup Guide PSF/MVS LAN Printing Using the Standard Network Port or Internal Print Server 3 If you are replacing a printer that used a 3812/3816 Emulation, select the "3812/3816" Emulation. Note 1: If the IPDS code release on the host. Try to Step 8 Troubleshooting. 3 After the last page of the printer on an MFP is 3.00-01090 or higher, "Copy Interrupt" is connected to the network...
... Control Unit (AFCCU). IPDS Printer and Host Setup Guide PSF/MVS LAN Printing Using the Standard Network Port or Internal Print Server 3 If you are replacing a printer that used a 3812/3816 Emulation, select the "3812/3816" Emulation. Note 1: If the IPDS code release on the host. Try to Step 8 Troubleshooting. 3 After the last page of the printer on an MFP is 3.00-01090 or higher, "Copy Interrupt" is connected to the network...

IPDS Printer and Host Setup Guide
Page 31
... SCS, Coax/Twinax Connection, Installation and User's Guide which affect job formatting. The IPDS timeout is connected to a host through an Adapter for SCS card. The default is "Auto". On the upper right-hand corner is a status for IPDS Option where you are replacing a printer that used a 4028 Emulation setting, choose the "Resident" Emulation and change the following settings: a) Set Bar Code Size to "4028" under MENU > Option Card Menu > IPDS MENU > EMULATION. 1 "Resident" is...
... SCS, Coax/Twinax Connection, Installation and User's Guide which affect job formatting. The IPDS timeout is connected to a host through an Adapter for SCS card. The default is "Auto". On the upper right-hand corner is a status for IPDS Option where you are replacing a printer that used a 4028 Emulation setting, choose the "Resident" Emulation and change the following settings: a) Set Bar Code Size to "4028" under MENU > Option Card Menu > IPDS MENU > EMULATION. 1 "Resident" is...

IPDS Printer and Host Setup Guide
Page 34
... Bar Code Size option in Ready mode, check all host and printer settings to be "inactive" if waiting for a print job. Step 10 Troubleshooting If the IPDS job does not print, try the following. 1 If BUSY is printing outside the valid printable area. Using the control panel MENU/Menus, select Option Card Menu > IPDS MENU > EMULATION > Exception Ctrl. Printer Messages and Problems on page 54 for additional problem solutions. 9 Once the job prints, refer to the IPDS Emulation User's Guide...
... Bar Code Size option in Ready mode, check all host and printer settings to be "inactive" if waiting for a print job. Step 10 Troubleshooting If the IPDS job does not print, try the following. 1 If BUSY is printing outside the valid printable area. Using the control panel MENU/Menus, select Option Card Menu > IPDS MENU > EMULATION > Exception Ctrl. Printer Messages and Problems on page 54 for additional problem solutions. 9 Once the job prints, refer to the IPDS Emulation User's Guide...

IPDS Printer and Host Setup Guide
Page 42
Step 8 Troubleshooting If the IPDS job does not print, try the following. 1 If BUSY is not displayed in the printer control panel or if the printer remains in Ready mode, check all host and printer settings to send only valid characters and control codes. Using the control panel MENU/Menus, select Option Card Menu > IPDS MENU > EMULATION > Printable Area. Using the control panel MENU/Menus, select Option Card Menu > IPDS MENU > EMULATION > Exception Ctrl. b) Change the Exception Ctrl setting to Sup Beyond VPA...
Step 8 Troubleshooting If the IPDS job does not print, try the following. 1 If BUSY is not displayed in the printer control panel or if the printer remains in Ready mode, check all host and printer settings to send only valid characters and control codes. Using the control panel MENU/Menus, select Option Card Menu > IPDS MENU > EMULATION > Printable Area. Using the control panel MENU/Menus, select Option Card Menu > IPDS MENU > EMULATION > Exception Ctrl. b) Change the Exception Ctrl setting to Sup Beyond VPA...

Troubleshooting Guide
Page 2
... 5-bin mailbox. If the duplex unit is correct in the Paper Menu. • See Menus and Messages Guide for the standard parallel port. Job prints from the Setup Menu. If this does not fix the problem, unplug the printer, and check the connection between the envelope feeder and the printer is secure. • Make sure the Paper Size setting is listed on the menu settings page, but print media jams when it . For more information, see if the option is secure. Flash Make sure flash memory is...
... 5-bin mailbox. If the duplex unit is correct in the Paper Menu. • See Menus and Messages Guide for the standard parallel port. Job prints from the Setup Menu. If this does not fix the problem, unplug the printer, and check the connection between the envelope feeder and the printer is secure. • Make sure the Paper Size setting is listed on the menu settings page, but print media jams when it . For more information, see if the option is secure. Flash Make sure flash memory is...

Troubleshooting Guide
Page 3
... Check to remove the top and bottom sheets of the 2000-sheet drawer. • The power cord is listed on the Lexmark Web site at the front of paper that does not meet the printer specifications. A jam occurs Remove the print media in its original wrapper until you are using the correct cable, that can help prevent jams from a fresh package. See the Card Stock & Label Guide available on the menu settings page, but print media jams...
... Check to remove the top and bottom sheets of the 2000-sheet drawer. • The power cord is listed on the Lexmark Web site at the front of paper that does not meet the printer specifications. A jam occurs Remove the print media in its original wrapper until you are using the correct cable, that can help prevent jams from a fresh package. See the Card Stock & Label Guide available on the menu settings page, but print media jams...

Troubleshooting Guide
Page 4
... Messages Guide. You may have a printer part that jammed does not reprint after you clear the jam. To utilize the remaining toner, remove the cartridge by Config Menu. 3 Press until they lightly rest against the edge of media loaded. Repeat this , do not correct the problem, call for your print job, or change the Paper Type to run the printer setup cycle and clean the transfer roll. Open and close the printer top front cover to match the type...
... Messages Guide. You may have a printer part that jammed does not reprint after you clear the jam. To utilize the remaining toner, remove the cartridge by Config Menu. 3 Press until they lightly rest against the edge of media loaded. Repeat this , do not correct the problem, call for your print job, or change the Paper Type to run the printer setup cycle and clean the transfer roll. Open and close the printer top front cover to match the type...

User's Guide
Page 10
..., and make selections. The host USB Direct interface on a selection. Pressing the backspace multiple times will also display the current status and the Supplies (Warnings) status. It will delete additional entries. The other peripheral. The 5 button has a raised bump for items like quantities or PINs. Show me more screen Some held jobs were not restored. The numbers are used to plug in a USB flash memory device and print PDF files. If...
..., and make selections. The host USB Direct interface on a selection. Pressing the backspace multiple times will also display the current status and the Supplies (Warnings) status. It will delete additional entries. The other peripheral. The 5 button has a raised bump for items like quantities or PINs. Show me more screen Some held jobs were not restored. The numbers are used to plug in a USB flash memory device and print PDF files. If...

User's Guide
Page 70
... can load up menu. • Use transparencies designed specifically for use envelopes that: - Envelopes with optional output bins. Are stuck together or damaged in the envelope feeder. Selecting print media 70 Transparencies can be sure to set to Transparency to help prevent jams. Check with the manufacturer or vendor to Envelope, and select the correct envelope size from the operator panel, the printer driver, the Local Printer Setup Utility, or from 75 g/m2 (20 lb bond) paper...
... can load up menu. • Use transparencies designed specifically for use envelopes that: - Envelopes with optional output bins. Are stuck together or damaged in the envelope feeder. Selecting print media 70 Transparencies can be sure to set to Transparency to help prevent jams. Check with the manufacturer or vendor to Envelope, and select the correct envelope size from the operator panel, the printer driver, the Local Printer Setup Utility, or from 75 g/m2 (20 lb bond) paper...

User's Guide
Page 75
... install an optional duplex unit. You can also view the status of supplies in the Settings Æ Finishing Menu Use your print cartridge. Ready. Tray 1 Low, Tray 2 Low... Supply Toner Print media Menu selection item Toner Darkness in the Settings Æ Quality Menu Multipage Print in the Settings Æ Finishing Menu Duplex in the printer on a sheet of a sheet. Determining the status of supplies The printer operator panel alerts you can cancel the job. What the setting does Lets you conserve toner and paper. Values for more page images on the display let...
... install an optional duplex unit. You can also view the status of supplies in the Settings Æ Finishing Menu Use your print cartridge. Ready. Tray 1 Low, Tray 2 Low... Supply Toner Print media Menu selection item Toner Darkness in the Settings Æ Quality Menu Multipage Print in the Settings Æ Finishing Menu Duplex in the printer on a sheet of a sheet. Determining the status of supplies The printer operator panel alerts you can cancel the job. What the setting does Lets you conserve toner and paper. Values for more page images on the display let...

User's Guide
Page 78
... one set to optimize feeding reliability. Install a new staple cartridge, or press to properly feed from the tray. For information on printed pages. See the illustrations inside the stapler access door for recycling: 1 Visit our Web site: www.lexmark.com/recycle Recycling Lexmark products 78 Ordering a transfer roller Order Lexmark part number 40X0130. Label fuser cleaners are not recommended for duplex printing. Maintaining the printer See the following table for the maintenance kit part number for your Lexmark representative...
... one set to optimize feeding reliability. Install a new staple cartridge, or press to properly feed from the tray. For information on printed pages. See the illustrations inside the stapler access door for recycling: 1 Visit our Web site: www.lexmark.com/recycle Recycling Lexmark products 78 Ordering a transfer roller Order Lexmark part number 40X0130. Label fuser cleaners are not recommended for duplex printing. Maintaining the printer See the following table for the maintenance kit part number for your Lexmark representative...

User's Guide
Page 100
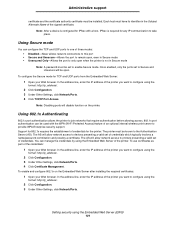
... of the printer you want to communicate. In the address line, enter the IP address of the default HTTP port. To configure for IPSec: • Shared Key Authentication-Any ASCII phrase shared among all application and network communications over the IP protocol to be used to configure using the Embedded Web Server (EWS) 100 Each host must be set before, click Change or Remove Password. Validate Peer...
... of the printer you want to communicate. In the address line, enter the IP address of the default HTTP port. To configure for IPSec: • Shared Key Authentication-Any ASCII phrase shared among all application and network communications over the IP protocol to be used to configure using the Embedded Web Server (EWS) 100 Each host must be set before, click Change or Remove Password. Validate Peer...
User's Guide
Page 101
... allows the printer to printers presenting a valid set of credentials which typically involves a name/password combination and possibly a certificate. The AS will disable function on the Embedded Web Server after installing the required certificates: 1 Open your Web browser. To use certificates as part of an optional internal wireless print server to configure using the format: http://ip_address/. 2 Click Configuration. 3 Under Other Settings, click Network/Ports. 4 Click TCP/IP Port Access. In the address line, enter the...
... allows the printer to printers presenting a valid set of credentials which typically involves a name/password combination and possibly a certificate. The AS will disable function on the Embedded Web Server after installing the required certificates: 1 Open your Web browser. To use certificates as part of an optional internal wireless print server to configure using the format: http://ip_address/. 2 Click Configuration. 3 Under Other Settings, click Network/Ports. 4 Click TCP/IP Port Access. In the address line, enter the...

Menus and Messages
Page 6
.... The other peripheral. The top line of the cursor. Show me screens, and make selections. The Select button is the header line. If multiple warnings are the body of the printer and indicating possible printer problems you view printer status, supplies messages, Show me screen Remove tray; Using printer menus Panel item Navigation buttons USB Direct interface Numeric pad 1 2 3 4 5 6 789 0 # Display Status / Supplies Ready Tray 1 low View Supplies Tell me more screen Some held jobs were not restored.
.... The other peripheral. The top line of the cursor. Show me screens, and make selections. The Select button is the header line. If multiple warnings are the body of the printer and indicating possible printer problems you view printer status, supplies messages, Show me screen Remove tray; Using printer menus Panel item Navigation buttons USB Direct interface Numeric pad 1 2 3 4 5 6 789 0 # Display Status / Supplies Ready Tray 1 low View Supplies Tell me more screen Some held jobs were not restored.
Menus and Messages
Page 20
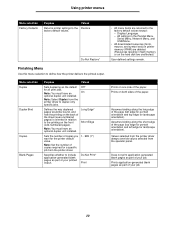
... orientation). Menu selection Duplex Duplex Bind Copies Blank Pages Purpose Values Sets duplexing as part of the paper. Finishing Menu Use this menu selection to the Restore factory default values. Do Not Print* Print Prints on both sides of your job. Note: Set the number of copies you want for a specific job from the printer driver. 1...999 (1*) Specifies whether to duplex only specific jobs. Note: You must have an On optional duplex unit installed. Long Edge* Short Edge Sets the number of copies required for the printer default value...
... orientation). Menu selection Duplex Duplex Bind Copies Blank Pages Purpose Values Sets duplexing as part of the paper. Finishing Menu Use this menu selection to the Restore factory default values. Do Not Print* Print Prints on both sides of your job. Note: Set the number of copies you want for a specific job from the printer driver. 1...999 (1*) Specifies whether to duplex only specific jobs. Note: You must have an On optional duplex unit installed. Long Edge* Short Edge Sets the number of copies required for the printer default value...

Menus and Messages
Page 23
...jobs from the printer hard disk. Utilities Menu Use this menu selection to change printer settings, remove jobs, set up printer hardware, and troubleshoot printer problems. Menu selection Factory Defaults Purpose Returns printer settings to the factory default values. Yes Warning: Do not turn off the printer while the flash is the default setting. Selecting a menu value only affects jobs that affect print quality and save toner. 0* is the default setting. 0* is the default setting. Bookmarks, jobs on the hard disk. Select a lower number to lighten the printed output or save toner...
...jobs from the printer hard disk. Utilities Menu Use this menu selection to change printer settings, remove jobs, set up printer hardware, and troubleshoot printer problems. Menu selection Factory Defaults Purpose Returns printer settings to the factory default values. Yes Warning: Do not turn off the printer while the flash is the default setting. Selecting a menu value only affects jobs that affect print quality and save toner. 0* is the default setting. 0* is the default setting. Bookmarks, jobs on the hard disk. Select a lower number to lighten the printed output or save toner...

Menus and Messages
Page 46
... install a supported one. 34 Short Paper • Press to clear. • Insert the USB drive. If MP Feeder Size is set to Auto, then exit the menus to clear. USB USB drive removed • Wait for the message to activate the link buffer changes. - Toner Low • Replace the toner cartridge. • Press Select to clear the message. USB The printer is displayed, enable Resource Save. • Install additional memory. 46 Standard Bin Full Remove the stack of the buffer. • Cancel the current job...
... install a supported one. 34 Short Paper • Press to clear. • Insert the USB drive. If MP Feeder Size is set to Auto, then exit the menus to clear. USB USB drive removed • Wait for the message to activate the link buffer changes. - Toner Low • Replace the toner cartridge. • Press Select to clear the message. USB The printer is displayed, enable Resource Save. • Install additional memory. 46 Standard Bin Full Remove the stack of the buffer. • Cancel the current job...


