
User's Guide
Page 5
... 40 Storing supplies ...40 Storing media ...40 Storing the toner cartridges ...40 Replacing the toner cartridges ...41 Replacing the fuser ...44 Replacing the waste toner bottle ...47 Replacing the photodeveloper cartridge ...49 Recycling Lexmark products ...52 Cleaning the printhead lens ...52 Chapter 6: Clearing jams 55 Hints for avoiding jams ...55 Identifying the...
... 40 Storing supplies ...40 Storing media ...40 Storing the toner cartridges ...40 Replacing the toner cartridges ...41 Replacing the fuser ...44 Replacing the waste toner bottle ...47 Replacing the photodeveloper cartridge ...49 Recycling Lexmark products ...52 Cleaning the printhead lens ...52 Chapter 6: Clearing jams 55 Hints for avoiding jams ...55 Identifying the...

User's Guide
Page 22
... cases, you can adjust registration with chemicals that may contaminate the printer • Preprinted papers that can be affected by the temperature in the printer fuser • Preprinted papers that do not meet DIN 19 309 • Recycled paper having a weight less than ±0.09 in the same source; Do not...
... cases, you can adjust registration with chemicals that may contaminate the printer • Preprinted papers that can be affected by the temperature in the printer fuser • Preprinted papers that do not meet DIN 19 309 • Recycled paper having a weight less than ±0.09 in the same source; Do not...

User's Guide
Page 41
... pages 3,000 pages 3,000 pages 3,000 pages 5,000 pages Ordering a fuser When the Replace Fuser message appears, the fuser has been exhausted and will no longer print until the waste toner bottle is now reset. 7 Press to return to be replaced. Order Lexmark part number C500X26G.After a new photodeveloper cartridge is installed, reset the...
... pages 3,000 pages 3,000 pages 3,000 pages 5,000 pages Ordering a fuser When the Replace Fuser message appears, the fuser has been exhausted and will no longer print until the waste toner bottle is now reset. 7 Press to return to be replaced. Order Lexmark part number C500X26G.After a new photodeveloper cartridge is installed, reset the...

User's Guide
Page 42
... information about changing menu settings, see page 45 for an illustration. Storing supplies Use the following guidelines for an extended period, remove the fuser. Storing the toner cartridges Store toner cartridges in humidity or temperature • Direct sunlight • Dusty places • A car for ...a long period of the media packages. Pull the fuser pressure release levers open , see the Menus and Messages Guide on top of time • An environment where corrosive gases are present •...
... information about changing menu settings, see page 45 for an illustration. Storing supplies Use the following guidelines for an extended period, remove the fuser. Storing the toner cartridges Store toner cartridges in humidity or temperature • Direct sunlight • Dusty places • A car for ...a long period of the media packages. Pull the fuser pressure release levers open , see the Menus and Messages Guide on top of time • An environment where corrosive gases are present •...

User's Guide
Page 46
Replacing the fuser 44 For more information, see Ordering a fuser. Wait for it to cool before replacing the fuser. 1 Turn the printer off. 2 Push the rear door release latch. 3 Gently lower the rear door. CAUTION: The fuser and the inside of the printer near the fuser may be hot. Maintenance Replacing the fuser When Replace Fuser appears on the operator panel, you must replace the fuser immediately.
Replacing the fuser 44 For more information, see Ordering a fuser. Wait for it to cool before replacing the fuser. 1 Turn the printer off. 2 Push the rear door release latch. 3 Gently lower the rear door. CAUTION: The fuser and the inside of the printer near the fuser may be hot. Maintenance Replacing the fuser When Replace Fuser appears on the operator panel, you must replace the fuser immediately.
User's Guide
Page 47
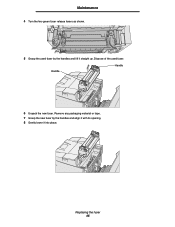
Replacing the fuser 45 Remove any packaging material or tape. 7 Grasp the new fuser by the handles and lift it into place. Handle Handle 6 Unpack the new fuser. Maintenance 4 Turn the two green fuser release levers as shown. 5 Grasp the used fuser. Dispose of the used fuser by the handles and align it with its opening. 8 Gently lower it straight up.
Replacing the fuser 45 Remove any packaging material or tape. 7 Grasp the new fuser by the handles and lift it into place. Handle Handle 6 Unpack the new fuser. Maintenance 4 Turn the two green fuser release levers as shown. 5 Grasp the used fuser. Dispose of the used fuser by the handles and align it with its opening. 8 Gently lower it straight up.
User's Guide
Page 48
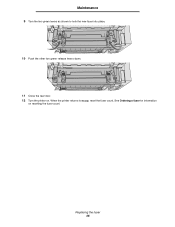
See Ordering a fuser for information on . Replacing the fuser 46 Maintenance 9 Turn the two green levers as shown to Ready, reset the fuser count. When the printer returns to lock the new fuser into place. 10 Push the other two green release levers down. 11 Close the rear door. 12 Turn the printer on resetting the fuser count.
See Ordering a fuser for information on . Replacing the fuser 46 Maintenance 9 Turn the two green levers as shown to Ready, reset the fuser count. When the printer returns to lock the new fuser into place. 10 Push the other two green release levers down. 11 Close the rear door. 12 Turn the printer on resetting the fuser count.
User's Guide
Page 63
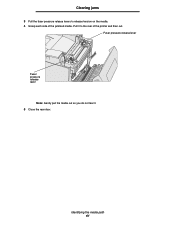
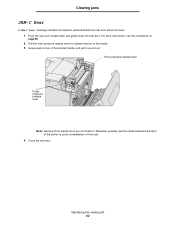
Fuser pressure release lever Fuser pressure release lever Note: Gently pull the media out so you do not tear it to release tension on the media. 4 Grasp each side of the printer and then out. Identifying the media path 61 Clearing jams 3 Pull the fuser pressure release levers to the rear of the jammed media. Pull it . 5 Close the rear door.
Fuser pressure release lever Fuser pressure release lever Note: Gently pull the media out so you do not tear it to release tension on the media. 4 Grasp each side of the printer and then out. Identifying the media path 61 Clearing jams 3 Pull the fuser pressure release levers to the rear of the jammed media. Pull it . 5 Close the rear door.
User's Guide
Page 64
... possible, pull the media towards the bottom of the printer to release tension on the media. 3 Grasp each corner of the fuser. 4 Close the rear door. Fuser pressure release lever Fuser pressure release lever Note: Gently pull the media out so you do not tear it up and out. For more information, see... the illustrations on page 60. 2 Pull the fuser pressure release levers to avoid contamination of the jammed media, and pull it . Identifying the media path 62 Clearing jams JAM-C Rear A JAM-C Rear ...
... possible, pull the media towards the bottom of the printer to release tension on the media. 3 Grasp each corner of the fuser. 4 Close the rear door. Fuser pressure release lever Fuser pressure release lever Note: Gently pull the media out so you do not tear it up and out. For more information, see... the illustrations on page 60. 2 Pull the fuser pressure release levers to avoid contamination of the jammed media, and pull it . Identifying the media path 62 Clearing jams JAM-C Rear A JAM-C Rear ...
User's Guide
Page 69
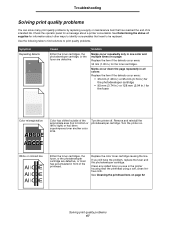
...following table to find solutions to print quality problems. Symptom Repeating defects Cause Either the toner cartridges, the photodeveloper cartridge, or the fuser are defective, or toner has accumulated in .) for a message about other ways to identify consumables that need to be replaced. ...If you see in .) for the fuser Color misregistration AABBCCDDEE ABCDE Color has shifted outside of the printhead. Remove and reinstall the photodeveloper cartridge. Solution Marks occur repeatedly only...
...following table to find solutions to print quality problems. Symptom Repeating defects Cause Either the toner cartridges, the photodeveloper cartridge, or the fuser are defective, or toner has accumulated in .) for a message about other ways to identify consumables that need to be replaced. ...If you see in .) for the fuser Color misregistration AABBCCDDEE ABCDE Color has shifted outside of the printhead. Remove and reinstall the photodeveloper cartridge. Solution Marks occur repeatedly only...

User's Guide
Page 70
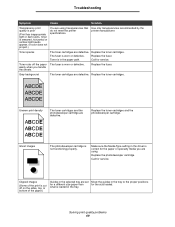
... toner cartridges may be defective or worn. Load paper from a fresh package in more than one printer. The fuser may be defective, empty, or worn. the paper. The fuser is stiff, try feeding from a new package. Replace the toner cartridges. Load paper from another tray. Print ...Replace the color toner cartridge causing the The toner cartridges are using paper that does not meet the printer specifications. streaks. Replace the fuser. Make sure the printer Media Type setting matches the type of paper you load in the trays is not damp. Replace the toner ...
... toner cartridges may be defective or worn. Load paper from a fresh package in more than one printer. The fuser may be defective, empty, or worn. the paper. The fuser is stiff, try feeding from a new package. Replace the toner cartridges. Load paper from another tray. Print ...Replace the color toner cartridge causing the The toner cartridges are using paper that does not meet the printer specifications. streaks. Replace the fuser. Make sure the printer Media Type setting matches the type of paper you load in the trays is not damp. Replace the toner ...
User's Guide
Page 71
... by the printer manufacturer. Toner rubs off on the sides, top, or bottom of the print is cut off the paper The fuser is worn or defective. Solving print quality problems 69 Replace the photodeveloper cartridge. Replace the toner cartridges. Make sure the Media Type ...Guides in the selected tray are defective. Toner specks The toner cartridges are set Move the guides in the tray. Replace the fuser. Replace the fuser. Ghost images The photodeveloper cartridge is loaded in the tray to the proper positions for a different size paper than for the paper...
... by the printer manufacturer. Toner rubs off on the sides, top, or bottom of the print is cut off the paper The fuser is worn or defective. Solving print quality problems 69 Replace the photodeveloper cartridge. Replace the toner cartridges. Make sure the Media Type ...Guides in the selected tray are defective. Toner specks The toner cartridges are set Move the guides in the tray. Replace the fuser. Replace the fuser. Ghost images The photodeveloper cartridge is loaded in the tray to the proper positions for a different size paper than for the paper...
User's Guide
Page 73
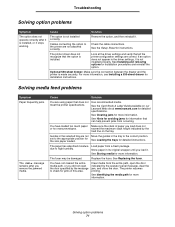
... You have not cleared the entire media path, or you did not open the door indicated by the load line on our Lexmark Web site at the driver settings and verify that does not meet the printer specifications. See Loading the trays for more information. ...See Identifying the media path for detailed instructions. Remove the option, and then reinstall it stops working. Use recommended media. The fuser may be damaged. Solving option problems 71 Cause Solution You are using paper that all the printer configuration settings are correct. Check ...
... You have not cleared the entire media path, or you did not open the door indicated by the load line on our Lexmark Web site at the driver settings and verify that does not meet the printer specifications. See Loading the trays for more information. ...See Identifying the media path for detailed instructions. Remove the option, and then reinstall it stops working. Use recommended media. The fuser may be damaged. Solving option problems 71 Cause Solution You are using paper that all the printer configuration settings are correct. Check ...

User's Guide
Page 80
...warranty service, you may be required to present the feature or option with the product. The Fuser Unit and Photodeveloper, and any claim concerning performance or nonperformance of Lexmark or a Remarketer for this product under this limited warranty, you transfer this product to another ...' and Remarketers' limitations of its warranty period. Warranty service does not include repair of your warranty alternatives and the nearest Lexmark authorized servicer in warranty service, damaged beyond the limit of remedies are substantially used with the product for which a Maintenance Kit...
...warranty service, you may be required to present the feature or option with the product. The Fuser Unit and Photodeveloper, and any claim concerning performance or nonperformance of Lexmark or a Remarketer for this product under this limited warranty, you transfer this product to another ...' and Remarketers' limitations of its warranty period. Warranty service does not include repair of your warranty alternatives and the nearest Lexmark authorized servicer in warranty service, damaged beyond the limit of remedies are substantially used with the product for which a Maintenance Kit...
User's Guide
Page 82
... 17 D display panel 6 E electronic emission statement 74 envelopes, guidelines 22 escape codes 72 F factory default settings, restoring 63 FCC statement 74 fuser, replacing 44 G guidelines avoiding jams 15 card stock 25 envelopes 22 labels 24 media 18 printing letterhead 22 I Indicator light 5 J jam messages... to avoid 55 L labels guidelines 24 printer maintenance 24 laser notices 77 letterhead 21 guidelines 21 page orientation 22 printing 22 Lexmark Authorized Supplies Dealers 38 loading standard tray envelopes 34 letterhead 34 trays optional 530-sheet tray 30 standard tray 30 M Macintosh 16...
... 17 D display panel 6 E electronic emission statement 74 envelopes, guidelines 22 escape codes 72 F factory default settings, restoring 63 FCC statement 74 fuser, replacing 44 G guidelines avoiding jams 15 card stock 25 envelopes 22 labels 24 media 18 printing letterhead 22 I Indicator light 5 J jam messages... to avoid 55 L labels guidelines 24 printer maintenance 24 laser notices 77 letterhead 21 guidelines 21 page orientation 22 printing 22 Lexmark Authorized Supplies Dealers 38 loading standard tray envelopes 34 letterhead 34 trays optional 530-sheet tray 30 standard tray 30 M Macintosh 16...

User's Guide
Page 83
...type 72, 74 N Navigation buttons 5 O optional 250-sheet legal-size tray 30 options verifying installation with menu settings page 17 ordering maintenance items 38 fuser 39 photodeveloper cartridge 39 waste toner bottle 39 supplies 38 toner cartridges 38 output bin, media support 37 overview, printer 4 P panel display 6 paper ... breaks 66 unresponsive printer 65 R recycling products 52 used supplies 43 removing options 11 printer from optional 530-sheet drawer 11 replacing fuser 44 photodeveloper cartridge 49 toner cartridges 41 waste toner bottle 47 restoring factory default settings 63 81
...type 72, 74 N Navigation buttons 5 O optional 250-sheet legal-size tray 30 options verifying installation with menu settings page 17 ordering maintenance items 38 fuser 39 photodeveloper cartridge 39 waste toner bottle 39 supplies 38 toner cartridges 38 output bin, media support 37 overview, printer 4 P panel display 6 paper ... breaks 66 unresponsive printer 65 R recycling products 52 used supplies 43 removing options 11 printer from optional 530-sheet drawer 11 replacing fuser 44 photodeveloper cartridge 49 toner cartridges 41 waste toner bottle 47 restoring factory default settings 63 81
User's Guide
Page 84
... settings,restoring, factory 63 status of supplies, determining 38 status page, printing 17 Stop button 5 storing media 25, 40 supplies 40 toner cartridges 40 supplies fuser 39 ordering 38 ordering toner cartridges 38 photodeveloper cartridge 39 recycling 43 status 38 storing 40 waste toner bottle 39 supplies, determining status 38 T toner...
... settings,restoring, factory 63 status of supplies, determining 38 status page, printing 17 Stop button 5 storing media 25, 40 supplies 40 toner cartridges 40 supplies fuser 39 ordering 38 ordering toner cartridges 38 photodeveloper cartridge 39 recycling 43 status 38 storing 40 waste toner bottle 39 supplies, determining status 38 T toner...

Menus and Messages
Page 5
... Config Menu Timeout SleepMode SleepTime Port Priority Display PaperDisp Auto Feed Calibration Test Menu TestPrint ConfigPage NetConfigPage StatusPage TestMode Utility Menu Clear Belt CG Clear Fuser Clear Print Info Setting default Tray2 Margin Network Menu Ip Addr Subnet. Error light Tray1:Letter Set K Toner CG ERROR The error light appears whenever...
... Config Menu Timeout SleepMode SleepTime Port Priority Display PaperDisp Auto Feed Calibration Test Menu TestPrint ConfigPage NetConfigPage StatusPage TestMode Utility Menu Clear Belt CG Clear Fuser Clear Print Info Setting default Tray2 Margin Network Menu Ip Addr Subnet. Error light Tray1:Letter Set K Toner CG ERROR The error light appears whenever...
Menus and Messages
Page 9
... change the first value (or hold for setting up the internal network adapter. Menu selection Clear Belt CG Clear Fuser Clear Print Info Setting default Tray2 Margin Purpose Resets the count for the Fuser. Network Menu The Network Menu is used for 3 seconds until the desired address is entered. 4 Once the address...
... change the first value (or hold for setting up the internal network adapter. Menu selection Clear Belt CG Clear Fuser Clear Print Info Setting default Tray2 Margin Purpose Resets the count for the Fuser. Network Menu The Network Menu is used for 3 seconds until the desired address is entered. 4 Once the address...

Menus and Messages
Page 12
... Replace WT. You can print only 20 to 500 images, depending on the coverage of the toner color. For instructions on . Replace the fuser unit. Wait for service. Pack TMA Sensor Error Warming Up Action The printer is required. The toner of the messages comes on setting the ...been duplicated. To clear the message, turn the printer off, reinstall the paper tray, and turn calibration on resetting the fuser count, see the Utility Menu. This does not include replacing the fuser unit. To clear the message: 1 Press to take the printer offline. 2 Press and hold for at least 3...
... Replace WT. You can print only 20 to 500 images, depending on the coverage of the toner color. For instructions on . Replace the fuser unit. Wait for service. Pack TMA Sensor Error Warming Up Action The printer is required. The toner of the messages comes on setting the ...been duplicated. To clear the message, turn the printer off, reinstall the paper tray, and turn calibration on resetting the fuser count, see the Utility Menu. This does not include replacing the fuser unit. To clear the message: 1 Press to take the printer offline. 2 Press and hold for at least 3...


