
Quick Reference
Page 4
... the paper stop , pull it so it flips forward. Loading paper and specialty media 4 Load up to another location, make sure the paper stop is supported only in Tray 1. or 550-sheet tray. Manual feeder Note: Feed paper into the feeder. 1 sheet of the trays and the manual feeder are printing...
... the paper stop , pull it so it flips forward. Loading paper and specialty media 4 Load up to another location, make sure the paper stop is supported only in Tray 1. or 550-sheet tray. Manual feeder Note: Feed paper into the feeder. 1 sheet of the trays and the manual feeder are printing...

Quick Reference
Page 7
... printing. Use the cartridge handle whenever you are holding the cartridge. Clearing jams 7 5 Close the front door. 6 Press to the printer using a paper size not supported for duplex printing.
... printing. Use the cartridge handle whenever you are holding the cartridge. Clearing jams 7 5 Close the front door. 6 Press to the printer using a paper size not supported for duplex printing.

Maintenance Guide
Page 11
...Follow these precautions: • Any cart used to move the printer must have a surface able to support the full footprint of the printer. Recycling Lexmark products To return Lexmark products to Lexmark for a relocation kit. Any cart used to move the options must have a surface able to... support the dimensions of the options. • Keep the printer in an upright position. • Avoid severe ...
...Follow these precautions: • Any cart used to move the printer must have a surface able to support the full footprint of the printer. Recycling Lexmark products To return Lexmark products to Lexmark for a relocation kit. Any cart used to move the options must have a surface able to... support the dimensions of the options. • Keep the printer in an upright position. • Avoid severe ...

User Guide
Page 3
... Selecting preprinted forms and letterhead...52 Using recycled paper and other office papers ...53 Storing paper...53 Supported paper sizes, types, and weights...54 Paper types and weights supported by the printer ...54 Paper sizes supported by the printer ...55 Printing 57 Printing a document...57 Printing on both sides of the paper...58...
... Selecting preprinted forms and letterhead...52 Using recycled paper and other office papers ...53 Storing paper...53 Supported paper sizes, types, and weights...54 Paper types and weights supported by the printer ...54 Paper sizes supported by the printer ...55 Printing 57 Printing a document...57 Printing on both sides of the paper...58...

User Guide
Page 5
Shipping the printer ...107 Administrative support 108 Adjusting Power Saver...108 Restoring the factory default settings...108 Checking the device status...109 Viewing reports...109 Restricting access to printer menus...110 ...
Shipping the printer ...107 Administrative support 108 Adjusting Power Saver...108 Restoring the factory default settings...108 Checking the device status...109 Viewing reports...109 Restricting access to printer menus...110 ...
User Guide
Page 6
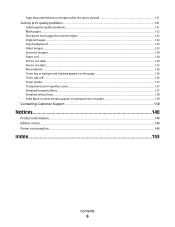
... quality is poor...137 Streaked horizontal lines...137 Streaked vertical lines ...138 Solid black or white streaks appear on transparencies or paper 139 Contacting Customer Support 139 Notices 140 Product information...140 Edition notice...140 Power consumption...146 Index 153 Contents 6
... quality is poor...137 Streaked horizontal lines...137 Streaked vertical lines ...138 Solid black or white streaks appear on transparencies or paper 139 Contacting Customer Support 139 Notices 140 Product information...140 Edition notice...140 Power consumption...146 Index 153 Contents 6

User Guide
Page 8
...Follow the set of instructions for local, or on the Lexmark Web site at www.lexmark.com. instances. 2 Click Technical Support. Learning about 5 From the Support Tools section, click contacting Lexmark, see the printed e-Mail Support. and may change without notice. Learning about the printer Finding... AM-8:00 PM ET) Note: Telephone numbers and support times may not be available in any Lexmark software program, click Help, Tips ΠHelp, or Help ΠHelp Topics. Customer support Description Telephone support E-mail support Where to find (North America) Where to find ...
...Follow the set of instructions for local, or on the Lexmark Web site at www.lexmark.com. instances. 2 Click Technical Support. Learning about 5 From the Support Tools section, click contacting Lexmark, see the printed e-Mail Support. and may change without notice. Learning about the printer Finding... AM-8:00 PM ET) Note: Telephone numbers and support times may not be available in any Lexmark software program, click Help, Tips ΠHelp, or Help ΠHelp Topics. Customer support Description Telephone support E-mail support Where to find (North America) Where to find ...
User Guide
Page 17
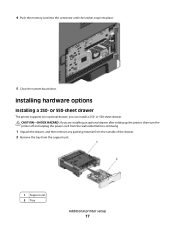
... the wall outlet before continuing 1 Unpack the drawer, and then remove any packing material from the outside of the drawer. 2 Remove the tray from the support unit. 1 Support unit 2 Tray Additional printer setup 17 Installing hardware options Installing a 250- 4 Push the memory card into the connector until the latches snap into place...
... the wall outlet before continuing 1 Unpack the drawer, and then remove any packing material from the outside of the drawer. 2 Remove the tray from the support unit. 1 Support unit 2 Tray Additional printer setup 17 Installing hardware options Installing a 250- 4 Push the memory card into the connector until the latches snap into place...
User Guide
Page 18
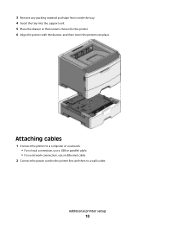
Attaching cables 1 Connect the printer to a computer or a network. • For a local connection, use a USB or parallel cable. • For a network connection, use an Ethernet cable. 2 Connect the power cord to the printer first and then to a wall outlet. Additional printer setup 18 3 Remove any packing material and tape from inside the tray. 4 Insert the tray into the support unit. 5 Place the drawer in the location chosen for the printer. 6 Align the printer with the drawer, and then lower the printer into place.
Attaching cables 1 Connect the printer to a computer or a network. • For a local connection, use a USB or parallel cable. • For a network connection, use an Ethernet cable. 2 Connect the power cord to the printer first and then to a wall outlet. Additional printer setup 18 3 Remove any packing material and tape from inside the tray. 4 Insert the tray into the support unit. 5 Place the drawer in the location chosen for the printer. 6 Align the printer with the drawer, and then lower the printer into place.
User Guide
Page 30
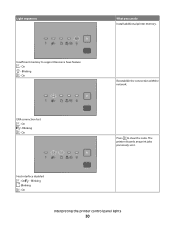
On Reestablish the connection with the network. On - Blinking - On Press to support Resource Save feature - On Interpreting the printer control panel lights 30 Blinking - The printer discards any print jobs previously sent. Blinking - On - Blinking - Light sequences What you can do Install additional printer memory. On - Host interface disabled - Insufficient memory to clear the code. ENA connection lost -
On Reestablish the connection with the network. On - Blinking - On Press to support Resource Save feature - On Interpreting the printer control panel lights 30 Blinking - The printer discards any print jobs previously sent. Blinking - On - Blinking - Light sequences What you can do Install additional printer memory. On - Host interface disabled - Insufficient memory to clear the code. ENA connection lost -

User Guide
Page 33
Light sequences Replace missing or defective cartridge - Remove the unsupported toner cartridge, and then replace it with a supported toner cartridge. Interpreting the printer control panel lights 33 On - For more information, see "Replacing the toner cartridge" on page 102. Blinking - On - On Cartridge part number unsupported by device - On What you can do Replace the toner cartridge. On -
Light sequences Replace missing or defective cartridge - Remove the unsupported toner cartridge, and then replace it with a supported toner cartridge. Interpreting the printer control panel lights 33 On - For more information, see "Replacing the toner cartridge" on page 102. Blinking - On - On Cartridge part number unsupported by device - On What you can do Replace the toner cartridge. On -

User Guide
Page 36
... open the rear door. 233.yy Paper jam - For more of the following : • Clear the jam at the standard exit bin. • Load paper supported by the printer" on page 55. 235.yy Paper jam - On Try one or more of the following : • Remove Tray 1. • Open the ...front door, and then open the rear door. 234.yy Paper jam - On Try one or more information, see "Paper sizes supported by the duplex function. On - On - Blinking - Blinking - On Interpreting the printer control panel lights 36 On - Blinking - Blinking - Blinking -
... open the rear door. 233.yy Paper jam - For more of the following : • Clear the jam at the standard exit bin. • Load paper supported by the printer" on page 55. 235.yy Paper jam - On Try one or more of the following : • Remove Tray 1. • Open the ...front door, and then open the rear door. 234.yy Paper jam - On Try one or more information, see "Paper sizes supported by the duplex function. On - On - Blinking - Blinking - On Interpreting the printer control panel lights 36 On - Blinking - Blinking - Blinking -

User Guide
Page 40
... browser. Specify all trays that do not know the IP address of measure (inches or millimeters) • Portrait Width • Portrait Height Note: The smallest supported Universal size is 76.2 x 127 mm (3 x 5 in the printer menus. and 550-sheet trays, and the manual feeder. Loading paper and specialty media This section...
... browser. Specify all trays that do not know the IP address of measure (inches or millimeters) • Portrait Width • Portrait Height Note: The smallest supported Universal size is 76.2 x 127 mm (3 x 5 in the printer menus. and 550-sheet trays, and the manual feeder. Loading paper and specialty media This section...

User Guide
Page 47
The paper stop , pull it so it stacks. To open position if you are not supported. Doing so may cause creases in neater stacking of 20 lb paper. Loading paper and specialty media 47 Use paper labels only. Forcing the paper ...
The paper stop , pull it so it stacks. To open position if you are not supported. Doing so may cause creases in neater stacking of 20 lb paper. Loading paper and specialty media 47 Use paper labels only. Forcing the paper ...

User Guide
Page 48
... the Settings tab. 3 Under the Paper Menu, find the Size and Type for each tray. 4 Make sure the sizes and types of paper are not supported. Loading paper and specialty media 48 or 550-sheet tray. • Vinyl, pharmacy, or dual-sided labels are the same under each tray to be...
... the Settings tab. 3 Under the Paper Menu, find the Size and Type for each tray. 4 Make sure the sizes and types of paper are not supported. Loading paper and specialty media 48 or 550-sheet tray. • Vinyl, pharmacy, or dual-sided labels are the same under each tray to be...
User Guide
Page 51
... of the paper, or grain short, running the width of the paper fibers in .), we recommend 90 g/m2 (24 lb) or heavier paper. Grain is supported only for 24 to the alignment of the paper.
... of the paper, or grain short, running the width of the paper fibers in .), we recommend 90 g/m2 (24 lb) or heavier paper. Grain is supported only for 24 to the alignment of the paper.

User Guide
Page 53
...to the US government a study demonstrating that all recycled paper will feed well. Lexmark consistently tests its printers with recycled paper (20-100% post-consumer waste) ... 24 lb laser papers, 50-90 Sheffield units) and much rougher papers (such as non-recycled paper. Lexmark has found no blanket statement can be made that recycled paper produced by major mills in the US fed ...Using recycled paper and other office papers As an environmentally conscious company, Lexmark supports the use of recycled office paper produced specifically for different temperature and humidity conditions.
...to the US government a study demonstrating that all recycled paper will feed well. Lexmark consistently tests its printers with recycled paper (20-100% post-consumer waste) ... 24 lb laser papers, 50-90 Sheffield units) and much rougher papers (such as non-recycled paper. Lexmark has found no blanket statement can be made that recycled paper produced by major mills in the US fed ...Using recycled paper and other office papers As an environmentally conscious company, Lexmark supports the use of recycled office paper produced specifically for different temperature and humidity conditions.

User Guide
Page 54
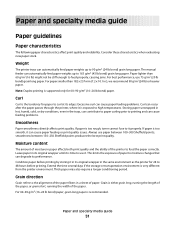
...-163 g/m2 (16-43 lb) paper weights. It is recommended to print 20 or fewer pages of paper they support. Vinyl, pharmacy, and dual-sided labels are supported for occasional use. Paper and specialty media guide 54 For information on card stock and labels, see the Card Stock & Label... size. Paper type Paper • Plain • Light • Heavy • Rough/Cotton • Recycled • Custom 250-sheet standard 250- Supported paper sizes, types, and weights The following tables provide information on standard and optional paper sources and the types of paper labels a month.
...-163 g/m2 (16-43 lb) paper weights. It is recommended to print 20 or fewer pages of paper they support. Vinyl, pharmacy, and dual-sided labels are supported for occasional use. Paper and specialty media guide 54 For information on card stock and labels, see the Card Stock & Label... size. Paper type Paper • Plain • Light • Heavy • Rough/Cotton • Recycled • Custom 250-sheet standard 250- Supported paper sizes, types, and weights The following tables provide information on standard and optional paper sources and the types of paper labels a month.

User Guide
Page 55
For more information, see "Configuring Universal paper settings" on page 40. Paper sizes supported by the printer Paper size Dimensions Standard Optional 250- 250-sheet tray or 550-sheet tray Manual feeder Duplex path A4 210 x ...229 mm X X X (6.4 x 9 in.) DL Envelope 110 x 220 mm X X X (4.3 x 8.7 in.) 7 3/4 Envelope 98 x 191 mm X X X (Monarch) (3.9 x 7.5 in.) 9 Envelope 98 x 225 mm X X X (3.9 x 8.9 in.) 1 A6 is supported only for grain long papers. 2 This size setting formats the page for 216 x 356 mm (8.5 x 14 in.) unless the size is specified by the software...
For more information, see "Configuring Universal paper settings" on page 40. Paper sizes supported by the printer Paper size Dimensions Standard Optional 250- 250-sheet tray or 550-sheet tray Manual feeder Duplex path A4 210 x ...229 mm X X X (6.4 x 9 in.) DL Envelope 110 x 220 mm X X X (4.3 x 8.7 in.) 7 3/4 Envelope 98 x 191 mm X X X (Monarch) (3.9 x 7.5 in.) 9 Envelope 98 x 225 mm X X X (3.9 x 8.9 in.) 1 A6 is supported only for grain long papers. 2 This size setting formats the page for 216 x 356 mm (8.5 x 14 in.) unless the size is specified by the software...
User Guide
Page 56
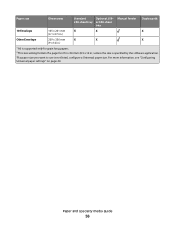
For more information, see "Configuring Universal paper settings" on page 40. Paper and specialty media guide 56 Paper size Dimensions Standard Optional 250- 250-sheet tray or 550-sheet tray Manual feeder Duplex path 10 Envelope 105 x 241 mm X X X (4.1 x 9.5 in.) Other Envelope 229 x 356 mm X X X (9 x 14 in.) 1 A6 is supported only for grain long papers. 2 This size setting formats the page for 216 x 356 mm (8.5 x 14 in.) unless the size is specified by the software application. 3If a paper size you want to use is not listed, configure a Universal paper size.
For more information, see "Configuring Universal paper settings" on page 40. Paper and specialty media guide 56 Paper size Dimensions Standard Optional 250- 250-sheet tray or 550-sheet tray Manual feeder Duplex path 10 Envelope 105 x 241 mm X X X (4.1 x 9.5 in.) Other Envelope 229 x 356 mm X X X (9 x 14 in.) 1 A6 is supported only for grain long papers. 2 This size setting formats the page for 216 x 356 mm (8.5 x 14 in.) unless the size is specified by the software application. 3If a paper size you want to use is not listed, configure a Universal paper size.


