
User Guide
Page 147
... from the wall outlet. The Power Saver Mode is the sum of Limited Warranty Lexmark E260, E260d, E260dn Lexmark International, Inc., Lexington, KY This limited warranty applies to change. By using the configuration menus, the Power Saver Timeout can be substantially higher than the average. The power... are provided in power units of power, then to completely stop product power consumption, disconnect the power supply cord from Lexmark or a Lexmark Remarketer, referred to in this product only if it was originally purchased for current values. The Power Saver Mode saves ...
... from the wall outlet. The Power Saver Mode is the sum of Limited Warranty Lexmark E260, E260d, E260dn Lexmark International, Inc., Lexington, KY This limited warranty applies to change. By using the configuration menus, the Power Saver Timeout can be substantially higher than the average. The power... are provided in power units of power, then to completely stop product power consumption, disconnect the power supply cord from Lexmark or a Lexmark Remarketer, referred to in this product only if it was originally purchased for current values. The Power Saver Mode saves ...

Service Manual
Page 4
...58 Printhead service check 2-65 Transfer roll service check 2-65 Tray 2 service check 2-66 Diagnostic aids 3-1 Accessing service menus 3-1 Printing menus 3-1 Moving around the menu 3-1 Configuration menu selections 3-4 Utilities 3-4 Setup 3-5 Parallel 3-5 USB 3-6 Network 3-7 Diagnostics mode selections 3-8 Adjustment procedures 3-9 Repair information 4-1 Handling ESD-sensitive parts 4-1 Removal procedures 4-2 ACM... Transfer roll removal 4-54 Wear strip (tray 1 and 250-sheet tray 2) removal 4-55 Wear strip (550-sheet tray 2) removal 4-56 iv Lexmark™ E260, E260d, E260dn
...58 Printhead service check 2-65 Transfer roll service check 2-65 Tray 2 service check 2-66 Diagnostic aids 3-1 Accessing service menus 3-1 Printing menus 3-1 Moving around the menu 3-1 Configuration menu selections 3-4 Utilities 3-4 Setup 3-5 Parallel 3-5 USB 3-6 Network 3-7 Diagnostics mode selections 3-8 Adjustment procedures 3-9 Repair information 4-1 Handling ESD-sensitive parts 4-1 Removal procedures 4-2 ACM... Transfer roll removal 4-54 Wear strip (tray 1 and 250-sheet tray 2) removal 4-55 Wear strip (550-sheet tray 2) removal 4-56 iv Lexmark™ E260, E260d, E260dn
Service Manual
Page 70
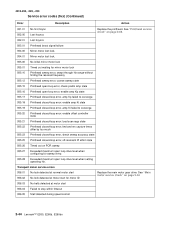
... sweep accuracy state 935.25 Printhead closed -loop error, amp Ki failed to stop within timeout 936.05 Stall detected during speed control 2-44 Lexmark™ E260, E260d, E260dn Transport motor service errors 936.01 No lock detected at normal motor start 936.02 No lock detected at motor start for sweep re... open loop drive level when setting operating Hz. See "Main motor service check" on POR sweep 935.27 Exceeded maximum open loop drive level when configuring for motor ID Replace the main motor gear drive.
... sweep accuracy state 935.25 Printhead closed -loop error, amp Ki failed to stop within timeout 936.05 Stall detected during speed control 2-44 Lexmark™ E260, E260d, E260dn Transport motor service errors 936.01 No lock detected at normal motor start 936.02 No lock detected at motor start for sweep re... open loop drive level when setting operating Hz. See "Main motor service check" on POR sweep 935.27 Exceeded maximum open loop drive level when configuring for motor ID Replace the main motor gear drive.
Service Manual
Page 72
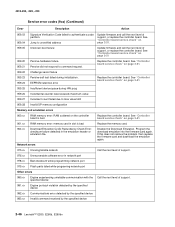
....xx Invalid command received by the specified device 2-46 Lexmark™ E260, E260d, E260dn 4513-200, -220, -230 Service error codes (9xx) (Continued) Error Description Action 959.03 959.04 Signature Verification Code failed to max value limit 959.28 Invalid SP memory configuration Memory and emulation errors 960.xx RAM memory error: RAM...
....xx Invalid command received by the specified device 2-46 Lexmark™ E260, E260d, E260dn 4513-200, -220, -230 Service error codes (9xx) (Continued) Error Description Action 959.03 959.04 Signature Verification Code failed to max value limit 959.28 Invalid SP memory configuration Memory and emulation errors 960.xx RAM memory error: RAM...

Service Manual
Page 84
...check the cable continuity between the LVPS/HVPS connector marked OPC (at the end of the beam or dust on page 3-62. 2-58 Lexmark™ E260, E260d, E260dn To print the print quality test pages: 1. Wait (approximately 10 seconds). 2. None should be caused by the PC roll not being ..., or the printhead in a 'dirty' print. Press and hold until the and lights come on the printer while pressing and holding . Enter Configuration Menu. d. Four pages print to these problems. To exit print quality test pages, turn the printer off the printer. When the light stays on...
...check the cable continuity between the LVPS/HVPS connector marked OPC (at the end of the beam or dust on page 3-62. 2-58 Lexmark™ E260, E260d, E260dn To print the print quality test pages: 1. Wait (approximately 10 seconds). 2. None should be caused by the PC roll not being ..., or the printhead in a 'dirty' print. Press and hold until the and lights come on the printer while pressing and holding . Enter Configuration Menu. d. Four pages print to these problems. To exit print quality test pages, turn the printer off the printer. When the light stays on...

Service Manual
Page 94
use actual sheet). Lexmark E260d, E260dn Lexmark E260d, E260dn 3-2 Lexmark™ E260, E260d, E260dn Note: The light sequences change relative to the option on the printer. 4513-200, -220, -230 Configuration Menu printout (sample only;
use actual sheet). Lexmark E260d, E260dn Lexmark E260d, E260dn 3-2 Lexmark™ E260, E260d, E260dn Note: The light sequences change relative to the option on the printer. 4513-200, -220, -230 Configuration Menu printout (sample only;

Service Manual
Page 96
... streaking. Return the photoconductor counter to factory default values. 4513-200, -220, -230 Configuration menu selections To enter the Configuration menu: 1. The replace photoconductor message should be cleared only when the photoconductor kit has been replaced. 3-4 Lexmark™ E260, E260d, E260dn Open the front access door. 3. Print menus by providing information about what the printer...
... streaking. Return the photoconductor counter to factory default values. 4513-200, -220, -230 Configuration menu selections To enter the Configuration menu: 1. The replace photoconductor message should be cleared only when the photoconductor kit has been replaced. 3-4 Lexmark™ E260, E260d, E260dn Open the front access door. 3. Print menus by providing information about what the printer...

Service Manual
Page 98
... jobs sent through a USB port. Values Off On Auto (default) Off-The printer filters PostScript print jobs using either Windows or Macintosh operating systems. 3-6 Lexmark™ E260, E260d, E260dn 4513-200, -220, -230 USB Use the USB menu to the printer and query printer status information simultaneously. This setting often causes Windows print... print jobs from computers using the Macintosh operating system. On-The printer processes raw binary PostScript print jobs from computers using Standard protocol. MAC Binary Configure the printer to fail.
... jobs sent through a USB port. Values Off On Auto (default) Off-The printer filters PostScript print jobs using either Windows or Macintosh operating systems. 3-6 Lexmark™ E260, E260d, E260dn 4513-200, -220, -230 USB Use the USB menu to the printer and query printer status information simultaneously. This setting often causes Windows print... print jobs from computers using the Macintosh operating system. On-The printer processes raw binary PostScript print jobs from computers using Standard protocol. MAC Binary Configure the printer to fail.

Service Manual
Page 100
... to begin . Turn off the printer. 2. Open the front access door. 3. Follow the instructions on None page 3-9 for more information. 3-8 Lexmark™ E260, E260d, E260dn Three pages all gray, all four margins (top, bottom, right, and left) to stop . Setting is disabled. Off (default) On Defaults Change...match the label ID after the controller board is replaced. 000101 (default) 000189 Printer alignment Align a new printhead. None Configuration ID Allow the printer ID to begin . See "Printhead assembly mechanical adjustment" on the menu page to metric.
... to begin . Turn off the printer. 2. Open the front access door. 3. Follow the instructions on None page 3-9 for more information. 3-8 Lexmark™ E260, E260d, E260dn Three pages all gray, all four margins (top, bottom, right, and left) to stop . Setting is disabled. Off (default) On Defaults Change...match the label ID after the controller board is replaced. 000101 (default) 000189 Printer alignment Align a new printhead. None Configuration ID Allow the printer ID to begin . See "Printhead assembly mechanical adjustment" on the menu page to metric.


