
Quick Reference
Page 5
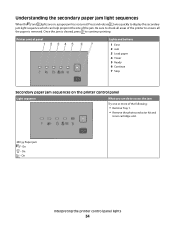
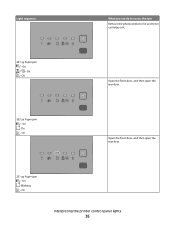
... to access each jam. On - On • Do not load the manual feeder while the printer is the unit housing the toner cartridge and photoconductor kit. 2 Standard exit bin 3 Front door 4 Manual feeder door 5 Standard 250-sheet tray (Tray 1) 6 Optional tray (Tray 2) 7... Rear door Understanding jam lights and access locations The following : • Remove Tray 1. • Open the front door, and then remove the photoconductor kit and toner cartridge unit. 201.yy Paper jam - For more information, see the setup documentation. Inside this door is printing. More detailed instructions...
... to access each jam. On - On • Do not load the manual feeder while the printer is the unit housing the toner cartridge and photoconductor kit. 2 Standard exit bin 3 Front door 4 Manual feeder door 5 Standard 250-sheet tray (Tray 1) 6 Optional tray (Tray 2) 7... Rear door Understanding jam lights and access locations The following : • Remove Tray 1. • Open the front door, and then remove the photoconductor kit and toner cartridge unit. 201.yy Paper jam - For more information, see the setup documentation. Inside this door is printing. More detailed instructions...

Quick Reference
Page 7
... not easy to remove, then open the rear door to the printer using a paper size not supported for duplex printing. Clearing jams behind the photoconductor kit and toner cartridge 1 Push the release button, and then lower the front door. On - Set the unit aside on the underside of... to continue printing. CAUTION-HOT SURFACE: The inside of the following: • Remove Tray 1. • Open the front door, and then remove the photoconductor kit and toner cartridge unit. • Remove Tray 2. Note: If the paper is jammed in the standard exit bin. Warning-Potential Damage: Do not ...
... not easy to remove, then open the rear door to the printer using a paper size not supported for duplex printing. Clearing jams behind the photoconductor kit and toner cartridge 1 Push the release button, and then lower the front door. On - Set the unit aside on the underside of... to continue printing. CAUTION-HOT SURFACE: The inside of the following: • Remove Tray 1. • Open the front door, and then remove the photoconductor kit and toner cartridge unit. • Remove Tray 2. Note: If the paper is jammed in the standard exit bin. Warning-Potential Damage: Do not ...

Quick Reference
Page 9
Clearing jams 9 The paper may be removed this way, check for jammed paper behind the photoconductor kit and toner cartridge unit. For more information, see "Clearing jams behind the rear door If the paper is not exiting the printer: 1 Push the ... touching. 3 Remove the jammed paper. . 2 Pull open the rear door. 4 Close both the front and rear doors. 5 Press to continue printing. Clearing jams behind the photoconductor kit and toner cartridge" on page 7. If the jam cannot be jammed with one end caught in the manual feeder can usually be hot. If...
Clearing jams 9 The paper may be removed this way, check for jammed paper behind the photoconductor kit and toner cartridge unit. For more information, see "Clearing jams behind the rear door If the paper is not exiting the printer: 1 Push the ... touching. 3 Remove the jammed paper. . 2 Pull open the rear door. 4 Close both the front and rear doors. 5 Press to continue printing. Clearing jams behind the photoconductor kit and toner cartridge" on page 7. If the jam cannot be jammed with one end caught in the manual feeder can usually be hot. If...

Maintenance Guide
Page 2
Contents Maintaining the printer 3 Cleaning the exterior of the printer...3 Storing supplies...3 Conserving supplies...3 Checking the status of supplies...4 Checking the status of supplies from a network computer 4 Ordering supplies...5 Ordering toner cartridges ...5 Ordering a photoconductor kit ...5 Replacing supplies...6 Replacing the toner cartridge ...6 Replacing the photoconductor kit ...8 Recycling Lexmark products...11 Moving the printer...11 Before moving the printer ...11 Moving the printer to another location...11 Shipping the printer ...11 Contents 2
Contents Maintaining the printer 3 Cleaning the exterior of the printer...3 Storing supplies...3 Conserving supplies...3 Checking the status of supplies...4 Checking the status of supplies from a network computer 4 Ordering supplies...5 Ordering toner cartridges ...5 Ordering a photoconductor kit ...5 Replacing supplies...6 Replacing the toner cartridge ...6 Replacing the photoconductor kit ...8 Recycling Lexmark products...11 Moving the printer...11 Before moving the printer ...11 Moving the printer to another location...11 Shipping the printer ...11 Contents 2

Maintenance Guide
Page 5
...the printer issues a message or a light sequence to let you know the photoconductor kit is low appears or when the print becomes faded, you purchased the printer. Part name Regular cartridge Lexmark Return Program Cartridge For the US and Canada Toner cartridge E260A21A E260A11A For ...;size plain paper. Maintaining the printer 5 Note: Repeat this time, order a photoconductor kit. The part numbers are as follows. Ordering supplies To order supplies in the U.S., contact Lexmark at www.lexmark.comor contact the place where you may be able to extend the life of the...
...the printer issues a message or a light sequence to let you know the photoconductor kit is low appears or when the print becomes faded, you purchased the printer. Part name Regular cartridge Lexmark Return Program Cartridge For the US and Canada Toner cartridge E260A21A E260A11A For ...;size plain paper. Maintaining the printer 5 Note: Repeat this time, order a photoconductor kit. The part numbers are as follows. Ordering supplies To order supplies in the U.S., contact Lexmark at www.lexmark.comor contact the place where you may be able to extend the life of the...

Maintenance Guide
Page 6
... when you experience faded print, remove the toner cartridge. To replace the toner cartridge: 1 Open the front door by printing a menu settings page. Part name Photoconductor kit Replacing supplies Replacing the toner cartridge Light sequence Toner is low Part number E260X22G • ‑ On • ‑ On When the "Toner is...
... when you experience faded print, remove the toner cartridge. To replace the toner cartridge: 1 Open the front door by printing a menu settings page. Part name Photoconductor kit Replacing supplies Replacing the toner cartridge Light sequence Toner is low Part number E260X22G • ‑ On • ‑ On When the "Toner is...

Maintenance Guide
Page 7
... into place when correctly installed. 6 Close the front door. Push the toner cartridge in all directions to direct light for an extended period of the photoconductor kit, and then pull the toner cartridge out using the handle. 3 Unpack the new toner cartridge. Warning-Potential Damage: When replacing a toner cartridge, do not... light exposure can cause print quality problems. 4 Rotate the cartridge in as far as it will go. 2 Press the button on the tracks of the photoconductor kit.
... into place when correctly installed. 6 Close the front door. Push the toner cartridge in all directions to direct light for an extended period of the photoconductor kit, and then pull the toner cartridge out using the handle. 3 Unpack the new toner cartridge. Warning-Potential Damage: When replacing a toner cartridge, do not... light exposure can cause print quality problems. 4 Rotate the cartridge in as far as it will go. 2 Press the button on the tracks of the photoconductor kit.

Maintenance Guide
Page 8
... does this by displaying the "Photoconductor life warning" light sequence or the "Replace photoconductor" light sequence. Note: The photoconductor kit is one item only. Light sequences Photoconductor life warning ‑ Blinking ‑ On Replace photoconductor ‑ Blinking ‑ Blinking ‑ On When you first receive either light sequence, you when the photoconductor kit reaches a page maximum...
... does this by displaying the "Photoconductor life warning" light sequence or the "Replace photoconductor" light sequence. Note: The photoconductor kit is one item only. Light sequences Photoconductor life warning ‑ Blinking ‑ On Replace photoconductor ‑ Blinking ‑ Blinking ‑ On When you first receive either light sequence, you when the photoconductor kit reaches a page maximum...

Maintenance Guide
Page 9
... cartridge form a unit. Maintaining the printer 9 Warning-Potential Damage: Be careful not to touch the photoconductor drum. Doing so may affect the print quality of the photoconductor kit. To replace the photoconductor kit: 1 Open the front door by pressing the button on the left side of the printer and... lowering the front door. 2 Pull the photoconductor kit and toner cartridge together as a unit out of the...
... cartridge form a unit. Maintaining the printer 9 Warning-Potential Damage: Be careful not to touch the photoconductor drum. Doing so may affect the print quality of the photoconductor kit. To replace the photoconductor kit: 1 Open the front door by pressing the button on the left side of the printer and... lowering the front door. 2 Pull the photoconductor kit and toner cartridge together as a unit out of the...

Maintenance Guide
Page 10
... aligning the arrows on the toner cartridge with the arrows in until it will go. 7 After you replace the photoconductor kit, reset the photoconductor counter. Warning-Potential Damage: Resetting the photoconductor counter without replacing the photoconductor kit may damage your printer and void your warranty. 8 Close the front door. Maintaining the printer 10 5 Insert... the unit with the tracks. Push the toner cartridge in the printer. To reset the counter, see the instruction sheet that came with the new photoconductor kit.
... aligning the arrows on the toner cartridge with the arrows in until it will go. 7 After you replace the photoconductor kit, reset the photoconductor counter. Warning-Potential Damage: Resetting the photoconductor counter without replacing the photoconductor kit may damage your printer and void your warranty. 8 Close the front door. Maintaining the printer 10 5 Insert... the unit with the tracks. Push the toner cartridge in the printer. To reset the counter, see the instruction sheet that came with the new photoconductor kit.

User Guide
Page 4
... Checking the status of supplies from a network computer 100 Ordering supplies...101 Ordering toner cartridges...101 Ordering a photoconductor kit ...102 Replacing supplies...102 Replacing the toner cartridge ...102 Replacing the photoconductor kit ...104 Recycling Lexmark products...107 Moving the printer...107 Before moving the printer ...107 Moving the printer to another location...107...
... Checking the status of supplies from a network computer 100 Ordering supplies...101 Ordering toner cartridges...101 Ordering a photoconductor kit ...102 Replacing supplies...102 Replacing the toner cartridge ...102 Replacing the photoconductor kit ...104 Recycling Lexmark products...107 Moving the printer...107 Before moving the printer ...107 Moving the printer to another location...107...

User Guide
Page 5
... to other printers...111 Clearing jams 113 Avoiding jams...113 Accessing jam areas...114 Understanding jam lights and access locations...114 Clearing jams behind the photoconductor kit and toner cartridge 118 Clearing jams from the standard exit bin...120 Clearing jams from Tray 1...120 Clearing jams from Tray 2...122 Clearing jams...
... to other printers...111 Clearing jams 113 Avoiding jams...113 Accessing jam areas...114 Understanding jam lights and access locations...114 Clearing jams behind the photoconductor kit and toner cartridge 118 Clearing jams from the standard exit bin...120 Clearing jams from Tray 1...120 Clearing jams from Tray 2...122 Clearing jams...
User Guide
Page 22
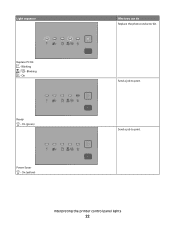
On Send a job to print. Light sequence What you can do Replace the photoconductor kit. Ready - On (green) Send a job to print. Power Saver - Blinking - On (yellow) Interpreting the printer control panel lights 22 Replace PC Kit - Blinking -
On Send a job to print. Light sequence What you can do Replace the photoconductor kit. Ready - On (green) Send a job to print. Power Saver - Blinking - On (yellow) Interpreting the printer control panel lights 22 Replace PC Kit - Blinking -
User Guide
Page 27
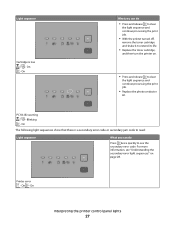
... page 28. On - On What you can do Press twice quickly to clear the light sequence and continue processing the print job. • Replace the photoconductor kit. PC Kit life warning - On Interpreting the printer control panel lights 27 Blinking - On The following light sequences show that there is low - For...
... page 28. On - On What you can do Press twice quickly to clear the light sequence and continue processing the print job. • Replace the photoconductor kit. PC Kit life warning - On Interpreting the printer control panel lights 27 Blinking - On The following light sequences show that there is low - For...
User Guide
Page 34
... of the jam. Press and release twice quickly to access the jam Try one or more of the following: • Remove Tray 1. • Remove the photoconductor kit and toner cartridge unit. 200.yy Paper jam -
... of the jam. Press and release twice quickly to access the jam Try one or more of the following: • Remove Tray 1. • Remove the photoconductor kit and toner cartridge unit. 200.yy Paper jam -
User Guide
Page 35
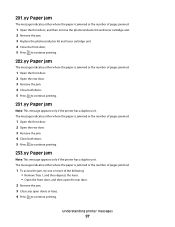
On - On Open the front door, and then open the rear door. 202.yy Paper jam - On - Blinking - On Open the front door, and then open the rear door. 231.yy Paper jam - On - On Interpreting the printer control panel lights 35 On - Light sequence What you can do to access the jam Remove the photoconductor kit and toner cartridge unit. 201.yy Paper jam - On -
On - On Open the front door, and then open the rear door. 202.yy Paper jam - On - Blinking - On Open the front door, and then open the rear door. 231.yy Paper jam - On - On Interpreting the printer control panel lights 35 On - Light sequence What you can do to access the jam Remove the photoconductor kit and toner cartridge unit. 201.yy Paper jam - On -

User Guide
Page 37
On 24x.yy Paper jam - On What you can do to access the jam Try one or more of the following : • Remove Tray 1. • Remove the photoconductor kit and toner cartridge unit. • Remove Tray 2. Light sequence 24x.yy Paper jam - On - On - On - Interpreting the printer control panel lights 37 On - Try one or more of the following : • Remove Tray 1. • Remove the photoconductor kit and toner cartridge unit. • Remove Tray 2. On - On -
On 24x.yy Paper jam - On What you can do to access the jam Try one or more of the following : • Remove Tray 1. • Remove the photoconductor kit and toner cartridge unit. • Remove Tray 2. Light sequence 24x.yy Paper jam - On - On - On - Interpreting the printer control panel lights 37 On - Try one or more of the following : • Remove Tray 1. • Remove the photoconductor kit and toner cartridge unit. • Remove Tray 2. On - On -
User Guide
Page 64
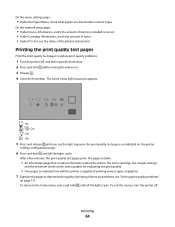
... amount of toner. • Under PC Unit, see the light sequence for evaluating the print quality • Two pages to determine the quality of the photoconductor kit . On -
... amount of toner. • Under PC Unit, see the light sequence for evaluating the print quality • Two pages to determine the quality of the photoconductor kit . On -

User Guide
Page 96
...more of the following : • Remove Tray 1. • Open the front door, and then remove the photoconductor kit and toner cartridge unit. 2 Remove the jam. 3 Replace the photoconductor kit and toner cartridge unit if you purchased your printer. 200.yy Paper jam The message indicates either where ...printer. • Upgrade (flash) the network firmware in the printer or print server. 84 PC Kit life warning The photoconductor kit is exhausted. Install a new photoconductor kit. 42.xy Cartridge region mismatch Replace the toner cartridge with one that is correct for the region where you have ...
...more of the following : • Remove Tray 1. • Open the front door, and then remove the photoconductor kit and toner cartridge unit. 2 Remove the jam. 3 Replace the photoconductor kit and toner cartridge unit if you purchased your printer. 200.yy Paper jam The message indicates either where ...printer. • Upgrade (flash) the network firmware in the printer or print server. 84 PC Kit life warning The photoconductor kit is exhausted. Install a new photoconductor kit. 42.xy Cartridge region mismatch Replace the toner cartridge with one that is correct for the region where you have ...
User Guide
Page 97
... either where the paper is jammed or the number of pages jammed. 1 Open the front door, and then remove the photoconductor kit and toner cartridge unit. 2 Remove the jam. 3 Replace the photoconductor kit and toner cartridge unit. 4 Close the front door. 5 Press to continue printing. 202.yy Paper jam The message indicates...
... either where the paper is jammed or the number of pages jammed. 1 Open the front door, and then remove the photoconductor kit and toner cartridge unit. 2 Remove the jam. 3 Replace the photoconductor kit and toner cartridge unit. 4 Close the front door. 5 Press to continue printing. 202.yy Paper jam The message indicates...


