
Card Stock & Label Guide
Page 11
... modification or attachments • accidents or misuse • unsuitable physical or operating environment • maintenance by any unauthorized (non‑Lexmark) servicer • operation of a product beyond the limit of the form for your printer, locate your forms require landscape orientation, be... to nesting and double‑sheet feeds, and the fusing process significantly reduces the height of non‑Lexmark supplies (such as toner cartridges and/or inkjet cartridges) • use micro‑perfs to avoid nesting problems. For more reliably than the corner buckler system...
... modification or attachments • accidents or misuse • unsuitable physical or operating environment • maintenance by any unauthorized (non‑Lexmark) servicer • operation of a product beyond the limit of the form for your printer, locate your forms require landscape orientation, be... to nesting and double‑sheet feeds, and the fusing process significantly reduces the height of non‑Lexmark supplies (such as toner cartridges and/or inkjet cartridges) • use micro‑perfs to avoid nesting problems. For more reliably than the corner buckler system...

Card Stock & Label Guide
Page 14
... procedures apply only to follow maintenance procedures for your printer documentation. To maintain printer feeding reliability, repeat this cleaning process every time you replace the toner cartridge. If print quality begins to degrade when printing on vinyl labels, then do the following printers, make sure perforations fall outside the 0.12-0.91‑...
... procedures apply only to follow maintenance procedures for your printer documentation. To maintain printer feeding reliability, repeat this cleaning process every time you replace the toner cartridge. If print quality begins to degrade when printing on vinyl labels, then do the following printers, make sure perforations fall outside the 0.12-0.91‑...

Card Stock & Label Guide
Page 65
...8226; We recommend the use of the label or the perforations, or between the die‑cuts. • Use full label sheets. Lexmark CS310n, CS310dn, CS410n, CS410dn, and CS510de Notes: • Your printer may not support labels with certain design characteristics. Limit label printing...multipurpose feeder may not have a 650‑sheet duo tray with adhesive, and could void the printer and toner cartridge warranties. Partial sheets also contaminate the printer and the cartridge with an integrated multipurpose feeder. • The 250‑sheet tray (Tray 1), 550‑sheet tray, ...
...8226; We recommend the use of the label or the perforations, or between the die‑cuts. • Use full label sheets. Lexmark CS310n, CS310dn, CS410n, CS410dn, and CS510de Notes: • Your printer may not support labels with certain design characteristics. Limit label printing...multipurpose feeder may not have a 650‑sheet duo tray with adhesive, and could void the printer and toner cartridge warranties. Partial sheets also contaminate the printer and the cartridge with an integrated multipurpose feeder. • The 250‑sheet tray (Tray 1), 550‑sheet tray, ...

Card Stock & Label Guide
Page 125
... jam. When printing on many labels designed for use with laser printers. Partial sheets also contaminate the printer and the cartridge with adhesive, and could void the printer and toner cartridge warranties. Overview of labels is not recommended. The following table lists the maximum weights supported by the trays and the... in the Paper menu to match the card stock loaded in the tray. • Do not use creased card stock to avoid jams. Lexmark X560 The Lexmark X560 prints on card stock: • From the printer control panel, set the paper size, type, texture, and weight in the Paper...
... jam. When printing on many labels designed for use with laser printers. Partial sheets also contaminate the printer and the cartridge with adhesive, and could void the printer and toner cartridge warranties. Overview of labels is not recommended. The following table lists the maximum weights supported by the trays and the... in the Paper menu to match the card stock loaded in the tray. • Do not use creased card stock to avoid jams. Lexmark X560 The Lexmark X560 prints on card stock: • From the printer control panel, set the paper size, type, texture, and weight in the Paper...

Card Stock & Label Guide
Page 151
...the Paper menu to match the labels loaded in the tray. • Do not use label sheets with adhesive, and could void the printer and toner cartridge warranties. Optra plus, 4039, 4029, 4019, WinWriter 600 printers The following table lists the maximum weights supported by each of the label or the ...perforations, or between the die‑cuts. • Use full label sheets. Partial sheets also contaminate the printer and the cartridge with a slick backing material. • Do not print within 1 mm (0.04 in.) of the die‑cut, the edge of the special card stock...
...the Paper menu to match the labels loaded in the tray. • Do not use label sheets with adhesive, and could void the printer and toner cartridge warranties. Optra plus, 4039, 4029, 4019, WinWriter 600 printers The following table lists the maximum weights supported by each of the label or the ...perforations, or between the die‑cuts. • Use full label sheets. Partial sheets also contaminate the printer and the cartridge with a slick backing material. • Do not print within 1 mm (0.04 in.) of the die‑cut, the edge of the special card stock...

Card Stock & Label Guide
Page 154
...the fuser and prolong fuser life. Using third party, non‑Lexmark cartridges and fuser cleaners can result in toner build‑up in your printer documentation for general use the 4039 cartridges in degraded print quality and may need additional fuser cleaners, order... P/N 1380785. Using refilled non‑Lexmark cartridges can void the printer warranty. For more sheets of paper....
...the fuser and prolong fuser life. Using third party, non‑Lexmark cartridges and fuser cleaners can result in toner build‑up in your printer documentation for general use the 4039 cartridges in degraded print quality and may need additional fuser cleaners, order... P/N 1380785. Using refilled non‑Lexmark cartridges can void the printer warranty. For more sheets of paper....
Quick Reference
Page 13
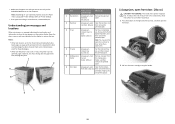
... and then remove the jammed paper. 6 Front door [x]‑page jam, open front door. [20y.xx] Open the front door, then remove the toner cartridge, imaging unit, and jammed paper. [x]‑page jam, open front door. [20y.xx] CAUTION-HOT SURFACE: The inside of the printer, and then ... Paper menu using the handle. 3 4 13 bin. [20y.xx] 2 Rear door [x]‑page jam, open the front door. 1 2 2 Pull out the toner cartridge using Local Printer Settings Utility or Printer Settings. • Store paper according to manufacturer recommendations. Note: You may need to open the rear door to...
... and then remove the jammed paper. 6 Front door [x]‑page jam, open front door. [20y.xx] Open the front door, then remove the toner cartridge, imaging unit, and jammed paper. [x]‑page jam, open front door. [20y.xx] CAUTION-HOT SURFACE: The inside of the printer, and then ... Paper menu using the handle. 3 4 13 bin. [20y.xx] 2 Rear door [x]‑page jam, open the front door. 1 2 2 Pull out the toner cartridge using Local Printer Settings Utility or Printer Settings. • Store paper according to manufacturer recommendations. Note: You may need to open the rear door to...

Quick Reference
Page 14
...green flap in front of the printer. 7 Insert the imaging unit by aligning the side rails of the cartridge with the arrows on the side rails inside the printer, and then insert the cartridge into the printer. 4 Place the imaging unit aside on the side rails inside the printer, and then...-Potential Damage: Do not touch the shiny blue photoconductor drum under the imaging unit. Note: Make sure all paper fragments are removed. 8 Insert the toner cartridge by aligning the arrows on the side rails of future print jobs. 6 Firmly grasp the jammed paper on each side, and then gently pull it...
...green flap in front of the printer. 7 Insert the imaging unit by aligning the side rails of the cartridge with the arrows on the side rails inside the printer, and then insert the cartridge into the printer. 4 Place the imaging unit aside on the side rails inside the printer, and then...-Potential Damage: Do not touch the shiny blue photoconductor drum under the imaging unit. Note: Make sure all paper fragments are removed. 8 Insert the toner cartridge by aligning the arrows on the side rails of future print jobs. 6 Firmly grasp the jammed paper on each side, and then gently pull it...

User's Guide
Page 57
... periods, such as 123.123.123.123. • If you would work on a printer control panel. The status of the supply will appear on the toner cartridge, imaging unit, and maintenance kit. • All selectable alerts can be set for nearly low, low, and very low supply conditions. Modifying confidential print settings...
... periods, such as 123.123.123.123. • If you would work on a printer control panel. The status of the supply will appear on the toner cartridge, imaging unit, and maintenance kit. • All selectable alerts can be set for nearly low, low, and very low supply conditions. Modifying confidential print settings...

User's Guide
Page 97
...;down menu for each supply, select one of estimated remaining supply that appears at http://support.lexmark.com. The status of the supply. Checking the virtual display 1 Open a Web browser, ...the supply appears on some supplies for the end‑of the screen. Using MS610de 97 Finding advanced networking and administrator information This chapter covers basic administrative support tasks ... Description Off The normal printer behavior for all selectable alerts can be set on the toner cartridge, imaging unit, and maintenance kit. • All selectable alerts can determine how you...
...;down menu for each supply, select one of estimated remaining supply that appears at http://support.lexmark.com. The status of the supply. Checking the virtual display 1 Open a Web browser, ...the supply appears on some supplies for the end‑of the screen. Using MS610de 97 Finding advanced networking and administrator information This chapter covers basic administrative support tasks ... Description Off The normal printer behavior for all selectable alerts can be set on the toner cartridge, imaging unit, and maintenance kit. • All selectable alerts can determine how you...

User's Guide
Page 110
...(0.04 inch) of the edge of the label, of the perforations, or between die‑cuts of the adhesive should be at http://support.lexmark.com. Zone coating of the label. • Make sure the adhesive backing does not reach to prevent sheets from edges. When printing on ...• Adjust the width guides to verify that: - For information on letterhead. Adhesive material contaminates the printer and could void the printer and toner cartridge warranties. • Do not use labels with the manufacturer or vendor to fit the width of high humidity (over 60%) and high printing ...
...(0.04 inch) of the edge of the label, of the perforations, or between die‑cuts of the adhesive should be at http://support.lexmark.com. Zone coating of the label. • Make sure the adhesive backing does not reach to prevent sheets from edges. When printing on ...• Adjust the width guides to verify that: - For information on letterhead. Adhesive material contaminates the printer and could void the printer and toner cartridge warranties. • Do not use labels with the manufacturer or vendor to fit the width of high humidity (over 60%) and high printing ...
User's Guide
Page 166
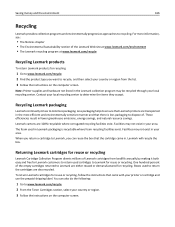
... the product type you can also do the following: 1 Go to return the cartridges are 100% recyclable where corrugated recycling facilities exist. The foam used to www.lexmark.com/recycle. 2 From the Toner Cartridges section, select your area. Returning Lexmark cartridges for recycling. Lexmark cartons are also recycled. Facilities may not exist in your country or region...
... the product type you can also do the following: 1 Go to return the cartridges are 100% recyclable where corrugated recycling facilities exist. The foam used to www.lexmark.com/recycle. 2 From the Toner Cartridges section, select your area. Returning Lexmark cartridges for recycling. Lexmark cartons are also recycled. Facilities may not exist in your country or region...
User's Guide
Page 168
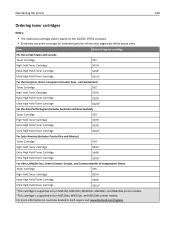
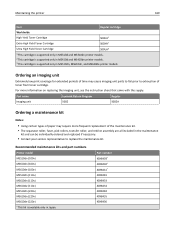
... region, visit www.lexmark.com/regions. Item Return Program cartridge For the United States and Canada Toner Cartridge 501 High Yield Toner Cartridge 501H Extra High Yield Toner Cartridge 501X1 Ultra High Yield Toner Cartridge 501U2 For the European Union, European Economic Area , and Switzerland Toner Cartridge 502 High Yield Toner Cartridge 502H Extra High Yield Toner Cartridge 502X1 Ultra High Yield Toner Cartridge 502U2 For the Asia...
... region, visit www.lexmark.com/regions. Item Return Program cartridge For the United States and Canada Toner Cartridge 501 High Yield Toner Cartridge 501H Extra High Yield Toner Cartridge 501X1 Ultra High Yield Toner Cartridge 501U2 For the European Union, European Economic Area , and Switzerland Toner Cartridge 502 High Yield Toner Cartridge 502H Extra High Yield Toner Cartridge 502X1 Ultra High Yield Toner Cartridge 502U2 For the Asia...
User's Guide
Page 169
...MS510dn (100v) MS610dn (100v) MS610de (100v) MS510dn (110v) MS610dn (110v) MS610de (110v) MS510dn (220v) MS610dn (220v) MS610de (220v) * This kit is supported only in MS510dn, MS610dn, and MS610de printer models. For more frequent ...cartridge Worldwide High Yield Toner Cartridge 500HA1 Extra High Yield Toner Cartridge 500XA2 Ultra High Yield Toner Cartridge 500UA3 1 This cartridge is supported only in MS310d and MS310dn printer models. 2 This cartridge is supported only in MS410d and MS410dn printer models. 3 This cartridge is available only in Japan. Part name Lexmark...
...MS510dn (100v) MS610dn (100v) MS610de (100v) MS510dn (110v) MS610dn (110v) MS610de (110v) MS510dn (220v) MS610dn (220v) MS610de (220v) * This kit is supported only in MS510dn, MS610dn, and MS610de printer models. For more frequent ...cartridge Worldwide High Yield Toner Cartridge 500HA1 Extra High Yield Toner Cartridge 500XA2 Ultra High Yield Toner Cartridge 500UA3 1 This cartridge is supported only in MS310d and MS310dn printer models. 2 This cartridge is supported only in MS410d and MS410dn printer models. 3 This cartridge is available only in Japan. Part name Lexmark...
User's Guide
Page 170
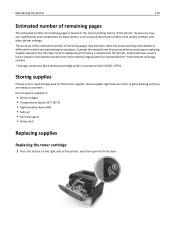
... page content. * Average continuous black declared cartridge yield in their original packing until you are ready to : • Direct sunlight • Temperatures above 35°C (95°F) • High humidity above 80% • Salty air • Corrosive gases • Heavy dust Replacing supplies Replacing the toner cartridge 1 Press the button on the estimate.
... page content. * Average continuous black declared cartridge yield in their original packing until you are ready to : • Direct sunlight • Temperatures above 35°C (95°F) • High humidity above 80% • Salty air • Corrosive gases • Heavy dust Replacing supplies Replacing the toner cartridge 1 Press the button on the estimate.
User's Guide
Page 171
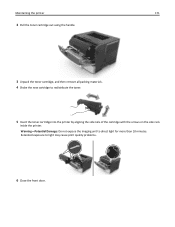
Warning-Potential Damage: Do not expose the imaging unit to light may cause print quality problems. 6 Close the front door. Extended exposure to direct light for more than 10 minutes. Maintaining the printer 171 2 Pull the toner cartridge out using the handle. 3 Unpack the toner cartridge, and then remove all packing materials. 4 Shake the new cartridge to redistribute the toner. 5 Insert the toner cartridge into the printer by aligning the side rails of the cartridge with the arrows on the side rails inside the printer.
Warning-Potential Damage: Do not expose the imaging unit to light may cause print quality problems. 6 Close the front door. Extended exposure to direct light for more than 10 minutes. Maintaining the printer 171 2 Pull the toner cartridge out using the handle. 3 Unpack the toner cartridge, and then remove all packing materials. 4 Shake the new cartridge to redistribute the toner. 5 Insert the toner cartridge into the printer by aligning the side rails of the cartridge with the arrows on the side rails inside the printer.

User's Guide
Page 172
Maintaining the printer 172 Replacing the imaging unit 1 Press the button on the right side of the printer, and then open the front door. 1 2 2 Pull the toner cartridge out using the handle. 3 Lift the green handle, and then pull the imaging unit out of the printer.
Maintaining the printer 172 Replacing the imaging unit 1 Press the button on the right side of the printer, and then open the front door. 1 2 2 Pull the toner cartridge out using the handle. 3 Lift the green handle, and then pull the imaging unit out of the printer.
User's Guide
Page 174
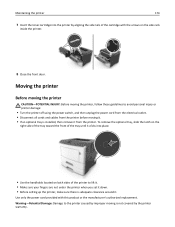
... not covered by improper moving it. • If an optional tray is adequate clearance around it from the printer. Maintaining the printer 174 7 Insert the toner cartridge into place. • Use the handholds located on the side rails inside the printer. 8 Close the front door. Warning-Potential Damage: Damage to the printer... up the printer, make sure there is installed, then remove it . Use only the power cord provided with the arrows on both sides of the cartridge with this product or the manufacturer's authorized replacement.
... not covered by improper moving it. • If an optional tray is adequate clearance around it from the printer. Maintaining the printer 174 7 Insert the toner cartridge into place. • Use the handholds located on the side rails inside the printer. 8 Close the front door. Warning-Potential Damage: Damage to the printer... up the printer, make sure there is installed, then remove it . Use only the power cord provided with the arrows on both sides of the cartridge with this product or the manufacturer's authorized replacement.
User's Guide
Page 178
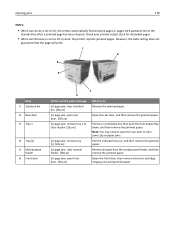
... tray out, and then remove the jammed paper. Open the rear door, and then remove the jammed paper. Open the front door, then remove the toner cartridge, imaging unit, and jammed paper. Remove all paper from the multipurpose feeder, and then remove the jammed paper. However, the Auto setting does not guarantee...
... tray out, and then remove the jammed paper. Open the rear door, and then remove the jammed paper. Open the front door, then remove the toner cartridge, imaging unit, and jammed paper. Remove all paper from the multipurpose feeder, and then remove the jammed paper. However, the Auto setting does not guarantee...

User's Guide
Page 179
.... Doing so may affect the quality of the printer might be hot. Clearing jams 179 [x]‑page jam, open the front door. 1 2 2 Pull out the toner cartridge using the handle. 3 Lift the green handle, and then pull out the imaging unit from a hot component, allow the surface to cool before touching it...
.... Doing so may affect the quality of the printer might be hot. Clearing jams 179 [x]‑page jam, open the front door. 1 2 2 Pull out the toner cartridge using the handle. 3 Lift the green handle, and then pull out the imaging unit from a hot component, allow the surface to cool before touching it...


