

Card Stock & Label Guide
Page 4
... E462dtn 74 Lexmark E320, E322...75 Lexmark E321, E323...76 Lexmark MS310d, MS310dn, MS410d, MS410dn, MS510dn, MS610dn, and MS610de 77 Lexmark MS710 and MS711...79 Lexmark MS810, MS811, and MS812...82 Lexmark MX310dn, MX410de, MX510de, MX511de, MX511dhe, MX610de, MX611de, and MX611dhe...84 Lexmark MX710, MX711, MX810, MX811, and MX812 86 Lexmark T420...89 Lexmark T430...91 Lexmark T520, T522...93 Lexmark T620, T622...
... E462dtn 74 Lexmark E320, E322...75 Lexmark E321, E323...76 Lexmark MS310d, MS310dn, MS410d, MS410dn, MS510dn, MS610dn, and MS610de 77 Lexmark MS710 and MS711...79 Lexmark MS810, MS811, and MS812...82 Lexmark MX310dn, MX410de, MX510de, MX511de, MX511dhe, MX610de, MX611de, and MX611dhe...84 Lexmark MX710, MX711, MX810, MX811, and MX812 86 Lexmark T420...89 Lexmark T430...91 Lexmark T520, T522...93 Lexmark T620, T622...

Card Stock & Label Guide
Page 7
..., E322, E323, E330, E332n, E340, E342n, E350, E360, E450, E460, E462dtn M series OptraTM T series W series WinWriterTM 600 MS310d, MS310dn, MS410d, MS410dn, MS510dn, MS610dn, MS610de, MS710, MS711, MS810, MS811, MS812, MX310dn, MX410de, MX510de, MX610de, MX611de, MX611dhe, MX710, MX711, MX810, MX811, MX812 All T420, T430, T520, T522, T620, T622... printing information and terms. For technical assistance contact numbers, see "Glossary" on the printer CD, or visit the Lexmark Web site at http://support.lexmark.com. Note: Always test print materials thoroughly before buying large quantities.
..., E322, E323, E330, E332n, E340, E342n, E350, E360, E450, E460, E462dtn M series OptraTM T series W series WinWriterTM 600 MS310d, MS310dn, MS410d, MS410dn, MS510dn, MS610dn, MS610de, MS710, MS711, MS810, MS811, MS812, MX310dn, MX410de, MX510de, MX610de, MX611de, MX611dhe, MX710, MX711, MX810, MX811, MX812 All T420, T430, T520, T522, T620, T622... printing information and terms. For technical assistance contact numbers, see "Glossary" on the printer CD, or visit the Lexmark Web site at http://support.lexmark.com. Note: Always test print materials thoroughly before buying large quantities.

Card Stock & Label Guide
Page 77
... label printing to occasional use the top exit when printing on page 14. The Lexmark MS310d, MS310dn, MS410d, MS410dn, MS510dn, MS610dn, and MS610de printer models do not support vinyl, pharmacy, or polyester labels. It is optimal. Card stock Weight: Up to 163 g/m2 Index Bristol (90 lb) Up ...
... label printing to occasional use the top exit when printing on page 14. The Lexmark MS310d, MS310dn, MS410d, MS410dn, MS510dn, MS610dn, and MS610de printer models do not support vinyl, pharmacy, or polyester labels. It is optimal. Card stock Weight: Up to 163 g/m2 Index Bristol (90 lb) Up ...
Forms and Bar Code Card User's Guide
Page 4
... .lfm and .lff. - Forms Composer and Forms Manager are required to an HP LaserJet with the printer. Supported devices • Lexmark MS812, MS811, MS810 • Lexmark MS610de, MS610dn • Lexmark MS510dn • Lexmark CS510de, CS510e • Lexmark CS410dn, CS410n With PCL 5 emulation, Forms and Bar Code Card is the functional equivalent of standard forms and bar codes...
... .lfm and .lff. - Forms Composer and Forms Manager are required to an HP LaserJet with the printer. Supported devices • Lexmark MS812, MS811, MS810 • Lexmark MS610de, MS610dn • Lexmark MS510dn • Lexmark CS510de, CS510e • Lexmark CS410dn, CS410n With PCL 5 emulation, Forms and Bar Code Card is the functional equivalent of standard forms and bar codes...

PRESCRIBE Emulation Technical Reference Guide
Page 3
... consider in select large accounts where the PRESCRIBE printer language is done using the Resource Save setting. Supported devices • Lexmark MS812, MS811, MS810 • Lexmark MS610de, MS610dn • Lexmark MS510dn • Lexmark CS510de, CS510e • Lexmark CS410dn, CS410n Installing the PRESCRIBE emulation option Note: Installing the option may not require further setup. For more information on...
... consider in select large accounts where the PRESCRIBE printer language is done using the Resource Save setting. Supported devices • Lexmark MS812, MS811, MS810 • Lexmark MS610de, MS610dn • Lexmark MS510dn • Lexmark CS510de, CS510e • Lexmark CS410dn, CS410n Installing the PRESCRIBE emulation option Note: Installing the option may not require further setup. For more information on...
User's Guide
Page 2
... Wi‑Fi Protected Setup 32 Connecting the printer to a wireless network using the Embedded Web Server 33 Verifying printer setup...34 Using MS510dn and MS610dn 35 Learning about the printer...35 Printer configurations ...35 Using the printer control panel...36 Understanding the colors of the indicator and Sleep button lights...
... Wi‑Fi Protected Setup 32 Connecting the printer to a wireless network using the Embedded Web Server 33 Verifying printer setup...34 Using MS510dn and MS610dn 35 Learning about the printer...35 Printer configurations ...35 Using the printer control panel...36 Understanding the colors of the indicator and Sleep button lights...

User's Guide
Page 12
... devices attached to install internal options. RS‑232‑C serial interface * This internal option is available only in the MS610de printer model. Parallel 1284‑B interface - If you are easily damaged by static electricity. Touch a metal surface on page... Hard disk* • Internal Solutions Ports (ISP)* - For MS510dn and MS610dn, see "Accessing the controller board" on page 73. Fonts - Available internal options • DDR3 DIMM • Flash memory - For MS610de, see "Accessing the controller board" on the printer before continuing. Accessing the ...
... devices attached to install internal options. RS‑232‑C serial interface * This internal option is available only in the MS610de printer model. Parallel 1284‑B interface - If you are easily damaged by static electricity. Touch a metal surface on page... Hard disk* • Internal Solutions Ports (ISP)* - For MS510dn and MS610dn, see "Accessing the controller board" on page 73. Fonts - Available internal options • DDR3 DIMM • Flash memory - For MS610de, see "Accessing the controller board" on the printer before continuing. Accessing the ...
User's Guide
Page 13
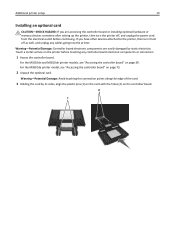
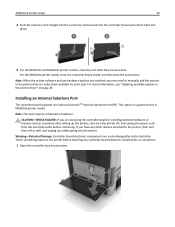
... connection points along the edge of the card. 3 Holding the card by static electricity. For the MS610de printer model, see "Accessing the controller board" on page 73. 2 Unpack the optional card. For the MS510dn and MS610dn printer models, see "Accessing the controller board" on page 39. Additional printer setup 13 Installing an...
... connection points along the edge of the card. 3 Holding the card by static electricity. For the MS610de printer model, see "Accessing the controller board" on page 73. 2 Unpack the optional card. For the MS510dn and MS610dn printer models, see "Accessing the controller board" on page 39. Additional printer setup 13 Installing an...
User's Guide
Page 14
... page 28. Note: When the printer software and any hardware options are installed, you are easily damaged by static electricity. For the MS610de printer model, close the controller board shield, and then close the controller board access door. Warning-Potential Damage: Controller board electronic components... Damage: Improper installation of the connector on the card must touch and be flushed against the controller board. 5 For the MS510dn and MS610dn printer models, close the access door. For more information, see "Updating available options in the printer driver to the card and the ...
... page 28. Note: When the printer software and any hardware options are installed, you are easily damaged by static electricity. For the MS610de printer model, close the controller board shield, and then close the controller board access door. Warning-Potential Damage: Controller board electronic components... Damage: Improper installation of the connector on the card must touch and be flushed against the controller board. 5 For the MS510dn and MS610dn printer models, close the access door. For more information, see "Updating available options in the printer driver to the card and the ...

User's Guide
Page 15
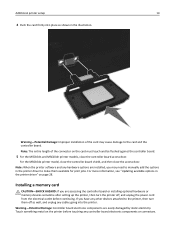
For the MS610de printer model, see "Accessing the controller board" on page 73. 2 Unpack the memory card. Warning-Potential Damage: Do not touch the connection points along the edge of the card. Additional printer setup 15 An optional memory card can be purchased separately and attached to the controller board. 1 Access the controller board. For the MS510dn and MS610dn printer models, see "Accessing the controller board" on page 39. Doing so may cause damage. 3 Align the notch (1) on the memory card with the ridge (2) on the connector. 1 2
For the MS610de printer model, see "Accessing the controller board" on page 73. 2 Unpack the memory card. Warning-Potential Damage: Do not touch the connection points along the edge of the card. Additional printer setup 15 An optional memory card can be purchased separately and attached to the controller board. 1 Access the controller board. For the MS510dn and MS610dn printer models, see "Accessing the controller board" on page 39. Doing so may cause damage. 3 Align the notch (1) on the memory card with the ridge (2) on the connector. 1 2
User's Guide
Page 16
... to the printer, then turn the printer off as well, and unplug any cables going into place. 1 2 5 For the MS510dn and MS610dn printer models, close the access door. Warning-Potential Damage: Controller board electronic components are accessing the controller board or installing optional hardware or memory ... forward into the controller board wall until it clicks into the printer. For more information, see "Updating available options in MS610de printer model. For the MS610de printer model, close the controller board shield, and then close the controller board access door.
... to the printer, then turn the printer off as well, and unplug any cables going into place. 1 2 5 For the MS510dn and MS610dn printer models, close the access door. Warning-Potential Damage: Controller board electronic components are accessing the controller board or installing optional hardware or memory ... forward into the controller board wall until it clicks into the printer. For more information, see "Updating available options in MS610de printer model. For the MS610de printer model, close the controller board shield, and then close the controller board access door.
User's Guide
Page 35
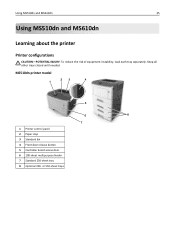
Keep all other trays closed until needed. MS510dn printer model 23 4 1 5 6 8 7 1 Printer control panel 2 Paper stop 3 Standard bin 4 Front door release button 5 Controller board access door 6 100‑sheet multipurpose feeder 7 Standard 250‑sheet tray 8 Optional 250‑ or 550‑sheet trays Using MS510dn and MS610dn 35 Using MS510dn and MS610dn Learning about the printer Printer configurations CAUTION-POTENTIAL INJURY: To reduce the risk of equipment instability, load each tray separately.
Keep all other trays closed until needed. MS510dn printer model 23 4 1 5 6 8 7 1 Printer control panel 2 Paper stop 3 Standard bin 4 Front door release button 5 Controller board access door 6 100‑sheet multipurpose feeder 7 Standard 250‑sheet tray 8 Optional 250‑ or 550‑sheet trays Using MS510dn and MS610dn 35 Using MS510dn and MS610dn Learning about the printer Printer configurations CAUTION-POTENTIAL INJURY: To reduce the risk of equipment instability, load each tray separately.
User's Guide
Page 36
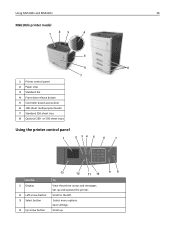
Set up . 98 Scroll up and operate the printer. Save settings. Select menu options. Scroll to the left. Using MS510dn and MS610dn 36 MS610dn printer model 1 23 4 5 6 8 7 1 Printer control panel 2 Paper stop 3 Standard bin 4 Front door release button 5 Controller board access door 6 100‑sheet multipurpose feeder 7 Standard 550‑sheet tray 8 Optional 250‑ or 550‑sheet trays Using the printer control panel 1 2 34 5 6 7 Use the 1 Display 2 Left arrow button 3 Select button 4 Up arrow button 13 12 11 10 To View the printer status and messages.
Set up . 98 Scroll up and operate the printer. Save settings. Select menu options. Scroll to the left. Using MS510dn and MS610dn 36 MS610dn printer model 1 23 4 5 6 8 7 1 Printer control panel 2 Paper stop 3 Standard bin 4 Front door release button 5 Controller board access door 6 100‑sheet multipurpose feeder 7 Standard 550‑sheet tray 8 Optional 250‑ or 550‑sheet trays Using the printer control panel 1 2 34 5 6 7 Use the 1 Display 2 Left arrow button 3 Select button 4 Up arrow button 13 12 11 10 To View the printer status and messages.
User's Guide
Page 37
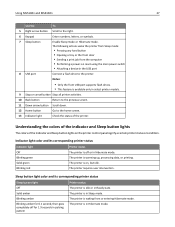
... and Sleep button lights The colors of the printer. The printer requires user intervention. The printer is available only in Hibernate mode. Using MS510dn and MS610dn 37 Use the To 5 Right arrow button Scroll to the printer. Notes: • Only the front USB port supports flash drives. • This feature is...
... and Sleep button lights The colors of the printer. The printer requires user intervention. The printer is available only in Hibernate mode. Using MS510dn and MS610dn 37 Use the To 5 Right arrow button Scroll to the printer. Notes: • Only the front USB port supports flash drives. • This feature is...
User's Guide
Page 38
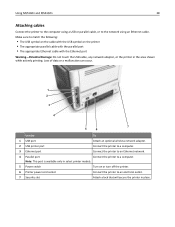
Using MS510dn and MS610dn 38 Attaching cables Connect the printer to the computer using a USB or parallel cable, or to an electrical outlet. 7 Security slot Attach a lock that will ...
Using MS510dn and MS610dn 38 Attaching cables Connect the printer to the computer using a USB or parallel cable, or to an electrical outlet. 7 Security slot Attach a lock that will ...
User's Guide
Page 39
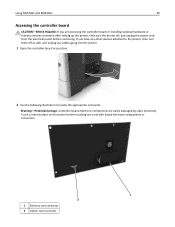
Using MS510dn and MS610dn 39 Accessing the controller board CAUTION-SHOCK HAZARD: If you have any controller board electronic components or connectors. 1 2 1 Memory card connector 2 Option card connector If ...
Using MS510dn and MS610dn 39 Accessing the controller board CAUTION-SHOCK HAZARD: If you have any controller board electronic components or connectors. 1 2 1 Memory card connector 2 Option card connector If ...
User's Guide
Page 40
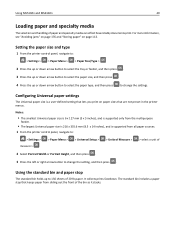
... press . 3 Press the left or right arrow button to 150 sheets of paper and specialty media can affect how reliably documents print. Using MS510dn and MS610dn 40 Loading paper and specialty media The selection and handling of 20‑lb paper. It collects prints facedown. Setting the paper size and type...
... press . 3 Press the left or right arrow button to 150 sheets of paper and specialty media can affect how reliably documents print. Using MS510dn and MS610dn 40 Loading paper and specialty media The selection and handling of 20‑lb paper. It collects prints facedown. Setting the paper size and type...
User's Guide
Page 41
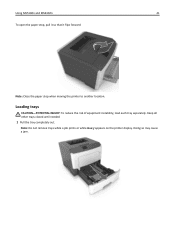
Using MS510dn and MS610dn 41 To open the paper stop when moving the printer to another location. Note: Close the paper stop , pull it so that it flips forward. A4 LTR EXEC B5 A5 A6 Note: Do not remove trays while a job prints or while Busy appears on the printer display. Doing so may cause a jam. Loading trays CAUTION-POTENTIAL INJURY: To reduce the risk of equipment instability, load each tray separately. Keep all other trays closed until needed. 1 Pull the tray completely out.
Using MS510dn and MS610dn 41 To open the paper stop when moving the printer to another location. Note: Close the paper stop , pull it so that it flips forward. A4 LTR EXEC B5 A5 A6 Note: Do not remove trays while a job prints or while Busy appears on the printer display. Doing so may cause a jam. Loading trays CAUTION-POTENTIAL INJURY: To reduce the risk of equipment instability, load each tray separately. Keep all other trays closed until needed. 1 Pull the tray completely out.
User's Guide
Page 42
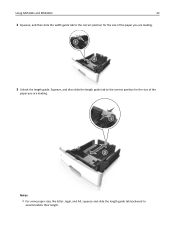
Squeeze, and then slide the length guide tab to accommodate their length. Using MS510dn and MS610dn 42 2 Squeeze, and then slide the width guide tab to the correct position for the size of the paper you are loading. 1 LGLLTR A4 EXEC B5 A5 A6 2 A4 LTR EXEC B5 A5 Notes: • For some paper sizes like letter, legal, and A4, squeeze and slide the length guide tab backward to the correct position for the size of the paper you are loading. 1 LGLLTR A4 EXEC B5 A5 2 A4 EXEC LTR B5 A5 3 Unlock the length guide.
Squeeze, and then slide the length guide tab to accommodate their length. Using MS510dn and MS610dn 42 2 Squeeze, and then slide the width guide tab to the correct position for the size of the paper you are loading. 1 LGLLTR A4 EXEC B5 A5 A6 2 A4 LTR EXEC B5 A5 Notes: • For some paper sizes like letter, legal, and A4, squeeze and slide the length guide tab backward to the correct position for the size of the paper you are loading. 1 LGLLTR A4 EXEC B5 A5 2 A4 EXEC LTR B5 A5 3 Unlock the length guide.
User's Guide
Page 43
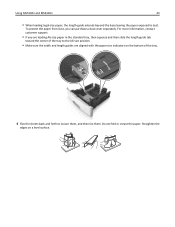
... A6‑size position. • Make sure the width and length guides are aligned with the paper size indicators on a level surface. Using MS510dn and MS610dn 43 • When loading legal‑size paper, the length guide extends beyond the base leaving the paper exposed to loosen them, and then fan...
... A6‑size position. • Make sure the width and length guides are aligned with the paper size indicators on a level surface. Using MS510dn and MS610dn 43 • When loading legal‑size paper, the length guide extends beyond the base leaving the paper exposed to loosen them, and then fan...

